


1. Introduction
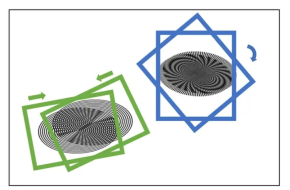
When the spatial frequency of the pixels of the photosensitive element is close to the spatial frequency of the stripes in the image, a new wavy interference pattern, the so-called moiré pattern, may be produced. The sensor's grid-like texture creates one such pattern. If the thin strips in the pattern intersect the structure of the sensor at a small angle, this will produce a noticeable interference effect in the image. This phenomenon is very common in fashion photography with fine textures such as cloth. This moiré pattern may appear through brightness or color. But here, only the image moiré produced during the remake is processed.
Recapture is to capture pictures from the computer screen, or take pictures against the screen; this method will produce moiré patterns on the pictures
The main processing ideas of the paper
Perform Haar transformation on the original image to obtain four down-sampled feature maps (two-sampled cA, Horizontal horizontal high frequency cH, Vertical vertical high frequency under the original image cV, Diagonal oblique high-frequency cD)
Then use four independent CNNs to convolute and pool the four downsampled feature maps to extract feature information
The original text then compares each channel and each pixel of the three high-frequency information convolution and pooling results, and takes max
to complete the previous step The obtained result and the result after cA convolution and pooling are made into a Cartesian product
Paper address
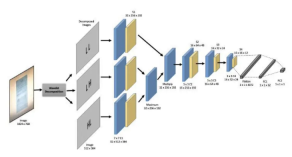
2. Reproduction of network structure
As shown in the figure below, this project reproduces the image demoire method of the paper, and modifies the data processing part. The network structure also refers to the structure in the source code to generate four downsampled feature maps for the image. , instead of the three in the paper, you can refer to the network structure for specific processing methods.
import math
import paddle
import paddle.nn as nn
import paddle.nn.functional as F
# import pywt
from paddle.nn import Linear, Dropout, ReLU
from paddle.nn import Conv2D, MaxPool2D
class mcnn(nn.Layer):
    def __init__(self, num_classes=1000):
        super(mcnn, self).__init__()
        self.num_classes = num_classes
        self._conv1_LL = Conv2D(3,32,7,stride=2,padding=1,)
        # self.bn1_LL = nn.BatchNorm2D(128)
        self._conv1_LH = Conv2D(3,32,7,stride=2,padding=1,)
        # self.bn1_LH = nn.BatchNorm2D(256)
        self._conv1_HL = Conv2D(3,32,7,stride=2,padding=1,)
        # self.bn1_HL = nn.BatchNorm2D(512)
        self._conv1_HH = Conv2D(3,32,7,stride=2,padding=1,)
        # self.bn1_HH = nn.BatchNorm2D(256)
        self.pool_1_LL = nn.MaxPool2D(kernel_size=2,stride=2, padding=0)
        self.pool_1_LH = nn.MaxPool2D(kernel_size=2,stride=2, padding=0)
        self.pool_1_HL = nn.MaxPool2D(kernel_size=2,stride=2, padding=0)
        self.pool_1_HH = nn.MaxPool2D(kernel_size=2,stride=2, padding=0)
        self._conv2 = Conv2D(32,16,3,stride=2,padding=1,)
        self.pool_2 = nn.MaxPool2D(kernel_size=2,stride=2, padding=0)
        self.dropout2 = Dropout(p=0.5)
        self._conv3 = Conv2D(16,32,3,stride=2,padding=1,)
        self.pool_3 = nn.MaxPool2D(kernel_size=2,stride=2, padding=0)
        self._conv4 = Conv2D(32,32,3,stride=2,padding=1,)
        self.pool_4 = nn.MaxPool2D(kernel_size=2,stride=2, padding=0)
        self.dropout4 = Dropout(p=0.5)
        # self.bn1_HH = nn.BatchNorm1D(256)
        self._fc1 = Linear(in_features=64,out_features=num_classes)
        self.dropout5 = Dropout(p=0.5)
        self._fc2 = Linear(in_features=2,out_features=num_classes)
    def forward(self, inputs1, inputs2, inputs3, inputs4):
        x1_LL = self._conv1_LL(inputs1)
        x1_LL = F.relu(x1_LL)
        x1_LH = self._conv1_LH(inputs2)
        x1_LH = F.relu(x1_LH)
        x1_HL = self._conv1_HL(inputs3)
        x1_HL = F.relu(x1_HL)
        x1_HH = self._conv1_HH(inputs4)
        x1_HH = F.relu(x1_HH)
        pool_x1_LL = self.pool_1_LL(x1_LL)
        pool_x1_LH = self.pool_1_LH(x1_LH)
        pool_x1_HL = self.pool_1_HL(x1_HL)
        pool_x1_HH = self.pool_1_HH(x1_HH)
        temp = paddle.maximum(pool_x1_LH, pool_x1_HL)
        avg_LH_HL_HH = paddle.maximum(temp, pool_x1_HH)
        inp_merged = paddle.multiply(pool_x1_LL, avg_LH_HL_HH)
        x2 = self._conv2(inp_merged)
        x2 = F.relu(x2)
        x2 = self.pool_2(x2)
        x2 = self.dropout2(x2)
        x3 = self._conv3(x2)
        x3 = F.relu(x3)
        x3 = self.pool_3(x3)
        x4 = self._conv4(x3)
        x4 = F.relu(x4)
        x4 = self.pool_4(x4)
        x4 = self.dropout4(x4)
        x4 = paddle.flatten(x4, start_axis=1, stop_axis=-1)
        x5 = self._fc1(x4)
        x5 = self.dropout5(x5)
        out = self._fc2(x5)
        return out
model_res = mcnn(num_classes=2)
paddle.summary(model_res,[(1,3,512,384),(1,3,512,384),(1,3,512,384),(1,3,512,384)])
---------------------------------------------------------------------------
Layer (type) Input Shape Output Shape Param #
===========================================================================
Conv2D-1 [[1, 3, 512, 384]] [1, 32, 254, 190] 4,736
Conv2D-2 [[1, 3, 512, 384]] [1, 32, 254, 190] 4,736
Conv2D-3 [[1, 3, 512, 384]] [1, 32, 254, 190] 4,736
Conv2D-4 [[1, 3, 512, 384]] [1, 32, 254, 190] 4,736
MaxPool2D-1 [[1, 32, 254, 190]] [1, 32, 127, 95] 0
MaxPool2D-2 [[1, 32, 254, 190]] [1, 32, 127, 95] 0
MaxPool2D-3 [[1, 32, 254, 190]] [1, 32, 127, 95] 0
MaxPool2D-4 [[1, 32, 254, 190]] [1, 32, 127, 95] 0
Conv2D-5 [[1, 32, 127, 95]] [1, 16, 64, 48] 4,624
MaxPool2D-5 [[1, 16, 64, 48]] [1, 16, 32, 24] 0
Dropout-1 [[1, 16, 32, 24]] [1, 16, 32, 24] 0
Conv2D-6 [[1, 16, 32, 24]] [1, 32, 16, 12] 4,640
MaxPool2D-6 [[1, 32, 16, 12]] [1, 32, 8, 6] 0
Conv2D-7 [[1, 32, 8, 6]] [1, 32, 4, 3] 9,248
MaxPool2D-7 [[1, 32, 4, 3]] [1, 32, 2, 1] 0
Dropout-2 [[1, 32, 2, 1]] [1, 32, 2, 1] 0
Linear-1 [[1, 64]] [1, 2] 130
Dropout-3 [[1, 2]] [1, 2] 0
Linear-2 [[1, 2]] [1, 2] 6
===========================================================================
Total params: 37,592
Trainable params: 37,592
Non-trainable params: 0
---------------------------------------------------------------------------
Input size (MB): 9.00
Forward/backward pass size (MB): 59.54
Params size (MB): 0.14
Estimated Total Size (MB): 68.68
---------------------------------------------------------------------------
{'total_params': 37592, 'trainable_params': 37592}3. Data preprocessing
Different from the source code, this project integrates the wavelet decomposition part of the image into the data The reading part is changed to perform wavelet decomposition online instead of performing wavelet decomposition offline in the source code and saving the image. First, define the function of wavelet decomposition
!pip install PyWavelets
import numpy as np
import pywt
def splitFreqBands(img, levRows, levCols):
    halfRow = int(levRows/2)
    halfCol = int(levCols/2)
    LL = img[0:halfRow, 0:halfCol]
    LH = img[0:halfRow, halfCol:levCols]
    HL = img[halfRow:levRows, 0:halfCol]
    HH = img[halfRow:levRows, halfCol:levCols]
    return LL, LH, HL, HH
def haarDWT1D(data, length):
    avg0 = 0.5;
    avg1 = 0.5;
    dif0 = 0.5;
    dif1 = -0.5;
    temp = np.empty_like(data)
    # temp = temp.astype(float)
    temp = temp.astype(np.uint8)
    h = int(length/2)
    for i in range(h):
        k = i*2
        temp[i] = data[k] * avg0 + data[k + 1] * avg1;
        temp[i + h] = data[k] * dif0 + data[k + 1] * dif1;
    data[:] = temp
# computes the homography coefficients for PIL.Image.transform using point correspondences
def fwdHaarDWT2D(img):
    img = np.array(img)
    levRows = img.shape[0];
    levCols = img.shape[1];
    # img = img.astype(float)
    img = img.astype(np.uint8)
    for i in range(levRows):
        row = img[i,:]
        haarDWT1D(row, levCols)
        img[i,:] = row
    for j in range(levCols):
        col = img[:,j]
        haarDWT1D(col, levRows)
        img[:,j] = col
    return splitFreqBands(img, levRows, levCols)
!cd "data/data188843/" && unzip -q 'total_images.zip'
import os
recapture_keys = [ 'ValidationMoire']
original_keys = ['ValidationClear']
def get_image_label_from_folder_name(folder_name):
    """
    :param folder_name:
    :return:
    """
    for key in original_keys:
        if key in folder_name:
            return 'original'
    for key in recapture_keys:
        if key in folder_name:
            return 'recapture'
    return 'unclear'
label_name2label_id = {
    'original': 0,
    'recapture': 1,}
src_image_dir = "data/data188843/total_images"
dst_file = "data/data188843/total_images/train.txt"
image_folder = [file for file in os.listdir(src_image_dir)]
print(image_folder)
image_anno_list = []
for folder in image_folder:
    label_name = get_image_label_from_folder_name(folder)
    # label_id = label_name2label_id.get(label_name, 0)
    label_id = label_name2label_id[label_name]
    folder_path = os.path.join(src_image_dir, folder)
    image_file_list = [file for file in os.listdir(folder_path) if
                        file.endswith('.jpg') or file.endswith('.jpeg') or
                        file.endswith('.JPG') or file.endswith('.JPEG') or file.endswith('.png')]
    for image_file in image_file_list:
        # if need_root_dir:
        #     image_path = os.path.join(folder_path, image_file)
        # else:
        image_path = image_file
        image_anno_list.append(folder +"/"+image_path +"\t"+ str(label_id) + '\n')
dst_path = os.path.dirname(src_image_dir)
if not os.path.exists(dst_path):
    os.makedirs(dst_path)
with open(dst_file, 'w') as fd:
    fd.writelines(image_anno_list)
import paddle
import numpy as np
import pandas as pd
import PIL.Image as Image
from paddle.vision import transforms
# from haar2D import fwdHaarDWT2D
paddle.disable_static()
# 定义数据预处理
data_transforms = transforms.Compose([
transforms.Resize(size=(448,448)),
transforms.ToTensor(), # transpose操作 + (img / 255)
# transforms.Normalize( # 减均值 除标准差
# mean=[0.31169346, 0.25506335, 0.12432463],
# std=[0.34042713, 0.29819837, 0.1375536])
#计算过程:output[channel] = (input[channel] - mean[channel]) / std[channel]
])
# 构建Dataset
class MyDataset(paddle.io.Dataset):
"""
步骤一:继承paddle.io.Dataset类
"""
def __init__(self, train_img_list, val_img_list, train_label_list, val_label_list, mode='train', ):
"""
步骤二:实现构造函数,定义数据读取方式,划分训练和测试数据集
"""
super(MyDataset, self).__init__()
self.img = []
self.label = []
# 借助pandas读csv的库
self.train_images = train_img_list
self.test_images = val_img_list
self.train_label = train_label_list
self.test_label = val_label_list
if mode == 'train':
# 读train_images的数据
for img,la in zip(self.train_images, self.train_label):
self.img.append('/home/aistudio/data/data188843/total_images/'+img)
self.label.append(paddle.to_tensor(int(la), dtype='int64'))
else:
# 读test_images的数据
for img,la in zip(self.test_images, self.test_label):
self.img.append('/home/aistudio/data/data188843/total_images/'+img)
self.label.append(paddle.to_tensor(int(la), dtype='int64'))
def load_img(self, image_path):
# 实际使用时使用Pillow相关库进行图片读取即可,这里我们对数据先做个模拟
image = Image.open(image_path).convert('RGB')
# image = data_transforms(image)
return image
def __getitem__(self, index):
"""
步骤三:实现__getitem__方法,定义指定index时如何获取数据,并返回单条数据(训练数据,对应的标签)
"""
image = self.load_img(self.img[index])
LL, LH, HL, HH = fwdHaarDWT2D(image)
label = self.label[index]
# print(LL.shape)
# print(LH.shape)
# print(HL.shape)
# print(HH.shape)
LL = data_transforms(LL)
LH = data_transforms(LH)
HL = data_transforms(HL)
HH = data_transforms(HH)
print(type(LL))
print(LL.dtype)
return LL, LH, HL, HH, np.array(label, dtype='int64')
def __len__(self):
"""
步骤四:实现__len__方法,返回数据集总数目
"""
return len(self.img)
image_file_txt = '/home/aistudio/data/data188843/total_images/train.txt'
with open(image_file_txt) as fd:
lines = fd.readlines()
train_img_list = list()
train_label_list = list()
for line in lines:
split_list = line.strip().split()
image_name, label_id = split_list
train_img_list.append(image_name)
train_label_list.append(label_id)
# print(train_img_list)
# print(train_label_list)
# 测试定义的数据集
train_dataset = MyDataset(mode='train',train_label_list=train_label_list, train_img_list=train_img_list, val_img_list=train_img_list, val_label_list=train_label_list)
# test_dataset = MyDataset(mode='test')
# 构建训练集数据加载器
train_loader = paddle.io.DataLoader(train_dataset, batch_size=2, shuffle=True)
# 构建测试集数据加载器
valid_loader = paddle.io.DataLoader(train_dataset, batch_size=2, shuffle=True)
print('=============train dataset=============')
for LL, LH, HL, HH, label in train_dataset:
print('label: {}'.format(label))
break4. Model training
model2 = paddle.Model(model_res)
model2.prepare(optimizer=paddle.optimizer.Adam(parameters=model2.parameters()),
              loss=nn.CrossEntropyLoss(),
              metrics=paddle.metric.Accuracy())
model2.fit(train_loader,
        valid_loader,
        epochs=5,
        verbose=1,
        )
The above is the detailed content of How to use python code to remove moiré from images. For more information, please follow other related articles on the PHP Chinese website!

 详细讲解Python之Seaborn(数据可视化)Apr 21, 2022 pm 06:08 PM
本篇文章给大家带来了关于Python的相关知识,其中主要介绍了关于Seaborn的相关问题,包括了数据可视化处理的散点图、折线图、条形图等等内容,下面一起来看一下,希望对大家有帮助。
 详细了解Python进程池与进程锁May 10, 2022 pm 06:11 PM
本篇文章给大家带来了关于Python的相关知识,其中主要介绍了关于进程池与进程锁的相关问题,包括进程池的创建模块,进程池函数等等内容,下面一起来看一下,希望对大家有帮助。
 Python自动化实践之筛选简历Jun 07, 2022 pm 06:59 PM
本篇文章给大家带来了关于Python的相关知识,其中主要介绍了关于简历筛选的相关问题,包括了定义 ReadDoc 类用以读取 word 文件以及定义 search_word 函数用以筛选的相关内容,下面一起来看一下,希望对大家有帮助。

 分享10款高效的VSCode插件,总有一款能够惊艳到你!!Mar 09, 2021 am 10:15 AM
VS Code的确是一款非常热门、有强大用户基础的一款开发工具。本文给大家介绍一下10款高效、好用的插件,能够让原本单薄的VS Code如虎添翼,开发效率顿时提升到一个新的阶段。
 Python数据类型详解之字符串、数字Apr 27, 2022 pm 07:27 PM
本篇文章给大家带来了关于Python的相关知识,其中主要介绍了关于数据类型之字符串、数字的相关问题,下面一起来看一下,希望对大家有帮助。
 详细介绍python的numpy模块May 19, 2022 am 11:43 AM
本篇文章给大家带来了关于Python的相关知识,其中主要介绍了关于numpy模块的相关问题,Numpy是Numerical Python extensions的缩写,字面意思是Python数值计算扩展,下面一起来看一下,希望对大家有帮助。
 python中文是什么意思Jun 24, 2019 pm 02:22 PM
pythn的中文意思是巨蟒、蟒蛇。1989年圣诞节期间,Guido van Rossum在家闲的没事干,为了跟朋友庆祝圣诞节,决定发明一种全新的脚本语言。他很喜欢一个肥皂剧叫Monty Python,所以便把这门语言叫做python。


Hot AI Tools

Undresser.AI Undress
AI-powered app for creating realistic nude photos

AI Clothes Remover
Online AI tool for removing clothes from photos.

Undress AI Tool
Undress images for free

Clothoff.io
AI clothes remover

AI Hentai Generator
Generate AI Hentai for free.

Hot Article
Hot Tools

mPDF
mPDF is a PHP library that can generate PDF files from UTF-8 encoded HTML. The original author, Ian Back, wrote mPDF to output PDF files "on the fly" from his website and handle different languages. It is slower than original scripts like HTML2FPDF and produces larger files when using Unicode fonts, but supports CSS styles etc. and has a lot of enhancements. Supports almost all languages, including RTL (Arabic and Hebrew) and CJK (Chinese, Japanese and Korean). Supports nested block-level elements (such as P, DIV),

SublimeText3 Linux new version
SublimeText3 Linux latest version

Notepad++7.3.1
Easy-to-use and free code editor

PhpStorm Mac version
The latest (2018.2.1) professional PHP integrated development tool

Dreamweaver CS6
Visual web development tools

