
Home >Java >javaTutorial >How to implement unified function processing in SpringBoot
How to implement unified function processing in SpringBoot

- WBOYWBOYWBOYWBOYWBOYWBOYWBOYWBOYWBOYWBOYWBOYWBOYWBforward
- 2023-05-15 23:43:101587browse
1. User login authority validation
The development of user login authority has gone from the previous verification of user login authority in each method to the unified user login verification process. It is a A process of gradual improvement and optimization.
1.1 Initial user login verification
Let’s first review the implementation method of initial user login verification:
@RestController
@RequestMapping("/user")
public class UserController {
    /**
     * 某⽅法 1
     */
    @RequestMapping("/m1")
    public Object method(HttpServletRequest request) {
        // 有 session 就获取,没有不会创建
        HttpSession session = request.getSession(false);
        if (session != null && session.getAttribute("userinfo") != null) {
            // 说明已经登录,业务处理
            return true;
        } else {
            // 未登录
            return false;
        }
    }
    /**
     * 某⽅法 2
     */
    @RequestMapping("/m2")
    public Object method2(HttpServletRequest request) {
        // 有 session 就获取,没有不会创建
        HttpSession session = request.getSession(false);
        if (session != null && session.getAttribute("userinfo") != null) {
            // 说明已经登录,业务处理
            return true;
        } else {
            // 未登录
            return false;
        }
    }
    // 其他⽅法...
}
As can be seen from the above code, each All methods have the same user login verification permissions. Its disadvantages are:
The user login verification method must be written separately in each method, even if it is encapsulated into Public methods also need to pass parameters for calling and make judgments in the method.
The more controllers are added, the more methods are called for user login verification, which increases the later modification costs and maintenance costs.
These user login verification methods have nothing to do with the business to be implemented next, but each method must be written once.
So it is urgent to provide a public AOP method for unified user login permission verification.
1.2 The problem of unified user login authentication in Spring AOP
When it comes to unified user login authentication, the first implementation solution we think of is Spring AOP pre-notification or surround notification. Implementation, the specific implementation code is as follows:
import org.aspectj.lang.ProceedingJoinPoint;
import org.aspectj.lang.annotation.*;
import org.springframework.stereotype.Component;
@Aspect
@Component
public class UserAspect {
    // 定义切点⽅法 controller 包下、⼦孙包下所有类的所有⽅法
    @Pointcut("execution(* com.example.demo.controller..*.*(..))")
    public void pointcut(){ }
    // 前置⽅法
    @Before("pointcut()")
    public void doBefore(){

    }

    // 环绕⽅法
    @Around("pointcut()")
    public Object doAround(ProceedingJoinPoint joinPoint){
        Object obj = null;
        System.out.println("Around ⽅法开始执⾏");
        try {
            // 执⾏拦截⽅法
            obj = joinPoint.proceed();
        } catch (Throwable throwable) {
            throwable.printStackTrace();
        }
        System.out.println("Around ⽅法结束执⾏");
        return obj;
    }
}
If you want to implement the user login permission verification function in the above Spring AOP aspect, there are the following two problems:
1. There is no way to obtain it to the HttpSession object.
2. We need to intercept some methods, but not other methods. For example, the registration method and the login method are not intercepted. In this case, it is difficult to exclude the rules of the method. Definition, even impossible to define.
So how to solve this?
1.3 Spring Interceptor
For the above problems, Spring provides a specific implementation interceptor: HandlerInterceptor. The implementation of the interceptor is divided into the following two steps:
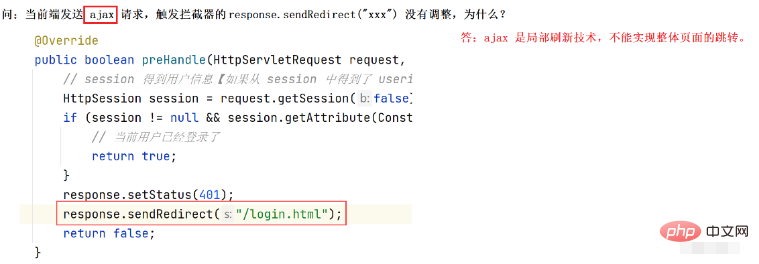
1. Create a custom interceptor and implement the preHandle (preprocessing before executing specific methods) method of the HandlerInterceptor interface.
2. Add the custom interceptor to the addInterceptors method of WebMvcConfigurer.
The specific implementation is as follows.
Supplementary filters:
Filters are provided by the web container. The triggering time is earlier than the interceptor. It is executed before Spring is initialized, so it cannot handle issues such as user login permission validation.
1.3.1 Preparation
package com.example.demo.controller;

import lombok.extern.slf4j.Slf4j;
import org.springframework.util.StringUtils;
import org.springframework.web.bind.annotation.RequestMapping;
import org.springframework.web.bind.annotation.RestController;

import javax.servlet.http.HttpServletRequest;
import javax.servlet.http.HttpSession;

@RestController
@RequestMapping("/user")
@Slf4j
public class UserController {

    @RequestMapping("/login")
    public boolean login(HttpServletRequest request,
                         String username, String password) {
//        // 1.非空判断
//        if (username != null && username != "" &&
//                password != null && username != "") {
//            // 2.验证用户名和密码是否正确
//        }

        // 1.非空判断
        if (StringUtils.hasLength(username) && StringUtils.hasLength(password)) {
            // 2.验证用户名和密码是否正确
            if ("admin".equals(username) && "admin".equals(password)) {
                // 登录成功
                HttpSession session = request.getSession();
                session.setAttribute("userinfo", "admin");
                return true;
            } else {
                // 用户名或密码输入错误
                return false;
            }
        }
        return false;
    }

    @RequestMapping("/getinfo")
    public String getInfo() {
        log.debug("执行了 getinfo 方法");
        return "执行了 getinfo 方法";
    }

    @RequestMapping("/reg")
    public String reg() {
        log.debug("执行了 reg 方法");
        return "执行了 reg 方法";
    }

}
1.3.2 Custom interceptor
Next use the code to implement it For permission verification when a user logs in, the custom interceptor is a common class. The specific implementation code is as follows:
package com.example.demo.config;

import lombok.extern.slf4j.Slf4j;
import org.springframework.stereotype.Component;
import org.springframework.web.servlet.HandlerInterceptor;

import javax.servlet.http.HttpServletRequest;
import javax.servlet.http.HttpServletResponse;
import javax.servlet.http.HttpSession;

/**
 * 登录拦截器
 */
@Component
@Slf4j
public class LoginInterceptor implements HandlerInterceptor {

    @Override
    public boolean preHandle(HttpServletRequest request, HttpServletResponse response, Object handler) throws Exception {
        // 登录判断业务
        HttpSession session = request.getSession(false);
        if (session != null && session.getAttribute("userinfo") != null) {
            return true;
        }
        log.error("当前用户没有访问权限");
        response.setStatus(401);
        return false;
    }
}
Returns the boolean type.
is equivalent to a layer of security: if
is false, it cannot continue to execute; if it is true, it can.
1.3.3 Add the custom interceptor to the system configuration
Add the custom interceptor in the previous step Enter the system configuration information. The specific implementation code is as follows:
package com.example.demo.config;

import org.springframework.beans.factory.annotation.Autowired;
import org.springframework.context.annotation.Configuration;
import org.springframework.web.servlet.config.annotation.InterceptorRegistry;
import org.springframework.web.servlet.config.annotation.ResourceHandlerRegistry;
import org.springframework.web.servlet.config.annotation.WebMvcConfigurer;

@Configuration // 一定不要忘记
public class MyConfig implements WebMvcConfigurer {

    @Autowired
    private LoginInterceptor loginInterceptor;

    @Override
    public void addInterceptors(InterceptorRegistry registry) {
        registry.addInterceptor(loginInterceptor)
                .addPathPatterns("/**") // 拦截所有请求
                .excludePathPatterns("/user/login") // 排除不拦截的 url
//                .excludePathPatterns("/**/*.html")
//                .excludePathPatterns("/**/*.js")
//                .excludePathPatterns("/**/*.css")
                .excludePathPatterns("/user/reg"); // 排除不拦截的 url
    }
}
or:
package com.example.demo.common;

import org.springframework.beans.factory.annotation.Autowired;
import org.springframework.context.annotation.Configuration;
import org.springframework.web.servlet.config.annotation.InterceptorRegistration;
import org.springframework.web.servlet.config.annotation.InterceptorRegistry;
import org.springframework.web.servlet.config.annotation.WebMvcConfigurer;

import java.util.ArrayList;
import java.util.List;

@Configuration
public class AppConfig implements WebMvcConfigurer {

    // 不拦截的 url 集合
    List<String> excludes = new ArrayList<String>() {{
        add("/**/*.html");
        add("/js/**");
        add("/editor.md/**");
        add("/css/**");
        add("/img/**"); // 放行 static/img 下的所有文件
        add("/user/login"); // 放行登录接口
        add("/user/reg"); // 放行注册接口
        add("/art/detail"); // 放行文章详情接口
        add("/art/list"); // 放行文章分页列表接口
        add("/art/totalpage"); // 放行文章分页总页数接口
    }};

    @Autowired
    private LoginInterceptor loginInterceptor;

    @Override
    public void addInterceptors(InterceptorRegistry registry) {
        // 配置拦截器
        InterceptorRegistration registration =
                registry.addInterceptor(loginInterceptor);
        registration.addPathPatterns("/**");
        registration.excludePathPatterns(excludes);
    }
}
If no object is injected, the parameters of addInterceptor() can also directly create a new object:
@Configuration // 一定不要忘记
public class MyConfig implements WebMvcConfigurer {

    @Override
    public void addInterceptors(InterceptorRegistry registry) {
        registry.addInterceptor(new LoginInterceptor())
                .addPathPatterns("/**") // 拦截所有请求
                .excludePathPatterns("/user/login") // 排除不拦截的 url
//                .excludePathPatterns("/**/*.html")
//                .excludePathPatterns("/**/*.js")
//                .excludePathPatterns("/**/*.css")
//                .excludePathPatterns("/**/*.jpg")
//                .excludePathPatterns("/**/login")
                .excludePathPatterns("/user/reg"); // 排除不拦截的 url
    }
}
Among them:
addPathPatterns: indicates the URL that needs to be intercepted, "**" indicates intercepting any method (that is, all methods).
excludePathPatterns: Indicates URLs that need to be excluded.
Note: The above interception rules can intercept the URLs used in this project, including static files (image files, JS, CSS, etc. files).
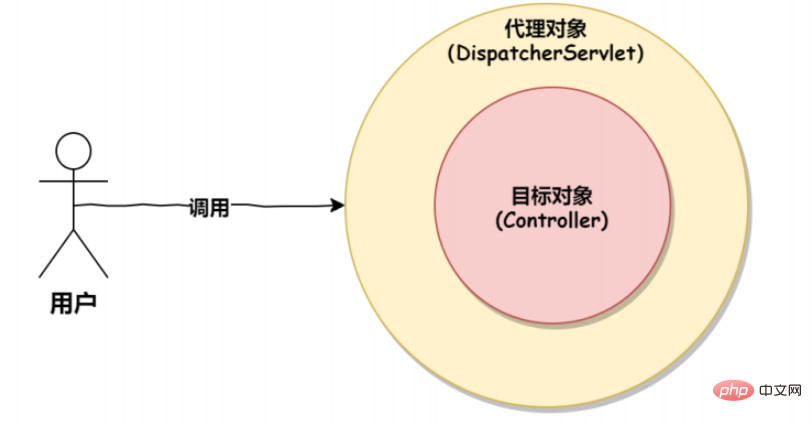
1.4 Interceptor implementation principle
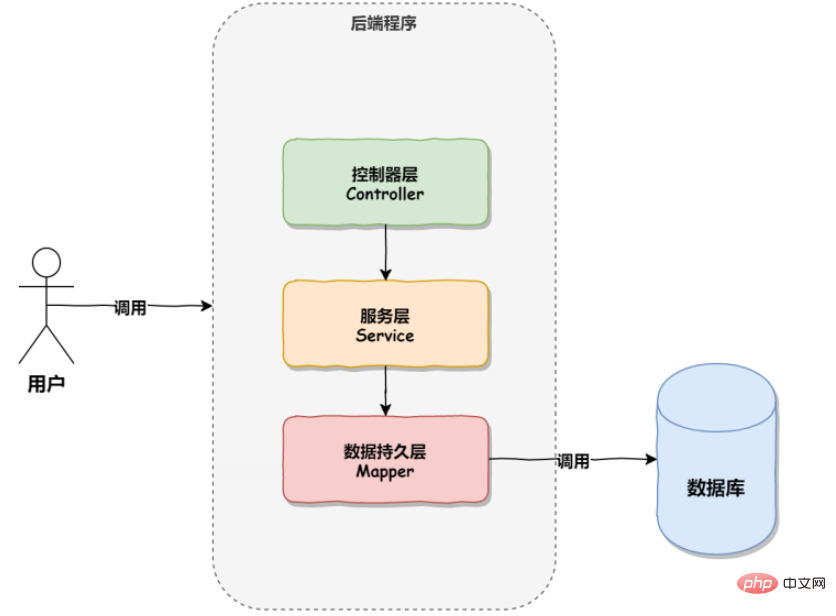
The calling sequence under normal circumstances:
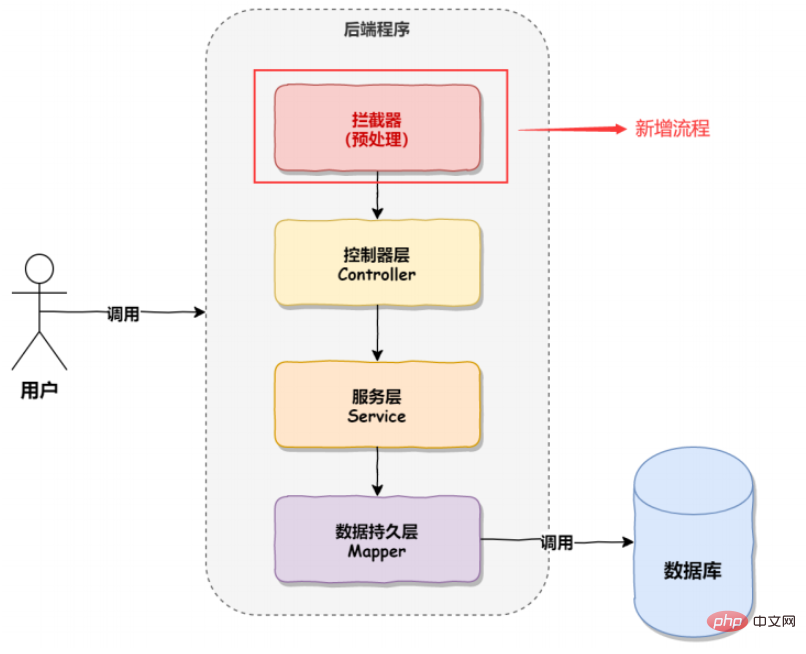
However, after having the interceptor, it will Carry out corresponding business processing before calling the Controller. The execution process is as shown in the figure below:
1.4.1 Implementation principle source code analysis
All Controller execution will be implemented through a dispatcher DispatcherServlet. This can be seen from the print information of the Spring Boot console, as shown in the following figure:
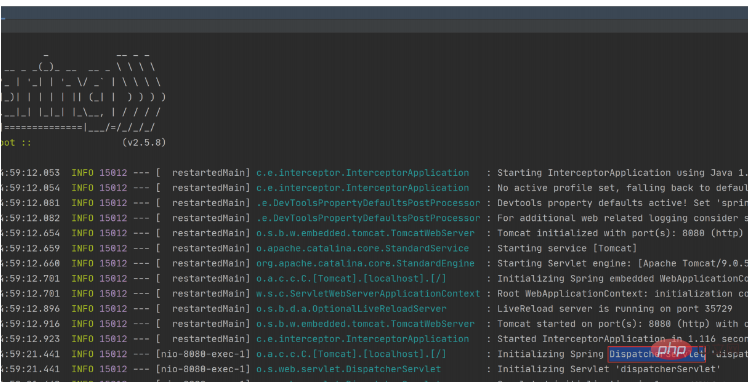
And all methods will execute the doDispatch scheduling method in DispatcherServlet. The doDispatch source code is as follows:
    protected void doDispatch(HttpServletRequest request, HttpServletResponse
            response) throws Exception {
        HttpServletRequest processedRequest = request;
        HandlerExecutionChain mappedHandler = null;
        boolean multipartRequestParsed = false;
        WebAsyncManager asyncManager = WebAsyncUtils.getAsyncManager(request);
        try {
            try {
                ModelAndView mv = null;
                Object dispatchException = null;
                try {
                    processedRequest = this.checkMultipart(request);
                    multipartRequestParsed = processedRequest != request;
                    mappedHandler = this.getHandler(processedRequest);
                    if (mappedHandler == null) {
                        this.noHandlerFound(processedRequest, response);
                        return;
                    }
                    HandlerAdapter ha = this.getHandlerAdapter(mappedHandler.g
                            etHandler());
                    String method = request.getMethod();
                    boolean isGet = HttpMethod.GET.matches(method);
                    if (isGet || HttpMethod.HEAD.matches(method)) {
                        long lastModified = ha.getLastModified(request, mapped
                                Handler.getHandler());
                        if ((new ServletWebRequest(request, response)).checkNo
                        tModified(lastModified) && isGet) {
                            return;
                        }
                    }
                    // 调⽤预处理【重点】
                    if (!mappedHandler.applyPreHandle(processedRequest, respon
                            se)) {
                        return;
                    }
                    // 执⾏ Controller 中的业务
                    mv = ha.handle(processedRequest, response, mappedHandler.g
                            etHandler());
                    if (asyncManager.isConcurrentHandlingStarted()) {
                        return;
                    }
                    this.applyDefaultViewName(processedRequest, mv);
                    mappedHandler.applyPostHandle(processedRequest, response,
                            mv);
                } catch (Exception var20) {
                    dispatchException = var20;
                } catch (Throwable var21) {
                    dispatchException = new NestedServletException("Handler di
                            spatch failed", var21);
                }
                this.processDispatchResult(processedRequest, response, mappedH
                        andler, mv, (Exception)dispatchException);
            } catch (Exception var22) {
                this.triggerAfterCompletion(processedRequest, response, mapped
                        Handler, var22);
            } catch (Throwable var23) {
                this.triggerAfterCompletion(processedRequest, response, mapped
                        Handler, new NestedServletException("Handler processing failed", var23));
            }
        } finally {
            if (asyncManager.isConcurrentHandlingStarted()) {
                if (mappedHandler != null) {
                    mappedHandler.applyAfterConcurrentHandlingStarted(processe
                            dRequest, response);
                }
            } else if (multipartRequestParsed) {
                this.cleanupMultipart(processedRequest);
            }
        }
    }
It can be seen from the above source code that the preprocessing method will be called before starting to execute the Controller. The method applyPreHandle, and the implementation source code of the applyPreHandle method is as follows:
    boolean applyPreHandle(HttpServletRequest request, HttpServletResponse response) throws Exception {
        for(int i = 0; i < this.interceptorList.size(); this.interceptorIndex
                = i++) {
            // 获取项⽬中使⽤的拦截器 HandlerInterceptor
            HandlerInterceptor interceptor = (HandlerInterceptor)this.intercep
            torList.get(i);
            if (!interceptor.preHandle(request, response, this.handler)) {
                this.triggerAfterCompletion(request, response, (Exception)null
                );
                return false;
            }
        }
        return true;
    }
As can be seen from the above source code, all interceptor HandlerInterceptor will be obtained in applyPreHandle and the preHandle method in the interceptor will be executed, so that The interceptor we defined earlier corresponds to it, as shown in the figure below:

此时⽤户登录权限的验证⽅法就会执⾏,这就是拦截器的实现原理。
1.4.2 拦截器小结
通过上⾯的源码分析,我们可以看出,Spring 中的拦截器也是通过动态代理和环绕通知的思想实现的,⼤体的调⽤流程如下:
1.5 扩展:统一访问前缀添加
所有请求地址添加 api 前缀:
    @Configuration
    public class AppConfig implements WebMvcConfigurer {
        // 所有的接⼝添加 api 前缀
        @Override
        public void configurePathMatch(PathMatchConfigurer configurer) {
            configurer.addPathPrefix("api", c -> true);
        }
    }
其中第⼆个参数是⼀个表达式,设置为 true 表示启动前缀。
二、统一异常处理
统⼀异常处理使⽤的是 @ControllerAdvice + @ExceptionHandler 来实现的,@ControllerAdvice 表示控制器通知类,@ExceptionHandler 是异常处理器,两个结合表示当出现异常的时候执⾏某个通知,也就是执⾏某个⽅法事件,具体实现代码如下:
package com.example.demo.config;

import org.springframework.web.bind.annotation.ControllerAdvice;
import org.springframework.web.bind.annotation.ExceptionHandler;
import org.springframework.web.bind.annotation.ResponseBody;

import java.util.HashMap;

/**
 * 统一处理异常
 */
@ControllerAdvice
public class ErrorAdive {

    @ExceptionHandler(Exception.class)
    @ResponseBody
    public HashMap<String, Object> exceptionAdvie(Exception e) {
        HashMap<String, Object> result = new HashMap<>();
        result.put("code", "-1");
        result.put("msg", e.getMessage());
        return result;
    }

    @ExceptionHandler(ArithmeticException.class)
    @ResponseBody
    public HashMap<String, Object> arithmeticAdvie(ArithmeticException e) {
        HashMap<String, Object> result = new HashMap<>();
        result.put("code", "-2");
        result.put("msg", e.getMessage());
        return result;
    }

}
方法名和返回值可以⾃定义,重要的是 @ControllerAdvice 和 @ExceptionHandler 注解。
以上⽅法表示,如果出现了异常就返回给前端⼀个 HashMap 的对象,其中包含的字段如代码中定义的那样。
我们可以针对不同的异常,返回不同的结果,⽐以下代码所示:
import org.springframework.web.bind.annotation.ControllerAdvice;
import org.springframework.web.bind.annotation.ExceptionHandler;
import org.springframework.web.bind.annotation.ResponseBody;
import java.util.HashMap;
@ControllerAdvice
@ResponseBody
public class ExceptionAdvice {
    @ExceptionHandler(Exception.class)
    public Object exceptionAdvice(Exception e) {
        HashMap<String, Object> result = new HashMap<>();
        result.put("success", -1);
        result.put("message", "总的异常信息:" + e.getMessage());
        result.put("data", null);
        return result;
    }
    @ExceptionHandler(NullPointerException.class)
    public Object nullPointerexceptionAdvice(NullPointerException e) {
        HashMap<String, Object> result = new HashMap<>();
        result.put("success", -1);
        result.put("message", "空指针异常:" + e.getMessage());
        result.put("data", null);
        return result;
    }
}
当有多个异常通知时,匹配顺序为当前类及其子类向上依次匹配,案例演示:
在 UserController 中设置⼀个空指针异常,实现代码如下:
    @RestController
    @RequestMapping("/u")
    public class UserController {
        @RequestMapping("/index")
        public String index() {
            Object obj = null;
            int i = obj.hashCode();
            return "Hello,User Index.";
        }
    }
以上程序的执⾏结果如下:
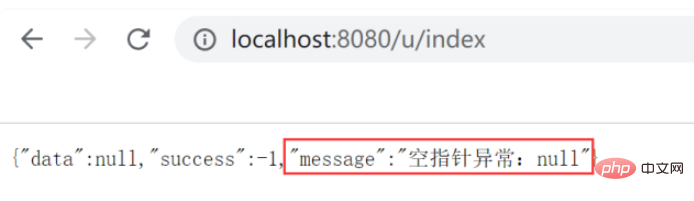
此时若出现异常就不会报错了,代码会继续执行,但是会把自定义的异常信息返回给前端!
统一完数据返回格式后:
package com.example.demo.common;

import org.springframework.web.bind.annotation.ControllerAdvice;
import org.springframework.web.bind.annotation.ExceptionHandler;
import org.springframework.web.bind.annotation.ResponseBody;

/**
 * 异常类的统一处理
 */
@ControllerAdvice
@ResponseBody
public class ExceptionAdvice {

    @ExceptionHandler(Exception.class)
    public Object exceptionAdvice(Exception e) {
        return AjaxResult.fail(-1, e.getMessage());
    }

}
统一异常处理不用配置路径,是拦截整个项目中的所有异常。
三、统一数据返回格式
3.1 为什么需要统一数据返回格式
统⼀数据返回格式的优点有很多,比如以下几个:
⽅便前端程序员更好的接收和解析后端数据接⼝返回的数据。
降低前端程序员和后端程序员的沟通成本,按照某个格式实现就⾏了,因为所有接⼝都是这样返回的。
有利于项⽬统⼀数据的维护和修改。
有利于后端技术部⻔的统⼀规范的标准制定,不会出现稀奇古怪的返回内容。
3.2 统一数据返回格式的实现
统⼀的数据返回格式可以使用 @ControllerAdvice + ResponseBodyAdvice接口 的方式实现,具体实现代码如下:
import org.springframework.core.MethodParameter;
import org.springframework.http.MediaType;
import org.springframework.http.server.ServerHttpRequest;
import org.springframework.http.server.ServerHttpResponse;
import org.springframework.web.bind.annotation.ControllerAdvice;
import org.springframework.web.servlet.mvc.method.annotation.ResponseBodyA
dvice;

import java.util.HashMap;

/**
 * 统一返回数据的处理
 */
@ControllerAdvice
public class ResponseAdvice implements ResponseBodyAdvice {
    /**
     * 内容是否需要重写(通过此⽅法可以选择性部分控制器和⽅法进⾏重写)
     * 返回 true 表示重写
     */
    @Override
    public boolean supports(MethodParameter returnType, Class converterTyp
e) {
        return true;
    }
    /**
     * ⽅法返回之前调⽤此⽅法
     */
    @Override
    public Object beforeBodyWrite(Object body, MethodParameter returnType,
                                  MediaType selectedContentType,
                                  Class selectedConverterType, ServerHttpR
                                          equest request,
                                  ServerHttpResponse response) {
        // 构造统⼀返回对象
        HashMap<String, Object> result = new HashMap<>();
        result.put("state", 1);
        result.put("msg", "");
        result.put("data", body);
        return result;
    }
}
统一处理后,此时所有返回的都是 json 格式的数据了。
若方法的返回类型为 String,统一数据返回格式封装后,返回会报错!?
转换器的问题,解决方案:
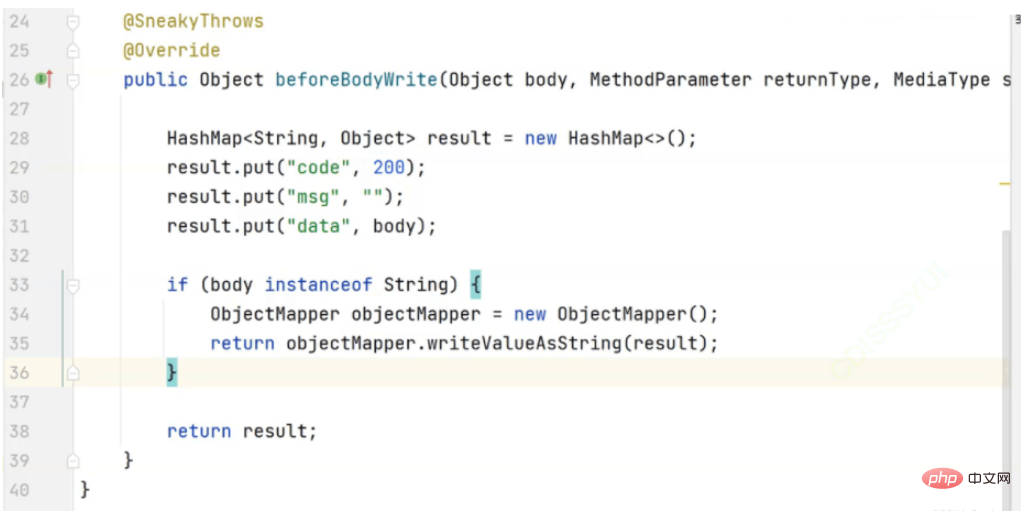
实际开发中这种统一数据返回格式的方式并不常用。因为它会将所有返回都再次进行封装,过于霸道了 ~
而通常我们会写一个统一封装的类,让程序猿在返回时统一返回这个类 (软性约束),例如:
package com.example.demo.common;

import java.util.HashMap;

/**
 * 自定义的统一返回对象
 */
public class AjaxResult {
    /**
     * 业务执行成功时进行返回的方法
     *
     * @param data
     * @return
     */
    public static HashMap<String, Object> success(Object data) {
        HashMap<String, Object> result = new HashMap<>();
        result.put("code", 200);
        result.put("msg", "");
        result.put("data", data);
        return result;
    }

    /**
     * 业务执行成功时进行返回的方法
     *
     * @param data
     * @return
     */
    public static HashMap<String, Object> success(String msg, Object data) {
        HashMap<String, Object> result = new HashMap<>();
        result.put("code", 200);
        result.put("msg", msg);
        result.put("data", data);
        return result;
    }

    /**
     * 业务执行失败返回的数据格式
     *
     * @param code
     * @param msg
     * @return
     */
    public static HashMap<String, Object> fail(int code, String msg) {
        HashMap<String, Object> result = new HashMap<>();
        result.put("code", code);
        result.put("msg", msg);
        result.put("data", "");
        return result;
    }

    /**
     * 业务执行失败返回的数据格式
     *
     * @param code
     * @param msg
     * @return
     */
    public static HashMap<String, Object> fail(int code, String msg, Object data) {
        HashMap<String, Object> result = new HashMap<>();
        result.put("code", code);
        result.put("msg", msg);
        result.put("data", data);
        return result;
    }
}
同时搭配统一数据返回格式:
package com.example.demo.common;

import com.fasterxml.jackson.databind.ObjectMapper;
import lombok.SneakyThrows;
import org.springframework.core.MethodParameter;
import org.springframework.http.MediaType;
import org.springframework.http.server.ServerHttpRequest;
import org.springframework.http.server.ServerHttpResponse;
import org.springframework.web.bind.annotation.ControllerAdvice;
import org.springframework.web.servlet.mvc.method.annotation.ResponseBodyAdvice;

import java.util.HashMap;

/**
 * 统一数据返回封装
 */
@ControllerAdvice
public class ResponseAdvice implements ResponseBodyAdvice {
    @Override
    public boolean supports(MethodParameter returnType, Class converterType) {
        return true;
    }

    @SneakyThrows
    @Override
    public Object beforeBodyWrite(Object body, MethodParameter returnType, MediaType selectedContentType, Class selectedConverterType, ServerHttpRequest request, ServerHttpResponse response) {
        if (body instanceof HashMap) { // 本身已经是封装好的对象
            return body;
        }
        if (body instanceof String) { // 返回类型是 String(特殊)
            ObjectMapper objectMapper = new ObjectMapper();
            return objectMapper.writeValueAsString(AjaxResult.success(body));
        }
        return AjaxResult.success(body);
    }
}
3.3 @ControllerAdvice 源码分析(了解)
通过对 @ControllerAdvice 源码的分析我们可以知道上⾯统⼀异常和统⼀数据返回的执⾏流程,我们先从 @ControllerAdvice 的源码看起,点击 @ControllerAdvice 实现源码如下:
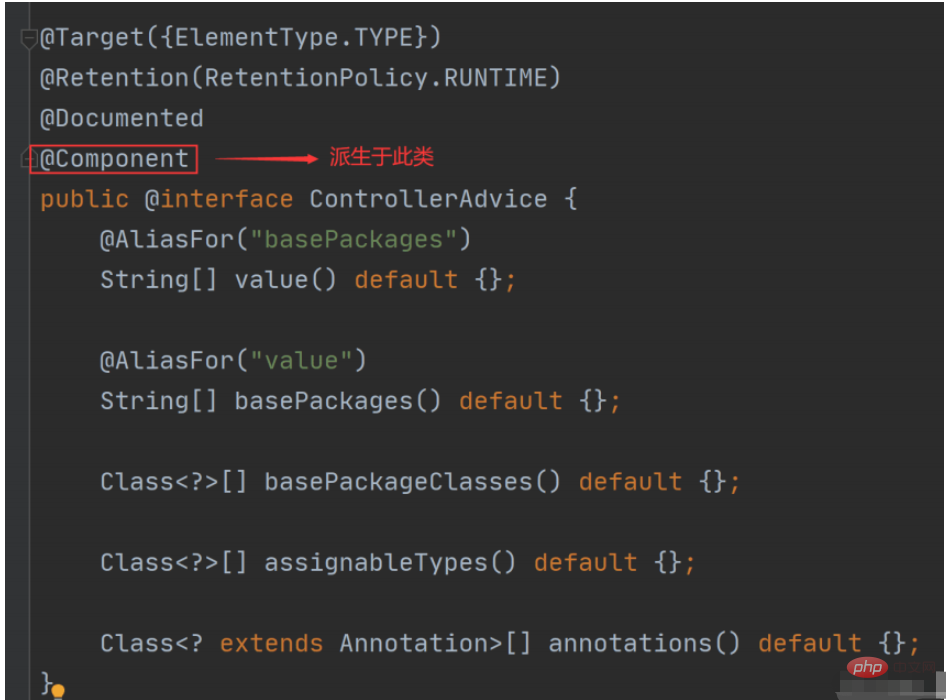
从上述源码可以看出 @ControllerAdvice 派⽣于 @Component 组件,⽽所有组件初始化都会调用 InitializingBean 接⼝。
所以接下来我们来看 InitializingBean 有哪些实现类?在查询的过程中我们发现了,其中 Spring MVC中的实现⼦类是 RequestMappingHandlerAdapter,它⾥⾯有⼀个⽅法 afterPropertiesSet() ⽅法,表示所有的参数设置完成之后执⾏的⽅法,如下图所示:
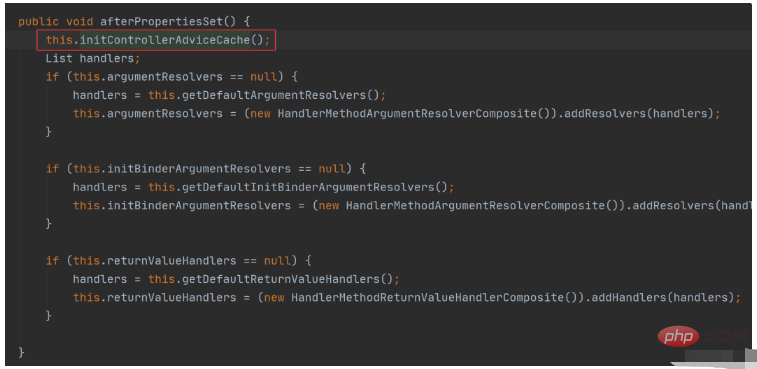
⽽这个⽅法中有⼀个 initControllerAdviceCache ⽅法,查询此⽅法的源码如下:
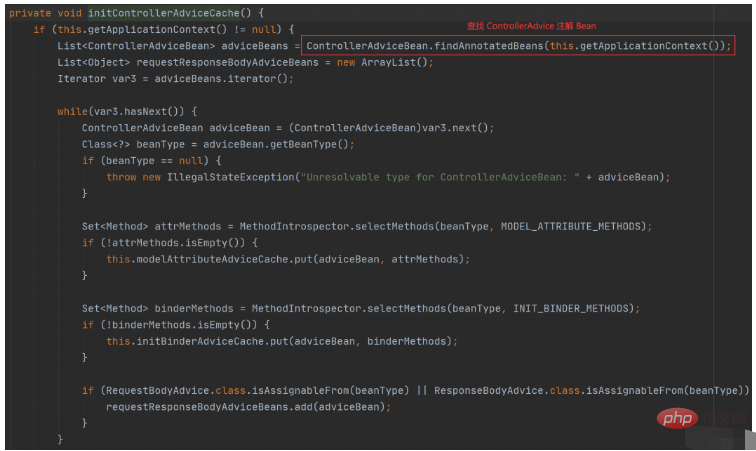
We found that when this method is executed, it will search and use all @ControllerAdvice classes. These classes will be in the container, but when an event occurs, the corresponding Advice method is called, such as before returning data. Call the unified data encapsulation. For example, if an exception occurs, the Advice method implementation of the exception is called.
The above is the detailed content of How to implement unified function processing in SpringBoot. For more information, please follow other related articles on the PHP Chinese website!