Home >Common Problem >How to fix color management not working in Windows 11
How to fix color management not working in Windows 11
- WBOYWBOYWBOYWBOYWBOYWBOYWBOYWBOYWBOYWBOYWBOYWBOYWBforward
- 2023-05-15 09:40:052836browse
You must have noticed the color difference between different devices, this is due to the different graphics cards used by the monitors. Therefore, a color profile on one monitor may make images look better than another. Using Windows color management tools, you can make an image on one monitor look the same as another. This tool is one of the most essential tools required by users working in color management environments such as graphic designers and photographers. On Windows, this tool can be used to assign desired color profiles to different monitors, thereby providing a good color experience to its users.
Possible reasons why color management tools stopped working in Windows 11 are
- Outdated Windows versions or GPU software
- Inconsistent color profile components
- The application cannot retrieve the color profile
- The color management scheme is not compatible with Windows 11
Windows 11 users reported that they were unable to modify it because the color management tool has stopped working The monitor's color profile. If you are facing this issue on Windows 11 PC, then you have found the right post. Read below to find a list of troubleshooting strategies that have helped other users facing this issue successfully resolve the issue.
Method 1 – Update Windows 11 to the latest version
If Microsoft has released any pending Windows 11 updates but you have not installed them yet, follow the steps mentioned below to update Windows 11 to the latest version available.
step 1. Press Windows I to open the Windows Settings application.
Step 2. In the left pane, select the Windows Update tab.
Step 3: On the right, click the Check for Updates button.

Step 4. Wait until Windows checks for any updates to the Windows 11 version on your PC.
Step 5. If an update is available, you can download and install it.
Step 6.Restart Your system and check if the color management tools are working properly and if you are able to change the monitor's color profile.
Method 2 – Reinstall the graphics driver
Steps 1. Press Windows R to open the Run box.
Step 2. Type devmgmt.msc and press Enter to open Device Manager.

When UAC prompts for permission, click Yes.
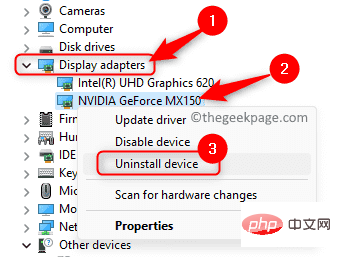
Step 3. In Device Manager, click the arrow next to Display Adapters to expand it.
Step 4. In the list of display adapters, right-click the GPU device you are using and select Uninstall device in the context menu.
Step 5. In the dialog box that opens, check the box next to Try to remove the driver for this device.
Then, click the Uninstall button.

#Step 6. Wait for the GPU driver to be uninstalled from your PC.
Restart the computer.
Step 7. When the system starts, Windows will check for missing drivers and automatically install the driver to replace the old driver.
Step 8. Now, download and install the proprietary software for your GPU device so that the driver will automatically update to the latest version.
The following are driver upgrade tools for some commonly used GPU drivers.
NVIDIA – GeForce Experience
Intel – Intel Drivers
AMD – Adrenaline
Step 9. Once your drivers are updated to the latest version, restart your PC and check if the color management issue has been fixed.
Method 3 – Reinstall Color Profiles
Steps 1. Use the Windows R key combination to open the Run box.
Step 2. Type ms-settings:display and press Enter to open the Display page in the Windows Settings application.

Step 3. On the System Display page, scroll down to the Related Settings section and clickAdvanced display.
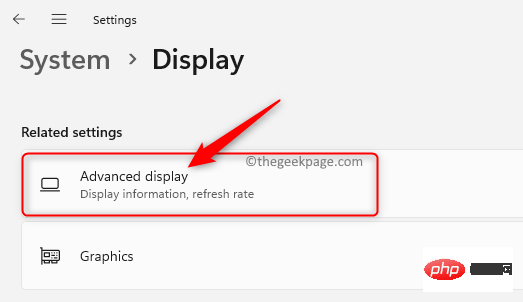
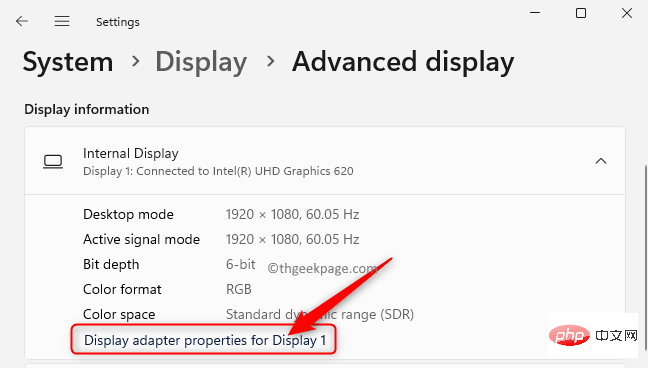
Step 4. You will be taken to the Advanced Display Settings window.
Here, click the Display Adapter Properties for Display 1 link in the Display Information section.
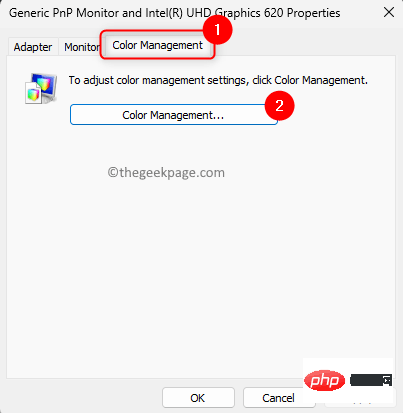
Step 5. In the Display Adapter Properties window, go to the Color Management tab.
Step 6. Here, click the Color Management button.
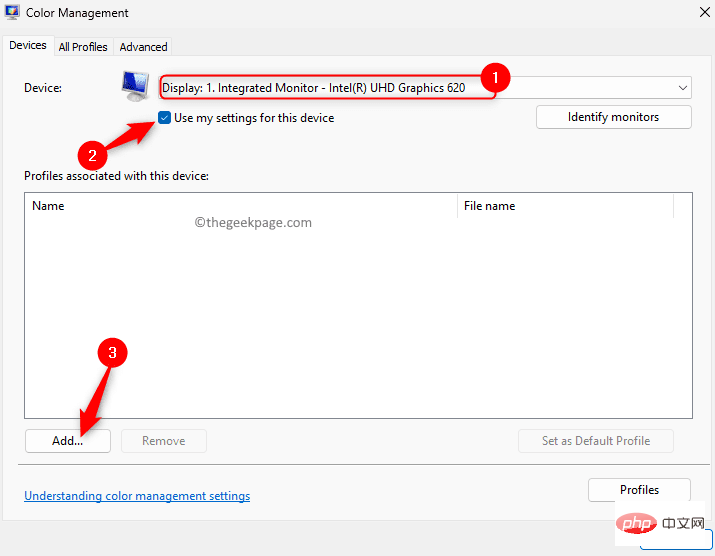
Step 7. In the Color Management window, go to the Devices tab.
Step 8. Use the drop-down menu next to Device and select the monitor for which you want to reinstall the color profile.
NOTE: If you have multiple monitors, click the Identify Monitor button to confirm the monitor.
Step 9. Now, check the box next to Use my settings for this device option.
Step 10. Then, click the Add... button.
Step 11. In the Associated Color Profile window, click the Browse button.
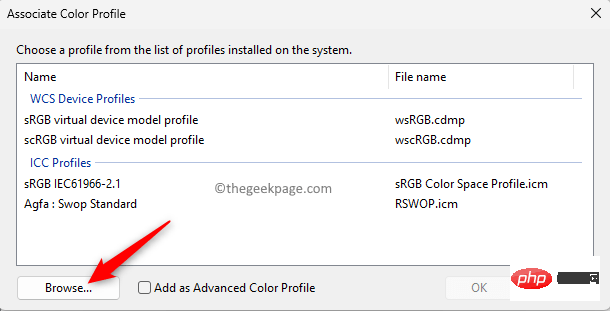
Note: You will need to visit your monitor's manufacturer's website to download the correct color profile for your monitor.
Go to the Downloads section and find the latest monitor driver for your monitor model instead of the graphics driver.
Download the file on your computer and unzip it. You will see a .icm file, which is the color profile for your monitor.
Step 12. Go to the location of the folder containing your extracted color profile.
Step 13. Select the color profile .icm file in this folder and click Add to install the color profile.
Step 14. Close the color management window.
Check if the problem has been resolved.
Method 4 – Reset the problematic application cannot retrieve color profile
Step 1. Click the Windows key on your keyboard and type Installed Apps in the Windows search bar.
Step 2. Select the installed application in the search results.

Step 3. On the Installed Applications page, search for the application that is having problems retrieving color profiles.
Step 4. Click the three-dot menu associated with the application and select Advanced options.

Step 5. On the app's Advanced Options page, find the Reset section.
Step 6. Click the Reset button.
Step 7. In the confirmation prompt that appears, click Reset again.

Step 8. Wait for the reset process to complete. After the reset operation, the application will be restored to the state it was in after it was installed on your PC.
Step 9. Open the application and perform the action that caused the problem and check if the problem is resolved.
Method 5 – Perform a Clean Installation or Repair Installation
There are two options for resetting your Windows to correct system file corruption affecting your PC’s color profile.
1. Follow the steps mentioned in the linked article to perform a fresh installation. When performing a clean installation, everything on the system is deleted before the installation begins. Unless you create a backup, you will lose all personal data, applications, games, and preferences.
2. Use Repair Installation to repair or install Windows by creating bootable installation media such as a USB or DVD. The advantage of this method is that you won't lose any data, applications, or preferences during the installation process.
Method 6 – Revert to Windows 10
If you are unable to resolve the color management scheme issue on Windows 11 after trying the above methods, then it is best to revert to Windows 10 to resolve it.
After you upgrade to Windows 11, you have a 10-day grace period to switch back to Windows 10 if needed. Use the following steps to restore to Windows 10 on your PC.
Step 1. Use the Windows I key combination to open the Windows Settings application.
Step 2. Select the System tab in the left pane.
Step 3. Move to the right pane and select the option Restore from the list.
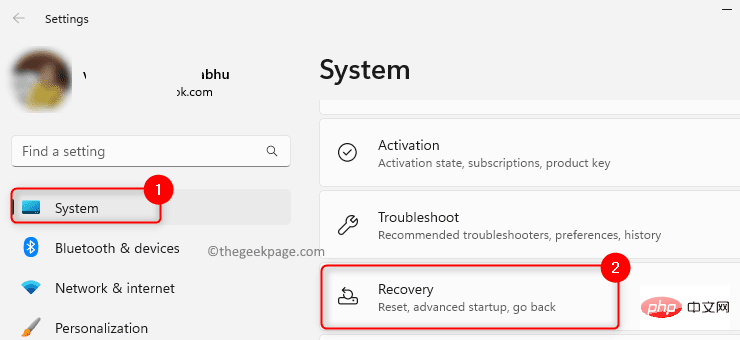
Step 4. If you are within the 10-day grace period, you will see the return option to allow recovery to Windows 10.
Here, click the Back button.

Step 5. You will see return to the Windows 10 screen.
Select the option indicating the reason for the return and click Next.
Step 6. On the screen that now appears, click Next to proceed to the next step.
Step 7. Finally, on the last screen, click Go back to Windows 10.
Step 8. Your system will now automatically restart and attempt to resume the installation.
Step 9. Wait until your system reverts to a previous version of Windows.
This recovery will take time, depending on the data and storage capacity of the system.
Step 10. The system will restart after the recovery process and you will see the Windows 10 startup screen.
Step 11. Log in to Windows 10.
Check whether the color management issue has been resolved.
If you are not within the 10-day recovery grace period, you will need to reinstall Windows 10 to resolve the issue.
The above is the detailed content of How to fix color management not working in Windows 11. For more information, please follow other related articles on the PHP Chinese website!

