





实例填坑
坑一
1. 发现天坑
我们通过一个计数器组件来演示这个坑,当想对父组件传递过来的值做操作时,发现操作无效,先看代码:
html>


    <meta>
    <meta>
    <meta>
    <script></script>
    <title>组件间传值</title>
    <div></div>

<script>
    const app = Vue.createApp({
        data() {
            return {
                num:0
            }
        },
       template: `
                <div>
                   <counter :count = "num"/>

                `
    });
    // 定义一个test组件
    app.component('counter',{
       props: ['count'],
      template: `<div @click="count+=1">{{count}}`
    });
    const vm = app.mount('#root');
</script>
在上面的代码中,我们定义了一个counter组件接收父组件的一个count值,当点击这个显示的值时,我们做加一操作。这时候我们运行代码会发现,我们的值并不会完成加一操作,而是会报父组件传递过来的值是只读的:

2. 填坑时刻
那假如我们要完成这个加一的功能怎么办呢?答案就是我们复制一份父组件传递过来的值,对我们自己的值进行操作:
html>


    <meta>
    <meta>
    <meta>
    <script></script>
    <title>组件间传值</title>
    <div></div>

<script>
    const app = Vue.createApp({
        data() {
            return {
                num:0
            }
        },
       template: `
                <div>
                   <counter :count = "num"/>

                `
    });
    // 定义一个test组件
    app.component('counter',{
       props: ['count'],
       data(){
        return{
            mCount:this.count
        }
       },
      template: `<div @click="mCount+=1">{{mCount}}`
    });
    const vm = app.mount('#root');
</script>
这时候我们再运行代码就会发现我们可以做加一操作了:

坑2:
1.发现天坑
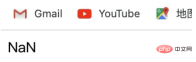
当我们定义一个单词名称比较长的属性,并且用“-”分隔符连接的时候,子组件无法接收到正确的值,显示NaN。代码如下:
html>


    <meta>
    <meta>
    <meta>
    <script></script>
    <title>组件间传值</title>
    <div></div>

<script>
    const app = Vue.createApp({
        data() {
            return {
                content:"hello world"
            }
        },
       template: `
                <div>
                   <test :content-helloworld = "content"/>

                `
    });
    // 定义一个test组件
    app.component('test',{
       props: ['content-helloworld'],
      template: `<div>{{content-helloworld}}`
    });
    const vm = app.mount('#root');
</script>
在上面的代码中,我们使用content-helloworld这个属性在父组件和子组件之间传值,按照我们的理解,应该是能传递成功的,但是显示的结果却不正确

Element Plus UI Vue3
下载
Element Plus Vue3 桌面组件库。在开发 Vue 3.x 页面时调用,使用 Element Plus 组件(如 el-button、el-input、el-form、el-table 等)。
上面到坑也是VUE中的单向数据流的概念,即子组件可以使用父组件传递过来的数据,但是不能修改父组件传递过来的数据
2.填坑时刻
当我们定义的属性值中有用“-”分隔符分隔时,我们在接收值的时候,需要将属性名改成驼峰命名的方式,如上面的例子中父组件使用content-helloworld传递值到子组件,那么子组件接收到时候应该将其改成驼峰命名方式:使用contentHelloworld接收
html>


    <meta>
    <meta>
    <meta>
    <script></script>
    <title>组件间传值</title>
    <div></div>

<script>
    const app = Vue.createApp({
        data() {
            return {
                content:"hello world"
            }
        },
       template: `
                <div>
                   <test :content-helloworld = "content"/>

                `
    });
    // 定义一个test组件
    app.component('test',{
       props: ['contentHelloworld'],
      template: `<div>{{contentHelloworld}}`
    });
    const vm = app.mount('#root');
</script>
这样值就能正确显示了

前端入门到VUE实战笔记:立即使用
在学习笔记中,你将探索 前端 的入门与实战技巧!