


Introduction to dockerfile
Docker can automatically build the image by reading the contents of the dockerfile. The dockerfile is a text file that contains all the commands that need to be executed during the build process. It can also be understood that dockfile is a script interpreted by the docker program. It consists of instructions one by one. Each instruction corresponds to a command under the Linux system. The docker program translates these dockerfile instructions into real Linux commands. Dockerfile has its own writing format and supported commands. The docker program resolves the dependencies between these commands, similar to makefile.
The docker program will read the dockerfile and generate a customized image according to the instructions. Compared with a black box like image, an obvious script like dockerfile is easier for users to accept. It clearly shows how the image is generated. With dockerfile, when we need to customize our own additional requirements, we only need to add or modify instructions on the dockerfile and regenerate the image, eliminating the trouble of typing commands.
Docker method of building an image: commit, dockerfile
1. Use commit to build an image:
Commit is built based on the original image The purpose of using this method to build an image is to save some configuration information and modified information in the image. Equivalent to a snapshot of an image.
2. Use dockerfile to build the image:
Dockerfile is the (custom) image required to quickly build.
Dockerfile instructions:
From: Specify the base image (from is a required instruction and must be the first instruction).
run: used to execute command line commands. Its basic format:
Shell format: run
exec format: run , this method is like the format in function calls;
copy: Copy the file. Its basic format:
Format 1: copy
Format 2: copy ["
add: A more advanced copy file, adding some functions on the basis of copy. If the compressed package is copied, it will be decompressed directly, and No need to use run to decompress;
cmd: container startup command. Its basic format:
Shell format: cmd
Exec format: cmd ["executable file", "Parameter 1", "Parameter 2"...]
Parameter list format: cmd ["Parameter 1", "Parameter 2"...], after specifying the entrypoint command, use cmd to specify the specific parameters
Entrypoint: Entry point. Its basic format is divided into exec and shell.
The purpose of entrypoint is the same as cmd, which is to specify the container startup program and parameters. Entrypoint can be replaced during operation, but it is more cumbersome than cmd and needs to be specified through the parameter --entrypoint of docker run. When entrypoint is specified, the meaning of cmd changes. Instead of running its command directly, the content of cmd is passed to the entrypoint command as a parameter. When executed, it becomes:
env: Set environment variables. (You can use the variables used here) Its basic format:
Format 1: env
Format 2: env
arg: Build parameters. The effect of build parameters is the same as that of env, which is to set environment variables. The difference is that the environment variables built by arg will not exist when the container is run in the future. Its basic format:
Format 1: arg
Format 2: This default value can be used in the build command docker build - -build-arg
volume: Define an anonymous volume. Its basic format:
Format 1: volume ["
Format 2: volume
Expose: Expose port. The expose directive declares the port provided by the runtime container. When starting the container, the port will not be opened because of this declaration. Its basic format:
Format 1: expose
Workdir: Specify the working directory. Its basic format:
Format 1: workdir
User: Specify the current user. user helps you switch to the specified user. Its basic format:
Format 1: user
healthcheck: Health check to determine whether the status of the container is normal. Its basic format:
Format 1: healthcheck [option] cmd
Format 2: healthcheck none: If the base image has a health check command , use this format to block its health check instructions
Build nginx image:
Create a directory and write dockerfile in the directory:
[root@docker ~]# mkdir mynginx
[root@docker ~]# cd mynginx/
[root@docker mynginx]# pwd
/root/mynginx
[root@docker mynginx]#
Download the nginx source code package to the created directory (mynginx directory):
[root@docker ~]# wget -p /root/mynginx/ http://nginx.org/download/nginx-1.15.2.tar.gz
Write the dockerfile:
[root@docker mynginx]# vi dockerfile
The content is as follows:
from centos
run ping -c 1 www.baidu.com
run yum -y install gcc make pcre-devel zlib-devel tar zlib
add nginx-1.15.2.tar.gz /usr/src/
run cd /usr/src/nginx-1.15.2 \
  && mkdir /usr/local/nginx \
  && ./configure --prefix=/usr/local/nginx && make && make install \
  && ln -s /usr/local/nginx/sbin/nginx /usr/local/sbin/ \
  && nginx
run rm -rf /usr/src/nginx-1.15.2
expose 80
Run the docker command to build the image:
[root@docker mynginx]# docker build -t nginx:v3 .
sending build context to docker daemon 1.029mb
step 1/7 : from centos
 ---> 5182e96772bf
step 2/7 : run ping -c 1 www.baidu.com
 ---> using cache
 ---> 2f70f8abaf2a
step 3/7 : run yum -y install gcc make pcre-devel zlib-devel tar zlib
 ---> using cache
 ---> dbdda4b7ae6f
step 4/7 : add nginx-1.15.2.tar.gz /usr/src/
 ---> using cache
 ---> 18ace6285668
step 5/7 : run cd /usr/src/nginx-1.15.2   && mkdir /usr/local/nginx   && ./configure --prefix=/usr/local/nginx && make && make install   && ln -s /usr/local/nginx/sbin/nginx /usr/local/sbin/   && nginx
 ---> using cache
 ---> 99629488ede9
step 6/7 : run rm -rf /usr/src/nginx-1.15.2
 ---> using cache
 ---> 869fbad71879
step 7/7 : expose 80
 ---> using cache
 ---> 384bed72ea6f
successfully built 384bed72ea6f
successfully tagged nginx:v3
Outputting two successfully means the build is successful!
Start the custom image:
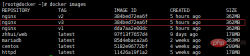
Use docker images to view the built image:
Start the custom image:
[root@docker ~]# docker run -dit -p 80:80 --name nginx nginx:v3
ecaafe1190447878b98dfb0198e92439db60ff7dab57a1674e0e9e7282a9c858
[root@docker ~]# docker ps -a
container id    image        command       created       status       ports        names
ecaafe119044    nginx:v3      "/bin/bash"     3 seconds ago    up 2 seconds    0.0.0.0:80->80/tcp  nginx
Note: At this time, no matter how you start the container, it is still in the exited state.
After various solutions, I finally figured out where the problem was. It turns out that when the container starts, it is started in the background corresponding to a thread. It is already started at startup, but after it executes the command, it exits and is not running in the background, so use the -dit parameter to let it Just run it in the background.
[root@docker ~]# docker run -dit -p 80:80 --name nginx nginx:v3
ecaafe1190447878b98dfb0198e92439db60ff7dab57a1674e0e9e7282a9c858
[root@docker ~]# docker ps -a
container id    image        command       created       status       ports        names
ecaafe119044    nginx:v3      "/bin/bash"     3 seconds ago    up 2 seconds    0.0.0.0:80->80/tcp  nginx
However...
At this time, another problem occurred. Although it was up, the nginx web page interface could not be accessed, and the connection was refused! ! ! !
[root@docker ~]# curl 192.168.100.22
curl: (7) failed connect to 192.168.100.22:80; 拒绝连接
[root@docker ~]# elinks --dump 192.168.100.22
elinks: 拒绝连接
Then, after asking Baidu, fq and Google, I finally found the problem. It turns out that you only need to use exec to enter the container and start nginx.
[root@docker ~]# docker exec -it nginx bash
[root@ecaafe119044 /]# nginx
[root@ecaafe119044 /]# exit
exit
rrree
The above is the detailed content of How to use dockerfile to build nginx image. For more information, please follow other related articles on the PHP Chinese website!

 NGINX vs. Apache: Performance, Scalability, and EfficiencyApr 19, 2025 am 12:05 AM
NGINX and Apache are both powerful web servers, each with unique advantages and disadvantages in terms of performance, scalability and efficiency. 1) NGINX performs well when handling static content and reverse proxying, suitable for high concurrency scenarios. 2) Apache performs better when processing dynamic content and is suitable for projects that require rich module support. The selection of a server should be decided based on project requirements and scenarios.
 The Ultimate Showdown: NGINX vs. ApacheApr 18, 2025 am 12:02 AM
NGINX is suitable for handling high concurrent requests, while Apache is suitable for scenarios where complex configurations and functional extensions are required. 1.NGINX adopts an event-driven, non-blocking architecture, and is suitable for high concurrency environments. 2. Apache adopts process or thread model to provide a rich module ecosystem that is suitable for complex configuration needs.
 NGINX in Action: Examples and Real-World ApplicationsApr 17, 2025 am 12:18 AM
NGINX can be used to improve website performance, security, and scalability. 1) As a reverse proxy and load balancer, NGINX can optimize back-end services and share traffic. 2) Through event-driven and asynchronous architecture, NGINX efficiently handles high concurrent connections. 3) Configuration files allow flexible definition of rules, such as static file service and load balancing. 4) Optimization suggestions include enabling Gzip compression, using cache and tuning the worker process.
 NGINX Unit: Supporting Different Programming LanguagesApr 16, 2025 am 12:15 AM
NGINXUnit supports multiple programming languages and is implemented through modular design. 1. Loading language module: Load the corresponding module according to the configuration file. 2. Application startup: Execute application code when the calling language runs. 3. Request processing: forward the request to the application instance. 4. Response return: Return the processed response to the client.
 Choosing Between NGINX and Apache: The Right Fit for Your NeedsApr 15, 2025 am 12:04 AM
NGINX and Apache have their own advantages and disadvantages and are suitable for different scenarios. 1.NGINX is suitable for high concurrency and low resource consumption scenarios. 2. Apache is suitable for scenarios where complex configurations and rich modules are required. By comparing their core features, performance differences, and best practices, you can help you choose the server software that best suits your needs.
 How to start nginxApr 14, 2025 pm 01:06 PM
Question: How to start Nginx? Answer: Install Nginx Startup Nginx Verification Nginx Is Nginx Started Explore other startup options Automatically start Nginx
 How to check whether nginx is startedApr 14, 2025 pm 01:03 PM
How to confirm whether Nginx is started: 1. Use the command line: systemctl status nginx (Linux/Unix), netstat -ano | findstr 80 (Windows); 2. Check whether port 80 is open; 3. Check the Nginx startup message in the system log; 4. Use third-party tools, such as Nagios, Zabbix, and Icinga.
 How to close nginxApr 14, 2025 pm 01:00 PM
To shut down the Nginx service, follow these steps: Determine the installation type: Red Hat/CentOS (systemctl status nginx) or Debian/Ubuntu (service nginx status) Stop the service: Red Hat/CentOS (systemctl stop nginx) or Debian/Ubuntu (service nginx stop) Disable automatic startup (optional): Red Hat/CentOS (systemctl disabled nginx) or Debian/Ubuntu (syst


Hot AI Tools

Undresser.AI Undress
AI-powered app for creating realistic nude photos

AI Clothes Remover
Online AI tool for removing clothes from photos.

Undress AI Tool
Undress images for free

Clothoff.io
AI clothes remover

AI Hentai Generator
Generate AI Hentai for free.

Hot Article
Hot Tools

SecLists
SecLists is the ultimate security tester's companion. It is a collection of various types of lists that are frequently used during security assessments, all in one place. SecLists helps make security testing more efficient and productive by conveniently providing all the lists a security tester might need. List types include usernames, passwords, URLs, fuzzing payloads, sensitive data patterns, web shells, and more. The tester can simply pull this repository onto a new test machine and he will have access to every type of list he needs.

EditPlus Chinese cracked version
Small size, syntax highlighting, does not support code prompt function

Zend Studio 13.0.1
Powerful PHP integrated development environment

SublimeText3 English version
Recommended: Win version, supports code prompts!

PhpStorm Mac version
The latest (2018.2.1) professional PHP integrated development tool

