


1. What is JWT
JSON Web Token (JWT) is currently the most popular cross-domain authentication solution. Current project development generally involves separation of the front-end and the end-end, which involves cross-domain and authentication issues.
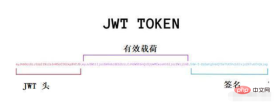
2. JWT composition
It consists of three parts: Header, Payload and signature
Header :
The header information consists of two parts: 1. The type of token, that is, JWT; 2. The signature algorithm used, such as HMASSHA256 or RSA;
{
  "alg": "HS256",
  "typ": "JWT"
}
In this json The typ attribute is used to identify that the entire token string is a JWT string; its alg attribute is used to describe the signature and digest algorithm used when issuing this JWT. The full names of the typ and alg attributes are actually type algorithm, respectively. The meaning of type and algorithm. The reason why they are represented by three letters is also based on the consideration of the final string size of JWT. It is also consistent with the name of JWT, so they are all three characters...typ and alg are the attributes specified in the JWT standard. name.
Payload:
payload is used to carry the data to be transmitted. Its json structure is actually a set of declarations for the data to be transmitted by JWT. These statements are called claims by the JWT standard. One of its "attribute value pairs" is actually a claim (requirement). Each claim represents a specific meaning and function.
We can put some business information in the claim.
Signature:
The signature is the two strings obtained after base64url encoding the json structures corresponding to the header and payload and splicing them together with 'English period' , and then generated according to the signature algorithm specified by alg in the header.
Different algorithms have different signature results. Take alg: HS256 as an example to illustrate how to obtain the previous signature.
According to the previous description of the available values of alg, HS256 actually contains two algorithms: HMAC algorithm and SHA256 algorithm. The former is used to generate a digest, and the latter is used to digitally sign the digest. These two algorithms can also be collectively referred to as HMACSHA256
jwt data structure diagram:
3. JWT operating principle
1. Once a login request is sent, it will inevitably carry user information uname and pwd
2. If the user information uname and pwd are successfully logged in, the user information will be generated into an encrypted string through the jwt tool class
3. The encrypted string will be sent to the front end in the form of a response header
4. The front-end server will have a response interceptor to intercept the jwt string carried by the response header and put it into Vuex
5. When requesting for the second time, there is a request interceptor in the front-end server, which will put the jwt string in Vuex into the request header request
6. When the request passes through a cross-domain method Reaching the backend server, there is another filter in the backend server, which will intercept the jwt string in the request header
7. The jwt tool class will parse the jwt string, parse it into user information, and finally verify it.
4. Springboot integrates JWT
Overall idea:
When the front end accesses the background login interface to log in, it first determines whether the user exists in the user table based on the user name and password. If it exists For this user, a jwt string is generated. You can add some business information to the jwt string (such as login account, user's real name, etc.), and return the jwt string to the front end.
The current end gets the jwt string and puts it in to the header of all requests, such as token=jwt string
Develop a filter on the backend to intercept all requests (except login requests, because the login request has not yet generated jwt), and obtain the jwt from the header of the request (That is, the value of the token), check the jwt and obtain the business information in the jwt, and put the business information in the header of the request, so that the back-end interface can obtain it directly from the header
If the filter If the jwt expires or the verification fails, a prompt will be returned to the front end, and the front end will return to the login page to allow the user to log in again.
1. Introduce dependencies in pom.xml
<!--jwt-->
        <dependency>
            <groupId>com.auth0</groupId>
            <artifactId>java-jwt</artifactId>
            <version>3.8.3</version>
        </dependency>
2. Develop jwt generation tool class, the code is as follows:
package com.lsl.exam.utils;

import com.auth0.jwt.JWT;
import com.auth0.jwt.algorithms.Algorithm;
import com.lsl.exam.entity.TabUser;

import java.util.Date;
import java.util.HashMap;
import java.util.Map;

public class JwtUtil {

    private static final long EXPIRE_TIME = 1000 * 60 * 60 *24;

    //设置私钥
    private static final String TOKEN_SECRET = "aa082c-66rt89-29sr3t-y9t7b8";


    /**
     * 创建携带自定义信息和声明的自定义私钥的jwt
     * @param user  用户信息表
     * @return  jwt串
     */
    public static String creatJwt(TabUser user){
        //构建头部信息
        Map<String,Object> header = new HashMap<>();
        header.put("typ","JWT");
        header.put("alg","HS256");

        //根据私钥构建密钥信息
        Algorithm algorithm = Algorithm.HMAC256(TOKEN_SECRET);

        //根据当前用户密码构建密钥信息
//        Algorithm algorithm = Algorithm.HMAC256(user.getUserpwd());

        //设置过期时间为当前时间一天后
        Date nowDate = new Date();
        Date expireDate = new Date(System.currentTimeMillis() + EXPIRE_TIME);

        String jwt = JWT.create().withHeader(header)
                .withClaim("account",user.getAccount())//业务信息:员工号
                .withClaim("username",user.getUsername())//业务信息:员工姓名
                .withClaim("rolename",user.getRoleName())//业务信息:角色
                .withIssuer("SERVICE")//声明,签名是有谁生成 例如 服务器
                .withNotBefore(new Date())//声明,定义在什么时间之前,该jwt都是不可用的
                .withExpiresAt(expireDate)//声明, 签名过期的时间
                .sign(algorithm);//根据algorithm生成签名

        return jwt;

    }
}
3. The back-end login interface logic is as follows:
package com.lsl.exam.controller;

import com.alibaba.fastjson.JSON;
import com.baomidou.mybatisplus.core.conditions.query.QueryWrapper;
import com.lsl.exam.entity.TabUser;
import com.lsl.exam.entity.backresult.ResultVO;
import com.lsl.exam.service.ITabRoleService;
import com.lsl.exam.service.IUserService;
import com.lsl.exam.utils.Base64Util;
import com.lsl.exam.utils.JwtUtil;
import com.lsl.exam.utils.ResultVoUtil;
import org.slf4j.Logger;
import org.springframework.beans.factory.annotation.Autowired;
import org.springframework.web.bind.annotation.*;

import javax.servlet.http.HttpServletRequest;
import java.util.ArrayList;
import java.util.HashMap;
import java.util.List;
import java.util.Map;

@RestController
@RequestMapping("/exam")
public class UserController {
    private static final Logger LOG = org.slf4j.LoggerFactory.getLogger("UserController");

    @Autowired
    IUserService userService;

    @Autowired
    ITabRoleService roleService;

    @PostMapping(value = "login",produces = "application/json;charset=UTF-8")
    @ResponseBody
    public ResultVO<?> login(@RequestBody Map params){
        Map reuslt = new HashMap();

        String account = params.get("account") == null ? "" : params.get("account").toString();
        String pwd = params.get("pwd") == null ? "" : params.get("pwd").toString();

        if ("".equals(account) || "".equals(pwd)){
            return ResultVoUtil.error(30000,"用户名或者密码不能为空!");
        }

        //pwd解密
        String decodePwd = Base64Util.decode(pwd);
        if ("".contains(decodePwd)){
            return ResultVoUtil.error(30000,"密码错误!");
        }

        TabUser user = userService.getOne(new QueryWrapper<TabUser>()
                .eq("account",account)
                .eq("userpwd",decodePwd));
        if (null == user){
            return ResultVoUtil.error(30000,"用户名或者密码错误");
        }

        //获取当前用户拥有的角色
        String userId = user.getId();
        Map roleMap = new HashMap();
        roleMap.put("userId",userId);
        List<Map> roleList = roleService.qryRoleInfoByUserId(roleMap);
        List<String> roleNames = new ArrayList<>();
        for(Map role : roleList){
            roleNames.add(role.get("role").toString());
        }
        user.setRoleName(JSON.toJSONString(roleNames));

        //生成带有业务信息的jwt串
        String jwt = JwtUtil.creatJwt(user);

        //把jwt和当前用户信息返给前端
        reuslt.put("jwt",jwt);
        reuslt.put("roleNames",roleNames);
        reuslt.put("username",user.getUsername());
        reuslt.put("account",user.getAccount());

        return ResultVoUtil.success(reuslt);
    }

    @PostMapping(value = "qryUser",produces = "application/json;charset=UTF-8")
    @ResponseBody
    public Object qryUser(HttpServletRequest request){

        //这里header中的信息是filter中放进去的
        String account = request.getHeader("account");
        String username = request.getHeader("username");
        String rolename = request.getHeader("rolename");

        List<TabUser> list = userService.list();
        return ResultVoUtil.success(list);
    }
}
4. Develop filter and perform jwt verification
package com.lsl.exam.filter;

import com.alibaba.fastjson.JSON;
import com.auth0.jwt.JWT;
import com.auth0.jwt.algorithms.Algorithm;
import com.auth0.jwt.interfaces.DecodedJWT;
import com.lsl.exam.entity.backresult.ResultVO;
import com.lsl.exam.utils.ResultVoUtil;
import org.apache.tomcat.util.http.MimeHeaders;
import org.springframework.stereotype.Component;

import javax.servlet.*;
import javax.servlet.annotation.WebFilter;
import javax.servlet.http.HttpServletRequest;
import java.io.IOException;
import java.io.PrintWriter;
import java.lang.reflect.Field;
import java.util.ArrayList;
import java.util.HashMap;
import java.util.List;
import java.util.Map;

/**
 * jwt校验过滤器
 */
@Component
@WebFilter(filterName = "jwtFilter",urlPatterns = {"/*"})
public class AuthJwtFilter implements Filter {
    @Override
    public void init(FilterConfig filterConfig) throws ServletException {

    }

    @Override
    public void doFilter(ServletRequest servletRequest, ServletResponse servletResponse, FilterChain filterChain) throws IOException, ServletException {
        HttpServletRequest httpServletRequest = (HttpServletRequest) servletRequest;
        String url = httpServletRequest.getRequestURL().toString();

        //配置不进行jwt校验的请求路径
        List<String> urlList = new ArrayList<>();
        urlList.add("/exam/login");

        boolean flag = false;
        for (String strUrl : urlList){
            if (url.contains(strUrl)){
                flag = true;
            }
        }

        try {
            if (!flag){
                String token = httpServletRequest.getHeader("token");
                //校验token,jwt过期有jwt自行校验,如果超时了,会执行catch里代码
                DecodedJWT decodeJwt = JWT.require(Algorithm.HMAC256("aa082c-66rt89-29sr3t-y9t7b8")).build().verify(token);

                //获取jwt中的业务信息
                String account = decodeJwt.getClaim("account").asString();
                String username = decodeJwt.getClaim("username").asString();
                String rolename = decodeJwt.getClaim("rolename").asString();
                Map<String, String> headerMap = new HashMap<>();
                headerMap.put("account",account);
                headerMap.put("username",username);
                headerMap.put("rolename",rolename);

                //把业务信息添加到request的header
                addHeader(httpServletRequest,headerMap);


//                Class<?> superclass = servletRequest.getClass().getSuperclass().getSuperclass();
//                Field requestField = superclass.getDeclaredField("request");
//                requestField.setAccessible(true);
//                RequestFacade requestFacadeInstance = (RequestFacade) requestField.get(servletRequest);
                RequestFacade requestFacadeInstance = (RequestFacade)superclass3;
//                Field requestField1 = requestFacadeInstance.getClass().getDeclaredField("request");
//                requestField1.setAccessible(true);
//                Object requestInstance =  requestField1.get(requestFacadeInstance);
//                Field coyoteRequestField = requestInstance.getClass().getDeclaredField("coyoteRequest");
//                coyoteRequestField.setAccessible(true);
//
//                Object coyoRequestInstance =  requestField1.get(requestInstance);
//                Field headersField = coyoRequestInstance.getClass().getDeclaredField("headers");
//                headersField.setAccessible(true);
//
//                MimeHeaders headers = (MimeHeaders) headersField.get(coyoRequestInstance);
//                headers.removeHeader("token");
//                headers.addValue("account").setString(account);
//                headers.addValue("username").setString(username);
//                headers.addValue("roleid").setString(roleid);
//

            }
        } catch (Exception e) {
            //jwt校验失败,返给前端的code=1,前端要重定向到登录页面
            PrintWriter writer = null;
            servletResponse.setCharacterEncoding("UTF-8");
            servletResponse.setContentType("text/html; charset=utf-8");

            try {
                writer = servletResponse.getWriter();
                ResultVO vo = ResultVoUtil.successLogout();
                String msg = JSON.toJSONString(vo);
                writer.println(msg);
            } catch (IOException ex) {

            } finally {
                if (writer != null){
                    writer.close();
                }
                return;
            }

        }

        filterChain.doFilter(servletRequest,servletResponse);
    }

    /**
     * 向request的header中放业务信息
     * @param request
     * @param headerMap
     */
    private void addHeader(HttpServletRequest request, Map<String, String> headerMap) {
        if (headerMap==null||headerMap.isEmpty()){
            return;
        }

        Class<? extends HttpServletRequest> c=request.getClass();
        //System.out.println(c.getName());
        System.out.println("request实现类="+c.getName());
        try{
            Field requestField=c.getDeclaredField("request");
            requestField.setAccessible(true);

            Object o=requestField.get(request);
            Field coyoteRequest=o.getClass().getDeclaredField("coyoteRequest");
            coyoteRequest.setAccessible(true);

            Object o2=coyoteRequest.get(o);
            System.out.println("coyoteRequest实现类="+o2.getClass().getName());
            Field headers=o2.getClass().getDeclaredField("headers");
            headers.setAccessible(true);

            MimeHeaders mimeHeaders=(MimeHeaders) headers.get(o2);
            for (Map.Entry<String,String> entry:headerMap.entrySet()){
                mimeHeaders.removeHeader(entry.getKey());
                mimeHeaders.addValue(entry.getKey()).setString(entry.getValue());
            }

        }catch (Exception e){
            e.printStackTrace();
        }

    }
    @Override
    public void destroy() {

    }
}
The above is the detailed content of How does springboot integrate JWT to achieve identity authentication?. For more information, please follow other related articles on the PHP Chinese website!

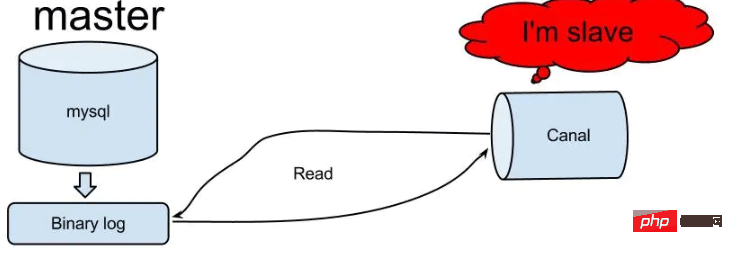 怎么使用SpringBoot+Canal实现数据库实时监控May 10, 2023 pm 06:25 PM
Canal工作原理Canal模拟MySQLslave的交互协议,伪装自己为MySQLslave,向MySQLmaster发送dump协议MySQLmaster收到dump请求,开始推送binarylog给slave(也就是Canal)Canal解析binarylog对象(原始为byte流)MySQL打开binlog模式在MySQL配置文件my.cnf设置如下信息:[mysqld]#打开binloglog-bin=mysql-bin#选择ROW(行)模式binlog-format=ROW#配置My
 Spring Boot怎么使用SSE方式向前端推送数据May 10, 2023 pm 05:31 PM
前言SSE简单的来说就是服务器主动向前端推送数据的一种技术,它是单向的,也就是说前端是不能向服务器发送数据的。SSE适用于消息推送,监控等只需要服务器推送数据的场景中,下面是使用SpringBoot来实现一个简单的模拟向前端推动进度数据,前端页面接受后展示进度条。服务端在SpringBoot中使用时需要注意,最好使用SpringWeb提供的SseEmitter这个类来进行操作,我在刚开始时使用网上说的将Content-Type设置为text-stream这种方式发现每次前端每次都会重新创建接。最
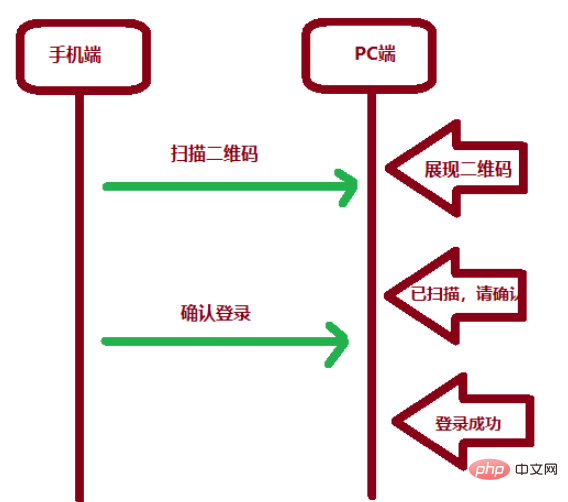 SpringBoot怎么实现二维码扫码登录May 10, 2023 pm 08:25 PM
一、手机扫二维码登录的原理二维码扫码登录是一种基于OAuth3.0协议的授权登录方式。在这种方式下,应用程序不需要获取用户的用户名和密码,只需要获取用户的授权即可。二维码扫码登录主要有以下几个步骤:应用程序生成一个二维码,并将该二维码展示给用户。用户使用扫码工具扫描该二维码,并在授权页面中授权。用户授权后,应用程序会获取一个授权码。应用程序使用该授权码向授权服务器请求访问令牌。授权服务器返回一个访问令牌给应用程序。应用程序使用该访问令牌访问资源服务器。通过以上步骤,二维码扫码登录可以实现用户的快
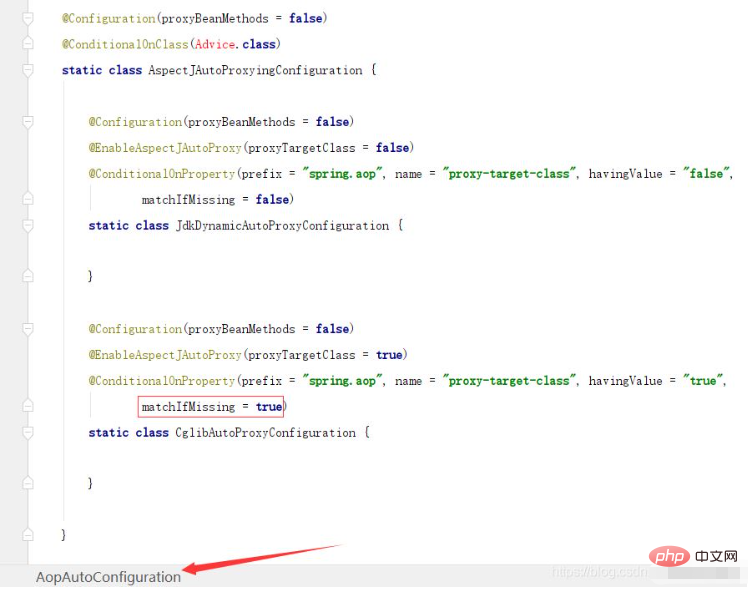 SpringBoot/Spring AOP默认动态代理方式是什么May 10, 2023 pm 03:52 PM
1.springboot2.x及以上版本在SpringBoot2.xAOP中会默认使用Cglib来实现,但是Spring5中默认还是使用jdk动态代理。SpringAOP默认使用JDK动态代理,如果对象没有实现接口,则使用CGLIB代理。当然,也可以强制使用CGLIB代理。在SpringBoot中,通过AopAutoConfiguration来自动装配AOP.2.Springboot1.xSpringboot1.xAOP默认还是使用JDK动态代理的3.SpringBoot2.x为何默认使用Cgl
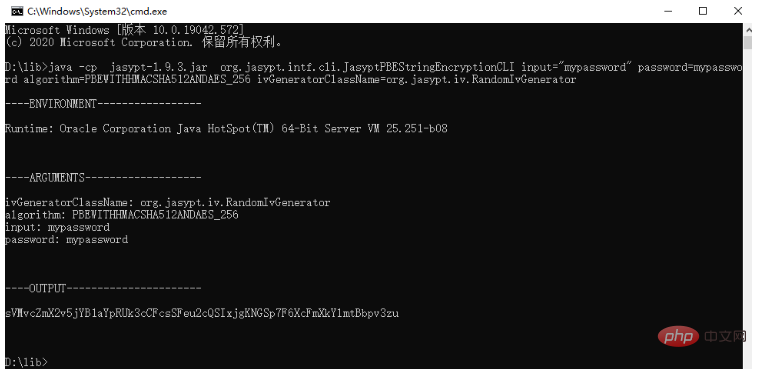 spring boot怎么对敏感信息进行加解密May 10, 2023 pm 02:46 PM
我们使用jasypt最新版本对敏感信息进行加解密。1.在项目pom文件中加入如下依赖:com.github.ulisesbocchiojasypt-spring-boot-starter3.0.32.创建加解密公用类:packagecom.myproject.common.utils;importorg.jasypt.encryption.pbe.PooledPBEStringEncryptor;importorg.jasypt.encryption.pbe.config.SimpleStrin
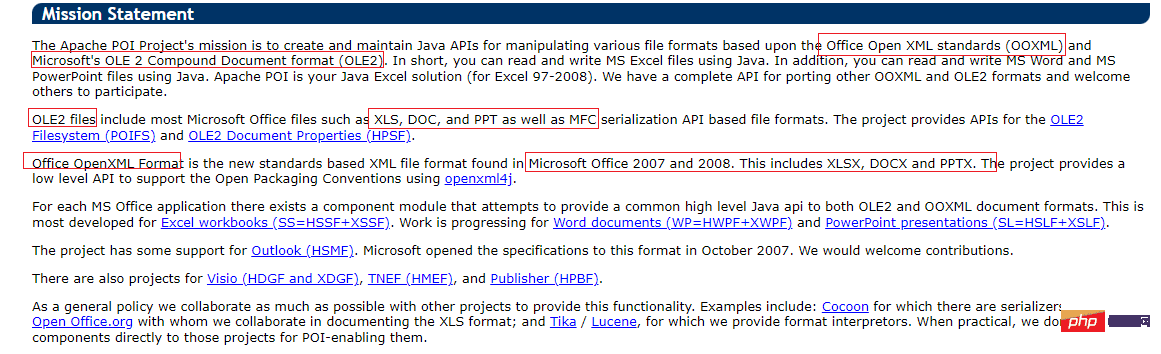 使用Java SpringBoot集成POI实现Word文档导出Apr 21, 2023 pm 12:19 PM
知识准备需要理解ApachePOI遵循的标准(OfficeOpenXML(OOXML)标准和微软的OLE2复合文档格式(OLE2)),这将对应着API的依赖包。什么是POIApachePOI是用Java编写的免费开源的跨平台的JavaAPI,ApachePOI提供API给Java程序对MicrosoftOffice格式档案读和写的功能。POI为“PoorObfuscationImplementation”的首字母缩写,意为“简洁版的模糊实现”。ApachePOI是创建和维护操作各种符合Offic
 springboot怎么整合shiro实现多验证登录功能May 10, 2023 pm 04:19 PM
1.首先新建一个shiroConfigshiro的配置类,代码如下:@ConfigurationpublicclassSpringShiroConfig{/***@paramrealms这儿使用接口集合是为了实现多验证登录时使用的*@return*/@BeanpublicSecurityManagersecurityManager(Collectionrealms){DefaultWebSecurityManagersManager=newDefaultWebSecurityManager();
 SpringBoot项目打包发布到外部tomcat遇到的问题怎么解决May 10, 2023 pm 05:49 PM
先说遇到问题的情景:初次尝试使用springboot框架写了个小web项目,在IntellijIDEA中能正常启动运行。使用maven运行install,生成war包,发布到本机的tomcat下,出现异常,主要的异常信息是.......LifeCycleException。经各种搜索,找到答案。springboot因为内嵌tomcat容器,所以可以通过打包为jar包的方法将项目发布,但是如何将springboot项目打包成可发布到tomcat中的war包项目呢?1.既然需要打包成war包项目,首


Hot AI Tools

Undresser.AI Undress
AI-powered app for creating realistic nude photos

AI Clothes Remover
Online AI tool for removing clothes from photos.

Undress AI Tool
Undress images for free

Clothoff.io
AI clothes remover

AI Hentai Generator
Generate AI Hentai for free.

Hot Article
Hot Tools

SublimeText3 Chinese version
Chinese version, very easy to use

Dreamweaver Mac version
Visual web development tools

WebStorm Mac version
Useful JavaScript development tools

Notepad++7.3.1
Easy-to-use and free code editor

SecLists
SecLists is the ultimate security tester's companion. It is a collection of various types of lists that are frequently used during security assessments, all in one place. SecLists helps make security testing more efficient and productive by conveniently providing all the lists a security tester might need. List types include usernames, passwords, URLs, fuzzing payloads, sensitive data patterns, web shells, and more. The tester can simply pull this repository onto a new test machine and he will have access to every type of list he needs.

