
Home >Java >javaTutorial >How to configure Spring Security in SpringBoot security management
How to configure Spring Security in SpringBoot security management

- WBOYWBOYWBOYWBOYWBOYWBOYWBOYWBOYWBOYWBOYWBOYWBOYWBforward
- 2023-05-12 21:52:102530browse
Common security frameworks in the field of Java development include Shiro and Spring Security. Shiro is a lightweight security management framework that provides authentication, authorization, session management, password management, cache management and other functions. Spring Security is a relatively complex security management framework with more powerful functions than Shiro, more granular permission control, and friendly support for OAuth 2. Because Spring Security originates from the Spring family, it can be seamlessly integrated with the Spring framework. , especially the automated configuration solution provided in Spring Boot, can make the use of Spring Security more convenient.
Basic configuration of Spring Security
Basic usage
1. Create a project and add dependencies
Create a Spring Boot project, and then add spring-boot-starter -security can depend on it
<dependency>
  <groupId>org.springframework.boot</groupId>
  <artifactId>spring-boot-starter-web</artifactId>
</dependency>
<dependency>
  <groupId>org.springframework.boot</groupId>
  <artifactId>spring-boot-starter-security</artifactId>
</dependency>
2. Add hello interface
@RestController
public class HelloController {
    @GetMapping("/hello")
    public String hello() {
        return "hello";
    }
}
3. Start project test
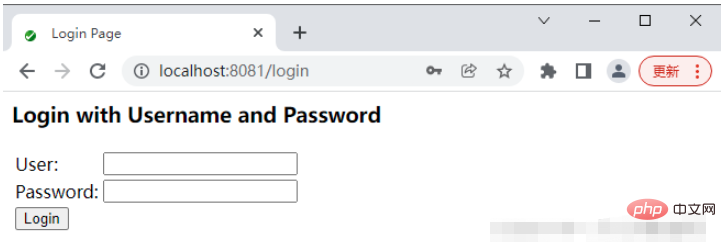
After successful startup, accessing the /hello interface will automatically jump to login Page, this login page is provided by Spring Security
#The default user name is user, and the default login password is randomly generated every time the project is started. Check the project startup Log
Using generated security password: 4f845a17-7b09-479c-8701-48000e89d364
After successful login, the user can access the /hello interface
Configure username and password
If developers are not satisfied with the default username and password, they can configure the default username, password and user role in application.properties
spring. security.user.name=tangsan
spring.security.user.password=tangsan
spring.security.user.roles=admin
Memory-based authentication
Developers can also customize classes that inherit from WebSecurityConfigurer to implement more customized configurations of Spring Security, such as memory-based authentication. The configuration method is as follows:
@Configuration
public class MyWebSecurityConfig extends WebSecurityConfigurerAdapter {
    @Bean
    PasswordEncoder passwordEncoder() {
        return NoOpPasswordEncoder.getInstance();
    }
    @Override
    protected void configure(AuthenticationManagerBuilder auth) throws Exception {
        auth.inMemoryAuthentication()
                .withUser("admin").password("123123").roles("ADMIN", "USER")
                .and()
                .withUser("tangsan").password("123123").roles("USER");
    }
}
Code explanation:
Customized MyWebSecurityConfig inherits from WebSecurityConfigurerAdapter, and rewrites the configure(AuthenticationManagerBuilder auth) method. In this method, two users are configured. One user is admin, with two roles ADMIN and USER; the other user is tangsan, Has a role USER
The Spring Security version used here is 5.0.6. Multiple password encryption methods are introduced in Spring Security 5.x. Developers must specify one. NoOpPasswordEncoder is used here, that is, the password is not encrypted
Note: For memory-based user configuration, there is no need to add the "ROLE_" prefix when configuring the role. This is the same as the following section 10.2 based on There are differences in database authentication.
After the configuration is completed, restart the project and you can log in using the two users configured here.
HttpSecurity
Although the authentication function can now be implemented, the protected resources are default and role management cannot be based on the actual situation. If you want to implement these functions, you need to rewrite the WebSecurityConfigurerAdapter Another method in
@Configuration
public class MyWebSecurityConfig extends WebSecurityConfigurerAdapter {
    @Bean
    PasswordEncoder passwordEncoder() {
        return NoOpPasswordEncoder.getInstance();
    }
    @Override
    protected void configure(AuthenticationManagerBuilder auth) throws Exception {
        auth.inMemoryAuthentication()
                .withUser("root").password("123123").roles("ADMIN", "DBA")
                .and()
                .withUser("admin").password("123123").roles("ADMIN", "USER")
                .and()
                .withUser("tangsan").password("123123").roles("USER");
    }
    @Override
    protected void configure(HttpSecurity http) throws Exception {
        http.authorizeRequests()
                .antMatchers("/admin/**")
                .hasRole("ADMIN")
                .antMatchers("/user/**")
                .access("hasAnyRole('ADMIN','USER')")
                .antMatchers("/db/**")
                .access("hasRole('ADMIN') and hasRole('DBA')")
                .anyRequest()
                .authenticated()
                .and()
                .formLogin()
                .loginProcessingUrl("/login")
                .permitAll()
                .and()
                .csrf()
                .disable();
    }
}
Code explanation:
First configure three users, the root user has the roles of ADMIN and DBA, and the admin user has the roles of ADMIN and USER , tangsan is used to have the USER role
Call the authorizeRequests() method to open the HttpSecurity configuration, antMatchers(), hasRole(), access() method configuration to access different paths that require different users. And role
- ##anyRequest(), authenticated() indicates that in addition to the previously defined, users must authenticate before accessing other URLs
- formLogin(), loginProcessingUrl("/login"), permitAll(), means to enable form login. The login page you saw earlier also configures the login interface to /login. You can directly call the /login interface to initiate a POST request. To log in, the user name in the login parameters must be named username, and the password must be named password. The loginProcessingUrl interface is configured to facilitate Ajax or mobile terminals to call the login interface. Finally, permitAll is configured, which means that all interfaces related to login can be accessed without authentication.
@RestController
public class HelloController {
    @GetMapping("/admin/hello")
    public String admin() {
        return "hello admin";
    }
    @GetMapping("/user/hello")
    public String user() {
        return "hello user";
    }
    @GetMapping("/db/hello")
    public String dba() {
        return "hello dba";
    }
    @GetMapping("/hello")
    public String hello() {
        return "hello";
    }
}
According to the above configuration, the "/admin/hello" interface root and admin users have access Permissions; "/user/hello" interface admin and tangsan users have access permissions; "/db/hello" only the root user has access permissions. Testing in the browser is easy and I won’t go into details here.
登录表单详细配置
目前为止,登录表单一直使用 Spring Security 提供的页面,登录成功后也是默认的页面跳转,但是,前后端分离已经成为企业级应用开发的主流,在前后端分离的开发方式中,前后端的数据交互通过 JSON 进行,这时,登录成功后就不是页面跳转了,而是一段 JSON 提示。要实现这些功能,只需要继续完善上文的配置
@Override
protected void configure(HttpSecurity http) throws Exception {
    http.authorizeRequests()
        .antMatchers("/admin/**")
        .hasRole("ADMIN")
        .antMatchers("/user/**")
        .access("hasAnyRole('ADMIN','USER')")
        .antMatchers("/db/**")
        .access("hasRole('ADMIN') and hasRole('DBA')")
        .anyRequest()
        .authenticated()
        .and()
        .formLogin()
        .loginPage("/login_page")
        .loginProcessingUrl("/login")
        .usernameParameter("name")
        .passwordParameter("passwd")
        .successHandler(new AuthenticationSuccessHandler() {
            @Override
            public void onAuthenticationSuccess(HttpServletRequest req,
                                                HttpServletResponse resp,
                                                Authentication auth)
                throws IOException {
                Object principal = auth.getPrincipal();
                resp.setContentType("application/json;charset=utf-8");
                PrintWriter out = resp.getWriter();
                resp.setStatus(200);
                Map<String, Object> map = new HashMap<>();
                map.put("status", 200);
                map.put("msg", principal);
                ObjectMapper om = new ObjectMapper();
                out.write(om.writeValueAsString(map));
                out.flush();
                out.close();
            }
        })
        .failureHandler(new AuthenticationFailureHandler() {
            @Override
            public void onAuthenticationFailure(HttpServletRequest req,
                                                HttpServletResponse resp,
                                                AuthenticationException e)
                throws IOException {
                resp.setContentType("application/json;charset=utf-8");
                PrintWriter out = resp.getWriter();
                resp.setStatus(401);
                Map<String, Object> map = new HashMap<>();
                map.put("status", 401);
                if (e instanceof LockedException) {
                    map.put("msg", "账户被锁定,登录失败!");
                } else if (e instanceof BadCredentialsException) {
                    map.put("msg", "账户名或密码输入错误,登录失败!");
                } else if (e instanceof DisabledException) {
                    map.put("msg", "账户被禁用,登录失败!");
                } else if (e instanceof AccountExpiredException) {
                    map.put("msg", "账户已过期,登录失败!");
                } else if (e instanceof CredentialsExpiredException) {
                    map.put("msg", "密码已过期,登录失败!");
                } else {
                    map.put("msg", "登录失败!");
                }
                ObjectMapper om = new ObjectMapper();
                out.write(om.writeValueAsString(map));
                out.flush();
                out.close();
            }
        })
        .permitAll()
        .and()
        .csrf()
        .disable();
}
代码解释:
loginPage(“/login_page”) 表示如果用户未获授权就访问一个需要授权才能访问的接口,就会自动跳转到 login_page 页面让用户登录,这个 login_page 就是开发者自定义的登录页面,而不再是 Spring Security 提供的默认登录页
loginProcessingUrl(“/login”) 表示登录请求处理接口,无论是自定义登录页面还是移动端登录,都需要使用该接口
usernameParameter(“name”),passwordParameter(“passwd”) 定义了认证所需要的用户名和密码的参数,默认用户名参数是 username,密码参数是 password,可以在这里定义
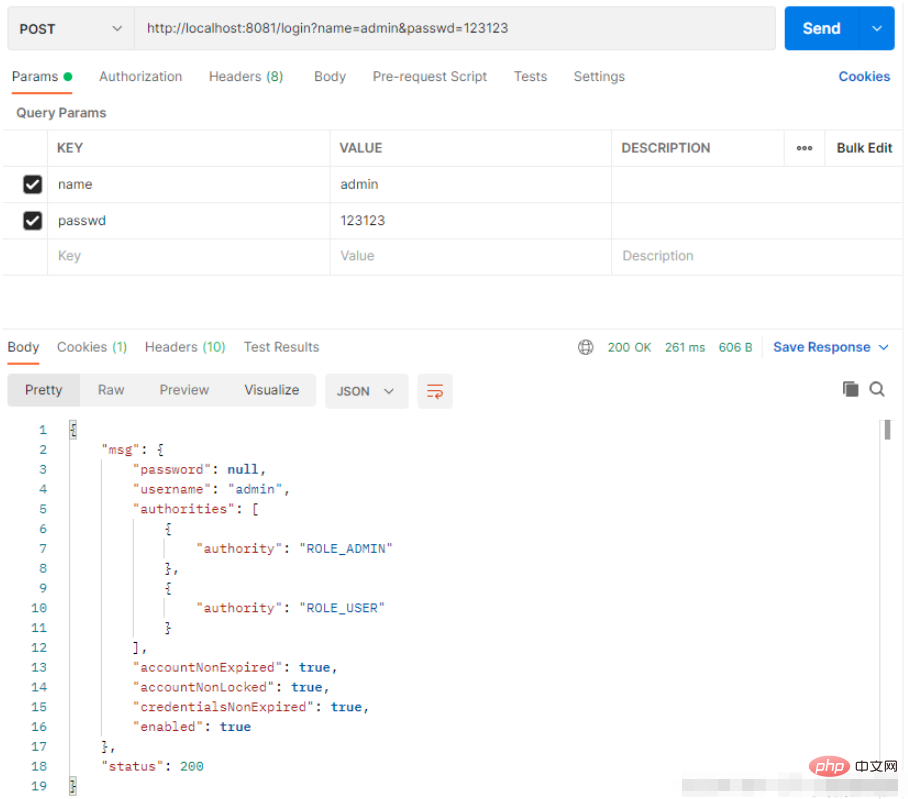
successHandler() 方法定义了登录成功的处理逻辑。用户登录成功后可以跳转到某一个页面,也可以返回一段 JSON ,这个要看具体业务逻辑,此处假设是第二种,用户登录成功后,返回一段登录成功的 JSON 。onAuthenticationSuccess 方法的第三个参数一般用来获取当前登录用户的信息,在登录后,可以获取当前登录用户的信息一起返回给客户端
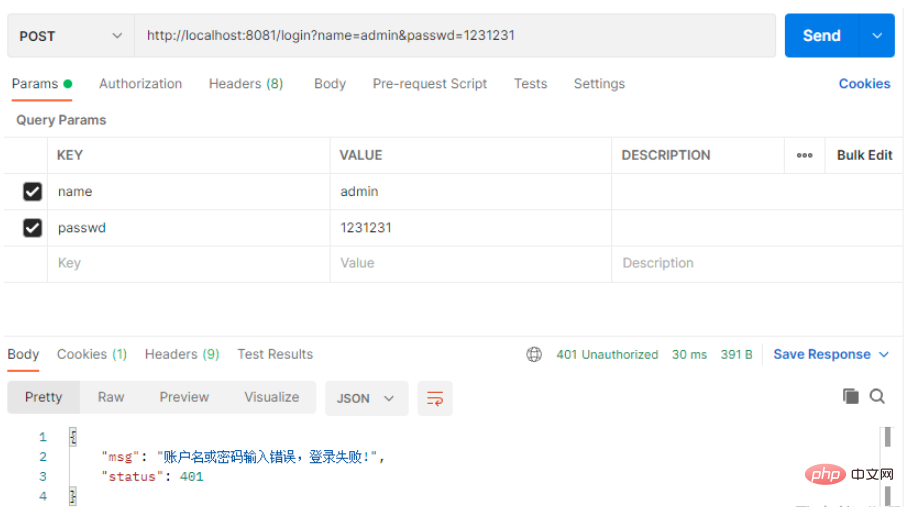
failureHandler 方法定义了登录失败的处理逻辑,和登录成功类似,不同的是,登录失败的回调方法里有一个 AuthenticationException 参数,通过这个异常参数可以获取登录失败的原因,进而给用户一个明确的提示
配置完成后,使用 Postman 进行测试
如果登录失败也会有相应的提示
注销登录配置
如果想要注销登录,也只需要提供简单的配置即可
@Override
protected void configure(HttpSecurity http) throws Exception {
    http.authorizeRequests()
        .antMatchers("/admin/**")
        .hasRole("ADMIN")
        .antMatchers("/user/**")
        .access("hasAnyRole('ADMIN','USER')")
        .antMatchers("/db/**")
        .access("hasRole('ADMIN') and hasRole('DBA')")
        .anyRequest()
        .authenticated()
        .and()
        .formLogin()
        .loginPage("/login_page")
        .loginProcessingUrl("/login")
        .usernameParameter("name")
        .passwordParameter("passwd")
        .successHandler(new AuthenticationSuccessHandler() {
            @Override
            public void onAuthenticationSuccess(HttpServletRequest req,
                                                HttpServletResponse resp,
                                                Authentication auth)
                throws IOException {
                Object principal = auth.getPrincipal();
                resp.setContentType("application/json;charset=utf-8");
                PrintWriter out = resp.getWriter();
                resp.setStatus(200);
                Map<String, Object> map = new HashMap<>();
                map.put("status", 200);
                map.put("msg", principal);
                ObjectMapper om = new ObjectMapper();
                out.write(om.writeValueAsString(map));
                out.flush();
                out.close();
            }
        })
        .failureHandler(new AuthenticationFailureHandler() {
            @Override
            public void onAuthenticationFailure(HttpServletRequest req,
                                                HttpServletResponse resp,
                                                AuthenticationException e)
                throws IOException {
                resp.setContentType("application/json;charset=utf-8");
                PrintWriter out = resp.getWriter();
                resp.setStatus(401);
                Map<String, Object> map = new HashMap<>();
                map.put("status", 401);
                if (e instanceof LockedException) {
                    map.put("msg", "账户被锁定,登录失败!");
                } else if (e instanceof BadCredentialsException) {
                    map.put("msg", "账户名或密码输入错误,登录失败!");
                } else if (e instanceof DisabledException) {
                    map.put("msg", "账户被禁用,登录失败!");
                } else if (e instanceof AccountExpiredException) {
                    map.put("msg", "账户已过期,登录失败!");
                } else if (e instanceof CredentialsExpiredException) {
                    map.put("msg", "密码已过期,登录失败!");
                } else {
                    map.put("msg", "登录失败!");
                }
                ObjectMapper om = new ObjectMapper();
                out.write(om.writeValueAsString(map));
                out.flush();
                out.close();
            }
        })
        .permitAll()
        .and()
        .logout()
        .logoutUrl("/logout")
        .clearAuthentication(true)
        .invalidateHttpSession(true)
        .addLogoutHandler(new LogoutHandler() {
            @Override
            public void logout(HttpServletRequest req,
                               HttpServletResponse resp,
                               Authentication auth) {
            }
        })
        .logoutSuccessHandler(new LogoutSuccessHandler() {
            @Override
            public void onLogoutSuccess(HttpServletRequest req,
                                        HttpServletResponse resp,
                                        Authentication auth)
                throws IOException {
                resp.sendRedirect("/login_page");
            }
        })
        .and()
        .csrf()
        .disable();
}
代码解释:
logout() 表示开启注销登录的配置
logoutUrl(“/logout”) 表示注销登录请求 URL 为 /logout ,默认也是 /logout
clearAuthentication(true) 表示是否清楚身份认证信息,默认为 true
invalidateHttpSession(true) 表示是否使 Session 失效,默认为 true
addLogoutHandler 方法中完成一些数据清楚工作,例如 Cookie 的清楚
logoutSuccessHandler 方法用于处理注销成功后的业务逻辑,例如返回一段 JSON 提示或者跳转到登录页面等
多个 HttpSecurity
如果业务比较复杂,也可以配置多个 HttpSecurity ,实现对 WebSecurityConfigurerAdapter 的多次扩展
@Configuration
public class MultiHttpSecurityConfig {
    @Bean
    PasswordEncoder passwordEncoder() {
        return NoOpPasswordEncoder.getInstance();
    }
    @Autowired
    protected void configure(AuthenticationManagerBuilder auth) throws Exception {
        auth.inMemoryAuthentication()
                .withUser("admin").password("123123").roles("ADMIN", "USER")
                .and()
                .withUser("tangsan").password("123123").roles("USER");
    }
    @Configuration
    @Order(1)
    public static class AdminSecurityConfig extends WebSecurityConfigurerAdapter{
        @Override
        protected void configure(HttpSecurity http) throws Exception {
            http.antMatcher("/admin/**").authorizeRequests()
                    .anyRequest().hasRole("ADMIN");
        }
    }
    @Configuration
    public static class OtherSecurityConfig extends WebSecurityConfigurerAdapter{
        @Override
        protected void configure(HttpSecurity http) throws Exception {
            http.authorizeRequests()
                    .anyRequest().authenticated()
                    .and()
                    .formLogin()
                    .loginProcessingUrl("/login")
                    .permitAll()
                    .and()
                    .csrf()
                    .disable();
        }
    }
}
代码解释:
配置多个 HttpSecurity 时,MultiHttpSecurityConfig 不需要继承 WebSecurityConfigurerAdapter ,在 MultiHttpSecurityConfig 中创建静态内部类继承 WebSecurityConfigurerAdapter 即可,静态内部类上添加 @Configuration 注解和 @Order注解,数字越大优先级越高,未加 @Order 注解的配置优先级最低
AdminSecurityConfig 类表示该类主要用来处理 “/admin/**” 模式的 URL ,其它 URL 将在 OtherSecurityConfig 类中处理
密码加密
1. 为什么要加密
略
2. 加密方案
Spring Security 提供了多种密码加密方案,官方推荐使用 BCryptPasswordEncoder,BCryptPasswordEncoder 使用 BCrypt 强哈希函数,开发者在使用时可以选择提供 strength 和 SecureRandom 实例。strength 越大,密码的迭代次数越多,密钥迭代次数为 2^strength 。strength 取值在 4~31 之间,默认为 10 。
3. 实践
只需要修改上文配置的 PasswordEncoder 这个 Bean 的实现即可
 @Bean
PasswordEncoder passwordEncoder() {
    return new BCryptPasswordEncoder(10);
}
参数 10 就是 strength ,即密钥的迭代次数(也可以不配置,默认为 10)。
使用以下方式获取加密后的密码。
public static void main(String[] args) {
    BCryptPasswordEncoder bCryptPasswordEncoder = new BCryptPasswordEncoder(10);
    String encode = bCryptPasswordEncoder.encode("123123");
    System.out.println(encode);
}
修改配置的内存用户的密码
auth.inMemoryAuthentication()
    .withUser("admin")
    .password("$2a$10$.hZESNfpLSDUnuqnbnVaF..Xb2KsAqwvzN7hN65Gd9K0VADuUbUzy")
    .roles("ADMIN", "USER")
    .and()
    .withUser("tangsan")
    .password("$2a$10$4LJ/xgqxSnBqyuRjoB8QJeqxmUeL2ynD7Q.r8uWtzOGs8oFMyLZn2")
    .roles("USER");
虽然 admin 和 tangsan 加密后的密码不一样,但是明文都是 123123 配置完成后,使用 admin/123123,或 tangsan/123123 就可以实现登录,一般情况下,用户信息是存储在数据库中的,因此需要用户注册时对密码进行加密处理
@Service
public class RegService {
    public int reg(String username, String password) {
        BCryptPasswordEncoder encoder = new BCryptPasswordEncoder(10);
        String encodePasswod = encoder.encode(password);
        return saveToDb(username, encodePasswod);
    }
    private int saveToDb(String username, String encodePasswod) {
        // 业务处理
        return 0;
    }
}
用户将密码从前端传来之后,通过 BCryptPasswordEncoder 实例中的 encode 方法对密码进行加密处理,加密完成后将密文存入数据库。
方法安全
上文介绍的认证和授权都是基于 URL 的,开发者也可通过注解来灵活配置方法安全,使用相关注解,首先要通过 @EnableGlobalMethodSecurity 注解开启基于注解的安全配置
@Configuration
@EnableGlobalMethodSecurity(prePostEnabled = true,securedEnabled = true)
public class MultiHttpSecurityConfig{
}
代码解释:
prePostEnabled = true 会解锁 @PreAuthorize 和 @PostAuthorize 两个注解, @PreAuthorize 注解会在方法执行前进行验证,而 @PostAuthorize 注解在方法执行后进行验证
securedEnabled = true 会解锁 @Secured 注解
开启注解安全后,创建一个 MethodService 进行测试
@Service
public class MethodService {
    @Secured("ROLE_ADMIN")
    public String admin() {
        return "hello admin";
    }
    @PreAuthorize("hasRole('ADMIN') and hasRole('DBA')")
    public String dba() {
        return "hello dba";
    }
    @PreAuthorize("hasAnyRole('ADMIN','DBA','USER')")
    public String user() {
        return "user";
    }
}
代码解释:
@Secured(“ROLE_ADMIN”) 注解表示访问该方法需要 ADMIN 角色,注意这里需要在角色前加一个前缀 ROLE_
@PreAuthorize(“hasRole(‘ADMIN’) and hasRole(‘DBA’)”) 注解表示访问该方法既需要 ADMIN 角色又需要 DBA 角色
@PreAuthorize(“hasAnyRole(‘ADMIN’,‘DBA’,‘USER’)”) 表示访问该方法需要 ADMIN 、DBA 或 USER 角色中至少一个
@PostAuthorize 和 @PreAuthorize 中都可以使用基于表达式的语法
最后在 Controller 中注入 Service 并调用 Service 中的方法进行测试
@RestController
public class HelloController {
    @Autowired
    MethodService methodService;
    @GetMapping("/hello")
    public String hello() {
        String user = methodService.user();
        return user;
    }
    @GetMapping("/hello2")
    public String hello2() {
        String admin = methodService.admin();
        return admin;
    }
    @GetMapping("/hello3")
    public String hello3() {
        String dba = methodService.dba();
        return dba;
    }
}
admin 访问 hello

admin 访问 hello2

admin 访问 hello3
The above is the detailed content of How to configure Spring Security in SpringBoot security management. For more information, please follow other related articles on the PHP Chinese website!