Why add caching to your application
Before diving into how to add caching to your application, the first question that comes to mind is why we need to use caching in our application.
Suppose there is an application containing customer data, and the user makes two requests to get the customer's data (id=100).
This is what happens when there is no cache.

#As you can see, for every request, the application goes to the database to get the data. Getting data from the database is a costly operation as it involves IO.
However, if there is a cache store in the middle where the data can be temporarily stored for a short period of time, these round trips can be saved to the database and saved at IO time.
This is what the above interaction looks like when using caching.

Implementing Caching in Spring Boot Applications
What caching support does SpringBoot provide?
SpringBoot only provides a cache abstraction that you can use to transparently and easily add cache to your Spring application.
It does not provide actual cache storage.
However, it can work with different types of cache providers such as Ehcache, Hazelcast, Redis, Caffee, etc.
SpringBoot's caching abstraction can be added to methods (using annotations)
Basically, the Spring framework will check the method before executing it Is the data already cached?
If yes, then it will get the data from cache.
Otherwise it will execute the method and cache the data
It also provides an abstraction to update or delete data from the cache.
In our current blog, we will learn how to add caching using Caffeine, a high-performance, near-optimal caching library based on Java 8.
You can specify which cache provider to use in the application.yaml file by setting the spring.cache.type property.
However, if no attribute is provided, Spring will automatically detect the cache provider based on the added library.
Add Build Dependencies
Now assuming you have a basic Spring boot application up and running, let’s add the cache dependency.
Open the build.gradle file and add the following dependencies to enable Spring Boot’s cache
compile('org.springframework.boot:spring-boot-starter-cache')
Next we will add a dependency on Caffeine
compile group: 'com.github.ben-manes.caffeine', name: 'caffeine', version: '2.8.5'
Cache Configuration
Now we need to enable caching in the Spring Boot application.
To do this, we need to create a configuration class and provide the annotation @EnableCaching.
@Configuration
@EnableCaching
public class CacheConfig {

}
Right now this class is an empty class, but we can add more configuration to it if needed.
Now that we have enabled the cache, let’s provide the cache name and configuration of the cache properties such as cache size, cache expiration time, etc.
The easiest way to do this is in application.yaml Add configuration in
spring:
  cache:
    cache-names: customers, users, roles
    caffeine:
      spec: maximumSize=500, expireAfterAccess=60s
The above configuration performs the following operations
Limits the available cache names to customers, users, and roles. Set the maximum cache size to 500.
When the number of objects in the cache reaches this limit, the objects will be removed from the cache according to the cache eviction policy. Set the cache expiration time to 1 minute.
This means that items will be removed from the cache 1 minute after being added to the cache.
There is another way to configure the cache instead of configuring the cache in the application.yaml file.
You can add and provide a CacheManager Bean in the cache configuration class, which can complete the exact same job as the above configuration in application.yaml
@Bean
public CacheManager cacheManager() {
    Caffeine<Object, Object> caffeineCacheBuilder =
        Caffeine.newBuilder()
            .maximumSize(500)
            .expireAfterAccess(
                    1, TimeUnit.MINUTES);

    CaffeineCacheManager cacheManager =
            new CaffeineCacheManager(
            "customers", "roles", "users");
    cacheManager.setCaffeine(caffeineCacheBuilder);
    return cacheManager;
}
In our code examples, we will use Java configuration.
We can do more things in Java, such as configuring RemovalListener to be executed when an item is removed from the cache, or enabling cache statistics logging, etc. Caching method results
In the sample Spring boot application we are using, we already have the following API GET
/API/v1/customer/{id} Retrieve customer records.
 We will add caching to the
method of the CustomerService class. To do this, we only need to do two things
1. Add the comment
@CacheConfig(cacheNames="customers") to CustomerService Classes Providing this option will ensure that all cacheable methods of
will use the cache name "customers" <p>2. 向方法 <code>Optional getCustomerById(Long customerId) 添加注释 @Cacheable
@Service
@Log4j2
@CacheConfig(cacheNames = "customers")
public class CustomerService {

    @Autowired
    private CustomerRepository customerRepository;

    @Cacheable
    public Optional<Customer> getCustomerById(Long customerId) {
        log.info("Fetching customer by id: {}", customerId);
        return customerRepository.findById(customerId);
    }
}
另外,在方法 getCustomerById() 中添加一个 LOGGER 语句,以便我们知道服务方法是否得到执行,或者值是否从缓存返回。
代码如下:log.info("Fetching customer by id: {}", customerId);测试缓存是否正常工作
这就是缓存工作所需的全部内容。现在是测试缓存的时候了。
启动您的应用程序,并点击客户获取url
http://localhost:8080/api/v1/customer/
在第一次API调用之后,您将在日志中看到以下行—“ Fetching customer by id ”。
但是,如果再次点击API,您将不会在日志中看到任何内容。这意味着该方法没有得到执行,并且从缓存返回客户记录。
现在等待一分钟(因为缓存过期时间设置为1分钟)。
一分钟后再次点击GETAPI,您将看到下面的语句再次被记录——“通过id获取客户”。
这意味着客户记录在1分钟后从缓存中删除,必须再次从数据库中获取。
为什么缓存有时会很危险
缓存更新/失效
通常我们缓存 GET 调用,以提高性能。
但我们需要非常小心的是缓存对象的更新/删除。
@CachePut
@cacheexecute
如果未将 @CachePut/@cacheexecute 放入更新/删除方法中,GET调用中缓存返回的对象将与数据库中存储的对象不同。考虑下面的示例场景。

如您所见,第二个请求已将人名更新为“ John Smith ”。但由于它没有更新缓存,因此从此处开始的所有请求都将从缓存中获取过时的个人记录(“ John Doe ”),直到该项在缓存中被删除/更新。
缓存复制
大多数现代web应用程序通常有多个应用程序节点,并且在大多数情况下都有一个负载平衡器,可以将用户请求重定向到一个可用的应用程序节点。

这种类型的部署为应用程序提供了可伸缩性,任何用户请求都可以由任何一个可用的应用程序节点提供服务。
在这些分布式环境(具有多个应用服务器节点)中,缓存可以通过两种方式实现
应用服务器中的嵌入式缓存(正如我们现在看到的)
远程缓存服务器
嵌入式缓存
嵌入式缓存驻留在应用程序服务器中,它随应用程序服务器启动/停止。由于每台服务器都有自己的缓存副本,因此对其缓存的任何更改/更新都不会自动反映在其他应用程序服务器的缓存中。
考虑具有嵌入式缓存的多节点应用服务器的下面场景,其中用户可以根据应用服务器为其请求服务而得到不同的结果。

正如您在上面的示例中所看到的,更新请求更新了 Application Node2 的数据库和嵌入式缓存。
但是, Application Node1 的嵌入式缓存未更新,并且包含过时数据。因此, Application Node1 的任何请求都将继续服务于旧数据。
要解决这个问题,您需要实现 CACHE REPLICATION —其中任何一个缓存中的任何更新都会自动复制到其他缓存(下图中显示为蓝色虚线)

远程缓存服务器
解决上述问题的另一种方法是使用远程缓存服务器(如下所示)。

然而,这种方法的最大缺点是增加了响应时间——这是由于从远程缓存服务器获取数据时的网络延迟(与内存缓存相比)
缓存自定义
到目前为止,我们看到的缓存示例是向应用程序添加基本缓存所需的唯一代码。
然而,现实世界的场景可能不是那么简单,可能需要进行一些定制。在本节中,我们将看到几个这样的例子
缓存密钥
我们知道缓存是密钥、值对的存储。
示例1:默认缓存键–具有单参数的方法
最简单的缓存键是当方法只有一个参数,并且该参数成为缓存键时。在下面的示例中, Long customerId 是缓存键

示例2:默认缓存键–具有多个参数的方法
在下面的示例中,缓存键是所有三个参数的SimpleKey– countryId 、 regionId 、 personId 。

示例3:自定义缓存密钥
在下面的示例中,我们将此人的 emailAddress 指定为缓存的密钥

示例4:使用 KeyGenerator 的自定义缓存密钥
让我们看看下面的示例–如果要缓存当前登录用户的所有角色,该怎么办。

该方法中没有提供任何参数,该方法在内部获取当前登录用户并返回其角色。
为了实现这个需求,我们需要创建一个如下所示的自定义密钥生成器

然后我们可以在我们的方法中使用这个键生成器,如下所示。

条件缓存
在某些用例中,我们只希望在满足某些条件的情况下缓存结果
示例1(支持 java.util.Optional –仅当存在时才缓存)
仅当结果中存在 person 对象时,才缓存 person 对象。
@Cacheable( value = "persons", unless = "#result?.id")
public Optional<Person> getPerson(Long personId)
示例2(如果需要,by-pass缓存)
@Cacheable(value = "persons", condition="#fetchFromCache")
public Optional<Person> getPerson(long personId, boolean fetchFromCache)
仅当方法参数“ fetchFromCache ”为true时,才从缓存中获取人员。通过这种方式,方法的调用方有时可以决定绕过缓存并直接从数据库获取值。
示例3(基于对象属性的条件计算)
仅当价格低于500且产品有库存时,才缓存产品。
@Cacheable(
   value="products",
   condition="#product.price<500",
   unless="#result.outOfStock")
public Product findProduct(Product product)
@CachePut
我们已经看到 @Cacheable 用于将项目放入缓存。
但是,如果该对象被更新,并且我们想要更新缓存,该怎么办?
我们已经在前面的一节中看到,不更新缓存post任何更新操作都可能导致从缓存返回错误的结果。
@CachePut(key = "#person.id")
public Person update(Person person)
但是如果 @Cacheable 和 @CachePut 都将一个项目放入缓存,它们之间有什么区别?
主要区别在于实际的方法执行
@Cacheable
@CachePut
缓存失效
缓存失效与将对象放入缓存一样重要。
当我们想要从缓存中删除一个或多个对象时,有很多场景。让我们看一些例子。
例1
假设我们有一个用于批量导入个人记录的API。
我们希望在调用此方法之前,应该清除整个 person 缓存(因为大多数 person 记录可能会在导入时更新,而缓存可能会过时)。我们可以这样做如下
@CacheEvict(
   value = "persons",
   allEntries = true,
   beforeInvocation = true)
public void importPersons()
例2
我们有一个Delete Person API,我们希望它在删除时也能从缓存中删除 Person 记录。
@CacheEvict(
   value = "persons",
   key = "#person.emailAddress")
public void deletePerson(Person person)
默认情况下 @CacheEvict 在方法调用后运行。
The above is the detailed content of How SpringBoot uses Caffeine to implement caching. For more information, please follow other related articles on the PHP Chinese website!
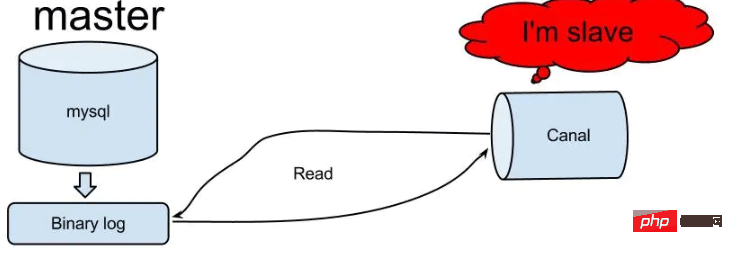 怎么使用SpringBoot+Canal实现数据库实时监控May 10, 2023 pm 06:25 PM
Canal工作原理Canal模拟MySQLslave的交互协议,伪装自己为MySQLslave,向MySQLmaster发送dump协议MySQLmaster收到dump请求,开始推送binarylog给slave(也就是Canal)Canal解析binarylog对象(原始为byte流)MySQL打开binlog模式在MySQL配置文件my.cnf设置如下信息:[mysqld]#打开binloglog-bin=mysql-bin#选择ROW(行)模式binlog-format=ROW#配置My
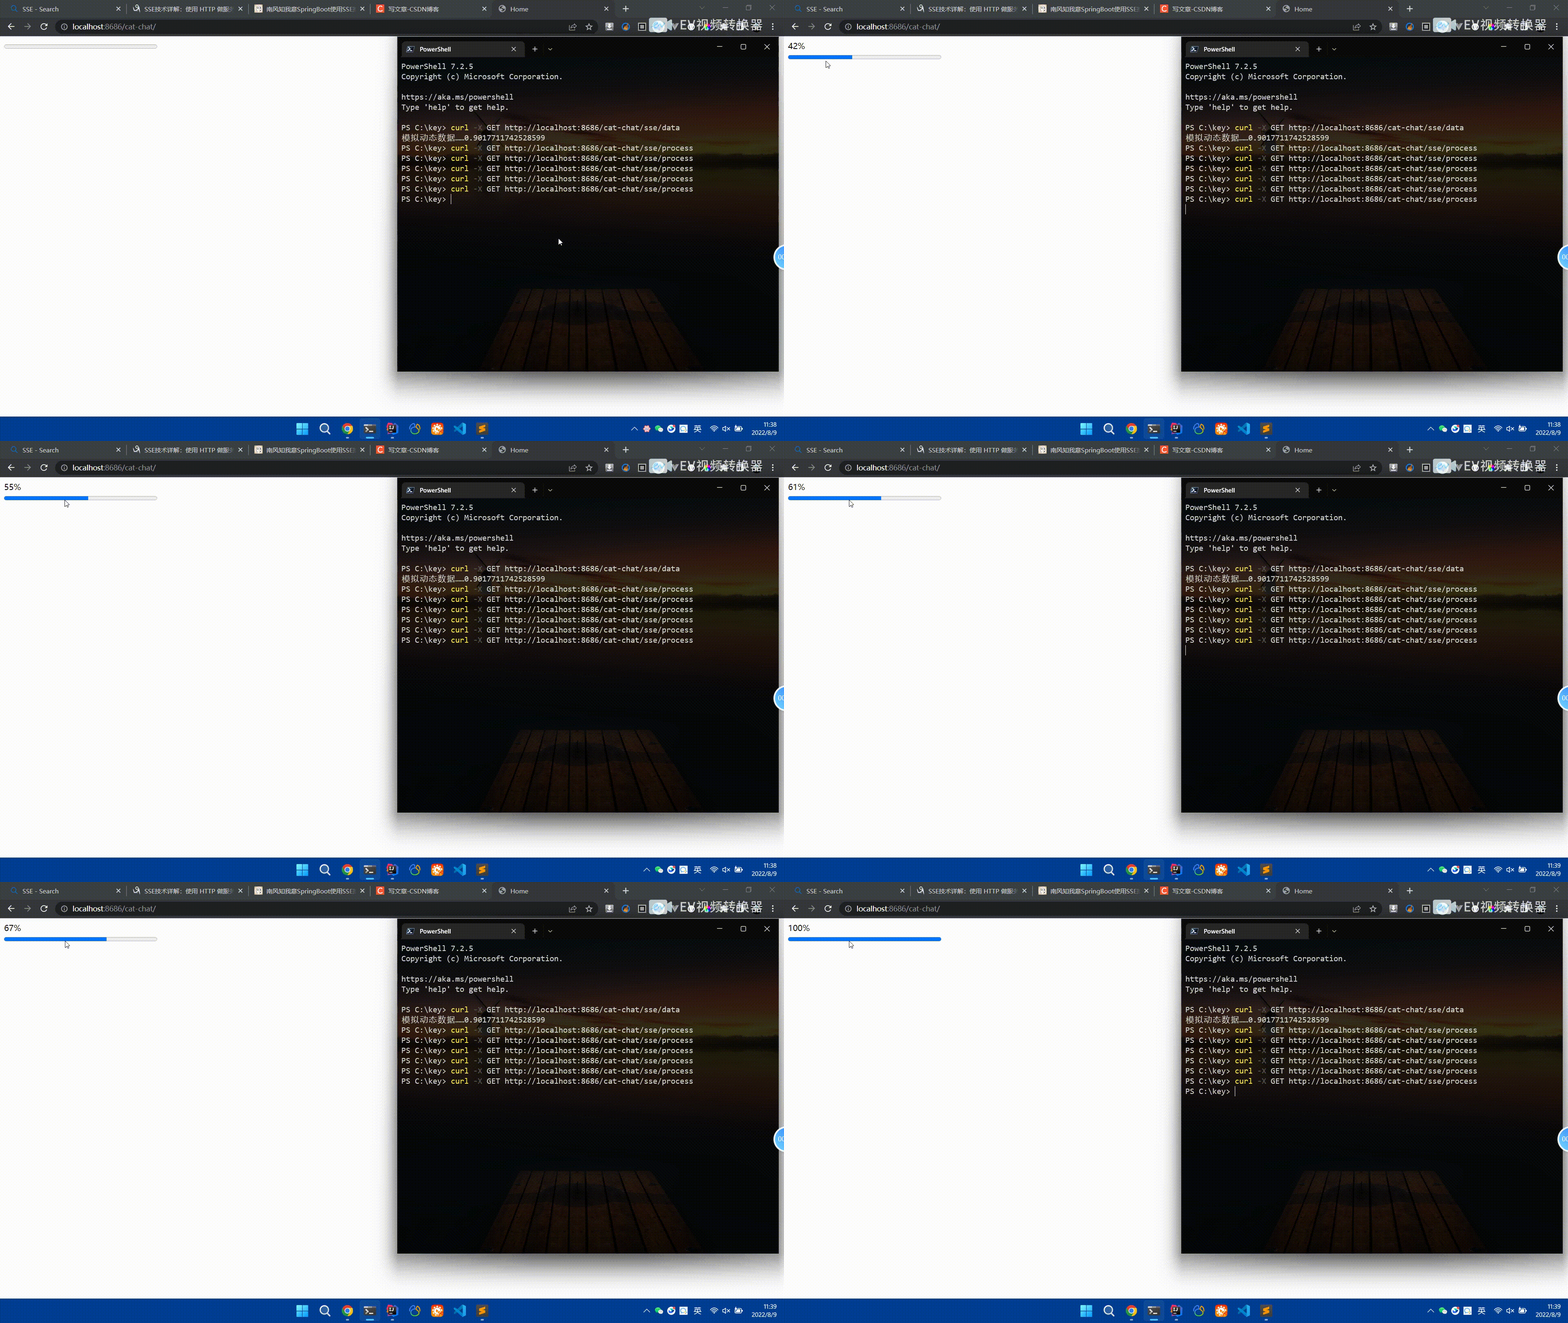 Spring Boot怎么使用SSE方式向前端推送数据May 10, 2023 pm 05:31 PM
前言SSE简单的来说就是服务器主动向前端推送数据的一种技术,它是单向的,也就是说前端是不能向服务器发送数据的。SSE适用于消息推送,监控等只需要服务器推送数据的场景中,下面是使用SpringBoot来实现一个简单的模拟向前端推动进度数据,前端页面接受后展示进度条。服务端在SpringBoot中使用时需要注意,最好使用SpringWeb提供的SseEmitter这个类来进行操作,我在刚开始时使用网上说的将Content-Type设置为text-stream这种方式发现每次前端每次都会重新创建接。最
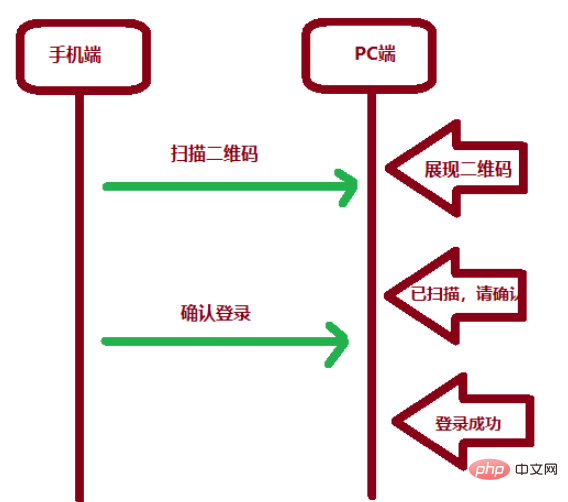 SpringBoot怎么实现二维码扫码登录May 10, 2023 pm 08:25 PM
一、手机扫二维码登录的原理二维码扫码登录是一种基于OAuth3.0协议的授权登录方式。在这种方式下,应用程序不需要获取用户的用户名和密码,只需要获取用户的授权即可。二维码扫码登录主要有以下几个步骤:应用程序生成一个二维码,并将该二维码展示给用户。用户使用扫码工具扫描该二维码,并在授权页面中授权。用户授权后,应用程序会获取一个授权码。应用程序使用该授权码向授权服务器请求访问令牌。授权服务器返回一个访问令牌给应用程序。应用程序使用该访问令牌访问资源服务器。通过以上步骤,二维码扫码登录可以实现用户的快
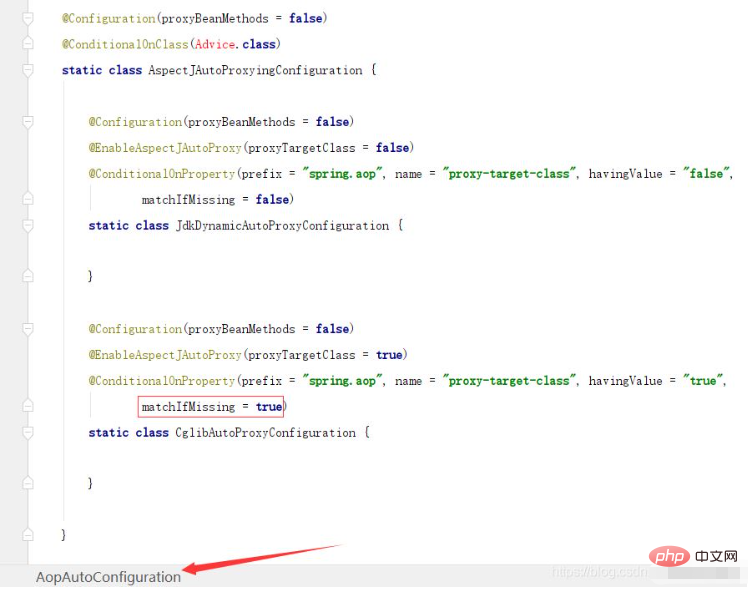 SpringBoot/Spring AOP默认动态代理方式是什么May 10, 2023 pm 03:52 PM
1.springboot2.x及以上版本在SpringBoot2.xAOP中会默认使用Cglib来实现,但是Spring5中默认还是使用jdk动态代理。SpringAOP默认使用JDK动态代理,如果对象没有实现接口,则使用CGLIB代理。当然,也可以强制使用CGLIB代理。在SpringBoot中,通过AopAutoConfiguration来自动装配AOP.2.Springboot1.xSpringboot1.xAOP默认还是使用JDK动态代理的3.SpringBoot2.x为何默认使用Cgl
 spring boot怎么对敏感信息进行加解密May 10, 2023 pm 02:46 PM
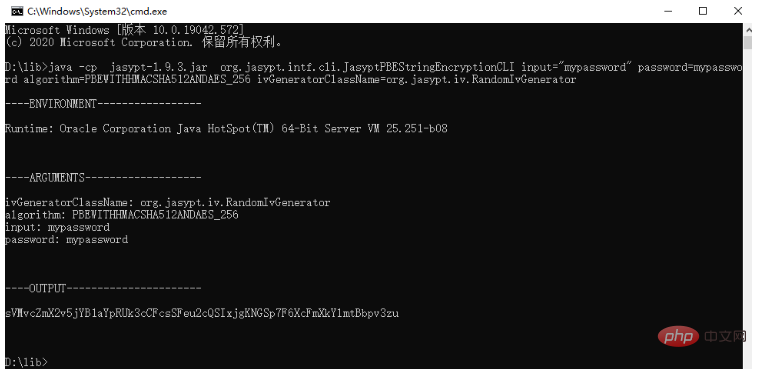
我们使用jasypt最新版本对敏感信息进行加解密。1.在项目pom文件中加入如下依赖:com.github.ulisesbocchiojasypt-spring-boot-starter3.0.32.创建加解密公用类:packagecom.myproject.common.utils;importorg.jasypt.encryption.pbe.PooledPBEStringEncryptor;importorg.jasypt.encryption.pbe.config.SimpleStrin
 使用Java SpringBoot集成POI实现Word文档导出Apr 21, 2023 pm 12:19 PM
知识准备需要理解ApachePOI遵循的标准(OfficeOpenXML(OOXML)标准和微软的OLE2复合文档格式(OLE2)),这将对应着API的依赖包。什么是POIApachePOI是用Java编写的免费开源的跨平台的JavaAPI,ApachePOI提供API给Java程序对MicrosoftOffice格式档案读和写的功能。POI为“PoorObfuscationImplementation”的首字母缩写,意为“简洁版的模糊实现”。ApachePOI是创建和维护操作各种符合Offic
 springboot怎么整合shiro实现多验证登录功能May 10, 2023 pm 04:19 PM
1.首先新建一个shiroConfigshiro的配置类,代码如下:@ConfigurationpublicclassSpringShiroConfig{/***@paramrealms这儿使用接口集合是为了实现多验证登录时使用的*@return*/@BeanpublicSecurityManagersecurityManager(Collectionrealms){DefaultWebSecurityManagersManager=newDefaultWebSecurityManager();
 SpringBoot项目打包发布到外部tomcat遇到的问题怎么解决May 10, 2023 pm 05:49 PM
先说遇到问题的情景:初次尝试使用springboot框架写了个小web项目,在IntellijIDEA中能正常启动运行。使用maven运行install,生成war包,发布到本机的tomcat下,出现异常,主要的异常信息是.......LifeCycleException。经各种搜索,找到答案。springboot因为内嵌tomcat容器,所以可以通过打包为jar包的方法将项目发布,但是如何将springboot项目打包成可发布到tomcat中的war包项目呢?1.既然需要打包成war包项目,首


Hot AI Tools

Undresser.AI Undress
AI-powered app for creating realistic nude photos

AI Clothes Remover
Online AI tool for removing clothes from photos.

Undress AI Tool
Undress images for free

Clothoff.io
AI clothes remover

AI Hentai Generator
Generate AI Hentai for free.

Hot Article

Hot Tools

MantisBT
Mantis is an easy-to-deploy web-based defect tracking tool designed to aid in product defect tracking. It requires PHP, MySQL and a web server. Check out our demo and hosting services.

Atom editor mac version download
The most popular open source editor

Dreamweaver Mac version
Visual web development tools

Notepad++7.3.1
Easy-to-use and free code editor

SublimeText3 English version
Recommended: Win version, supports code prompts!


