Home >Web Front-end >Vue.js >How to use the built-in component Teleport in Vue3
How to use the built-in component Teleport in Vue3
- PHPzforward
- 2023-05-12 10:07:052374browse
1. Basic concepts
1.1 Simple understanding
There are built-in components in both Vue2 and Vue3, such as component built-in Components, transition built-in components, etc. Built-in components are global components that are officially encapsulated for us, and we can use them directly.
The Teleport built-in component has been added to Vue3. Let’s first take a look at how the official documentation explains it.
is a built-in component that can "transmit" a part of the template inside a component to a location outside the component's DOM structure.
Popular explanation:
teleport is a built-in component. We all know that HTML has a hierarchical relationship, and the components in Vue3 also have a hierarchical relationship.
If a subcomponent is referenced in the parent component, then the subcomponent HTML will definitely be included by the parent component HTML after rendering into the page.
But if the subcomponent is placed in the teleport component, then we can specify that the subcomponent is rendered under other DOM nodes other than the parent component, such as body or other DOM, etc. This is somewhat similar to "teleportation".
1.2 Typical case
When we use Vue’s UI component library, we often use the modal box component. For example: use the modal box of Element-plus.
<template>
<el-button @click="dialogVisible = true">打开弹窗</el-button>
<el-dialog
v-model="dialogVisible"
append-to-body
title="我是弹窗"
width="30%">
</el-dialog>
</template>
<script>
import { ref } from 'vue';
export default {
setup(){
const dialogVisible = ref(false);
return {
dialogVisible
}
}
}
</script>In the above code, the Element-plus pop-up component is referenced in the App.vue component, and an append-to-body attribute is added.

You can see that although the pop-up component is written in the App.vue component, the rendered result is that the pop-up component belongs to the body node. This is because the use After removing the append-to-body attribute of the pop-up window in Element-plus, let’s remove this attribute and see what the result is:

You can see that the pop-up window component behaves well again Went under the App.vue component.
Why do this?
It’s very simple. If there are a lot of pop-up windows, how to manage their z-index, that is, the hierarchical relationship when the windows pop up at the same time. If each pop-up window is in its own parent component, then we have no control over it. It is necessary to unscrew them all and put them under the same parent element, so that we can easily set the hierarchical relationship.
What does this have to do with the teleport component? It has a lot to do with it. The append-to-body attribute effect of the pop-up window above is done for us by Element. What if we want to achieve such an effect ourselves? We can use the built-in component teleport.
2. Basic usage
2.1 Transmitting DOM nodes
<template>
  <div class="app">
    App组件
    <Teleport to="body">
      <div>我是被 teleport 包裹的元素</div>
    </Teleport>
  </div>
</template>
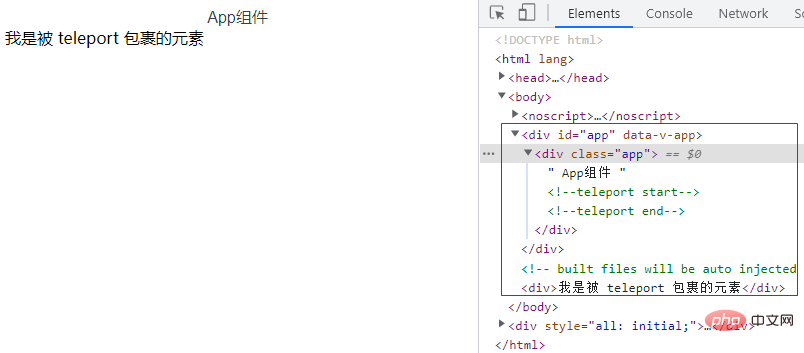
As can be seen from the above figure, although the elements of the Teleport package belong app.vue component, but after rendering it is rendered under the body dom element.
This is all thanks to Teleport's transmission function. Its usage is very simple. The syntax code is as follows:
where to is the destination of "transmission", that is, where the contents of the package need to be transmitted. go.
<Teleport to="body">
</Teleport>

to 允许接收值:
期望接收一个 CSS 选择器字符串或者一个真实的 DOM 节点。
提示:
<Teleport> 挂载时,传送的 to 目标必须已经存在于 DOM 中。理想情况下,这应该是整个 Vue 应用 DOM 树外部的一个元素。
如果目标元素也是由 Vue 渲染的,你需要确保在挂载 <Teleport> 之前先挂载该元素。
2.2 Teleport component
only changes the rendered DOM structure, it will not affect the logical relationship between components.
In other words, if contains a component, then the component always maintains a logical parent-child relationship with the component that uses . Incoming props and triggered events will also work as usual.
This also means that injection from the parent component will also work as expected, and the child component will be nested below the parent component in Vue Devtools, rather than being placed where the actual content is moved to.
// 父组件
<template>
<div class="app">
<Teleport to="body">
<div>被 teleport 包裹的组件-- {{count}}</div>
<ChildComponent v-model="count"/>
</Teleport>
</div>
</template>
<script>
import { ref } from 'vue';
import ChildComponent from '@/components/childComponent';
export default {
components:{
ChildComponent
},
setup(){
const count = ref(100);
return {
count,
}
}
}
</script>// 子组件
<template>
子组件:<input type="text" v-model.number="inputVal" @input="userInput">
</template>
<script>
import { ref, watch } from 'vue';
export default {
props:{
modelValue:{
default:0,
}
},
setup(props,{emit}) {
const inputVal = ref(null);
const userInput = () => {
emit('update:modelValue', inputVal.value)
};
watch(props,(newVal,oldVal) => {
inputVal.value = props.modelValue;
},{immediate:true})
return {
userInput,
inputVal,
}
},
}
</script>
2.3 Disabling the transmission function
In some scenarios, it may be necessary to disable depending on the situation. We can pass the
<template>
<div class="app">
app组件
<Teleport to="body" :disabled="true">
<p>我是被 teleport 包裹的元素</p>
<p>{{ message }}</p>
</Teleport>
</div>
</template>
<script>
import { ref } from 'vue';
export default {
setup(){
const message = ref('我是在 App 组件内部');
return {
message,
}
}
}
</script>

2.4 Multiple elements are sent to one node
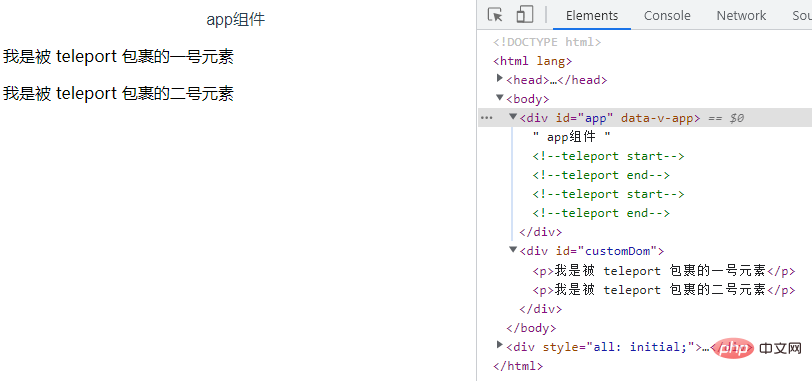
Multiple components can mount their content on the same target element , and the order is simply appending them in sequence, and the ones mounted later will be placed further behind the target element.
<!-- index.html -->
<body>
  <div id="app"></div>
  <div id="customDom"></div>
</body>
rrree

The above is the detailed content of How to use the built-in component Teleport in Vue3. For more information, please follow other related articles on the PHP Chinese website!
Related articles
See more- About vue using validator: VeeValidate3
- What are the differences between computed and method in Vue?
- Introduction to the method of turning off Eslint verification in the vue project
- Introduction to several methods of defining component templates in Vue.js
- Four places to implement AJAX in Vue applications

