
Home >Java >javaTutorial >How does Java SpringBoot integrate JSP and MyBatis?
How does Java SpringBoot integrate JSP and MyBatis?

- 王林forward
- 2023-05-11 17:46:06984browse
Getting started with Spring Boot starter
To run a traditional Spring project, you not only need to import various dependencies, but also configure various XML configuration files, which is very cumbersome, but after the Spring Boot project is created, , it can be run directly without writing any code or making any configuration. This is all due to Spring Boot's starter mechanism
Spring Boot extracts various scenarios in daily enterprise application development and makes it Each starter integrates various dependencies that may be used in this scenario. Users only need to introduce the starter dependencies in Maven, and SpringBoot can automatically scan the information to be loaded and start the corresponding default configuration. . The starter provides a large amount of automatic configuration, freeing users from the hassle of dealing with various dependencies and configurations. All these starters follow the conventional default configuration and allow users to adjust these configurations, that is, following the principle of "Convention is greater than configuration"
Not all starters are powered by Spring Boot is officially provided, and some starters are provided by third-party technology vendors, such as druid-spring-boot-starter and mybatis-spring-boot-starter, etc. Of course, there are also individual third-party technologies. Spring Boot officially does not provide a starter, and third-party technology vendors do not provide a starter either.
Take spring-boot-starter-web as an example, it can provide what is needed for Web development scenarios. Almost all dependencies, so when using Spring Boot to develop a Web project, you only need to introduce the Starter, without additionally importing the Web server and other Web dependencies
    <!--SpringBoot父项目依赖管理-->
    <parent>
        <groupId>org.springframework.boot</groupId>
        <artifactId>spring-boot-starter-parent</artifactId>
        <version>2.5.13</version>
        <relativePath/>
    </parent>

    <dependencies>
        <!--导入 spring-boot-starter-web-->
        <dependency>
            <groupId>org.springframework.boot</groupId>
            <artifactId>spring-boot-starter-web</artifactId>
        </dependency>
        ...
    </dependencies>
</project>
You may find a problem, that is, in In the above pom.xml configuration, when the dependency spring-boot-starter-web is introduced, its version is not specified, but in the dependency tree, we see that all dependencies have version information, so these version information Where is it controlled?
In fact, these version information are uniformly controlled by spring-boot-starter-parent (version arbitration center).
spring-boot-starter-parent
spring-boot-starter-parent is the parent dependency of all Spring Boot projects, it is called the version of Spring Boot The arbitration center can uniformly manage some common dependencies within the project.
<!--SpringBoot父项目依赖管理-->
<parent>
    <groupId>org.springframework.boot</groupId>
    <artifactId>spring-boot-starter-parent</artifactId>
    <version>2.4.5</version>
</parent>
Spring Boot projects can obtain some reasonable default configurations by inheriting spring-boot-starter-parent, which mainly provides the following features:
Default JDK version (Java 8)
Default character set (UTF-8)
Dependency management function
Resource filtering
Default plug-in configuration
Identifies application.properties and application.yml type configuration files
SpringBoot basic settings
1.1 SpringBoot settings port number
server:
  port: 8989 #配置端口
1.2 SpringBoot settings project name
server:
  servlet:
    context-path: /springboot   #配置项目的虚拟路径(根路径) 项目名使用/开头
1.3 Split of SpringBoot configuration files
spring:
  profiles:
    active: dev  #开发环境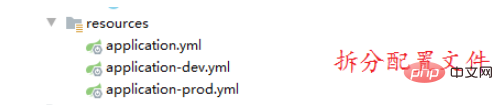
1.4 SpringBoot startup log
# 显示sql
logging:
  level:
    cn.kgc.springboot.mapper: debug  #开启日志
1.5 SpringBoot implements hot deployment
In the process of opening a web project, we usually need to re-open the code every time we modify it. Start the project and implement redeployment. But as projects become larger and larger, each start is a time-consuming matter. Therefore, hot deployment is a very innovative technology. With hot deployment, we can greatly improve our development efficiency
spring-boot-devtools implements hot deployment
1.Introduce dependencies
<dependency>
     <groupId>org.springframework.boot</groupId>
     <artifactId>spring-boot-devtools</artifactId>
</dependency>
2.Configure maven plug-in
<build>
    <plugins>
        <plugin>
            <groupId>org.springframework.boot</groupId>
            <artifactId>spring-boot-maven-plugin</artifactId>
            <configuration>
                <fork>true</fork> <!-- 如果devtools不生效  请设置该属性 -->
            </configuration>
        </plugin>
    </plugins>
</build>
3.Configure application.yml file
devtools:
  restart:
    enabled: true #开启热部署
4.Modify idea settings
File-Settings-Compiler Check Build Project automatically
5. Set Registry
ctrl shift alt /, select Registry, check Compiler autoMake allow when app running
1.6 SpringBoot enables paging query
1.Introduce dependencies:
<dependency>
     <groupId>com.github.pagehelper</groupId>
     <artifactId>pagehelper-spring-boot-starter</artifactId>
     <version>1.2.12</version>
</dependency>

----------------------------------------------
 <dependency>
     <groupId>com.github.pagehelper</groupId>
     <artifactId>pagehelper-spring-boot-starter</artifactId>
     <version>1.2.10</version>
</dependency>
2.Configure the application.yml file (you can use the default without configuring)
# pageHelper分页配置
pagehelper:
  helper-dialect: mysql  #数据库类型
  reasonable: true   #分页合理化 page<1 查询第一页 page >pageNumber 查询最后一页
  support-methods-arguments: true  # 支持mapper接口传递参数开启分页
  params: count=countSql  #用于从对象中根据属性名取值
3. Write the controller, business layer, and persistence layer for testing
@Override
public PageInfo<User> getPage(int pageNum, int pageSize) {

    PageHelper.startPage(pageNum, pageSize);

    List<User> userList = userMapper.selectList();

    PageInfo<User> pageInfo = new PageInfo<>(userList);

    return pageInfo;
}
springBoot Object Management
-
Management Object
How to manage objects in spring:
1. Use xml configuration files and use bean tags in the files to set object management
<bean id="" class="xxx.xxx.xxx"></bean>
2. Use the annotation @Component @Controller @Service @Repository
How springboot manages objects:
1. Use configuration mode to create objects
Springboot supports using the @Configuration annotation to be added to the configuration class. As a configuration class, this class is equivalent to the spring configuration file. This annotation can only be used on the class. Use the @Bean annotation on the method in the configuration class, which is equivalent to the bean tag
@Configuration
public class MyConfiguration{
    @Bean
    public User getUser(){
        return new User();
    }
    @Bean
    public Student getStudent(){
        return new Student();
    }
}
in the spring configuration file. 2. Use the original spring annotation @Component @Controller @Service @ Repository
-
Attribute injection
spring original injection method
1.set method
2.constructor
3.Automatic injection
name: tom
age: 30
price: 23.5
sex: true
birth: 2021/11/28 12:12:12
array: 12,13,15,17
list: 李四,lisi,tom
map: "{'aa':30,'bb':'lisi'}" # 注入map使用json格式  取值的个数#{${map}}
对象的注入
object:
  name: lisi
  age: 20
  birth: 2021/11/24
@Controller
@RequestMapping("/inject2")
@ConfigurationProperties("object")
public class InjectController2 {

    private String name;
    private Integer age;
    private Date birth;

   	public void setName(String name) {
        this.name = name;
    }
    public void setAge(Integer age) {
        this.age = age;
    }
    public void setBirth(Date birth) {
        this.birth = birth;
    }
    @RequestMapping("/inject")
    @ResponseBody
    public String inject(){
        System.out.println(name);
        System.out.println(age);
        System.out.println(birth);
        return  "ok";
    }
}
注意:添加一下依赖,可以再写yaml文件时提示,消除红色的警告提示。
<dependency>
    <groupId>org.springframework.boot</groupId>
    <artifactId>spring-boot-configuration-processor</artifactId>
    <optional>true</optional>
</dependency>
springBoot整合JSP
引入依赖
<!--        标准标签库-->
<dependency>
    <groupId>jstl</groupId>
    <artifactId>jstl</artifactId>
    <version>1.2</version>
</dependency>
<!--        让springboot内置的tomcat具有解析jsp的能力-->
<dependency>
    <groupId>org.apache.tomcat.embed</groupId>
    <artifactId>tomcat-embed-jasper</artifactId>
</dependency>
配置视图解析器
spring:
  mvc:
    view:
      prefix: /
      suffix: .jsp
设置不重启项目 刷新jsp页面
server:
  servlet:
    jsp:
      init-parameters:
        development: true  # 修改jsp页面无需重新启动项目
集成后无法访问jsp页面解决方案
1.添加插件
<build>
    <resources>
        <!--注册webapp目录为资源目录-->
        <resource>
            <directory>src/main/webapp</directory>
            <targetPath>META-INF/resources</targetPath>
            <includes>
                <include>**/*.*</include>
            </includes>
        </resource>
    </resources>
    <plugins>
        <plugin>
            <groupId>org.springframework.boot</groupId>
            <artifactId>spring-boot-maven-plugin</artifactId>
        </plugin>
    </plugins>
</build>
2.设置工作目录
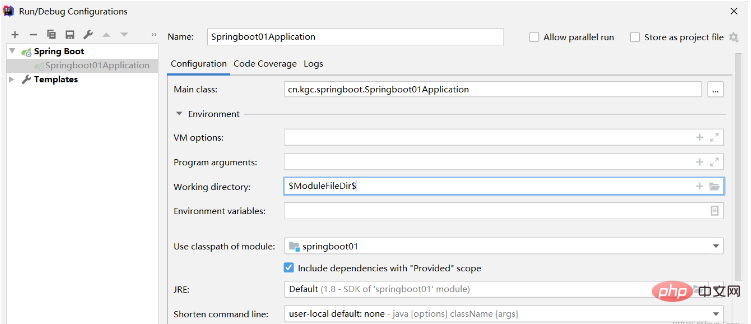
3.插件启动
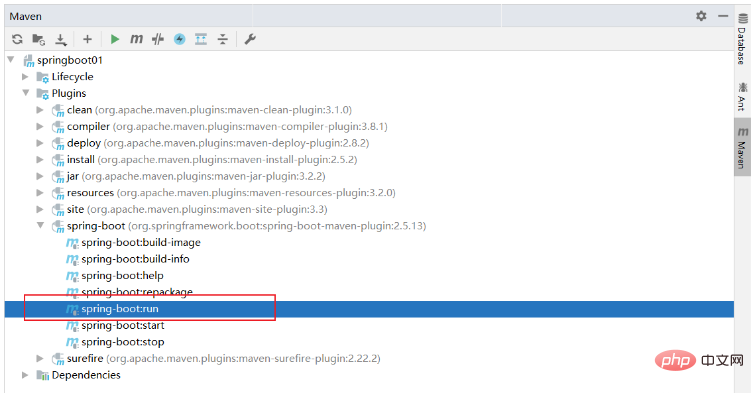
SpringBoot整合MyBatis
引入依赖
<dependency>
    <groupId>mysql</groupId>
    <artifactId>mysql-connector-java</artifactId>
    <version>5.1.47</version>
</dependency>
<dependency>
    <groupId>org.mybatis.spring.boot</groupId>
    <artifactId>mybatis-spring-boot-starter</artifactId>
    <version>2.1.3</version>
</dependency>
<dependency>
    <groupId>com.alibaba</groupId>
    <artifactId>druid</artifactId>
    <version>1.1.12</version>
</dependency>
编写配置文件
spring:
  datasource:
    type: com.alibaba.druid.pool.DruidDataSource
    driver-class-name: com.mysql.jdbc.Driver
    username: root
    password: root
    url: jdbc:mysql://localhost:3306/mybatis?serverTimezone=UTC&characterEncoding=utf-8
mybatis配置
mybatis:
  mapper-locations: classpath:mapper/*.xml  #设置mapper文件的位置
  type-aliases-package: cn.kgc.springboot.entity # 起别名
  configuration:
    map-underscore-to-camel-case: true #开启驼峰命名
设置dao接口的扫描
1.在入口类上使用注解,完成扫描
@SpringBootApplication
@MapperScan("cn.kgc.springboot.dao") //扫描dao接口所在的包 同时生成代理对象 注入spring容器
public class Springday02Application {
    public static void main(String[] args) {
        SpringApplication.run(Springday02Application.class, args);
    }
}
The above is the detailed content of How does Java SpringBoot integrate JSP and MyBatis?. For more information, please follow other related articles on the PHP Chinese website!