


1. Overview
This article mainly records how to automatically deploy the SpringBoot project jar package through Gitlab CI/CD.
2. Early preparation
Prepare three CentOS7 servers and deploy the following services respectively:
| Serial number | System | IP | Service |
|---|---|---|---|
| 1 | CentOS7 | 192.168.56.10 | Gitlab |
| 2 | CentOS7 | 192.168.56.11 | Runner (install Docker) |
| 3 | CentOS7 | 192.168.56.12 | SpringBoot project jar package (install jdk, maven, etc.) |
The above services can also use only one CentOS7 and deploy all programs on the same machine, but it is more recommended to deploy them separately;
3. Overall architecture diagram

Description:
Gitlab Server is used to deploy Gitlab remote warehouse. It has high CPU and memory requirements. It is recommended to have a 4-core CPU and more than 4GB of memory;
Runner Server is used to deploy and execute the stage defined in the .gitlab-ci.yml file; you need to have permission to access the Gitlab warehouse, you can download the code and implement it through registration (gitlab-runner register) ;
Your Laptop Server user deploys your application, here is the SpringBoot jar package, you need to install JDK and Maven in advance and configure the environment variables;
4. Environment setup
1. Environment preparation (optional)
Execute the following commands on three servers:
yum -y upgrade
yum -y install wget
yum -y install vim
2. Gitlab installation
Reference address:
https://about.gitlab.com/install/#centos-7
https://www.xieniao.com/article/188877.htm
(1) Install and configure necessary dependencies
sudo yum install -y curl policycoreutils-python openssh-server
sudo systemctl enable sshd
sudo systemctl start sshd

sudo firewall-cmd --permanent --add-service=http
sudo firewall-cmd --permanent --add-service=https
sudo systemctl reload firewalld
(2) Install mail service
sudo yum install postfix
sudo systemctl enable postfix
sudo systemctl start postfix
(3) Add gitlab mirror
wget https://mirrors.tuna.tsinghua.edu.cn/gitlab-ce/yum/el7/gitlab-ce-13.4.0-ce.0.el7.x86_64.rpm
(4) Install gitlab installation command
rpm -i gitlab-ce-13.4.0-ce.0.el7.x86_64.rpm --nodeps --force
Picture after successful installation:

(5) Modify the gitlab configuration file to specify the server IP and custom port
vim /etc/gitlab/gitlab.rb
(6) Reset and start GitLab
gitlab-ctl reconfigure
gitlab-ctl restart
The prompt "ok: run:" indicates successful startup
(7) Visit the GitLab page
If 502 is reported, wait for a while Try refreshing after a certain amount of time, usually about 1-2 minutes.

The account set in this article: root, new password: 11112222
3. Install Runner
(1) Download one Binary file
sudo curl -L --output /usr/local/bin/gitlab-runner https://gitlab-runner-downloads.s3.amazonaws.com/latest/binaries/gitlab-runner-linux-amd64
(2) Modify execution permissions
sudo chmod a+x /usr/local/bin/gitlab-runner
(3) Create GitLab CI user
sudo useradd --comment 'GitLab Runner' --create-home gitlab-runner --shell /bin/bash
(4) Install and run as a service
sudo gitlab-runner install --user=gitlab-runner --working-directory=/home/gitlab-runner
sudo gitlab-runner start
If you encounter the prompt sudo: gitlab-runner: command not found, switch to the root user, you can remove sudo and execute the above command.
(5) Register Runner
Reference address: https://docs.gitlab.com/runner/register/index.html
Execute gitlab-runner register command:
[root@localhost bin]# gitlab-runner register
Runtime platform                                    arch=amd64 os=linux pid=21527 revision=4e1f20da version=13.4.0
Running in system-mode.

Please enter the gitlab-ci coordinator URL (e.g. https://gitlab.com/):
http://192.168.56.10/

Please enter the gitlab-ci token for this runner:
PwF1sZPX_zsB-xChSKjH

Please enter the gitlab-ci description for this runner:
[localhost.localdomain]: test ci cd desc

Please enter the gitlab-ci tags for this runner (comma separated):
my-tag,other-tag

Registering runner... succeeded                     runner=PwF1sZPX
Please enter the executor: ssh, virtualbox, parallels, shell, docker-ssh, docker+machine, docker-ssh+machine, kubernetes, custom, docker:
docker

Please enter the default Docker image (e.g. ruby:2.6):
maven:3.3.9-jdk-8
Runner registered successfully. Feel free to start it, but if it's running already the config should be automatically reloaded!
Note: The docker method is selected here, so additional docker needs to be installed on the server
#!/bin/bash
# 移除掉旧的版本
sudo yum remove docker \
                  docker-client \
                  docker-client-latest \
                  docker-common \
                  docker-latest \
                  docker-latest-logrotate \
                  docker-logrotate \
                  docker-selinux \
                  docker-engine-selinux \
                  docker-engine

# 删除所有旧的数据
sudo rm -rf /var/lib/docker

#  安装依赖包
sudo yum install -y yum-utils \
  device-mapper-persistent-data \
  lvm2

# 添加源,使用了阿里云镜像
sudo yum-config-manager \
    --add-repo \
    http://mirrors.aliyun.com/docker-ce/linux/centos/docker-ce.repo

# 配置缓存
sudo yum makecache fast

# 安装最新稳定版本的docker
sudo yum install -y docker-ce

# 配置镜像加速器
sudo mkdir -p /etc/docker
sudo tee /etc/docker/daemon.json <p>Register a globally shared Runner here (administrator Permissions, copy server address and Token), can be used by all projects, or you can register a separate Runner at the project level (enter the project Runner settings page, copy the address and Token). <br></p><p><img src="/static/imghwm/default1.png" data-src="https://img.php.cn/upload/article/000/000/164/168379748034185.png?x-oss-process=image/resize,p_40" class="lazy" alt="Gitlab CI-CD自动化部署SpringBoot项目的方法"></p><p>After successful registration, the registered Runner can be viewed in the Runner list<br></p><p><img src="/static/imghwm/default1.png" data-src="https://img.php.cn/upload/article/000/000/164/168379748013802.png?x-oss-process=image/resize,p_40" class="lazy" alt="Gitlab CI-CD自动化部署SpringBoot项目的方法"></p><p> Check :Run untagged jobs Indicates whether this runner can pick jobs without tags<br></p><p><img src="/static/imghwm/default1.png" data-src="https://img.php.cn/upload/article/000/000/164/168379748195337.png?x-oss-process=image/resize,p_40" class="lazy" alt="Gitlab CI-CD自动化部署SpringBoot项目的方法"></p><h3 id="Install-the-application-server-environment">4. Install the application server environment</h3><p>(1) Allow users to log in remotely (Optional) </p><pre class="brush:php;toolbar:false">vi /etc/ssh/sshd_config
修改:
PasswordAuthentication yes
PermitRootLogin yes

重启服务:
service sshd restart
(2) Install JDK1.8
(2) Decompress
tar -zxvf jdk-8u161-linux-x64.tar.gz
重命名:
mv jdk1.8.0_161 java1.8
(3) Configure environment variables
vi /etc/profile

添加以下内容:
export JAVA_HOME=/usr/local/java1.8
export PATH=$JAVA_HOME/bin:$PATH
export CLASSPATH=.:$JAVA_HOME/lib/dt.jar:$JAVA_HOME/lib/tools.jar
保存退出

source /etc/profile
java -version
(3 ) Install Maven3.3.9
(2) Unzip
tar -zxvf apache-maven-3.3.9-bin.tar.gz

重命名:
mv apache-maven-3.3.9 maven-3.3.9
(3) Configure environment variables
vi /etc/profile

添加以下内容:
export MAVEN_HOME=/usr/local/maven-3.3.9
export PATH=$MAVEN_HOME/bin:$PATH
保存退出

source /etc/profile
mvn -v
5. Create SpringBoot project
1. Use Gitlab Spring template quickly creates a SpringBoot project;


If an error is reported, delete this line in pom.xml
If you report this error:
[FATAL] Non-resolvable parent POM for com.example:demo:0.0.1-SNAPSHOT: Could not transfer artifact org.springframework.boot:spring-boot-starter- parent:pom:2.0.1.RELEASE from/to central (https://repo.maven.apache.org/maven2): Connect to repo.maven.apache.org:443 [repo.maven.apache.org/151.101 .40.215] failed: Connection timed out (Connection timed out) and 'parent.relativePath' points at wrong local POM @ line 14, column 10
Modified version
1.5.9 .RELEASE
2、添加环境变量(登录应用服务器密码)
注: 其中 ssh_password 这个添加到环境变量中,取消勾选 Protect Branch (仅保护分支);修改和添加都是默认勾选,需要取消,否则,其他分支不能读取到该变量;

先在应用服务器上创建一个目录,用于上传存放项目 jar 包:
mkdir gitlab-project
添加 .gitlab-ci.yml 文件时,可以先再 CI/CD Pipeline 中 的 CI Lint 中检验 .gitlab-ci.yml 文件格式
# 定义一些变量, 下面各阶段会使用
variables:
  server_ip: 192.168.56.12
  jar_name: demo-0.0.1-SNAPSHOT.jar
  java_path: /usr/local/java1.8/bin
  upload_path: /usr/local/gitlab-project

# 定义执行的各个阶段及顺序
stages:
  - build
  - upload
  - deploy

# 使用 maven 镜像打包项目
maven-build:
  stage: build
  image: maven:3.5.0-jdk-8
  script:
    - mvn package -B -Dmaven.test.skip=true
  cache:
    key: m2-repo
    paths:
      - .m2/repository
  artifacts:
    paths:
      - target/$jar_name

# 上传生成的 jar 包到你的应用服务器,这里使用 ictu/sshpass 这个镜像,是为了使用 sshpass 命令
upload-jar:
  stage: upload
  image: ictu/sshpass
  script:
    - ls -l target/
    - sshpass -p $ssh_password scp -o UserKnownHostsFile=/dev/null -o StrictHostKeyChecking=no target/$jar_name root@$server_ip:$upload_path/$jar_name

# 启动 SpringBoot jar包
deploy-test:
  stage: deploy
  image: ictu/sshpass
  script:
    - sshpass -p $ssh_password ssh -o UserKnownHostsFile=/dev/null -o StrictHostKeyChecking=no root@$server_ip "nohup $java_path/java -jar $upload_path/$jar_name >/dev/null 2>&1 &"
这里使用了DockerHub上面的一个公共镜像(ictu/sshpass),主要是想使用启动自带的sshpass命令执行scp和ssh命令。
如果一切顺利的话,就会自动触发 CI/CD ;失败的话查看报错信息,可使用 Debug 模式执行调试命令 。
[root@localhost gitlab-project]# jps
22119 Jps
22073 demo-0.0.1-SNAPSHOT.jar
[root@localhost gitlab-project]# curl localhost:8080
Spring is here!

可能遇到的问题总结:
权限问题:可以先使用 root 用户看看是不是权限问题导致,如果是的话,提升执行用户的权限;并发问题:这里没有修改 Runner 的并发数,可以修改同时可以进行的任务并发数;其他问题:读取不到配置的环境变量,取消勾选仅保护分支的选项;
未执行job:没有勾选未配置 tags 也执行选项;
The above is the detailed content of Gitlab CI-CD method to automatically deploy SpringBoot projects. For more information, please follow other related articles on the PHP Chinese website!

 Spring Boot怎么使用SSE方式向前端推送数据May 10, 2023 pm 05:31 PM
前言SSE简单的来说就是服务器主动向前端推送数据的一种技术,它是单向的,也就是说前端是不能向服务器发送数据的。SSE适用于消息推送,监控等只需要服务器推送数据的场景中,下面是使用SpringBoot来实现一个简单的模拟向前端推动进度数据,前端页面接受后展示进度条。服务端在SpringBoot中使用时需要注意,最好使用SpringWeb提供的SseEmitter这个类来进行操作,我在刚开始时使用网上说的将Content-Type设置为text-stream这种方式发现每次前端每次都会重新创建接。最
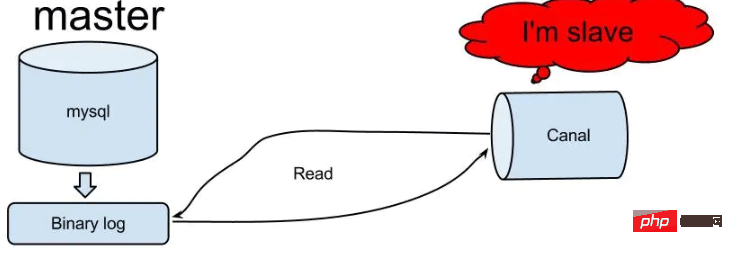 怎么使用SpringBoot+Canal实现数据库实时监控May 10, 2023 pm 06:25 PM
Canal工作原理Canal模拟MySQLslave的交互协议,伪装自己为MySQLslave,向MySQLmaster发送dump协议MySQLmaster收到dump请求,开始推送binarylog给slave(也就是Canal)Canal解析binarylog对象(原始为byte流)MySQL打开binlog模式在MySQL配置文件my.cnf设置如下信息:[mysqld]#打开binloglog-bin=mysql-bin#选择ROW(行)模式binlog-format=ROW#配置My
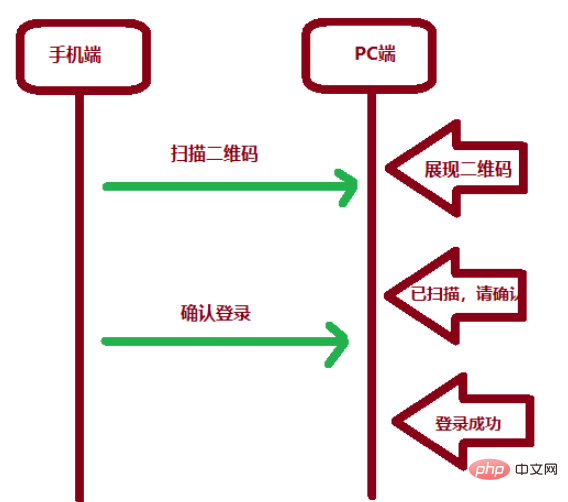 SpringBoot怎么实现二维码扫码登录May 10, 2023 pm 08:25 PM
一、手机扫二维码登录的原理二维码扫码登录是一种基于OAuth3.0协议的授权登录方式。在这种方式下,应用程序不需要获取用户的用户名和密码,只需要获取用户的授权即可。二维码扫码登录主要有以下几个步骤:应用程序生成一个二维码,并将该二维码展示给用户。用户使用扫码工具扫描该二维码,并在授权页面中授权。用户授权后,应用程序会获取一个授权码。应用程序使用该授权码向授权服务器请求访问令牌。授权服务器返回一个访问令牌给应用程序。应用程序使用该访问令牌访问资源服务器。通过以上步骤,二维码扫码登录可以实现用户的快
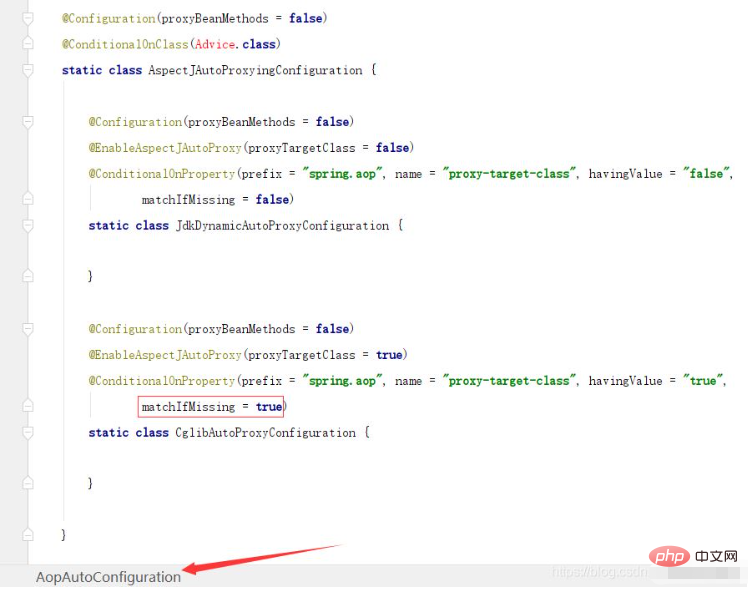 SpringBoot/Spring AOP默认动态代理方式是什么May 10, 2023 pm 03:52 PM
1.springboot2.x及以上版本在SpringBoot2.xAOP中会默认使用Cglib来实现,但是Spring5中默认还是使用jdk动态代理。SpringAOP默认使用JDK动态代理,如果对象没有实现接口,则使用CGLIB代理。当然,也可以强制使用CGLIB代理。在SpringBoot中,通过AopAutoConfiguration来自动装配AOP.2.Springboot1.xSpringboot1.xAOP默认还是使用JDK动态代理的3.SpringBoot2.x为何默认使用Cgl
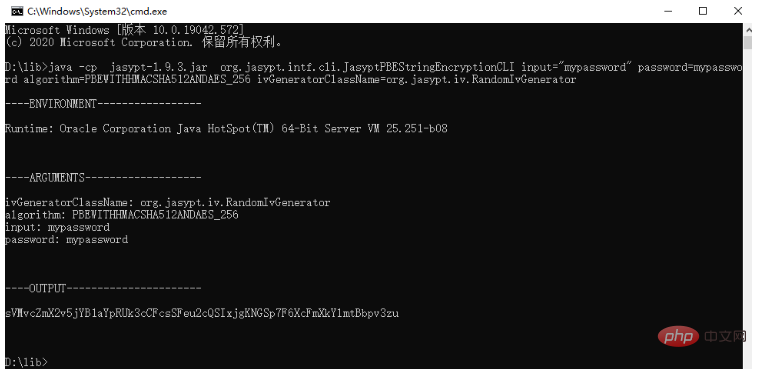 spring boot怎么对敏感信息进行加解密May 10, 2023 pm 02:46 PM
我们使用jasypt最新版本对敏感信息进行加解密。1.在项目pom文件中加入如下依赖:com.github.ulisesbocchiojasypt-spring-boot-starter3.0.32.创建加解密公用类:packagecom.myproject.common.utils;importorg.jasypt.encryption.pbe.PooledPBEStringEncryptor;importorg.jasypt.encryption.pbe.config.SimpleStrin
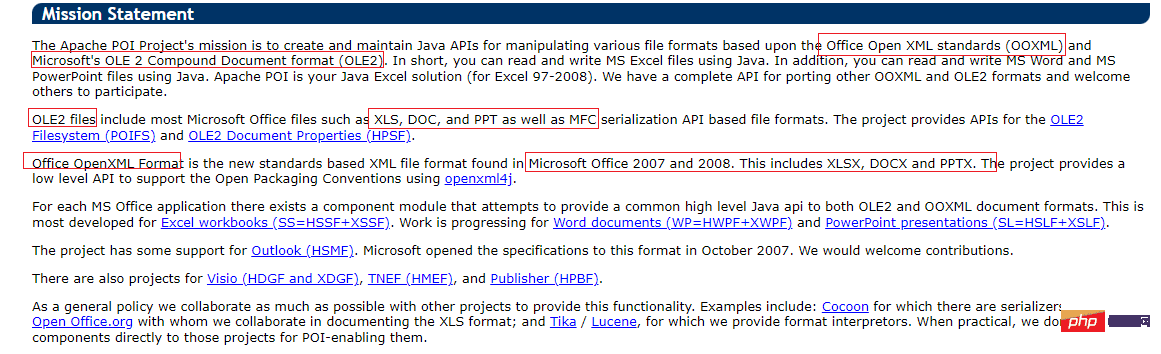 使用Java SpringBoot集成POI实现Word文档导出Apr 21, 2023 pm 12:19 PM
知识准备需要理解ApachePOI遵循的标准(OfficeOpenXML(OOXML)标准和微软的OLE2复合文档格式(OLE2)),这将对应着API的依赖包。什么是POIApachePOI是用Java编写的免费开源的跨平台的JavaAPI,ApachePOI提供API给Java程序对MicrosoftOffice格式档案读和写的功能。POI为“PoorObfuscationImplementation”的首字母缩写,意为“简洁版的模糊实现”。ApachePOI是创建和维护操作各种符合Offic
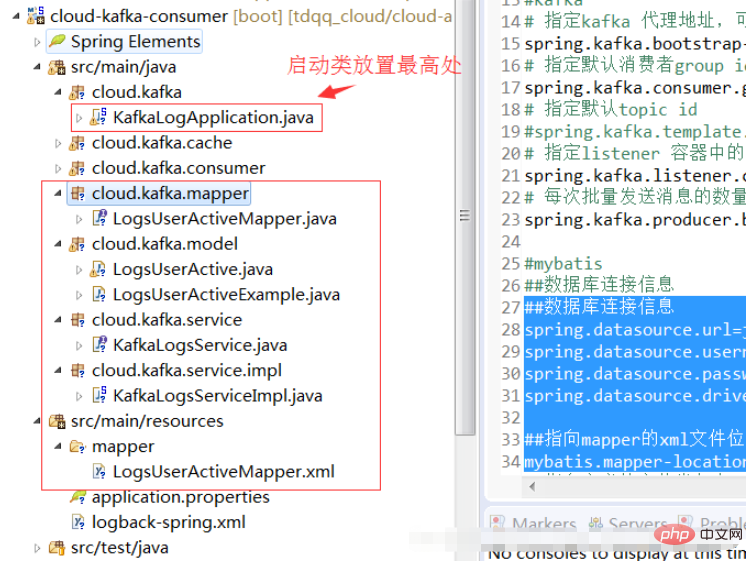 springboot怎么配置mybatis和事务管理May 10, 2023 pm 07:13 PM
一、springboot与mybatis的配置1.首先,springboot配置mybatis需要的全部依赖如下:org.springframework.bootspring-boot-starter-parent1.5.1.RELEASEorg.springframework.bootspring-boot-starter-web1.5.1.RELEASEorg.mybatis.spring.bootmybatis-spring-boot-starter1.2.0com.oracleojdbc
 springboot怎么整合shiro实现多验证登录功能May 10, 2023 pm 04:19 PM
1.首先新建一个shiroConfigshiro的配置类,代码如下:@ConfigurationpublicclassSpringShiroConfig{/***@paramrealms这儿使用接口集合是为了实现多验证登录时使用的*@return*/@BeanpublicSecurityManagersecurityManager(Collectionrealms){DefaultWebSecurityManagersManager=newDefaultWebSecurityManager();


Hot AI Tools

Undresser.AI Undress
AI-powered app for creating realistic nude photos

AI Clothes Remover
Online AI tool for removing clothes from photos.

Undress AI Tool
Undress images for free

Clothoff.io
AI clothes remover

AI Hentai Generator
Generate AI Hentai for free.

Hot Article
Hot Tools

MantisBT
Mantis is an easy-to-deploy web-based defect tracking tool designed to aid in product defect tracking. It requires PHP, MySQL and a web server. Check out our demo and hosting services.

SecLists
SecLists is the ultimate security tester's companion. It is a collection of various types of lists that are frequently used during security assessments, all in one place. SecLists helps make security testing more efficient and productive by conveniently providing all the lists a security tester might need. List types include usernames, passwords, URLs, fuzzing payloads, sensitive data patterns, web shells, and more. The tester can simply pull this repository onto a new test machine and he will have access to every type of list he needs.

PhpStorm Mac version
The latest (2018.2.1) professional PHP integrated development tool

Dreamweaver CS6
Visual web development tools

Zend Studio 13.0.1
Powerful PHP integrated development environment

