


1. Framework Maven deployment and installation
After downloading the framework source code, execute mvn clean install in the project root path to install it into the local maven library. If you need to share and use Nexus private server, add distributionManagement configuration in the root path pom.xml file, specify the Nexus warehouse distribution address, and use mvn clean deploy to install to the remote maven warehouse, as
<distributionmanagement>
<repository>
<id>nexus-releases</id>
<url>
http://ip:port/repository/maven-releases/
</url>
</repository>
<snapshotrepository>
<id>nexus-snapshots</id>
<url>
http://ip:port/repository/maven-snapshots/
</url>
</snapshotrepository>
</distributionmanagement>
specified above The repository needs to have corresponding account configuration in all maven configuration files settings.xml (id needs to correspond one to one), such as
<servers>
<server>
<id>nexus-snapshots</id>
<username>admin</username>
<password>xxx</password>
</server>
<server>
<id>nexus-releases</id>
<username>admin</username>
<password>xxx</password>
</server>
</servers>
2. pom.xml configuration
There are three ways to introduce this database framework into the project:
Directly introduce cn.jboost.springboot:tkmapper-spring-boot-starter (without connection pool)
Directly introduce cn.jboost.springboot:druid-spring-boot-starter (druid connection pool support)
- ##The project inherits cn.jboost.springboot:spring- boot-parent (using druid connection pool)
#第一种方式
<dependency>
<groupid>cn.jboost.springboot</groupid>
<artifactid>tkmapper-spring-boot-starter</artifactid>
<version>1.2-SNAPSHOT</version>
</dependency>

#第二种方式
<dependency>
<groupid>cn.jboost.springboot</groupid>
<artifactid>druid-spring-boot-starter</artifactid>
<version>1.2-SNAPSHOT</version>
</dependency>

#第三种方式
<parent>
<groupid>cn.jboost.springboot</groupid>
<artifactid>spring-boot-parent</artifactid>
<version>1.2-SNAPSHOT</version>
<relativepath></relativepath> <!-- lookup parent from repository -->
</parent>
Introduce the driver dependency of mysql or postgresql (others) according to the situation The database does not yet support type conversion and has not been tested)
3. Configure the data source
spring:
datasource:
druid:
driver-class-name: com.mysql.jdbc.Driver
url: jdbc:mysql://localhost:3306/test?autoReconnect=true&useUnicode=true&characterEncoding=utf-8
username: root
password:
# 自定义配置
initialSize: 2 # 初始化大小
minIdle: 1 # 最小连接
maxActive: 5 # 最大连接
druidServletSettings:
allow: 127.0.0.1
deny:
loginUsername: admin
loginPassword: Passw0rd
resetEnable: true
druidFilterSettings:
exclusions: '*.js,*.gif,*.jpg,*.png,*.css,*.ico,/druid/*'
maxWait: 60000 # 配置获取连接等待超时的时间
timeBetweenEvictionRunsMillis: 60000 # 配置间隔多久才进行一次检测,检测需要关闭的空闲连接,单位是毫秒
minEvictableIdleTimeMillis: 300000 # 配置一个连接在池中最小生存的时间,单位是毫秒
validationQuery: SELECT 'x'
testWhileIdle: true
testOnBorrow: false
testOnReturn: false
poolPreparedStatements: true # 打开PSCache,并且指定每个连接上PSCache的大小
maxPoolPreparedStatementPerConnectionSize: 20
filters: stat #,wall(添加wall代码里不能直接拼接sql,druid有sql注入校验) # 配置监控统计拦截的filters,去掉后监控界面sql无法统计,'wall'用于防火墙
connectionProperties: druid.stat.mergeSql=true;druid.stat.slowSqlMillis=5000 # 通过connectProperties属性来打开mergeSql功能;慢SQL记录
useGlobalDataSourceStat: true # 合并多个DruidDataSource的监控数据
If you do not use a connection pool, the configuration is relatively simple, as follows
spring:
datasource:
url: jdbc:mysql://localhost:3306/test?autoReconnect=true&useUnicode=true&characterEncoding=utf-8
username: root
password:
driver-class-name: com.mysql.jdbc.Driver
4. Define the corresponding domain and mapper , service, controller objects at each layer
@Table(name = "user")
@Getter
@Setter
@ToString
public class User extends AutoIncrementKeyBaseDomain<integer> {
private String name;
@ColumnType(jdbcType = JdbcType.CHAR)
private Gender gender;
private List<string> favor;
private Map<string> address;
public enum Gender{
M,
F
}
}</string></string></integer>
needs to be added The @Table annotation specifies the database table name. You can implement auto-increment primary key by inheriting AutoIncrementKeyBaseDomain, or implement UUID primary key by UUIDKeyBaseDomain. If you customize other types of primary keys, inherit BaseDomain. The framework's Service layer general method implementation BaseService only supports single-column primary keys and does not support composite primary keys (and it is not recommended to use composite primary keys) The framework defaults to mapping complex type attributes such as List and Map to For mysql's json type or postgresql's jsonb type, if a certain attribute does not require mapping, you can add the @Transient annotation; for enumeration types, you need to add @ColumnType to specify the jdbcType. Dao layer defines UserMapper,
@Repository
public interface UserMapper extends BaseMapper<user> {
}</user>
BaseMapper implements the functions of adding, deleting, modifying and batch inserting a single table by default. If you need to define complex queries, you can define them in this interface and then use mapper xml file writing and implementation. The service layer defines UserService, which inherits the general functions of BaseService (see the source code for details). You can also customize methods in this class. @Service
public class UserService extends BaseService<integer> {
@Transactional
public void createWithTransaction(User user){
create(user);
//用于测试事务
throw new RuntimeException("抛出异常,让前面的数据库操作回滚");
}
}</integer>The controller layer defines UserController, which inherits The general interface of BaseController (please view the source code for details)
@RestController
@RequestMapping("/user")
public class UserController extends BaseController<integer> {
}</integer>
is as above. You only need to define the interface or class corresponding to each layer and inherit the basic interface or class to complete the user's basic addition, deletion, modification and query functions. No need to write A line of specific implementation code.
5. Test and run
The above is the detailed content of How to implement single table operation by integrating Mapper in springboot. For more information, please follow other related articles on the PHP Chinese website!

 怎么使用SpringBoot+Canal实现数据库实时监控May 10, 2023 pm 06:25 PM
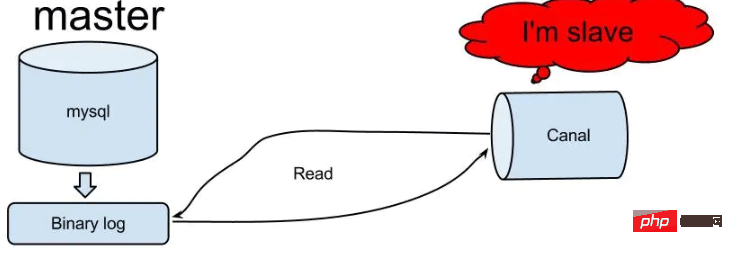
Canal工作原理Canal模拟MySQLslave的交互协议,伪装自己为MySQLslave,向MySQLmaster发送dump协议MySQLmaster收到dump请求,开始推送binarylog给slave(也就是Canal)Canal解析binarylog对象(原始为byte流)MySQL打开binlog模式在MySQL配置文件my.cnf设置如下信息:[mysqld]#打开binloglog-bin=mysql-bin#选择ROW(行)模式binlog-format=ROW#配置My
 Spring Boot怎么使用SSE方式向前端推送数据May 10, 2023 pm 05:31 PM
前言SSE简单的来说就是服务器主动向前端推送数据的一种技术,它是单向的,也就是说前端是不能向服务器发送数据的。SSE适用于消息推送,监控等只需要服务器推送数据的场景中,下面是使用SpringBoot来实现一个简单的模拟向前端推动进度数据,前端页面接受后展示进度条。服务端在SpringBoot中使用时需要注意,最好使用SpringWeb提供的SseEmitter这个类来进行操作,我在刚开始时使用网上说的将Content-Type设置为text-stream这种方式发现每次前端每次都会重新创建接。最
 SpringBoot怎么实现二维码扫码登录May 10, 2023 pm 08:25 PM
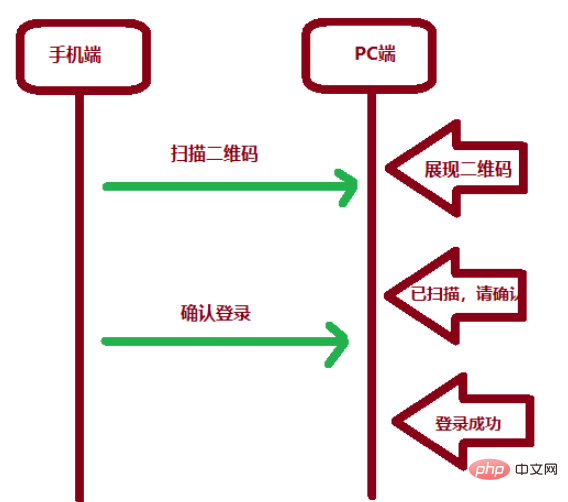
一、手机扫二维码登录的原理二维码扫码登录是一种基于OAuth3.0协议的授权登录方式。在这种方式下,应用程序不需要获取用户的用户名和密码,只需要获取用户的授权即可。二维码扫码登录主要有以下几个步骤:应用程序生成一个二维码,并将该二维码展示给用户。用户使用扫码工具扫描该二维码,并在授权页面中授权。用户授权后,应用程序会获取一个授权码。应用程序使用该授权码向授权服务器请求访问令牌。授权服务器返回一个访问令牌给应用程序。应用程序使用该访问令牌访问资源服务器。通过以上步骤,二维码扫码登录可以实现用户的快
 SpringBoot/Spring AOP默认动态代理方式是什么May 10, 2023 pm 03:52 PM
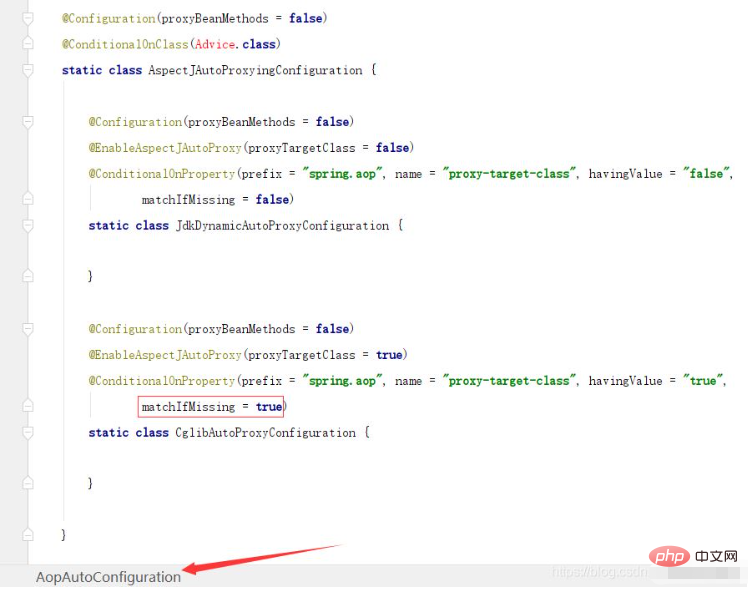
1.springboot2.x及以上版本在SpringBoot2.xAOP中会默认使用Cglib来实现,但是Spring5中默认还是使用jdk动态代理。SpringAOP默认使用JDK动态代理,如果对象没有实现接口,则使用CGLIB代理。当然,也可以强制使用CGLIB代理。在SpringBoot中,通过AopAutoConfiguration来自动装配AOP.2.Springboot1.xSpringboot1.xAOP默认还是使用JDK动态代理的3.SpringBoot2.x为何默认使用Cgl
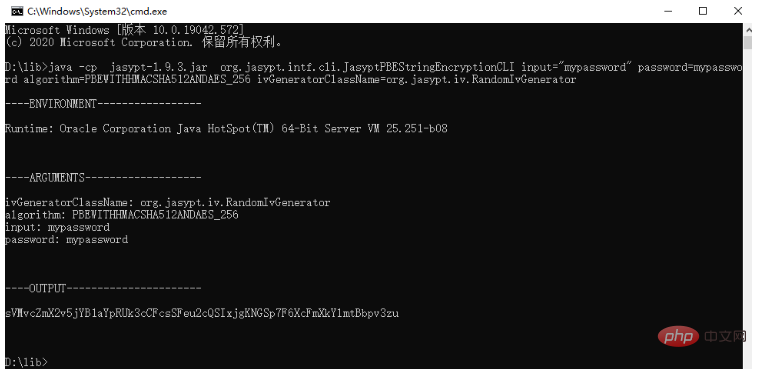 spring boot怎么对敏感信息进行加解密May 10, 2023 pm 02:46 PM
我们使用jasypt最新版本对敏感信息进行加解密。1.在项目pom文件中加入如下依赖:com.github.ulisesbocchiojasypt-spring-boot-starter3.0.32.创建加解密公用类:packagecom.myproject.common.utils;importorg.jasypt.encryption.pbe.PooledPBEStringEncryptor;importorg.jasypt.encryption.pbe.config.SimpleStrin
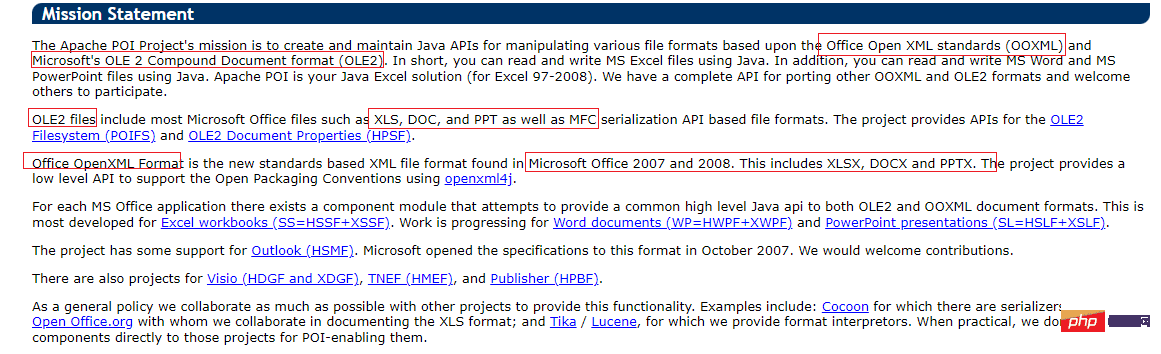 使用Java SpringBoot集成POI实现Word文档导出Apr 21, 2023 pm 12:19 PM
知识准备需要理解ApachePOI遵循的标准(OfficeOpenXML(OOXML)标准和微软的OLE2复合文档格式(OLE2)),这将对应着API的依赖包。什么是POIApachePOI是用Java编写的免费开源的跨平台的JavaAPI,ApachePOI提供API给Java程序对MicrosoftOffice格式档案读和写的功能。POI为“PoorObfuscationImplementation”的首字母缩写,意为“简洁版的模糊实现”。ApachePOI是创建和维护操作各种符合Offic
 springboot怎么整合shiro实现多验证登录功能May 10, 2023 pm 04:19 PM
1.首先新建一个shiroConfigshiro的配置类,代码如下:@ConfigurationpublicclassSpringShiroConfig{/***@paramrealms这儿使用接口集合是为了实现多验证登录时使用的*@return*/@BeanpublicSecurityManagersecurityManager(Collectionrealms){DefaultWebSecurityManagersManager=newDefaultWebSecurityManager();
 Springboot如何实现视频上传及压缩功能May 10, 2023 pm 05:16 PM
一、定义视频上传请求接口publicAjaxResultvideoUploadFile(MultipartFilefile){try{if(null==file||file.isEmpty()){returnAjaxResult.error("文件为空");}StringossFilePrefix=StringUtils.genUUID();StringfileName=ossFilePrefix+"-"+file.getOriginalFilename(


Hot AI Tools

Undresser.AI Undress
AI-powered app for creating realistic nude photos

AI Clothes Remover
Online AI tool for removing clothes from photos.

Undress AI Tool
Undress images for free

Clothoff.io
AI clothes remover

AI Hentai Generator
Generate AI Hentai for free.

Hot Article
Hot Tools

Safe Exam Browser
Safe Exam Browser is a secure browser environment for taking online exams securely. This software turns any computer into a secure workstation. It controls access to any utility and prevents students from using unauthorized resources.

ZendStudio 13.5.1 Mac
Powerful PHP integrated development environment

SublimeText3 English version
Recommended: Win version, supports code prompts!

Zend Studio 13.0.1
Powerful PHP integrated development environment

Dreamweaver CS6
Visual web development tools

