


1 Background
The project needs a function that can dynamically add scheduled tasks. The project currently uses the xxl-job scheduled task scheduling system, but after some understanding of the xxl-job function , I found that xxl-job’s support for dynamically adding scheduled tasks and dynamically deleting scheduled tasks to the project is not that good, so I need to manually implement the function of a scheduled task
二dynamic scheduled task scheduling
1 Technology Selection
Timer or ScheduledExecutorService
Both of these can implement scheduled task scheduling, let’s take a look first Timer's scheduled task scheduling
  public class MyTimerTask extends TimerTask {
    private String name;
    public MyTimerTask(String name){
        this.name = name;
    }
    public String getName() {
        return name;
    }
    public void setName(String name) {
        this.name = name;
    }
    @Override
    public void run() {
        //task
        Calendar instance = Calendar.getInstance();
        System.out.println(new SimpleDateFormat("yyyy-MM-dd HH:mm:ss").format(instance.getTime()));
    }
}
Timer timer = new Timer();
MyTimerTask timerTask = new MyTimerTask("NO.1");
//首次执行,在当前时间的1秒以后,之后每隔两秒钟执行一次
timer.schedule(timerTask,1000L,2000L);
Let's take a look at the implementation of ScheduledThreadPoolExecutor
//org.apache.commons.lang3.concurrent.BasicThreadFactory
ScheduledExecutorService executorService = new ScheduledThreadPoolExecutor(1,
    new BasicThreadFactory.Builder().namingPattern("example-schedule-pool-%d").daemon(true).build());
executorService.scheduleAtFixedRate(new Runnable() {
    @Override
    public void run() {
        //do something
    }
},initialDelay,period, TimeUnit.HOURS);
Both can implement scheduled tasks, so what are their differences? Using Alibaba p3c will give suggestions and differences
多线程并行处理定时任务时,Timer运行多个TimeTask时,只要其中之一没有捕获抛出的异常,其它任务便会自动终止运行,使用ScheduledExecutorService则没有这个问题。
From the suggestion point of view, you must choose ScheduledExecutorService. Let’s take a look at the source code to see why Timer will terminate execution if there is a problem.
/**
 * The timer thread.
 */
private final TimerThread thread = new TimerThread(queue);
public Timer() {
    this("Timer-" + serialNumber());
}
public Timer(String name) {
    thread.setName(name);
    thread.start();
}
New Object, we see that a thread is started, so what is this thread doing? Take a look at
class TimerThread extends Thread {
boolean newTasksMayBeScheduled = true;
/**
* 每一件一个任务都是一个quene
*/
private TaskQueue queue;
TimerThread(TaskQueue queue) {
this.queue = queue;
}
public void run() {
try {
mainLoop();
} finally {
// Someone killed this Thread, behave as if Timer cancelled
synchronized(queue) {
newTasksMayBeScheduled = false;
queue.clear(); // 清除所有任务信息
}
}
}
/**
* The main timer loop. (See class comment.)
*/
private void mainLoop() {
while (true) {
try {
TimerTask task;
boolean taskFired;
synchronized(queue) {
// Wait for queue to become non-empty
while (queue.isEmpty() && newTasksMayBeScheduled)
queue.wait();
if (queue.isEmpty())
break; // Queue is empty and will forever remain; die
// Queue nonempty; look at first evt and do the right thing
long currentTime, executionTime;
task = queue.getMin();
synchronized(task.lock) {
if (task.state == TimerTask.CANCELLED) {
queue.removeMin();
continue; // No action required, poll queue again
}
currentTime = System.currentTimeMillis();
executionTime = task.nextExecutionTime;
if (taskFired = (executionTime<=currentTime)) {
if (task.period == 0) { // Non-repeating, remove
queue.removeMin();
task.state = TimerTask.EXECUTED;
} else { // Repeating task, reschedule
queue.rescheduleMin(
task.period<0 ? currentTime - task.period
: executionTime + task.period);
}
}
}
if (!taskFired) // Task hasn't yet fired; wait
queue.wait(executionTime - currentTime);
}
if (taskFired) // Task fired; run it, holding no locks
task.run();
} catch(InterruptedException e) {
}
}
}
} We see that mainLoop() is executed, and inside it is the while (true) method that loops infinitely to obtain the time in the task object in the program Compare it with the current time, if it is the same, it will be executed. However, once an error is reported, it will enter finally and clear all task information.
At this time we have found the answer. After the timer is instantiated, it starts a thread and performs tasks in an uninterrupted loop matching. It is single-threaded. Once an error is reported, the thread is terminated. Therefore, subsequent tasks will not be executed, and ScheduledThreadPoolExecutor is executed by multiple threads. Even if one of the tasks reports an error, it will not affect the execution of other threads.
2 Using ScheduledThreadPoolExecutor
From the above, using ScheduledThreadPoolExecutor is relatively simple, but we want to achieve something more elegant, so chooseTaskScheduler To implement
@Component
public class CronTaskRegistrar implements DisposableBean {
    private final Map<Runnable, ScheduledTask> scheduledTasks = new ConcurrentHashMap<>(16);
    @Autowired
    private TaskScheduler taskScheduler;
    public TaskScheduler getScheduler() {
        return this.taskScheduler;
    }
    public void addCronTask(Runnable task, String cronExpression) {
        addCronTask(new CronTask(task, cronExpression));
    }
    private void addCronTask(CronTask cronTask) {
        if (cronTask != null) {
            Runnable task = cronTask.getRunnable();
            if (this.scheduledTasks.containsKey(task)) {
                removeCronTask(task);
            }
            this.scheduledTasks.put(task, scheduleCronTask(cronTask));
        }
    }
    public void removeCronTask(Runnable task) {
        Set<Runnable> runnables = this.scheduledTasks.keySet();
        Iterator it1 = runnables.iterator();
        while (it1.hasNext()) {
            SchedulingRunnable schedulingRunnable = (SchedulingRunnable) it1.next();
            Long taskId = schedulingRunnable.getTaskId();
            SchedulingRunnable cancelRunnable = (SchedulingRunnable) task;
            if (taskId.equals(cancelRunnable.getTaskId())) {
                ScheduledTask scheduledTask = this.scheduledTasks.remove(schedulingRunnable);
                if (scheduledTask != null){
                    scheduledTask.cancel();
                }
            }
        }
    }
    public ScheduledTask scheduleCronTask(CronTask cronTask) {
        ScheduledTask scheduledTask = new ScheduledTask();
        scheduledTask.future = this.taskScheduler.schedule(cronTask.getRunnable(), cronTask.getTrigger());
        return scheduledTask;
    }
    @Override
    public void destroy() throws Exception {
        for (ScheduledTask task : this.scheduledTasks.values()) {
            task.cancel();
        }
        this.scheduledTasks.clear();
    }
}
TaskScheduler is the core class for this function implementation, but it is an interface
public interface TaskScheduler {
   /**
    * Schedule the given {@link Runnable}, invoking it whenever the trigger
    * indicates a next execution time.
    * <p>Execution will end once the scheduler shuts down or the returned
    * {@link ScheduledFuture} gets cancelled.
    * @param task the Runnable to execute whenever the trigger fires
    * @param trigger an implementation of the {@link Trigger} interface,
    * e.g. a {@link org.springframework.scheduling.support.CronTrigger} object
    * wrapping a cron expression
    * @return a {@link ScheduledFuture} representing pending completion of the task,
    * or {@code null} if the given Trigger object never fires (i.e. returns
    * {@code null} from {@link Trigger#nextExecutionTime})
    * @throws org.springframework.core.task.TaskRejectedException if the given task was not accepted
    * for internal reasons (e.g. a pool overload handling policy or a pool shutdown in progress)
    * @see org.springframework.scheduling.support.CronTrigger
    */
   @Nullable
   ScheduledFuture<?> schedule(Runnable task, Trigger trigger);
As you can see from the previous code, We injected this class into the class, but it is an interface. How do we know which implementation class it is? In the past, when this happened, we had to add @Primany or @Quality to the class to execute the implemented class, but we saw that my There is no mark on the injection because it is implemented in another way
@Configuration
public class SchedulingConfig {
    @Bean
    public TaskScheduler taskScheduler() {
        ThreadPoolTaskScheduler taskScheduler = new ThreadPoolTaskScheduler();
        // 定时任务执行线程池核心线程数
        taskScheduler.setPoolSize(4);
        taskScheduler.setRemoveOnCancelPolicy(true);
        taskScheduler.setThreadNamePrefix("TaskSchedulerThreadPool-");
        return taskScheduler;
    }
}
The Bean TaskScheduler is registered during spring initialization, and we can see that its implementation is ThreadPoolTaskScheduler. Some people say in online information ThreadPoolTaskScheduler is the default implementation class of TaskScheduler. In fact, it is not. We still need to specify it. In this way, when we want to replace the implementation, we only need to modify the configuration class, which is very flexible.
Why is it said to be a more elegant implementation, because its core is also implemented through ScheduledThreadPoolExecutor
public ScheduledExecutorService getScheduledExecutor() throws IllegalStateException {
   Assert.state(this.scheduledExecutor != null, "ThreadPoolTaskScheduler not initialized");
   return this.scheduledExecutor;
}
Three multi-node task execution issues
This time During the implementation process, I did not choose xxl-job for implementation, but used TaskScheduler for implementation. This also caused a problem. xxl-job is a distributed program scheduling system, which is used when applications want to execute scheduled tasks. When xxl-job is used, no matter how many nodes are deployed in the application, xxl-job will only select one of the nodes as the node for scheduled task execution, so that scheduled tasks will not be executed simultaneously on different nodes, causing repeated execution problems. Instead, use To implement TaskScheduler, we must consider the issue of repeated execution on multiple nodes. Of course, since there is a problem, there is a solution
· The first option is to separate the scheduled task function and deploy it separately, and only deploy one node. The second option uses redis setNx to ensure that only one task is running at the same time. Execution
I chose the second option to execute. Of course, there are some ways to ensure that it is not executed repeatedly. I won’t go into details here. Here is my implementation
public void executeTask(Long taskId) {
    if (!redisService.setIfAbsent(String.valueOf(taskId),"1",2L, TimeUnit.SECONDS)) {
        log.info("已有执行中定时发送短信任务,本次不执行!");
        return;
    }
The above is the detailed content of How to implement SpringBoot scheduled task function. For more information, please follow other related articles on the PHP Chinese website!

 怎么使用SpringBoot+Canal实现数据库实时监控May 10, 2023 pm 06:25 PM
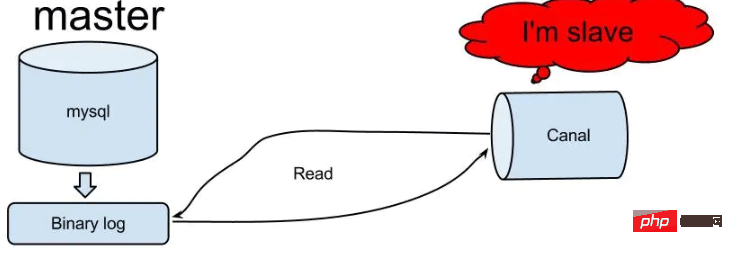
Canal工作原理Canal模拟MySQLslave的交互协议,伪装自己为MySQLslave,向MySQLmaster发送dump协议MySQLmaster收到dump请求,开始推送binarylog给slave(也就是Canal)Canal解析binarylog对象(原始为byte流)MySQL打开binlog模式在MySQL配置文件my.cnf设置如下信息:[mysqld]#打开binloglog-bin=mysql-bin#选择ROW(行)模式binlog-format=ROW#配置My
 Spring Boot怎么使用SSE方式向前端推送数据May 10, 2023 pm 05:31 PM
前言SSE简单的来说就是服务器主动向前端推送数据的一种技术,它是单向的,也就是说前端是不能向服务器发送数据的。SSE适用于消息推送,监控等只需要服务器推送数据的场景中,下面是使用SpringBoot来实现一个简单的模拟向前端推动进度数据,前端页面接受后展示进度条。服务端在SpringBoot中使用时需要注意,最好使用SpringWeb提供的SseEmitter这个类来进行操作,我在刚开始时使用网上说的将Content-Type设置为text-stream这种方式发现每次前端每次都会重新创建接。最
 SpringBoot怎么实现二维码扫码登录May 10, 2023 pm 08:25 PM
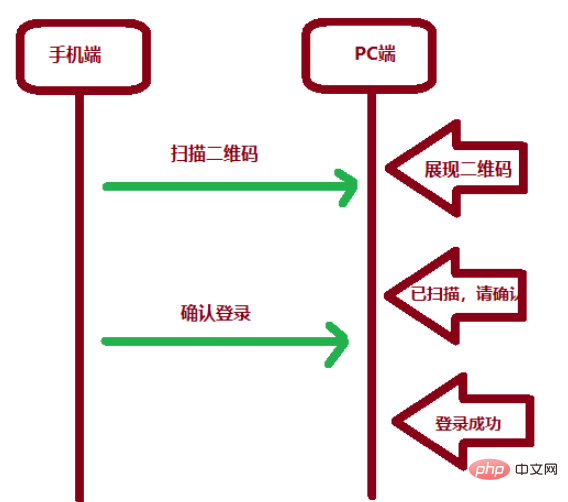
一、手机扫二维码登录的原理二维码扫码登录是一种基于OAuth3.0协议的授权登录方式。在这种方式下,应用程序不需要获取用户的用户名和密码,只需要获取用户的授权即可。二维码扫码登录主要有以下几个步骤:应用程序生成一个二维码,并将该二维码展示给用户。用户使用扫码工具扫描该二维码,并在授权页面中授权。用户授权后,应用程序会获取一个授权码。应用程序使用该授权码向授权服务器请求访问令牌。授权服务器返回一个访问令牌给应用程序。应用程序使用该访问令牌访问资源服务器。通过以上步骤,二维码扫码登录可以实现用户的快
 spring boot怎么对敏感信息进行加解密May 10, 2023 pm 02:46 PM
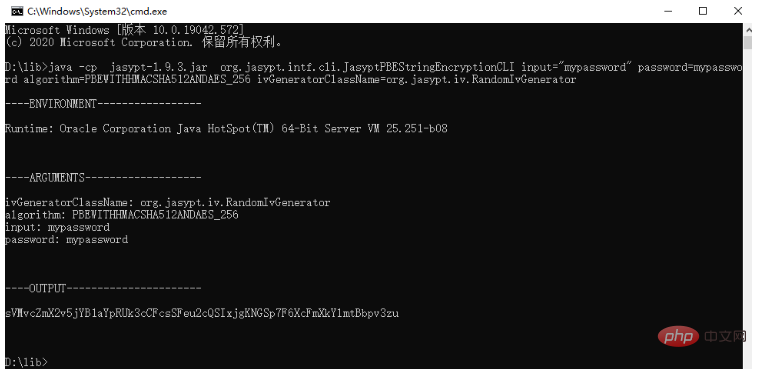
我们使用jasypt最新版本对敏感信息进行加解密。1.在项目pom文件中加入如下依赖:com.github.ulisesbocchiojasypt-spring-boot-starter3.0.32.创建加解密公用类:packagecom.myproject.common.utils;importorg.jasypt.encryption.pbe.PooledPBEStringEncryptor;importorg.jasypt.encryption.pbe.config.SimpleStrin
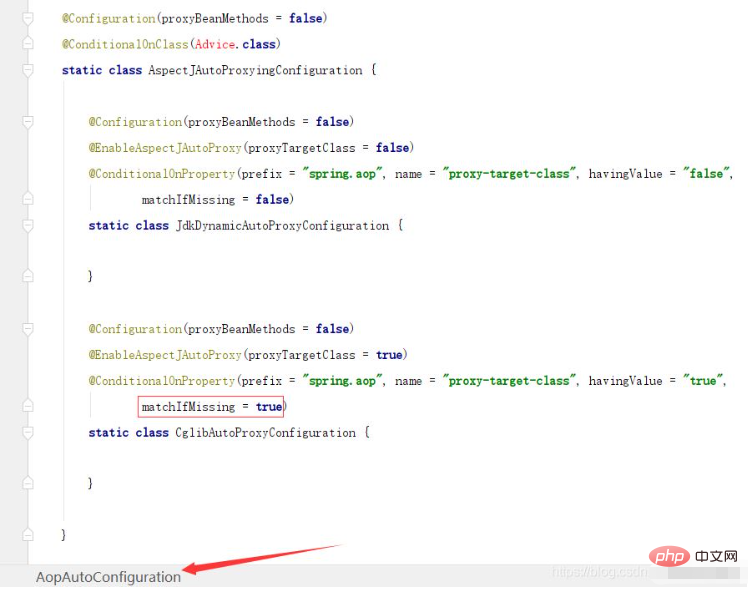 SpringBoot/Spring AOP默认动态代理方式是什么May 10, 2023 pm 03:52 PM
1.springboot2.x及以上版本在SpringBoot2.xAOP中会默认使用Cglib来实现,但是Spring5中默认还是使用jdk动态代理。SpringAOP默认使用JDK动态代理,如果对象没有实现接口,则使用CGLIB代理。当然,也可以强制使用CGLIB代理。在SpringBoot中,通过AopAutoConfiguration来自动装配AOP.2.Springboot1.xSpringboot1.xAOP默认还是使用JDK动态代理的3.SpringBoot2.x为何默认使用Cgl
 使用Java SpringBoot集成POI实现Word文档导出Apr 21, 2023 pm 12:19 PM
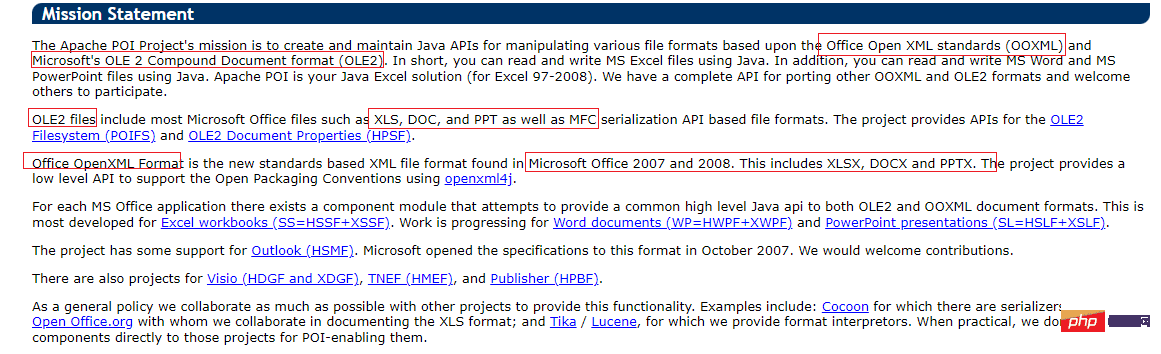
知识准备需要理解ApachePOI遵循的标准(OfficeOpenXML(OOXML)标准和微软的OLE2复合文档格式(OLE2)),这将对应着API的依赖包。什么是POIApachePOI是用Java编写的免费开源的跨平台的JavaAPI,ApachePOI提供API给Java程序对MicrosoftOffice格式档案读和写的功能。POI为“PoorObfuscationImplementation”的首字母缩写,意为“简洁版的模糊实现”。ApachePOI是创建和维护操作各种符合Offic
 springboot怎么整合shiro实现多验证登录功能May 10, 2023 pm 04:19 PM
1.首先新建一个shiroConfigshiro的配置类,代码如下:@ConfigurationpublicclassSpringShiroConfig{/***@paramrealms这儿使用接口集合是为了实现多验证登录时使用的*@return*/@BeanpublicSecurityManagersecurityManager(Collectionrealms){DefaultWebSecurityManagersManager=newDefaultWebSecurityManager();
 Springboot如何实现视频上传及压缩功能May 10, 2023 pm 05:16 PM
一、定义视频上传请求接口publicAjaxResultvideoUploadFile(MultipartFilefile){try{if(null==file||file.isEmpty()){returnAjaxResult.error("文件为空");}StringossFilePrefix=StringUtils.genUUID();StringfileName=ossFilePrefix+"-"+file.getOriginalFilename(


Hot AI Tools

Undresser.AI Undress
AI-powered app for creating realistic nude photos

AI Clothes Remover
Online AI tool for removing clothes from photos.

Undress AI Tool
Undress images for free

Clothoff.io
AI clothes remover

AI Hentai Generator
Generate AI Hentai for free.

Hot Article
Hot Tools

SublimeText3 Mac version
God-level code editing software (SublimeText3)

mPDF
mPDF is a PHP library that can generate PDF files from UTF-8 encoded HTML. The original author, Ian Back, wrote mPDF to output PDF files "on the fly" from his website and handle different languages. It is slower than original scripts like HTML2FPDF and produces larger files when using Unicode fonts, but supports CSS styles etc. and has a lot of enhancements. Supports almost all languages, including RTL (Arabic and Hebrew) and CJK (Chinese, Japanese and Korean). Supports nested block-level elements (such as P, DIV),

SublimeText3 Chinese version
Chinese version, very easy to use

EditPlus Chinese cracked version
Small size, syntax highlighting, does not support code prompt function

VSCode Windows 64-bit Download
A free and powerful IDE editor launched by Microsoft

