Home >Common Problem >How to fix unable to reconnect all network drives issue
How to fix unable to reconnect all network drives issue
- WBOYWBOYWBOYWBOYWBOYWBOYWBOYWBOYWBOYWBOYWBOYWBOYWBforward
- 2023-05-07 14:34:1611588browse
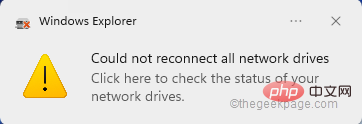
Whenever you plug a new external device into your system, Windows will recognize it and map it automatically (alternatively, you can map it manually). This feature ensures that you don't have to manually map all external drives every time you boot. In some cases, you may find this error message popping up in the corner of your screen, saying "Unable to reconnect all network drives". There are some simple solutions to this fix, including remapping the latest external drive again.
Fix 1 – Make sure Windows is actually waiting for network drives
Sometimes, Windows does boot so fast that the network drive fails in such a short time correctly mapped.
1. So, press the ⊞ Win R keys at the same time.
2. Then, enter “ gpedit.msc ” and click “ OK ”.
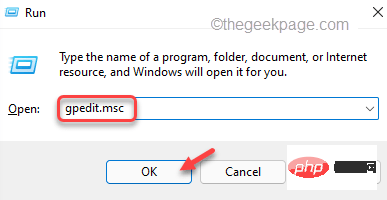
This will open the Local Group Policy Editor.
3. When it appears, by this way -
计算机配置 > 管理模板 > 系统 > 登录
4. On the right side, you will see the list of policies.
5. Just look for the "Always wait for network at computer startup and logon" policy setting.
6. Simply double-click the policy to change it.
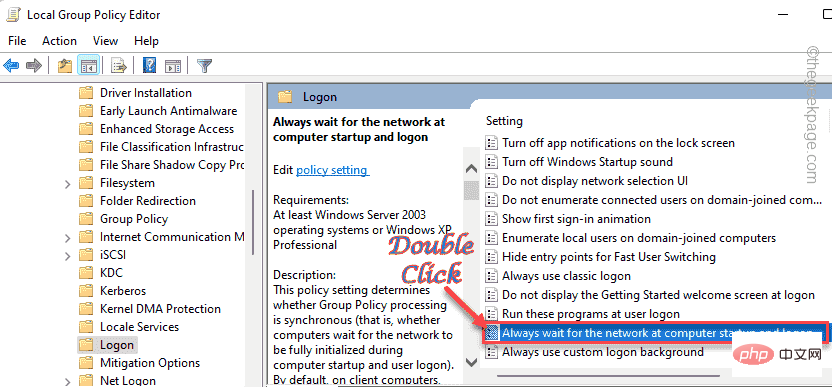
7. Set the policy setting to "Enabled".
8. After that, click "Apply" and "OK" to save the changes.
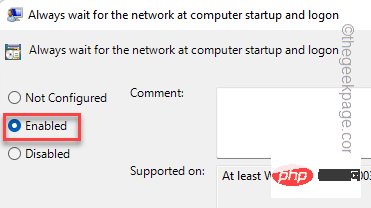
After that, close the Group Policy Editor. Restart the computer after completion.
Fix 2 – Using a batch file
You can create a batch file and then a powershell script to resolve this issue.
Step 1 CMD script
1. Enter "Notepad" in the search box.
2. Then, click "Notepad" to access.
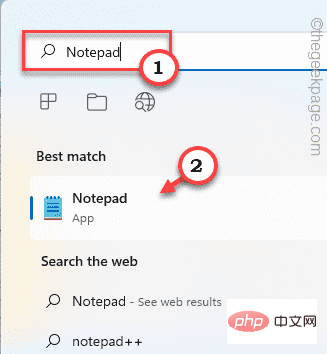
#2. With Notepad open, copy and paste these lines into Notepad.
PowerShell -Command "Set-ExecutionPolicy -Scope CurrentUser Unrestricted" >> "%TEMP%\StartupLog.txt" 2>&1 PowerShell -文件 "%SystemDrive%\Scripts\MapDrives.ps1" >> "%TEMP%\StartupLog.txt" 2>&1
3. After pasting the line in Notepad, click "File" and click "Save As...".
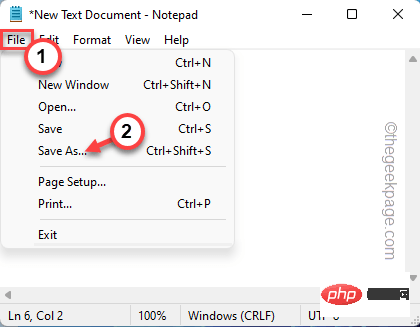
4. Next, set the file type to "All files".
7. Then, name the batch file " batch.cmd "
8. Navigate to Desktop to save the file. After that, click "Save" to save the file.
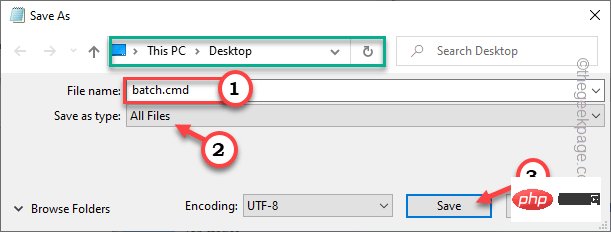
After saving the file, go to the next step.
Step 2 – POWERSHELL Script
Now, you have to make a powershell script.
1. Start Notepad again.
2. Now, copy these lines from here and paste them into the terminal.
$i=3 而($真){ $error.clear() $MappedDrives = Get-SmbMapping |where -property Status -Value Unavailable -EQ | 选择本地路径,远程路径 foreach($MappedDrives 中的 $MappedDrives) { 尝试 { New-SmbMapping -LocalPath $MappedDrive.LocalPath -RemotePath $MappedDrive.RemotePath -Persistent $True } 抓住 { 写入主机“将 $MappedDrive.RemotePath 映射到 $MappedDrive.LocalPath 时出错” } } $i = $i - 1 if($error.Count -eq 0 -Or $i -eq 0) {break} 开始-睡眠-秒 30}3. Now, click on "File" and "Save as..." to continue.

4. Then, just set "Files of type:" to "All files".
7. Just set the name of the powershell script to "MapDrives.ps1".
8. Save this file to your desktop as before.
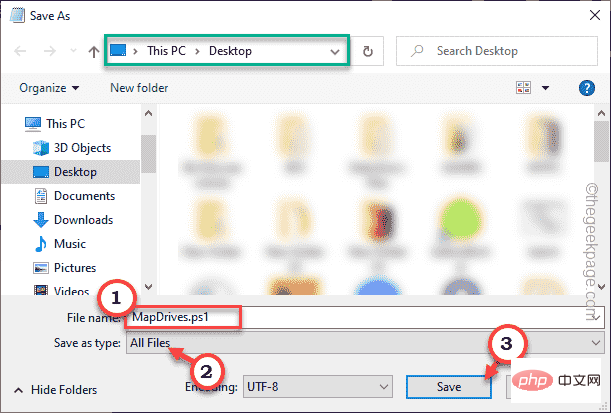
After saving these files, go to the next step.
Step 3 – Move these scripts
You can move these scripts to the Startup folder.
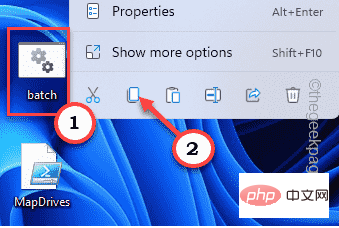
1. Go to the desktop where these scripts are saved. Right-click on the "batch.cmd" file and click on the copy icon to copy it.
#2. Now you just need to move these files to the "Startup" folder on your system.
%ProgramData%\Microsoft\Windows\开始菜单\程序\启动
[
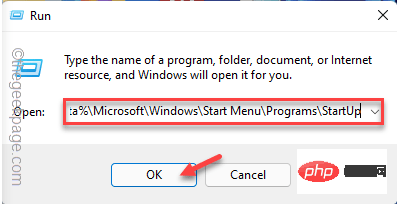
You can also navigate to this folder from Run.
A sort of. Press the Windows key and R key at the same time to open the running terminal.
Bay. Paste that address there and click "OK".
%ProgramData%\Microsoft\Windows\开始菜单\程序\启动
]
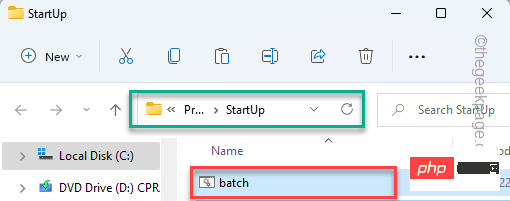
3. 现在,只需将 cmd 脚本粘贴到 Startup 文件夹中。
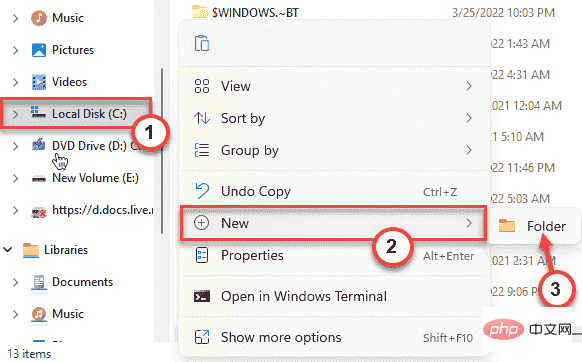
4. 之后进入系统盘(一般是C盘)。
5. 接下来,创建一个名为“ Scripts ”的新文件夹。
6. 现在,复制“ MapDrives.ps1 ”文件。
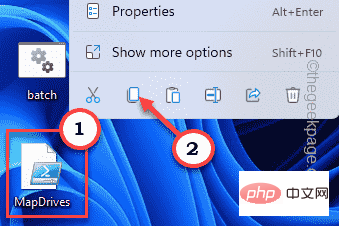
7. 将复制的 powershell 文件粘贴到Scripts文件夹中。
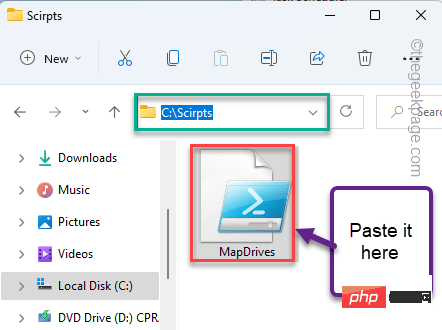
完成此操作后,关闭每个窗口并重新启动系统。
修复 3 – 使用注册表禁用通知
只需一个简单的注册表调整,您就可以轻松摆脱启动时烦人的通知。
1.首先在搜索框中输入“ regedit.msc ”。
2.之后,点击“注册表编辑器”访问它。
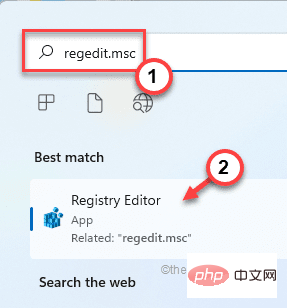
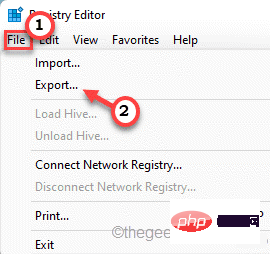
警告 – 注册表编辑器是系统上最敏感的位置之一。因此,在继续下一步之前,请对您的注册表进行新的备份。
当注册表编辑器打开时,点击“文件”并点击“导出”选项来备份注册表。
3.取完备份后,往这边走——
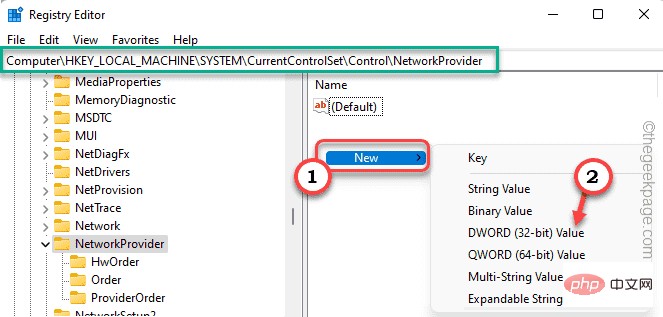
HKEY_LOCAL_MACHINE\SYSTEM\CurrentControlSet\Control\NetworkProvider
4. 现在,在右侧窗格中,查找名为“ RestoreConnection ”的值。
5. 如果您找不到任何此类值,只需右键点击空格并点击“ New> ”,然后点击“ DWORD (32-bit) Value ”。
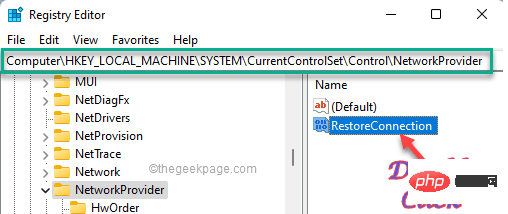
6. 现在,您将值命名为“ RestoreConnection ”。
7. 之后,只需双击它。
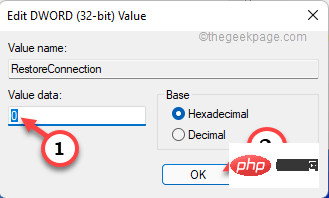
8. 将值设置为“ 0 ”。
9. 之后,点击“确定”保存更改。
关闭注册表编辑器。重新启动系统后,检查您是否面临任何此类通知问题。
修复 4 – 断开有问题的驱动器
如果您使用的是配置错误的设备,断开它应该可以帮助您解决问题。
1. 只需同时按下Windows 键+E键。
2. 然后,点击左侧的“这台电脑”。
在这里,您会注意到一起列出的所有驱动器。检查哪些驱动器的名称旁边显示了一个红十字。该设备是错误消息的原因。
3.只需右键点击驱动器并点击“显示更多选项”。
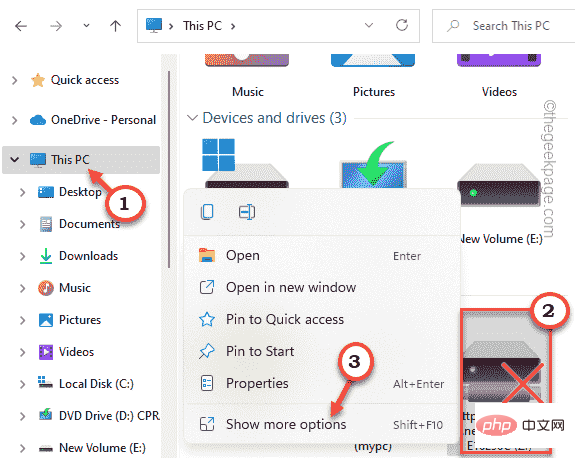
4. 点击“断开连接”以断开驱动器与系统的连接。
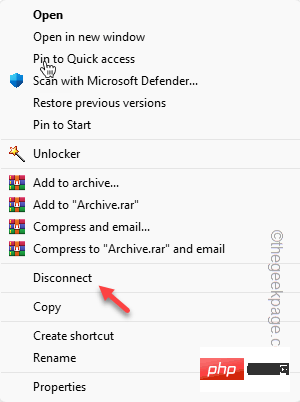
断开连接后,重新启动设备。
现在您将停止接收错误消息。另一方面,如果您以后需要它,您可以轻松地重新映射它。
修复 5 – 使用任务计划程序
您可以使用任务计划程序在系统启动时映射驱动器。
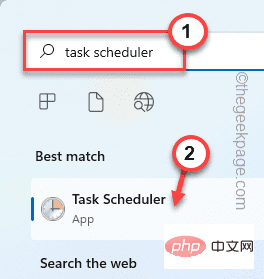
1.在搜索框中输入“任务调度程序”。
2.然后,点击“任务计划程序”访问它。
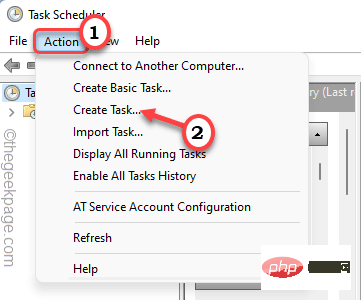
3. 打开任务计划程序屏幕后,点击“操作”,然后单击“创建任务”选项以创建新任务。
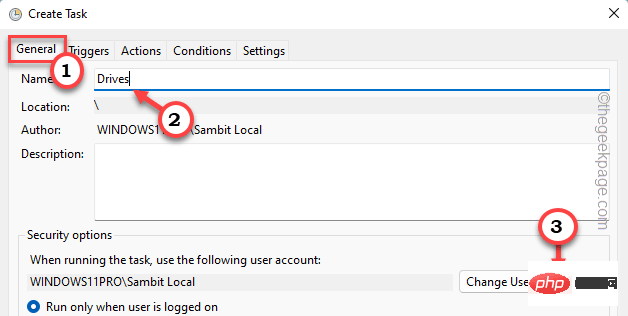
4. 在创建任务窗口中,转到“常规”选项卡。
5. 给这个任务起任何你喜欢的名字。
6. 现在,您必须更改特定的用户组。为此,请点击“更改用户或组... ”。选项。
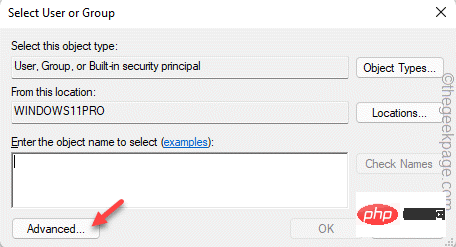
7. 现在,点击“高级”。
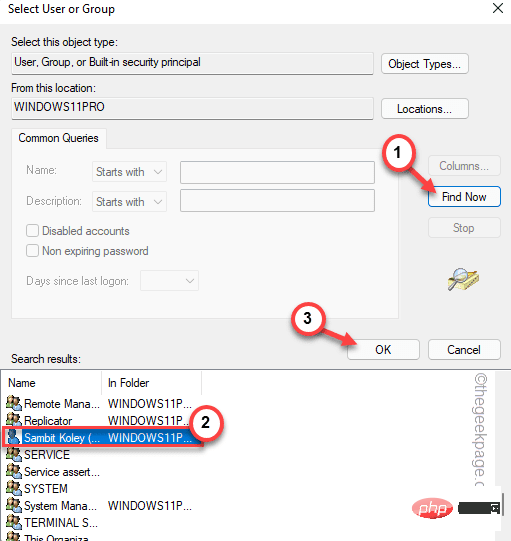
8. 只需点击“立即查找”。
9. 之后,查找您的帐户并选择它。
10.接下来,点击“确定”。
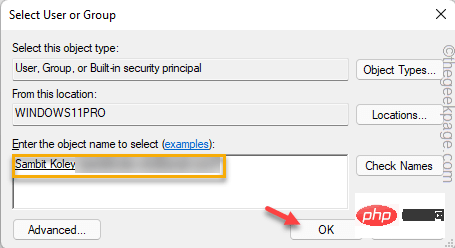
11. 最后,点击“确定”继续下一步。
12. 最后,回到创建任务窗口,选中“以最高权限运行”。

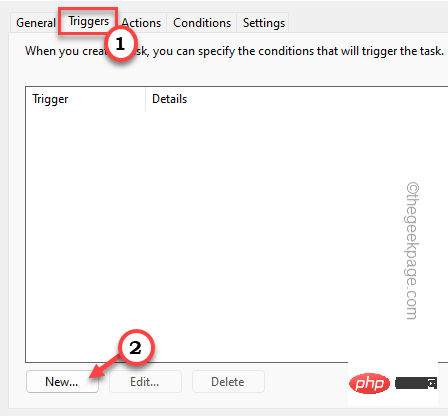
13. 然后,转到“触发器”部分。
14. 点击“新建”选项。
15. 接下来,设置“开始任务:”设置“登录时”。
16. 然后,点击“确定”。
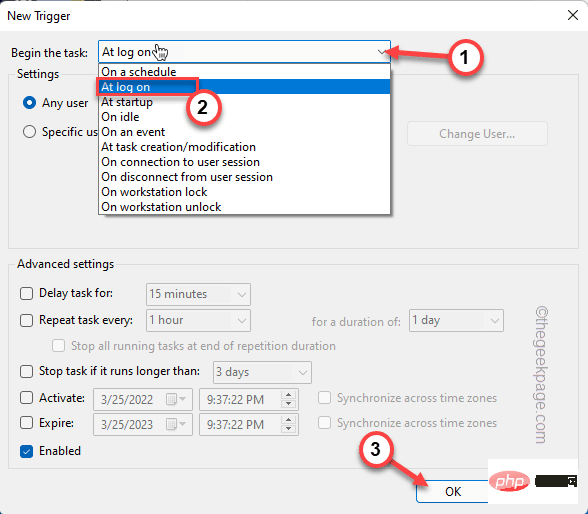
17. 转到“操作”区域。
18. 最后,点击“ New… ”选项。
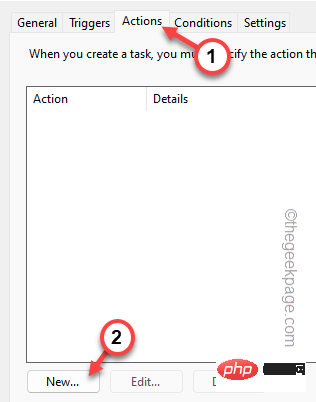
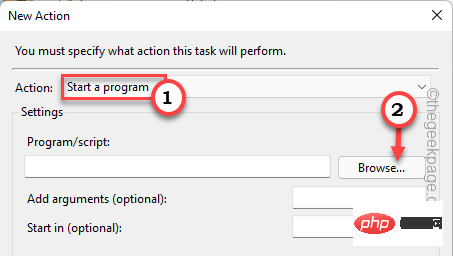
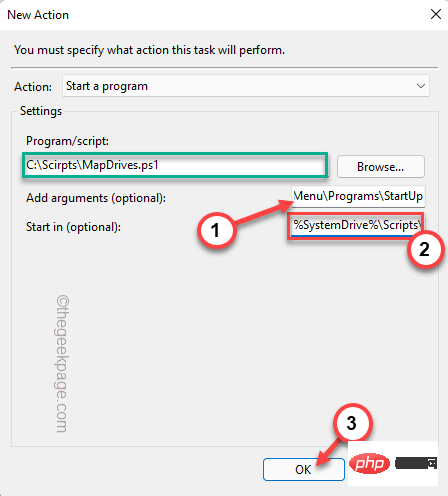
19.在New Action页面中,将“Action:”设置为“ Start a program ”。
20. 之后,点击“浏览… ”。
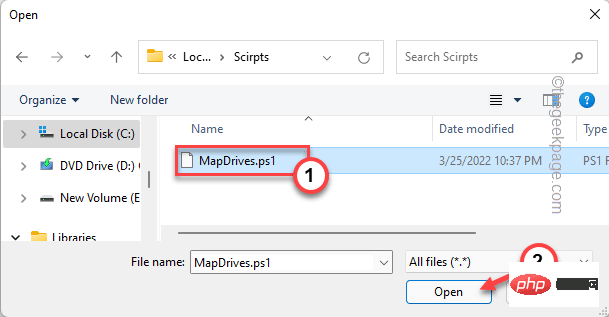
21. 此外,导航到您之前保存的 powershell 脚本 ( Fix – 2 )。
22.然后,选择powershell脚本并点击“打开”。
23.将其粘贴到“添加参数”框中。
-windowsstyle 隐藏 -command .\MapDrives.ps1 >> %TEMP%\StartupLog.txt 2>&1
24. 在“开始于”框中,粘贴-
%SystemDrive%\脚本\
25. 最后,点击“确定”。
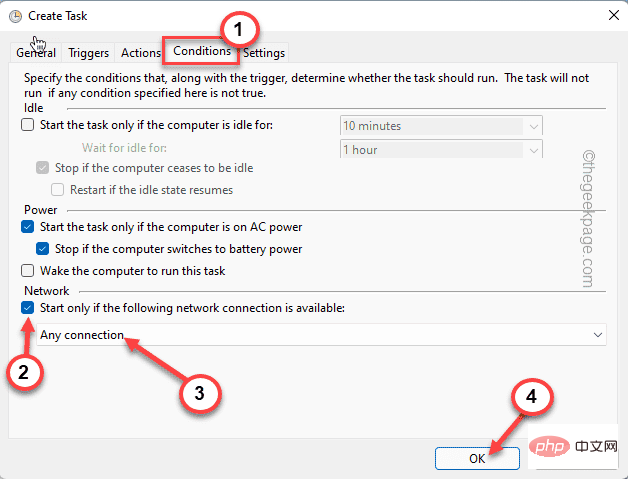
26. 转到“条件”选项卡。
27. 现在,只需检查屏幕上的最后一个选项,“仅在以下网络可用时启动”。
28.从下拉列表中选择“任何连接”。
29、最后点击“确定”,最终创建该任务。
关闭任务计划程序并重新启动系统。
修复 6 – 重新连接外部设备
如果由于外部设备而出现此问题,请尝试重新连接实际的外部设备。
这应该可以解决您面临的问题。
替代提示–
或者,您可以使用任何网络驱动器管理器来更正确地管理网络设备。
The above is the detailed content of How to fix unable to reconnect all network drives issue. For more information, please follow other related articles on the PHP Chinese website!

