


In modern macOS versions (Mojave and above), Mac has a hidden screen recording application with more advanced controls such as timer, save to target option, show/hide mouse pointer, remember last Sub-selection, microphone control, etc.
If you mainly do simple screen recording on your Mac, the native functionality is free and requires no app download.
However, if you need advanced features, we'll also cover some third-party options below.
Screen Recording on Mac: From Basics to Advanced
Built-in macOS Tools
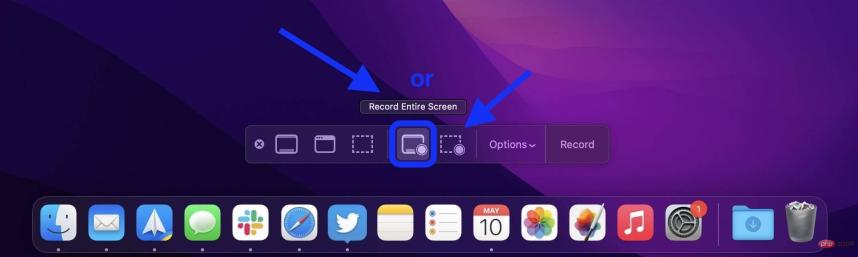
- On your Mac keyboard, press the combination command shift 5 (Can be used while running any application)
- In the bottom middle of the screen, select the rectangle with the round icon to record the entire screen or the rectangle with the round icon Dashed rectangle to record your screen selections
- If you want to enable the microphone, show mouse clicks, select a save location, etc., click the options button
- Select RecordStart
- When finished, click the "Stop" button (circle with a square icon) in the menu bar in the upper right/center corner of the screen
- By default, Your recording will appear on your Mac desktop unless you selected a different save location
You can also pull up this menu in QuickTime by clicking File > New Screen Recording, but the keyboard shortcut Usually faster.
Here's everything on Mac:
From there you can click Record to start or click OptionsCustomize your screen recording settings.

If you have multiple monitors in your setup, you will be able to select which screen to record if you select the full screen option.
When finished, click the Stop button (circle with a square icon) in the menu bar at the top center/right of the screen.

Find your saved screen recording on the desktop or in a saved location you choose when customizing
Screen recording on Mac using third-party apps
If you need advanced screen recording capabilities, the 9to5Mac team’s favorite is CleanShot X.
Capabilities include:
- Comments
- Quick access overlays
- Scroll capture in addition to entire screen, selections, windows, etc.
- Freeze Screen
- Powerful Screen Recording
- Record as GIF
- Auto-Enable Do Not Disturb
- Show/Hide Cursor
- Hide desktop clutter while recording
- Capture clicks
- Capture keystrokes
- Upload screenshots and recordings and get a link to share with CleanShot Cloud
- Tags
- Team Management Features
- Custom Domains and Brands
CleanShot X is priced at $29 for a one-time purchase of 1 Mac. This includes one year of updates (optional $19 annual subscription for future updates). Meanwhile, CleanShot Cloud Pro offers all the features, including custom domain and branding, self-destruct control, and more, starting at $8 per user per month when paid annually.
Two more third-party screen recording apps for Mac worth checking out include:
- Snagit – Free trial, then $63
- Monosnap – Free basic plan or Premium and Business plans for $2.50 or $5 per month
The above is the detailed content of Screen Recording on Mac: Tips and Tricks from Basics to Advanced. For more information, please follow other related articles on the PHP Chinese website!

Hot AI Tools

Undresser.AI Undress
AI-powered app for creating realistic nude photos

AI Clothes Remover
Online AI tool for removing clothes from photos.

Undress AI Tool
Undress images for free

Clothoff.io
AI clothes remover

Video Face Swap
Swap faces in any video effortlessly with our completely free AI face swap tool!

Hot Article
Hot Tools

SublimeText3 Linux new version
SublimeText3 Linux latest version

Dreamweaver Mac version
Visual web development tools

ZendStudio 13.5.1 Mac
Powerful PHP integrated development environment

SecLists
SecLists is the ultimate security tester's companion. It is a collection of various types of lists that are frequently used during security assessments, all in one place. SecLists helps make security testing more efficient and productive by conveniently providing all the lists a security tester might need. List types include usernames, passwords, URLs, fuzzing payloads, sensitive data patterns, web shells, and more. The tester can simply pull this repository onto a new test machine and he will have access to every type of list he needs.

SublimeText3 Mac version
God-level code editing software (SublimeText3)

