Your ISP is configured to provide a default Domain Name System (DNS) when setting up your Internet connection. This poses various security threats and slows down the internet, so DNS servers must be assigned manually.
Browse this detailed guide to learn how to change DNS settings on your Windows 11 computer and protect your online presence.
How to change DNS settings on Windows 11?
1. Use the Settings app
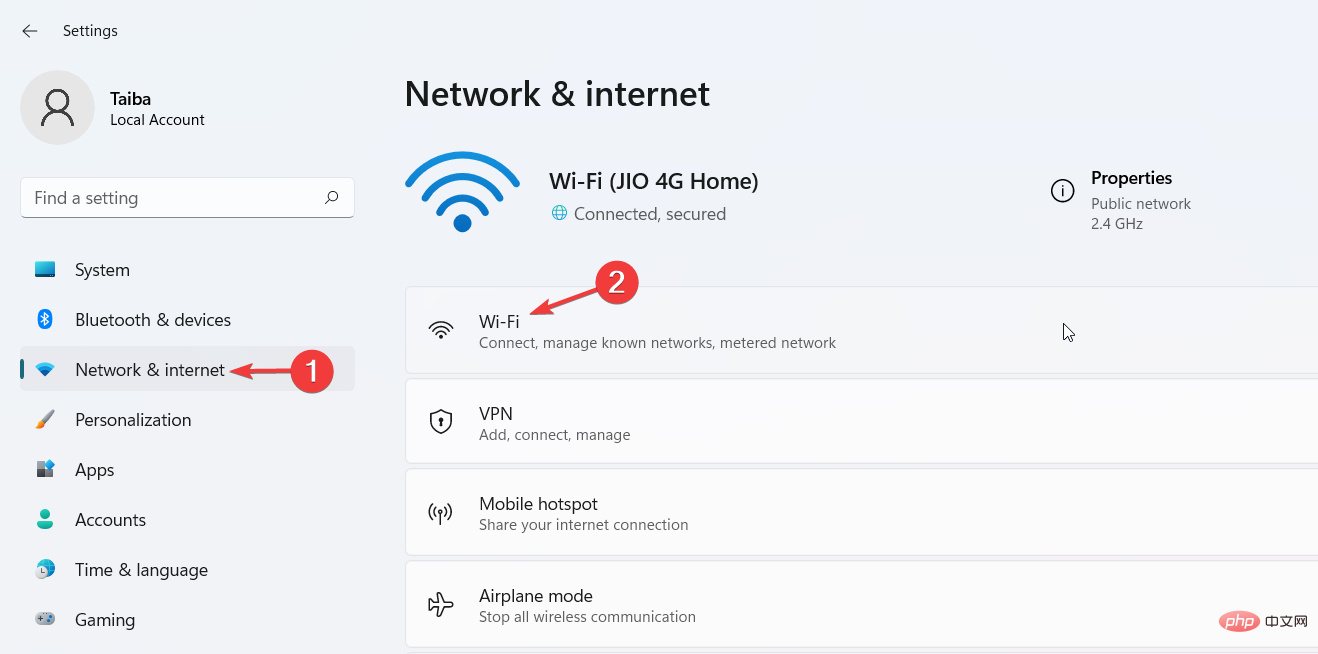
- Use the shortcut to go to the Settings app. WindowsI
- Select Network & Internet from the left sidebar, then select Wi-Fi or Ethernet from the right, depending to your internet connection.

- Scroll down and select Hardware Properties.

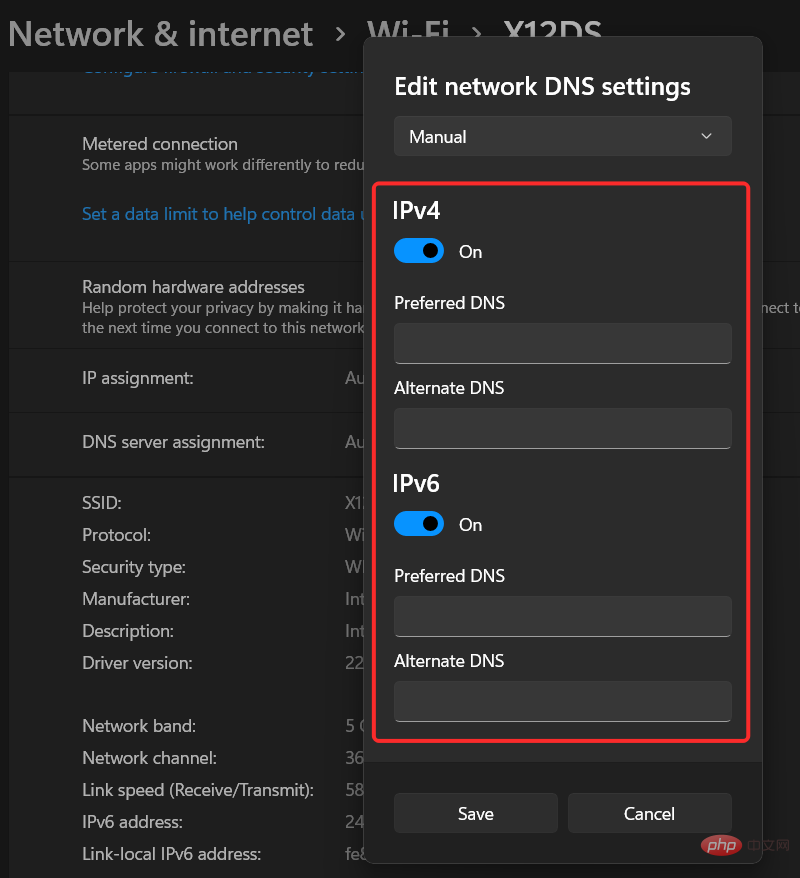
- Find the DNS Server Assignment setting and click the Edit button next to it.

- This will open the "Edit DNS Settings" pop-up window. Here, expand the drop-down menu at the top and select Manual instead of Automatic (DHCP). Next, enable the switch for
- IPv4 or IPv6 depending on the IP connection type.
 Now, provide the primary DNS server address in the
 - "Preferred DNS" field and then provide the secondary DNS server address in the "Alternate DNS" field. (For example, 8.8.8.8 is the preferred DNS address and 8.8.4.4 is the alternative DNS address for the Google DNS servers)
 If you want to enable the DNS over HTTPS feature to encrypt DNS requests, set the Encryption" and "
 - Alternate DNS Encryption" drop-down lists select "Only Encrypted (HTTPS-based) DNS".
 Press the
 - "Save" button after completing the changes.
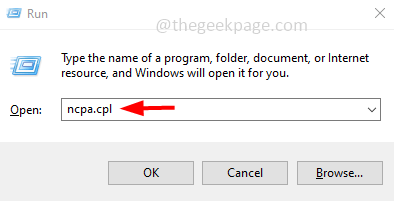
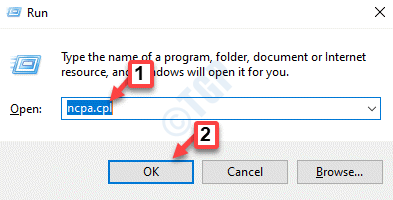
- Use the shortcut to launch the
- "Run" command window, type the following command and press "OK". This will open Network Connections directly in Control Panel. WindowsR
ncpa.cpl<strong></strong> ##right click Wi-Fi
 - or Ethernet connection, depending on your connection type, and select Properties from the context menu.
 This will open the " Wi-Fi Properties
 - " window. Double-click Internet Protocol Version 4 (TCP/IPv4) located under the This connection uses the following items section.
 In the new pop-up window, enable the Use the following DNS server address option and provide the preferred DNS server and Alternate
 - DNS server address in their respective fields . (For example, to use Cloudflare DNS servers, assign 1.1.1.1 as the preferred DNS and 1.0.0.1 as the backup DNS).
 Press the "OK"
 - button to save the changes. Many of our readers prefer Control Panel to change their Windows 11 PC’s DNS settings. Although this is one of the oldest methods of configuring DNS settings, it does not allow you to enable DNS encryption for your server.
3. Use the Command Prompt
- key, type cmd in the search bar, and then select Run as administrator located in the right pane. Windows

- Click the is button on the User Access Control popup.
- In the Command Prompt window, type or copy-paste the following command, and then press the key. Replace Preferred DNS with the primary DNS address of your preferred server. Enter
<strong>netsh interface ipv4 set dnsservers Wi-Fi Static Preferred DNS primary</strong>
- Next, type or copy-paste the following command to Assign alternate DNS server and press key. Replace the secondary DNS with the secondary DNS server address. Enter
<strong>netsh interface ipv4 add dnsservers Wi-Fi Alternate DNS index=2</strong>
- If you wantwill be done manually DNS To reset settings to automatic (DHCP), please type the following command and press the key. Enter
<strong>netsh interface ip set dns "Local Area Connection" dhcp</strong>
If you are using a wired Ethernet connection, Please replace Wi-Fi with Ethernet in the above command.
Expert Tip:
Some PC problems are difficult to solve, especially when they involve corrupted repositories or missing Windows files. If you are having trouble fixing errors, your system may be partially corrupted.
We recommend installing Restoro, a tool that will scan your machine and determine what the fault is.
Click here to download and start repairing.
We also recommend reading our guide to diagnosing and fixing the most common DNS problems tying up your Windows computer.
4. Using the Windows PowerShell
- key, type powershell and select Run as administrator from the right section. Windows
- Type and copy-paste the following command, then press the keys to find out the Interface Index of the current network configuration. Enter
<strong>Get-NetAdapter | Select-Object InterfaceAlias , InterfaceIndex</strong> ##Now type or copy paste the following command and click to assign
 - Primary DNSServer address. Replace N with the interface index of the current network: Enter
Set-DnsClientServerAddress -InterfaceIndex N -ServerAddresses 8.8.8.8<strong></strong> If you also want to assign an
 - alternate DNS address, you need to type the address after adding a comma:
Set-DnsClientServerAddress -InterfaceIndex N -ServerAddresses 8.8.8.8, 8.8.4.4<strong></strong>
The above is the detailed content of How to change DNS settings on Windows 11. For more information, please follow other related articles on the PHP Chinese website!
 win11 DNS服务器错误如何解决Jan 10, 2024 pm 09:02 PM
我们在连接网络时需要使用正确的dns才可以上网。同理,如果我们使用了错误的dns设置就会提示dns服务器错误了,这时候我们可以尝试在网络设置中选择自动获取dns来解决,下面就一起来看下具体解决方法吧。win11网络dns服务器错误怎么办方法一:重新设置DNS1、首先,点击任务栏中的开始进入,在其中找到并点开“设置”图标按钮。2、然后点击左侧栏中的“网络&Internet”选项命令。3、然后在右侧找到“以太网”选项,点击进入。4、之后,点击DNS服务器分配中的“编辑”,最后将DNS设置为“自动(D
 修复:Windows 11 更新错误 0x80072ee7Apr 14, 2023 pm 01:31 PM
某些 Windows 11 更新可能会导致问题和更大的版本,从而导致性能错误。例如,如果您不修复更新错误 0x80072ee7,它可能会使您的机器运行异常。它在不同的情况下触发,修复它取决于故障背后的原因。有时,用户报告在安装某些 Windows 更新时会出现此问题。浏览时不会随机出现安全通知和系统错误。如果发生这种情况,您的计算机可能存在不需要的程序或恶意软件。错误背后的原因各不相同,从防病毒问题到其他干扰 Windows 更新的软件。Windows 更新错误是如何发生的?如果浏览时出现 0x
 如何在 Windows 10 / 11 上的一张 LAN 卡中分配多个 IP 地址May 30, 2023 am 11:25 AM
有时需要为单个LAN卡分配多个地址。例如,如果需要运行多个具有唯一IP地址的网站或将应用程序绑定到不同的IP地址等。如果您正在考虑如何为单个网络接口卡或LAN卡分配多个地址,那么本文将帮助您实现它。按照下面的步骤直到最后,它就会完成。那么让我们开始吧!在一张LAN卡中分配多个IP地址第1步:一起使用Windows+R键打开运行提示并键入ncpa.cpl,然后按回车键打开网络连接窗口。第2步:右键单击您的网络适配器以太网或WiFi选项,然后单击属性。第3步:从属性窗口
 如何修复 Xbox Series S/X 下载速度、降低 ping 和延迟Apr 16, 2023 pm 04:49 PM
多年来,Xbox控制台得到了突飞猛进的改进。多年来,游戏不断发展,具有栩栩如生的功能,而游戏玩家似乎无法获得足够的体验。在Xbox上玩您最喜欢的游戏可能是一种完全引人入胜的体验。但是,有时使用这些高级功能,如果互联网速度不是那么好,我们最终会遇到延迟或ping问题。有时我们希望游戏下载速度更快。如今,像ForzaHorizon5和MortalKombat这样的游戏需要超过100GB的内存。如果我们没有正确的互联网设置来帮助我们,下载此类游戏可能需要很长时间。方法1:通过
 如何解决Steam错误代码105无法连接到服务器?Apr 22, 2023 pm 10:16 PM
Steam是一个流行的游戏库。它允许其用户玩游戏,并将游戏下载到他们的Steam帐户。由于它是一个基于云的库,它允许用户使用任何计算机,并允许他们在有限的计算机内存中存储许多游戏。这些功能使其在游戏玩家社区中非常受欢迎。但是,许多游戏玩家报告在他们的系统中看到以下错误代码。错误代码105-无法连接到服务器。服务器可能是离线错误这个错误主要是由于连接中的一些问题而出现的。当您在系统中看到此问题时,请尝试以下常规修复并检查问题是否得到解决。重启你的路由器。重新启动您的系统。还是看到问题了?不用担心
 如何在 Windows 11 上更改 DNS 设置May 01, 2023 pm 06:58 PM
您的ISP配置在设置互联网连接时提供默认域名系统(DNS)。这会带来各种安全威胁并降低互联网速度,因此必须手动分配DNS服务器。浏览此详细指南,了解如何更改Windows11计算机上的DNS设置并保护您的在线状态。如何更改Windows11上的DNS设置?1.使用“设置”应用使用+快捷方式转到“设置”应用。WindowsI从左侧边栏中选择网络和互联网,然后从右侧选择Wi-Fi或以太网,具体取决于您的互联网连接。向下滚动并选择硬件属性。找到DNS服务器分配设置,然后单击它
 修复:DNS 服务器没有响应 Windows 11 中的问题Jun 01, 2023 pm 04:52 PM
当Windows用户无法在系统上的浏览器上浏览或加载网页时,他们碰巧想到了可能导致此问题的所有因素。尽管许多Windows用户在他们的系统上解决此问题时,它会抛出一条错误消息,指出“DNS服务器没有响应”,用户不知道如何解决此问题以使用稳定的互联网连接。我们在这篇文章中提出了一个解决方案,它肯定会解决这个问题。但是,请事先尝试这些解决方法——尝试重新启动路由器并检查这是否导致问题。更改浏览器应用程序。也就是说,如果您使用的是MicrosoftEdge浏览器,请将其关闭并打开Google
 解决“Windows 11 上的 DNS 服务器未响应”问题的 12 种方法Apr 15, 2023 pm 10:46 PM
什么是DNS?DNS是域名系统的首字母缩写词,它是一个分散的命名系统,所有计算机、服务器和更多试图连接到互联网的设备都使用它。DNS有助于识别您的PC和发送到它的流量,系统会自动破译并显示必要的信息。为什么我在Windows11上收到“DNS服务器没有响应”?这个问题可能有很多原因。有时,Windows可能会将网络问题误认为是DNS问题,而有时它很可能是第三方应用程序干扰了您的网络。最近对AVG防病毒软件的更新似乎是导致此问题的主要原因,禁用该更新似乎可以解决大多数用户的此问题

Hot AI Tools

Undresser.AI Undress
AI-powered app for creating realistic nude photos

AI Clothes Remover
Online AI tool for removing clothes from photos.

Undress AI Tool
Undress images for free

Clothoff.io
AI clothes remover

AI Hentai Generator
Generate AI Hentai for free.

Hot Article

Hot Tools

Atom editor mac version download
The most popular open source editor

mPDF
mPDF is a PHP library that can generate PDF files from UTF-8 encoded HTML. The original author, Ian Back, wrote mPDF to output PDF files "on the fly" from his website and handle different languages. It is slower than original scripts like HTML2FPDF and produces larger files when using Unicode fonts, but supports CSS styles etc. and has a lot of enhancements. Supports almost all languages, including RTL (Arabic and Hebrew) and CJK (Chinese, Japanese and Korean). Supports nested block-level elements (such as P, DIV),

SublimeText3 Linux new version
SublimeText3 Linux latest version

VSCode Windows 64-bit Download
A free and powerful IDE editor launched by Microsoft

ZendStudio 13.5.1 Mac
Powerful PHP integrated development environment


 ##right click
  This will open the "
 In the new pop-up window, enable the Use the following DNS server address option and provide the preferred DNS server and
  Press the


