Home >Java >javaTutorial >How to use Springboot to quickly integrate shiro security framework
How to use Springboot to quickly integrate shiro security framework
- WBOYWBOYWBOYWBOYWBOYWBOYWBOYWBOYWBOYWBOYWBOYWBOYWBforward
- 2023-04-25 08:04:061283browse
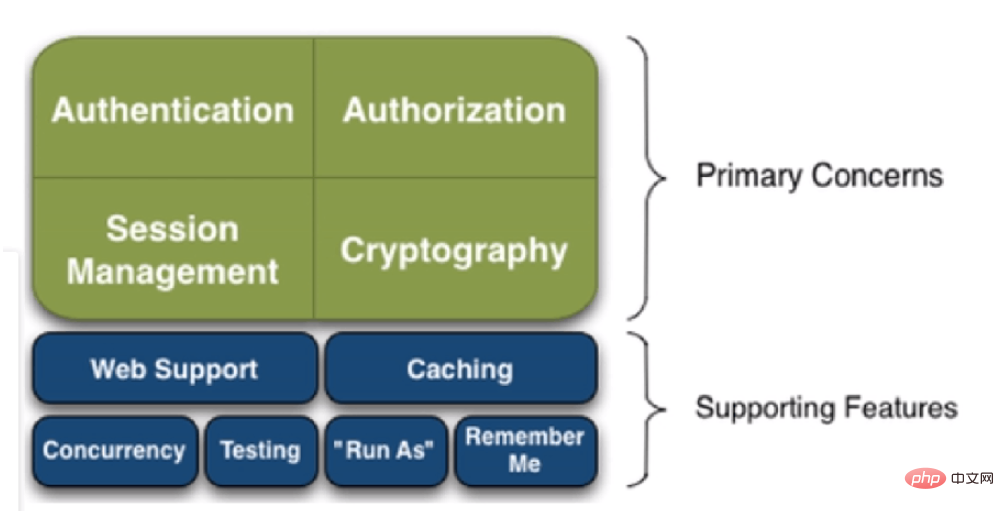
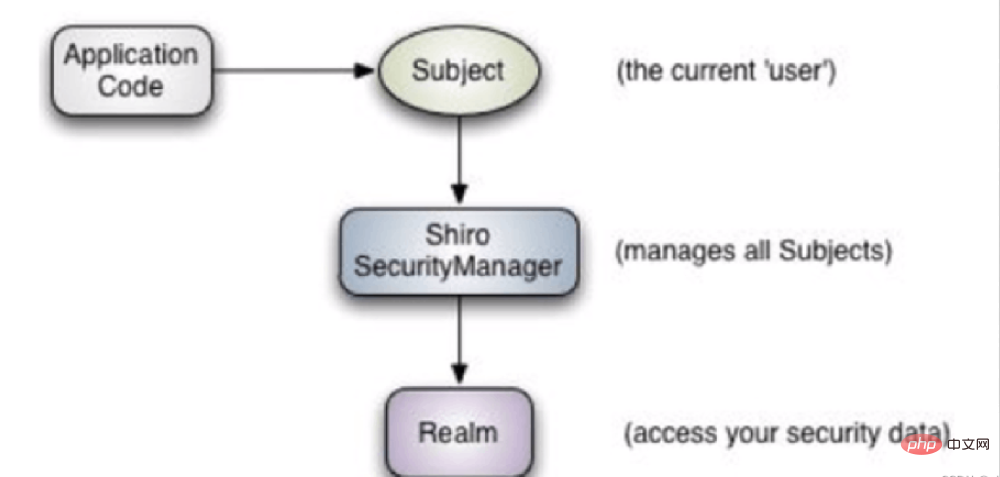
Let’s first popularize what shiro is. Shiro’s original name is Apache Shiro. It is a Java security (permission) framework. Shiro makes it very easy to develop good enough applications that can be used not only in the JavaSE environment, but also in the JavaEE environment. Shiro can complete authentication, authorization, encryption, session management, web integration, caching and other advanced applications. See the function and architecture diagram of shiro as shown in the figure:


Without further ado, Springboot integrates shiro, let’s go directly to the code
pom.xml file
<?xml version="1.0" encoding="UTF-8"?>
<project xmlns="http://maven.apache.org/POM/4.0.0" xmlns:xsi="http://www.w3.org/2001/XMLSchema-instance"
         xsi:schemaLocation="http://maven.apache.org/POM/4.0.0 https://maven.apache.org/xsd/maven-4.0.0.xsd">
    <modelVersion>4.0.0</modelVersion>
    <parent>
        <groupId>org.springframework.boot</groupId>
        <artifactId>spring-boot-starter-parent</artifactId>
        <version>2.6.11</version>
        <relativePath/> <!-- lookup parent from repository -->
    </parent>
    <groupId>com.example</groupId>
    <artifactId>demo02</artifactId>
    <version>0.0.1-SNAPSHOT</version>
    <name>demo02</name>
    <description>demo02</description>

    <properties>
        <java.version>1.8</java.version>
    </properties>

    <dependencies>
        <dependency>
            <groupId>org.apache.shiro</groupId>
            <artifactId>shiro-spring</artifactId>
            <version>1.4.1</version>
        </dependency>

        <dependency>
            <groupId>org.mybatis.spring.boot</groupId>
            <artifactId>mybatis-spring-boot-starter</artifactId>
            <version>2.1.0</version>
        </dependency>
        <dependency>
            <groupId>mysql</groupId>
            <artifactId>mysql-connector-java</artifactId>
           <version>8.0.31</version>
        </dependency>
        <!-- https://mvnrepository.com/artifact/log4j/log4j -->
        <dependency>
            <groupId>log4j</groupId>
            <artifactId>log4j</artifactId>
            <version>1.2.17</version>
        </dependency>
        <!-- https://mvnrepository.com/artifact/com.alibaba/druid -->
        <dependency>
            <groupId>com.alibaba</groupId>
            <artifactId>druid</artifactId>
            <version>1.1.12</version>
        </dependency>

        <dependency>
            <groupId>org.projectlombok</groupId>
         <artifactId>lombok</artifactId>
           <version>1.18.18</version>
            <scope>compile</scope>
        </dependency>


        <dependency>
            <groupId>org.springframework.boot</groupId>
            <artifactId>spring-boot-starter-thymeleaf</artifactId>
        </dependency>
        <dependency>
            <groupId>org.thymeleaf</groupId>
            <artifactId>thymeleaf</artifactId>
        </dependency>
        <dependency>
            <groupId>org.thymeleaf.extras</groupId>
            <artifactId>thymeleaf-extras-java8time</artifactId>
        </dependency>
        <dependency>
            <groupId>org.springframework.boot</groupId>
            <artifactId>spring-boot-starter-web</artifactId>
        </dependency>

        <dependency>
            <groupId>org.springframework.boot</groupId>
            <artifactId>spring-boot-starter-test</artifactId>
            <scope>test</scope>
        </dependency>

        <dependency>
            <groupId>com.github.theborakompanioni</groupId>
            <artifactId>thymeleaf-extras-shiro</artifactId>
            <version>2.0.0</version>
        </dependency>


    </dependencies>

    <build>
        <plugins>
            <plugin>
                <groupId>org.apache.maven.plugins</groupId>
                <artifactId>maven-compiler-plugin</artifactId>
                <version>3.8.1</version>
                <configuration>
                    <source>1.8</source>
                    <target>1.8</target>
                    <encoding>UTF-8</encoding>
                </configuration>
            </plugin>
            <plugin>
                <groupId>org.springframework.boot</groupId>
                <artifactId>spring-boot-maven-plugin</artifactId>
            </plugin>
        </plugins>
    </build>

</project>
Then we create a database /*
Navicat MySQL Data Transfer
Source Server:
Source Server Version: 80030
Source Host : localhost:3306
Source Database : mybatis
Target Server Type : MYSQL
Target Server Version : 80030
File Encoding : 65001
Date : 2023-03-14 18:00:05
*/
SET FOREIGN_KEY_CHECKS=0;
– Table structure for user
DROP TABLE IF EXISTS user;
CREATE TABLE user (id int NOT NULL AUTO_INCREMENT,name varchar(255) DEFAULT NULL,pwd varchar(255) DEFAULT NULL,perms varchar(100) DEFAULT NULL,
PRIMARY KEY (id)
) ENGINE=InnoDB AUTO_INCREMENT=4 DEFAULT CHARSET=utf8mb4 COLLATE=utf8mb4_0900_ai_ci;
– Records of user
INSERT INTO user VALUES (‘1’ , ‘qin’, ‘d1b129656359e35e95ebd56a63d7b9e0’, ‘user:add’);
INSERT INTO user VALUES (‘2’, ‘hai’, ‘123’, &ls; user:insert’);
INSERT INTO user VALUES (‘3’, ‘root’, ‘d1b129656359e35e95ebd56a63d7b9e0’, ‘user:update’);
application .yml file
spring:
   datasource:
      username: xxxx
      password: xxxxxxxxxxxx
      url: jdbc:mysql://localhost:3306/mybatis
      driver-class-name: com.mysql.cj.jdbc.Driver
      type: com.alibaba.druid.pool.DruidDataSource
mybatis:
   mapper-locations: classpath:mapper/*tat.slowSqlMillis=500
controller layer MyController class
package com.example.demo02.controller;

import lombok.extern.slf4j.Slf4j;
import org.apache.shiro.SecurityUtils;
import org.apache.shiro.authc.IncorrectCredentialsException;
import org.apache.shiro.authc.UnknownAccountException;
import org.apache.shiro.authc.UsernamePasswordToken;
import org.apache.shiro.subject.Subject;
import org.springframework.stereotype.Controller;
import org.springframework.ui.Model;
import org.springframework.web.bind.annotation.RequestMapping;
import org.springframework.web.bind.annotation.RequestParam;
import org.springframework.web.bind.annotation.ResponseBody;

@Controller
@Slf4j
public class MyController {

    @RequestMapping("/")
    public  String toIndex(Model model){
        model.addAttribute("msg","hello,shiro");
        return "login";

    }


    @RequestMapping("/user/add")
    public String add(){
        return "user/add";
    }

    @RequestMapping("/user/update")
    public String update(){
        return  "user/update";
    }
    @RequestMapping("/toLogin")
    public String toLogin(){
        return "login";
    }

    @RequestMapping("/noauth")
    @ResponseBody
    public String noAuth(){
        return "未经授权不能访问此页面";
    }

    //登录操作
    @RequestMapping("/login")
    public String login(String username, String password, @RequestParam(defaultValue = "false")boolean rememberMe,Model model){
//使用shiro,编写认证操作
//1. 获取Subject
        Subject subject = SecurityUtils.getSubject();
//2. 封装用户的数据
        UsernamePasswordToken token = new UsernamePasswordToken(username, password,rememberMe);
//3. 执行登录的方法,只要没有异常就代表登录成功!
        try {
            subject.login(token); //登录成功!返回首页
            System.out.println("输出认证成功跳转页面");


            return "index";
        } catch (UnknownAccountException e) { //用户名不存在
            model.addAttribute("msg","用户名不存在");
            return "login";
        } catch (IncorrectCredentialsException e) { //密码错误
            model.addAttribute("msg","密码错误");
            return "login";
        }
    }
}
pojo layer User
package com.example.demo02.pojo;

import lombok.AllArgsConstructor;
import lombok.Data;
import lombok.NoArgsConstructor;
@Data
@AllArgsConstructor
@NoArgsConstructor
public class User {
    private int id;
    private String name;
    private String pwd;
    private String perms;
}
config layer configuration two classes
The first class ShiroConfig
package com.example.demo02.config;

import at.pollux.thymeleaf.shiro.dialect.ShiroDialect;
import org.apache.shiro.authc.credential.HashedCredentialsMatcher;
import org.apache.shiro.spring.web.ShiroFilterFactoryBean;
import org.apache.shiro.web.mgt.DefaultWebSecurityManager;
import org.springframework.beans.factory.annotation.Qualifier;
import org.springframework.context.annotation.Bean;
import org.springframework.context.annotation.Configuration;

import java.util.LinkedHashMap;
import java.util.Map;

//声明为配置类
@Configuration
public class ShiroConfig {
    //创建 ShiroFilterFactoryBean
    @Bean
    public ShiroFilterFactoryBean
    getShiroFilterFactoryBean(@Qualifier("securityManager")DefaultWebSecurityManager securityManager){
        ShiroFilterFactoryBean shiroFilterFactoryBean = new ShiroFilterFactoryBean();
//设置安全管理器
        shiroFilterFactoryBean.setSecurityManager(securityManager);
/*
添加Shiro内置过滤器,常用的有如下过滤器:
anon: 无需认证就可以访问
authc: 必须认证才可以访问
user: 如果使用了记住我功能就可以直接访问
perms: 拥有某个资源权限才可以访问
role: 拥有某个角色权限才可以访问
*
/

 */
        //进行一个拦截
    Map<String,String> filterMap = new LinkedHashMap<String, String>();
//    filterMap.put("/user/add","authc");
//    filterMap.put("/user/update","authc");
        //授权
//        filterMap.put("/user/add","perms[user:add]"); //大家记得注意顺序!

        filterMap.put("/user/add","perms[user:add]");
        filterMap.put("/user/update","perms[user:update]");
        filterMap.put("/user/*","authc");
        shiroFilterFactoryBean.setFilterChainDefinitionMap(filterMap);


    shiroFilterFactoryBean.setLoginUrl("/toLogin");
    //未授权页面
        shiroFilterFactoryBean.setUnauthorizedUrl("/noauth");
        return shiroFilterFactoryBean;
}
    //创建 DefaultWebSecurityManager
    @Bean(name = "securityManager")
    public DefaultWebSecurityManager
    getDefaultWebSecurityManager(@Qualifier("userRealm")UserRealm userRealm){
        DefaultWebSecurityManager securityManager = new DefaultWebSecurityManager();
        //2创建加密对象,设置相关属性
        HashedCredentialsMatcher matcher = new HashedCredentialsMatcher();
        //2.1采用md5加密
        matcher.setHashAlgorithmName("md5");
        //2.2迭代加密次数
        matcher.setHashIterations(3);
        //3将加密对象存储到myRealm中
        userRealm.setCredentialsMatcher(matcher);


//关联Realm
        securityManager.setRealm(userRealm);
        return securityManager;
    }
    //创建 realm 对象
    @Bean
    public UserRealm userRealm(){
        return new UserRealm();
    }

    //配置ShiroDialect:方言,用于 thymeleaf 和 shiro 标签配合使用
    @Bean
    public ShiroDialect getShiroDialect(){
        return new ShiroDialect();
    }
}
UserRealm
package com.example.demo02.config;


import com.example.demo02.pojo.User;
import com.example.demo02.service.UserService;
import org.apache.shiro.SecurityUtils;
import org.apache.shiro.authc.*;
import org.apache.shiro.authz.AuthorizationInfo;
import org.apache.shiro.authz.SimpleAuthorizationInfo;
import org.apache.shiro.realm.AuthorizingRealm;
import org.apache.shiro.subject.PrincipalCollection;
import org.apache.shiro.subject.Subject;
import org.apache.shiro.util.ByteSource;
import org.springframework.beans.factory.annotation.Autowired;

import java.util.List;

//自定义得UserRaelm
public class UserRealm extends AuthorizingRealm {

    @Autowired
    UserService userService;
    //授权
    @Override
    protected AuthorizationInfo doGetAuthorizationInfo(PrincipalCollection principalCollection) {
        System.out.println("执行了=》授权doGetAuthorizationInfo");
        SimpleAuthorizationInfo info=new SimpleAuthorizationInfo();

//        info.addStringPermission("user:update");
        info.addStringPermission("user:add");
        //拿到当前用户登陆对象
        Subject subject= SecurityUtils.getSubject();
        User currentUser= (User) subject.getPrincipal();//拿到User对象
         info.addStringPermission(currentUser.getPerms());//设置当前用户对象

        return info;
    }

    //执行认证逻辑
    @Override
    protected AuthenticationInfo doGetAuthenticationInfo(AuthenticationToken token) throws AuthenticationException {
        System.out.println("执行了=>认证逻辑AuthenticationToken");
//假设数据库的用户名和密码
//        String name = "root";
//        String password = "123456";


//1.判断用户名
        UsernamePasswordToken userToken = (UsernamePasswordToken)token;
       //连接真实的数据库
        User user= userService.queryUserByName(userToken.getUsername());
//
        if(user==null){
            return  null;
        }
        Subject subject = SecurityUtils.getSubject();
        subject.getSession().setAttribute("loginUser",user);


//2. 验证密码,我们可以使用一个AuthenticationInfo实现类SimpleAuthenticationInfo
// shiro会自动帮我们验证!重点是第二个参数就是要验证的密码!
        return new SimpleAuthenticationInfo(user, user.getPwd(),ByteSource.Util.bytes("salt"),"");
//        if(user !=null){
//            AuthenticationInfo info = new SimpleAuthenticationInfo(
//                    token.getPrincipal(),
//                    user.getPwd(),
//                    ByteSource.Util.bytes("salt"),
//                    token.getPrincipal().toString()
//            );
//            return info;
//        }
//        return null;


    }
}
service layer
First the class UserServiceImpl
package com.example.demo02.service;


import com.example.demo02.mapper.UserMapper;
import com.example.demo02.pojo.User;
import org.springframework.beans.factory.annotation.Autowired;
import org.springframework.stereotype.Service;
@Service
public class UserServiceImpl implements UserService {
    @Autowired
    UserMapper userMapper;
    @Override
    public User queryUserByName(String name) {
        return userMapper.queryUserByName(name);
    }
}
Then the interface UserService
package com.example.demo02.service;

import com.example.demo02.pojo.User;

public interface UserService {
    public User queryUserByName(String name);
}
mapper layer
Interface Usermapper
package com.example.demo02.mapper;

import com.example.demo02.pojo.User;
import org.apache.ibatis.annotations.Mapper;
import org.apache.ibatis.annotations.Param;
import org.apache.ibatis.annotations.Select;
import org.springframework.stereotype.Repository;

@Repository
//@Mapper
public interface UserMapper {
    @Select("select * from user where name=#{name}")
    public User queryUserByName(@Param("name") String name);
}
Then there are the static and templates in the front-end resources
The back-end implementation authentication diagram

The data stored in the database is an encrypted file

The above is the detailed content of How to use Springboot to quickly integrate shiro security framework. For more information, please follow other related articles on the PHP Chinese website!
Related articles
See more- How to Inject Dependencies into Self-Instantiated Objects in Spring?
- Where Should You Place Your JFrames?
- Implicit vs. Explicit Waits in Selenium-WebDriver: Which Should You Choose?
- How to Dynamically Add Files to the Java Classpath at Runtime?
- API Debugging: Best Practices for Fetching Test Data from a Database

