Home >Java >javaTutorial >How to use Docker to build a Java running environment
How to use Docker to build a Java running environment
- WBOYWBOYWBOYWBOYWBOYWBOYWBOYWBOYWBOYWBOYWBOYWBOYWBforward
- 2023-04-24 22:40:112269browse
>What does docker do?
Docker is an advanced container engine based on linux container (lxc-linux container), developed based on go language,
The source code is hosted on github and is open source in compliance with the apache2.0 agreement. The goal of docker is to implement a lightweight operating system virtualization solution.
To learn docker, you must first understand a few concepts:
Image - Docker’s image is similar to the common system ISO image and contains application information;
Container - The container is equivalent to a virtual machine that can be run. The application runs in the container, and docker runs on "docker";
Warehouse - The warehouse is a place where images are stored, similar to git Version control is also divided into two forms: public warehouse (public) and private warehouse (private);
Docker supports most Linux distributions. By using docker containers, you can run on different operating systems.
Run your own applications on different machines without having to worry about hardware, operating environment and other configurations. Application migration becomes very simple.
>Comparison between docker and traditional virtualization technology
Compared with traditional virtual machine technology, docker takes up less resources, starts faster, and is very Convenient project deployment and operation and maintenance.
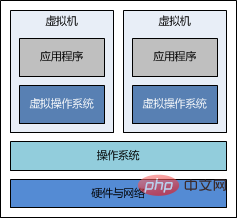
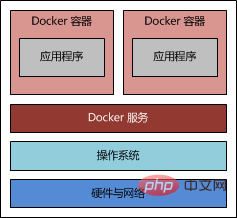
Docker implements virtualization at the operating system level and reuses the operating system of the local host. The traditional method is to virtualize multiple operating systems based on hardware and then deploy related Applications.
The picture below refers to the relevant blog post, which vividly illustrates the difference between traditional virtualization technologies such as docker and vm:
 vs
vs
>Building a docker environment
I am using ubuntu 14.04 and install the docker service on it.
Quick installation of docker
The 14.04 version of the ubuntu warehouse already supports the installation of docker,
You can use the quick installation method,
sudo apt-get update
sudo apt-get install docker.io
Start services and daemons
service docker.io status
service docker.io start
This method of installation is usually not the latest version of docker.
If you want to install the latest version, you can go to the docker official website to download and install it.
>Create the first docker image
The general process of building a docker image is to first create a container, and modify the image in the container, and configure the relevant environment, etc., and finally submit the modifications as a new image.
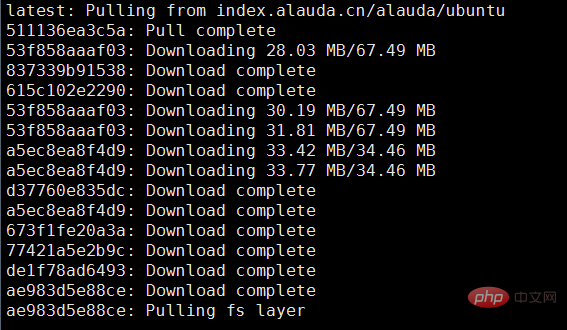
(1) Download the image file
Download the system used to make the image,
sudo docker pull index.alauda.cn/alauda/ubuntu

Here I download the image from Lingqueyun Center pull.
Or you can pull it directly from the docker mirror center, but it seems to be very slow:
sudo docker pull ubuntu
After the download is successful, use the images command to view the local mirror list:
docker images

It should be noted here that when using docker, please add sudo.
After docker is installed by default, you need to run the sudo command every time you execute docker. If you do not follow sudo, directly executing the docker command will report some permission errors.
(2) Start the container and modify the image
After the image is downloaded locally, you can use docker to run it,
Start the container through the following command parameters,
docker run
-i: Indicates running the container in "interactive mode"
-t: Indicates that the command line will be entered after the container is started
-v: Indicates which local directory needs to be mounted into the container,
Format: -v
My related programs are all in the /data/software/ directory of the current machine, and I want to mount it Load to the same directory of the container:
sudo docker run -i -t -v /data/software/:/data/software/ ae983d5e88ce /bin/bash
"Image ID", you can also use "warehouse name: tag name", for example: index.alauda.cn/alauda/ubuntu:latest.
The above command can use the specified image to run a shell. If you want to exit the terminal, you can use the exit command, or press ctrl -p ctrl -q in sequence to switch to the host machine. However, in this way, the container still runs the day after tomorrow.
After starting the terminal, enter the /data/software/ directory, you can find that the files in the current machine directory have been synchronized: 
(3) Install jdk and tomcat, etc.
Install related jdk and other programs, all are installed to the /data/ directory:
tar -zxvf jdk-7u25-linux-x64.tar.gz -c /data/
mv jdk1.7.0_25 jdk

unzip apache-tomcat-7.0.54.zip -d /data/
mv apache-tomcat-7.0.54 tomcat
Configure environment variables
vi /etc/profile
Add the following configuration:
#set java environment
export java_home=/data/jdk
export jre_home=${java_home}/jre
export classpath=.:javahome/lib:javahome/lib:{jre_home}/lib
export path=javahome/bin:javahome/bin:path

export catalina_home=/data/tomcat
export catalina_base=/data/tomcat
Save and exit, the settings will take effect immediately:
source /etc/profile
(4) Write startup script
启动tomcat时必须通过tomcathome/bin/catalina.sh实现,不能使用tomcathome/bin/catalina.sh实现,不能使用tomcat_home/bin/startup.sh启动,否则脚本执行后容器会马上退出。
vi /data/start.sh
添加以下内容:
#!/bin/bash
# export environment variable
source /etc/profile
# start tomcat
bash /data/tomcat/bin/catalina.sh run
添加可执行权限:chmod u+x /data/start.sh
(5)构建镜像
使用docker构建镜像的两种方法:
使用docker commit 命令,更直观一些;
使用docker build命令和dockerfile文件,可以模板化镜像构建过程;
这里使用docker commit的方式创建镜像。
查看容器列表:
sudo docker ps -a
container id image command created status ports names
39b2cf60a4c1 ae983d5e88ce:latest "/bin/bash" 5 hours ago exited (0) 9 seconds ago dreamy_euclid
提交一个新的镜像:
sudo docker commit 39b2cf60a4c1 bingyue/docdemo
如果有docker账号,可以将镜像推送到docker hub或资金的私有registry中。
现在查看本地的docker镜像,
sudo docker images

可以看到本地仓库已经有刚刚创建的docker镜像。
repository tag image id created virtual size
bingyue/docdemo latest bfc7ed316d42 about a minute ago 528.2 mb
index.alauda.cn/alauda/ubuntu latest ae983d5e88ce 10 months ago 255.1 mb
docker inspect可以查看新创建的镜像的详细信息:
sudo docker inspect bingyue/docdemo
(6)运行新创建的镜像
docker run -d -p 18080:8080 --name docdemo bingyue/docdemo /data/start.sh
-p:表示宿主机与容器的端口映射,此时将容器内部的 8080 端口映射为宿主机的 18080 端口,
这样就向外界暴露了 18080 端口,可通过 docker 网桥来访问容器内部的 8080 端口了。
查看后台是否启动成功:
docker ps
测试访问:
(7)提交至docker仓库
如果有docker仓库的账户,可以将本地创建的镜像提交至仓库。
>使用体验
到这一步,差不多完成了docker的初体验,docker应用还是比较简单的,真正复杂的应该是背后的虚拟化技术。
一步一步部署下来,的确docker相比传统的虚拟机技术要简单了很多,有机会继续深入学习。
附:添加docker用户组,避免sudo输入
默认安装完 docker 后,每次执行 docker 都需要运行 sudo 命令,影响效率。如果不跟 sudo,直接执行 docker images 命令会有如下问题:
get http:///var/run/docker.sock/v1.18/images/json: dial unix /var/run/docker.sock: permission denied. are you trying to connect to a tls-enabled daemon without tls?
把当前用户执行权限添加到相应的docker用户组里面就可以解决这个问题。
添加一个新的docker用户组
sudo groupadd docker
# 添加当前用户到docker用户组里
sudo gpasswd -a bingyue docker
# 重启docker后台监护进程
sudo service docker restart
# 重启之后,尝试一下,是否生效
docker version
#若还未生效,则系统重启,则生效
sudo reboot
docker常用命令
# 下载一个ubuntu镜像
sudo docker pull ubuntu
# 使用ubuntu运行一个交互性的shell
sudo docker run -i -t ubuntu /bin/bash
#docker ps命令
sudo docker ps #列出当前所有正在运行的container
sudo docker ps -l #列出最近一次启动的,且正在运行的container
sudo docker ps -a #列出所有的container
#port命令
docker run -p 80:8080 <image> <cmd> #映射容器的8080端口到宿主机的80端口
#删除容器命令
sudo docker rm `sudo docker ps -a -q`#删除所有容器
sudo docker rm $container_id#删除容器id为container_id的容器
#其他命令快速参考:
sudo docker images #查看本地镜像
sudo docker attach $container_id #启动一个已存在的docker实例
sudo docker stop $container_id #停止docker实例
sudo docker logs $container_id #查看docker实例运行日志,确保正常运行
sudo docker inspect $container_id #查看container的实例属性,比如ip等等
The above is the detailed content of How to use Docker to build a Java running environment. For more information, please follow other related articles on the PHP Chinese website!

