

AngularJS Node.js implements online chat room_AngularJS

I have to say that getting started with AngularJS is much harder than I thought. After reading the PhoneCat examples provided on the official website, I went to MOOC and read Da Mo Qiongqiu’s AngularJS Practical Series. There are still many unclear questions about basic usage, so I decided to create an online chat room to help understand. DEMO can be clicked →chat room, and code can be clicked→ChatRoom-AngularJS.
You can stamp the clear picture http://files.jb51.net/file_images/article/201508/201508281040051.gif
Function
Before starting development, first clarify the functions that need to be implemented:
New user logs in and broadcasts to notify other users
The user goes offline and broadcasts to notify other users
Can display the number of online people and list
Group chat and private messaging available
If a user sends a group message, the broadcast will notify all other users
If the user sends a private message, the recipient interface will be notified separately
Because I am an aesthetic scumbag, I relied entirely on bootstrap. In addition, I also imitated the bubble design in WeChat chat history.
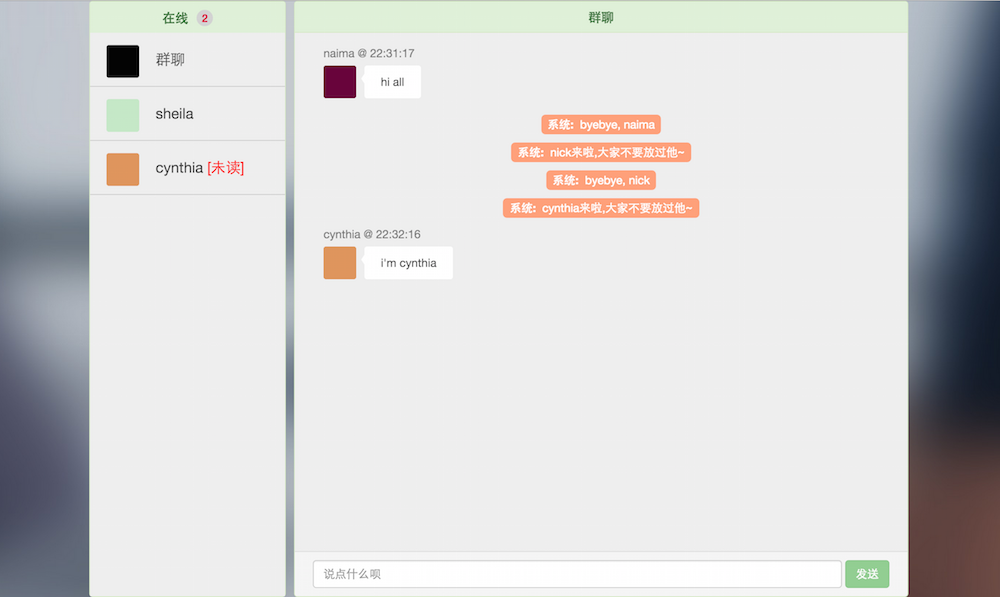
The interface is divided into two sections: left and right, which are used to display online lists and chat content respectively.
In the online list on the left, click on different items to switch chat partners in the right section.
The conversation records with the current chat partner are displayed on the right, but only the most recent 30 are displayed. The content of each chat record includes the sender's nickname and avatar, sending time, and message content. Regarding the avatar, we will do a simple process here and replace it with squares filled with random colors. In addition, the styles of the messages you send and the messages you receive naturally need to be designed differently. All effects can be seen in the picture below.
You can stamp the clear picture http://files.jb51.net/file_images/article/201508/201508281040052.png
Server
We use Node.js and mix express and socket.io to develop the server. Open the terminal in the program root directory and execute:
npm initFollow the prompts and generate a package.json file. Open and configure dependencies:
 "dependencies": {
  "express": "^4.13.3",
  "socket.io": "^1.3.6"
 }
Then execute npm install to install dependent modules.
Next, we create a new app.js in the root directory and write the server-side code in it. Create a new public folder to store the client code.
The main contents in app.js are as follows:
var express = require('express');
var app = require('express')();
var http = require('http').createServer(app);
var io = require('socket.io')(http);

app.use(express.static(__dirname + '/public'));


app.get('/', function (req, res) {
  res.sendfile('index.html');
});


io.on('connection',function(socket){
  socket.on('addUser',function(data){ //有新用户进入聊天室
  });

  socket.on('addMessage',function(data){ //有用户发送新消息
  });

  socket.on('disconnect', function () { //有用户退出聊天室
  );
});

http.listen(3002, function () {
  console.log('listening on *:3002');
});
In the above code, we added listeners for the following events:
-addUser, a new user enters the chat room
This event is triggered by the client inputting a nickname. After receiving it, the server will judge whether the nickname already exists. If it already exists, notify the client that the nickname is invalid:
socket.emit('userAddingResult',{result:false});On the contrary, notify the client that the nickname is valid and all currently connected user information, and broadcast the new user information to other connected users:
socket.emit('userAddingResult',{result:true});
allUsers.push(data);//allUsers保存了所有用户
socket.emit('allUser',allUsers);//将所有在线用户发给新用户
socket.broadcast.emit('userAdded',data);//广播欢迎新用户,除新用户外都可看到
You need to pay attention to the difference between 'socket.emit' and 'socket.broadcast.emit'. You can check this blog post Explanation of several usages of socket.io emit:
// send to current request socket client
socket.emit('message', "this is a test");
// sending to all clients except sender
socket.broadcast.emit('message', "this is a test");
-addMessage, a user sends a new message
In this event monitoring, two types of situations need to be handled:
1. Private message
If the message is sent to a specific user A, then you need to obtain the socket instance corresponding to A and then call its emit method. So every time a client connects to the server, we have to save its socket instance for subsequent needs.
connectedSockets[nickname]=socket;//以昵称作下标,保存每个socket实例,发私信需要用需要发私信时,取出socket实例做操作即可:
connectedSockets[nickname].emit('messageAdded',data)2.群发
群发就比较简单了,用broadcast方法即可:
socket.broadcast.emit('messageAdded',data);//广播消息,除原发送者外都可看到-disconnect,有用户退出聊天室
需要做三件事情:
1.通知其他用户“某用户下线”
socket.broadcast.emit('userRemoved', data);2.将用户从保存了所有用户的数组中移除
3.将其socket实例从保存了所有客户端socket实例的数组中移除
delete connectedSockets[nickname]; //删除对应的socket实例运行一下服务端代码,观察有无错误:
node app.js若没什么问题,继续编写客户端的代码。
客户端
在public目录下新建'index.html',客户端需要用到bootstrap、angularjs、socket.io、jQuery以及我们自己的js和css文件,先把这些文件用标签引入。
<!DOCTYPE html>
<html>
<head lang="en">
  <meta charset="UTF-8">
  <title></title>
  <link href="http://cdn.bootcss.com/bootstrap/3.3.5/css/bootstrap.min.css" rel="stylesheet">
  <link rel="stylesheet" href="./assets/style/app.css"/>
  <script src="http://libs.baidu.com/jquery/2.0.0/jquery.min.js"></script>
  <script src="/socket.io/socket.io.js"></script>
  <script src="//cdn.bootcss.com/angular.js/1.4.3/angular.min.js"></script>
  <script src="./assets/js/app.js"></script>
</head>
<body></body>
</html>
我们并不立即深入逻辑细节,把框架搭好先。
首先,在body上加上ng-app属性,标记一下angularjs的“管辖范围”。这个练习中我们只用到了一个控制器,同样将ng-controller属性加到body标签。
接下来在js中,我们来创建module及controller。
var app=angular.module("chatRoom",[]);
app.controller("chatCtrl",['$scope','socket','randomColor',function($scope,socket,randomColor){}]);
注意这里,我们用内联注入添加了socket和randomColor服务依赖。这里我们不用推断式注入,以防部署的时候用uglify或其他工具进行了混淆,变量经过了重命名导致注入失效。
在这个练习中,我们自定义了两个服务,socket和randomColor,前者是对socket.io的包装,让其事件进入angular context,后者是个可以生成随机色的服务,用来给头像指定颜色。
//socket服务
app.factory('socket', function($rootScope) {
  var socket = io(); //默认连接部署网站的服务器
  return {
    on: function(eventName, callback) {...},
    emit: function(eventName, data, callback) {...}
  };
});

//randomcolor服务
app.factory('randomColor', function($rootScope) {
  return {
    newColor: function() {
      return '#'+('00000'+(Math.random()*0x1000000<<0).toString(16)).slice(-6);//返回一个随机色
    }
  };
});
注意socket服务中连接的语句“var socket = io();”,我们并没有传入任何url,是因为其默认连接部署这个网站的服务器。
考虑到聊天记录以及在线人员列表都是一个个逻辑及结构重复的条目,且html结构较复杂,为了其复用性,我们把它们封装成两个指令:
app.directive('message', ['$timeout',function($timeout) {}])
  .directive('user', ['$timeout',function($timeout) {}]);
注意这里两个指令都注入了'$timeout'依赖,其作用后文会解释。
这样一个外层框架就搭好了,现在我们来完成内部的细节。
登录
页面刚加载时只显示登录界面,只有当输入昵称提交后且收到服务端通知昵称有效方可跳转到聊天室。我们将ng-show指令添加到登录界面和聊天室各自的dom节点上,来帮助我们显示或隐藏元素。用'hasLogined'的值控制是显示或隐藏。
<!-- chat room -->
<div class="chat-room-wrapper" ng-show="hasLogined">
...
</div>
<!-- end of chat room -->

<!-- login form -->
<div class="userform-wrapper" ng-show="!hasLogined">
...
</div>
<!-- end of login form -->
JS部分
 $scope.login = function() { //登录
   socket.emit("addUser", {...});
 }

 //收到登录结果
 socket.on('userAddingResult', function(data) {
   if (data.result) {
     $scope.hasLogined = true;
   } else { //昵称被占用
     $scope.hasLogined = false;
   }
 });
这里监听了socket连接上的'userAddingResult'事件,接收服务端的通知,确认是否登录成功。
socket连接监听
成功登录以后,我们还监听socket连接上的其他事件:
//接收到欢迎新用户消息,显示系统欢迎辞,刷新在线列表<br>
socket.on('userAdded', function(data) {});<br>
//接收到所有用户信息,初始化在线列表<br>
socket.on('allUser', function(data) {});<br>
//接收到用户退出消息,刷新在线列表<br>
socket.on('userRemoved', function(data) {});<br>
//接收到新消息,添加到聊天记录<br>
socket.on('messageAdded', function(data) {});<br>
接收到事件以后,做相应的刷新动作,这里的socket是socket.io经过包装的服务,内部仅包装了我们需要用到的两个函数on和emit。我们在事件监听里对model做的修改,都会在AngularJS内部得到通知和处理,UI才会得到及时刷新。
监听内做的事情太具体和琐碎了,这里就不列出了,接下来介绍一下message指令。
message 指令
最后分享一下我在写message指令时遇到的问题。首先看一下其代码:
app.directive('message', ['$timeout',function($timeout) {
  return {
    restrict: 'E',
    templateUrl: 'message.html',
    scope:{
      info:"=",
      self:"=",
      scrolltothis:"&"
    },
    link:function(scope, elem, attrs){
        $timeout(scope.scrolltothis);
    }
  };
}])
以及其模板message.html:
<div ng-switch on="info.type">
  <!-- 欢迎消息 -->
  <div class="system-notification" ng-switch-when="welcome">系统{{info.text}}来啦,大家不要放过他~</div>
  <!-- 退出消息 -->
  <div class="system-notification" ng-switch-when="bye">系统:byebye,{{info.text}}</div>
  <!-- 普通消息 -->
  <div class="normal-message" ng-switch-when="normal" ng-class="{others:self!==info.from,self:self===info.from}">
    <div class="name-wrapper">{{info.from}} @ {{time | date: 'HH:mm:ss' }}</div>
    <div class="content-wrapper">{{info.text}}<span class="avatar"></span></div>
  </div>
</div>
模板中我们用ng-switch指令监听info.type变量的值,根据其值的不同显示不同内容。比如,当info.type值为"welcome"时,创建第一个dom节点,删除下方另外两个div。
另外,普通消息下,为了在UI上区分自己发出去的和收到的消息,需要给他们应用不同的样式,这里用ng-class指令实现。
ng-class="{others:self!==info.from,self:self===info.from}"当'self===info.from'返回true时,应用'self'类,否则,应用'others'类。
在此指令中,我们创建了独立作用域,并绑定了三个属性,绑定完后还必须在父作用域的HTML标签上添加相应属性。
scope:{
    info:"=",
    self:"=",
    scrolltothis:"&"
}

<message self="nickname" scrolltothis="scrollToBottom()" info="message" ng-repeat="message in messages"></message>
在link函数中,执行一个动作:每当一个message被加到页面上时,将聊天记录滚动到最下方,一开始我是这样写的:
link:function(scope, elem, attrs){ scope.scrolltothis();}结果发生了一个很奇怪的现象,总是滚动到上一条位置,而不是最新这条。调试之后发现是因为'scrolltothis'函数执行的时候,DOM还没渲染,所以在函数内部获取scrollHeight的时候获得的总是添加DOM节点之前的状态。这时候,可以把代码放到$timeout里延迟0秒执行,延迟0秒并不意味着会立即执行,因为js的单线程特性,代码实际会等到dom渲染完再执行。
$timeout(scope.scrolltothis);完整代码可以戳我的GitHub→ChatRoom-AngularJS,DEMO可以戳→chat room
有任何不妥之处或错误欢迎各位指出,不胜感激~

 Python vs. JavaScript: A Comparative Analysis for DevelopersMay 09, 2025 am 12:22 AM
The main difference between Python and JavaScript is the type system and application scenarios. 1. Python uses dynamic types, suitable for scientific computing and data analysis. 2. JavaScript adopts weak types and is widely used in front-end and full-stack development. The two have their own advantages in asynchronous programming and performance optimization, and should be decided according to project requirements when choosing.
 Python vs. JavaScript: Choosing the Right Tool for the JobMay 08, 2025 am 12:10 AM
Whether to choose Python or JavaScript depends on the project type: 1) Choose Python for data science and automation tasks; 2) Choose JavaScript for front-end and full-stack development. Python is favored for its powerful library in data processing and automation, while JavaScript is indispensable for its advantages in web interaction and full-stack development.
 Python and JavaScript: Understanding the Strengths of EachMay 06, 2025 am 12:15 AM
Python and JavaScript each have their own advantages, and the choice depends on project needs and personal preferences. 1. Python is easy to learn, with concise syntax, suitable for data science and back-end development, but has a slow execution speed. 2. JavaScript is everywhere in front-end development and has strong asynchronous programming capabilities. Node.js makes it suitable for full-stack development, but the syntax may be complex and error-prone.
 JavaScript's Core: Is It Built on C or C ?May 05, 2025 am 12:07 AM
JavaScriptisnotbuiltonCorC ;it'saninterpretedlanguagethatrunsonenginesoftenwritteninC .1)JavaScriptwasdesignedasalightweight,interpretedlanguageforwebbrowsers.2)EnginesevolvedfromsimpleinterpreterstoJITcompilers,typicallyinC ,improvingperformance.
 JavaScript Applications: From Front-End to Back-EndMay 04, 2025 am 12:12 AM
JavaScript can be used for front-end and back-end development. The front-end enhances the user experience through DOM operations, and the back-end handles server tasks through Node.js. 1. Front-end example: Change the content of the web page text. 2. Backend example: Create a Node.js server.
 Python vs. JavaScript: Which Language Should You Learn?May 03, 2025 am 12:10 AM
Choosing Python or JavaScript should be based on career development, learning curve and ecosystem: 1) Career development: Python is suitable for data science and back-end development, while JavaScript is suitable for front-end and full-stack development. 2) Learning curve: Python syntax is concise and suitable for beginners; JavaScript syntax is flexible. 3) Ecosystem: Python has rich scientific computing libraries, and JavaScript has a powerful front-end framework.
 JavaScript Frameworks: Powering Modern Web DevelopmentMay 02, 2025 am 12:04 AM
The power of the JavaScript framework lies in simplifying development, improving user experience and application performance. When choosing a framework, consider: 1. Project size and complexity, 2. Team experience, 3. Ecosystem and community support.
 The Relationship Between JavaScript, C , and BrowsersMay 01, 2025 am 12:06 AM
Introduction I know you may find it strange, what exactly does JavaScript, C and browser have to do? They seem to be unrelated, but in fact, they play a very important role in modern web development. Today we will discuss the close connection between these three. Through this article, you will learn how JavaScript runs in the browser, the role of C in the browser engine, and how they work together to drive rendering and interaction of web pages. We all know the relationship between JavaScript and browser. JavaScript is the core language of front-end development. It runs directly in the browser, making web pages vivid and interesting. Have you ever wondered why JavaScr


Hot AI Tools

Undresser.AI Undress
AI-powered app for creating realistic nude photos

AI Clothes Remover
Online AI tool for removing clothes from photos.

Undress AI Tool
Undress images for free

Clothoff.io
AI clothes remover

Video Face Swap
Swap faces in any video effortlessly with our completely free AI face swap tool!

Hot Article
Hot Tools

DVWA
Damn Vulnerable Web App (DVWA) is a PHP/MySQL web application that is very vulnerable. Its main goals are to be an aid for security professionals to test their skills and tools in a legal environment, to help web developers better understand the process of securing web applications, and to help teachers/students teach/learn in a classroom environment Web application security. The goal of DVWA is to practice some of the most common web vulnerabilities through a simple and straightforward interface, with varying degrees of difficulty. Please note that this software

SublimeText3 English version
Recommended: Win version, supports code prompts!

Atom editor mac version download
The most popular open source editor

Notepad++7.3.1
Easy-to-use and free code editor

Safe Exam Browser
Safe Exam Browser is a secure browser environment for taking online exams securely. This software turns any computer into a secure workstation. It controls access to any utility and prevents students from using unauthorized resources.

