


4 Easy Ways to Customize and Change Icons in Windows 11

Windows 11 brought a number of user interface changes that were largely welcomed by users. However, when it comes to the new icons, many users don't seem satisfied.
You no longer get a preview of folder contents when viewing icons, and some people have found that the new quick access icons are misaligned.
If you're in the same boat and want to change your icon, here's everything you need to know.
Can you change icons in Windows 11?
Yes, you can officially change your icon in Windows 11, but the process is cumbersome. This is because you need to change the icon for each item in Explorer individually.
Also, some system apps do not allow you to change their icons, but this can be easily bypassed by using shortcuts for the same app.
This is the recommended way to change icons if you only want to change the icons for a few items in File Explorer. However, if you wish to change your entire icon pack in Windows 11, we recommend using a third-party tool instead.
You can find more information about this in the tutorial below.
Before you begin: Create a system restore point for your backup
Before you begin, we recommend that you create a system restore point. This will help you revert any changes with a single click to prevent problems in the future.
In the worst case scenario, System Restore can also help you restore your installation from recovery media. Please follow the steps below to get started.
Open the Start menu, search for "System Restore" and click "Create Restore Point" from the search results.

Now click "Create".

Enter the name of the restore point. We recommend that you name it something relevant so that you can easily identify it in the future.

Click "Create" when finished.

Your system will now create a restore point. Wait for the process to complete, and once it is complete, click Close.

You will now create a system restore point in Windows 11. You can now follow the tutorial below to change your icon accordingly.
4 Ways to Change Icons in Windows 11
Here’s how to change icons in Windows 11 natively and using third-party apps.
When changing the icon natively, some projects allow you to change the icon, and then some projects do not allow you to change the icon.
Follow any section below, depending on your choice.
Method 1: Change the icon of a supported application
Find the item you want to change the icon for, and then right-click the item. Select Properties from the context menu. Alternatively, you can select the item and hit the Alt Enter keyboard.

Switch to custom tabs by clicking Custom tabs at the top of the screen.

Now click on "Change Icon...".

Select an icon from the options on the screen. If you wish to use a custom icon, you can click "Browse..." and select the same icon from local storage.

Note: Windows File Explorer currently only supports icon files in .ico format.
Click "OK" when finished.

Click OK again.

That's it!

You will now change the icon of the selected item in File Explorer.
Change the icons of unsupported applications and items
Note: You can only change the icons of such apps when they are in File Explorer or added to the desktop. Pinning these items to the taskbar or Start menu will return them to using the default icon.
In this case, if you are trying to change the icon in the folder or desktop, you can use the following tutorial.
However, if you want to change the icons for key items like This PC, Recycle Bin, Quick Access icons, etc., you can use the next section instead. let's start.
Method 2: Changing the system icon is not natively supported
Press the Windows i keyboard and click "Personalization" on the left.

Click "Theme".

Now click on “Desktop Icon Settings”.

Click and select the desired system icon from the list on the screen and click Change Icon.

Note: For system items that are not in this panel, you can skip to the next section.
Select an icon from the list on the screen. If you want to use a custom icon, you can click "Browse..." and select the same icon from local storage.

After selecting, click OK.

#Click OK and you will now change the selected system icon on your PC.

Method 3: Change other icons that are not natively supported
Press the Windows R keyboard, enter the following content, and then press EnterKeyboard.
shell:AppsFolder

You will now have a list of most system icons on your PC as well as user-installed applications. Find the one you want to change and right-click on it.

Select "Create Shortcut".
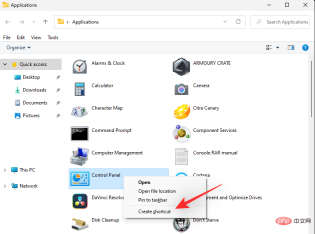
You will now be notified that a shortcut cannot be created in the same location. Click Yes to create the shortcut on your desktop.

Close the folder and select the new icon on your desktop. After selecting, press Alt Enterkeyboard.

Now click on "Change Icon...".

Select the icon you want to use from the list on the screen. If you want to use a custom icon, you can click "Browse...".

Now click OK.

Click OK again.

The icon of the selected item should now change.

Method Four: Use Third-Party APP 7tsp
Third-party applications can help you change icons on your entire PC with a single click. Sadly, most of the content hasn't been updated in a while, but 7tsp seems to be running fine on Windows 11. Please follow the steps below to help you through the process.
WARNING: We strongly recommend that you back up sensitive data and close all running applications before following the tutorial below. Additionally, we highly recommend creating a system restore point on your PC in case any issues arise.
Note: This process requires a DeviantArt account. If you don't have one yet, you can sign up for one using this link before continuing with the steps below.
- 7tsp | Download Link
Open the link above and click on the "Download Icon" to download 7tsp to your PC.

#Extract the archive to a convenient location and right-click on the file with the .ee extension.

Rename the extension to ".exe". You can select the icon from the context menu toolbar at the top.

After renaming, launch the application and click "Add Custom Package".

Now select the desired icon pack that you want to use. We will be using the icon pack from "Proma" in this tutorial.

Now click on "Start Patching".

NOTE: While 7tsp does create a system restore point for you, it is known to be unusable or unreadable in some situations. We want you to create a manual before continuing with this process.
Let 7tsp create a restore point on your PC. This will help you revert to the original icon if something goes wrong.

After patching the file, you will be prompted to restart the system. We recommend that you restart your system as soon as possible.

The icon in Windows 11 should now be changed as shown below.

How to install updates after changing the icon
Updating Windows can be a little finicky after changing the icon in File Explorer.
Based on the preferred methods above, here’s how to install updates after changing icons in Windows 11.
Method 1: If you changed the icon locally
If you changed the icon locally, then you don’t have anything to worry about.
Windows updates are always compatible with native icon changes. You can simply continue updating your Windows normally without encountering any issues
Note: In some cases, when receiving an update for a Microsoft product or OEM application that you have changed the icon for, the installation Changes may be reset after updating. In this case, you will have to change the icon of such an item again. This usually happens when the installation structure or the program's directory changes due to an update.
Method 2: If you use a third-party application to change your icon
If you use a third-party application like 7tsp to change your icon in Windows 11, then it is highly recommended that you Restore the default icon pack before applying Windows updates.
Windows stores its icons in .dll files, not .ico libraries. This forces 7tsp to patch these files to change the icon in File Explorer. However, these modified files may cause problems with future Windows updates that have not yet been configured.
Therefore, when using such applications, it is highly recommended that you revert to the default icon before updating Windows.
After updating Windows, you can install packages and patch files again based on compatibility. Here’s how to restore the default icon pack using 7tsp on PC.
Open 7tsp on your PC and the currently applied icon pack should already be listed on your left. Click "Restore" in the lower right corner of the screen.

Select "Restore modified system files to before using 7tsp".

Now click OK.

Click "Yes" to confirm your choice.

Restart your PC when prompted.

That's it! The changes should now be restored on your PC.

You can now install Windows Updates on your PC as usual. After installing the update, you can patch the files again to add custom icon packs to Windows 11.
Related: Exiting S Mode Doesn’t Work? How to fix
How to clear the icon cache and restart Windows Explorer
Clearing the icon cache can help you apply custom icons to icons that refuse to show the necessary changes.
Additionally, when used in conjunction with restarting Windows Explorer on Windows 11, this can help resolve graphics issues and glitches. Here's how you can do both on your device.
1. Clear your icon cache
Here’s how to clear your icon cache in Windows 11, please follow the tutorial below to help you complete the process.
Press Windows R on your keyboard, type the following, and then press Ctrl Shift Enter on your keyboard.
cmd

This will launch the command prompt as administrator on your PC. Enter and execute the following commands on your PC one by one.
ie4uinit.exe -show

- ##taskkill /IM explorer.exe /F

- ##DEL /A /Q "%localappdata%\IconCache.db"

- DEL /A /F /Q "%localappdata%\Microsoft\Windows\Explorer\iconcache*"
After completion, finally enter the following command. Make sure to save all your work before doing this as this will immediately restart your PC.
shutdown /r /f /t 00

After restarting, your icon should refresh. This is how to rebuild the icon cache in Windows 11.
2. Restart Windows File Explorer
Press Ctrl Shift Escon the keyboard to open the Task Manager. Now find Windows Explorer in the list and click and select it.

Right click on the same and select "Restart".

That's it! Windows File Explorer should now automatically restart on your PC.
FAQ
Changing icons can be intimidating at first. So here are some frequently asked questions to help you get up to speed. let's start.
What if my icon cache is messed up?
If your icons look cluttered, or you encounter bugs that hinder your productivity, you can easily revert your changes using the system restore points we created earlier.
If you use 7tsp, you can also use it to restore the original icon. After restoring the original icons, we recommend that you try another icon pack or the latest version of 7tsp to help resolve this issue.
Is it safe to clear the icon cache?
Yes, it is completely safe to clear the icon cache and rebuild it. Windows will automatically rebuild the cache once it detects that the old file no longer exists. This usually happens after your PC restarts itself.
Will changing the icon affect performance?
Yes, changing the icon will affect your performance, but it is negligible when changing the icon natively. However, if you use 7tsp, the performance impact may be significant depending on which icon pack you use.
If you are facing high CPU usage, we recommend switching to an icon pack that is compatible with your OS version. If you can't find it, we recommend trying one that's at least compatible with Windows 10 1909 or higher.
The above is the detailed content of 4 Easy Ways to Customize and Change Icons in Windows 11. For more information, please follow other related articles on the PHP Chinese website!

Hot AI Tools

Undresser.AI Undress
AI-powered app for creating realistic nude photos

AI Clothes Remover
Online AI tool for removing clothes from photos.

Undress AI Tool
Undress images for free

Clothoff.io
AI clothes remover

Video Face Swap
Swap faces in any video effortlessly with our completely free AI face swap tool!

Hot Article
Hot Tools

WebStorm Mac version
Useful JavaScript development tools

SublimeText3 Linux new version
SublimeText3 Linux latest version

SublimeText3 Mac version
God-level code editing software (SublimeText3)

Atom editor mac version download
The most popular open source editor

Dreamweaver CS6
Visual web development tools

