


MX Linux system requirements:
MX Linux’s minimum system requirements are not very high. As a middle-weight Linux operating system, old PCs can also run easily.
- At least AMD or intel 1486 or better.
- At least 512 MB RAM
- 5GB hard drive or more space to install it.
- CD./DVD drive support (if you want to use a CD to install MX Linux)
- USB boot support in the BIOS if you plan to install it using a USB drive.
- AC97 or HDA compatible sound card
Recommended MX Linux system requirements
- Modern i686 Intel or AMD processor
- 2 GB RAM or more
- At least 20 GB of available hard drive space
- 3D capable video card for 3D desktop
- SoundBlaster, AC97 or HDA compatible Sound Card
- For use as LiveUSB, 8 GB is free if using persistence.
Step 1: Download the latest ISO image of MX Linux
To install MX Linux on VirtualBox, the first thing we need is its bootable ISO image. At the time of writing, the latest version of the operating system is MX Linux 19, so we downloaded the same version. It's available in both 32-bit and 64-bit formats, so here's the official link to get system-compatible images. However, our system is 64-bit, so what we download is the same.
Step 2: Install VirtualBox on your system
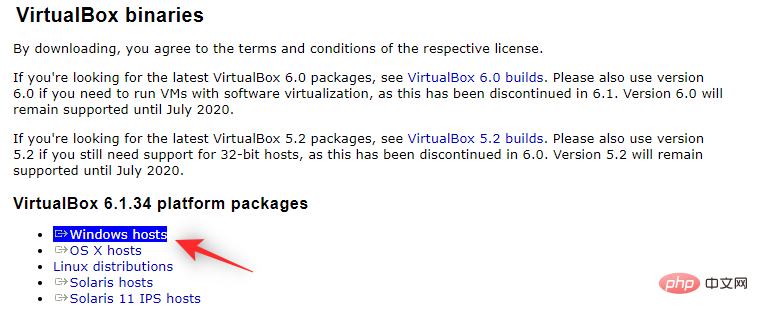
If you already have VirtualBox installed on your system, then just move on to the next step. For those looking for an installation method, they can visit www.virtualbox.org to get a compatible VBox setup for their system.
Step 3: Run VirtualBox and create MX Linux VM
- Open VirtualBox.
- Click the "New" button.
- Type MX Linux and click the Next button.
- Use the memory size slider and set RAM to 2 GB or more for better performance.

- Create a virtual disk.
- Select VHD in case you want to use MX Linux virtual machines with Hyper-V in the future.
- Leave Default Dynamic allocation selected and click the Next button.
- Set the virtual disk size for the MX Linux installation, the minimum is 5 GB, but if you plan to install various software on it, set it to at least 20GB.
- Finally, click the Create button.


Step 4: Insert the MX Linux ISO image as boot source in the created VM
Now, on the left side of VirtualBox, you will see the recently created virtual machine, Select it and click on the settings option given in the menu.

Under Settings, select the Storage option from the left menu and click Empty Driveicon. After that again select the given CD icon and then select the virtual disc file.

File Explorer will open, select the MX Linux ISO image you downloaded and click on the OK button.
Step 5: Start the MX Linux VM
To start it, first, select its VM from the left and click the Start button on the VirtualBox menu.
On the boot menu we will have several options:
- MX-19 X64
- Virtual Box Video
- From Hard drive boot
- Memory test
- Switch to Grub bootloader
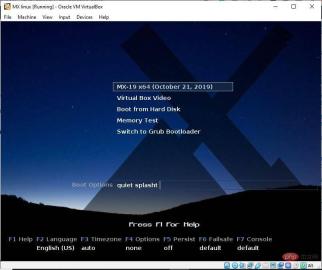
If you want to run MX Linux in a Live environment and To install, please select the first one. Virtual Box Video One doesn't just launch it at its supported resolutions.
Step 6: Follow the steps to install MX Linux on VirtualBox
After getting the live screen of the operating system, click on the installer icon provided on its desktop.

The installer will automatically set the keyboard layout, just click the "Next" button for further processing.

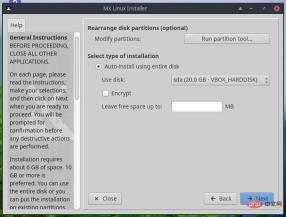
Since we are on a virtual machine, there is no need to perform any manual partitioning and let the system handle it. All you need to do is click the "Next" button and accept the formatting of the virtual drive.
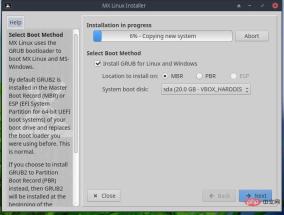
Wait for some time and click the Next button to set more things while the system files are copied to the virtual drive.
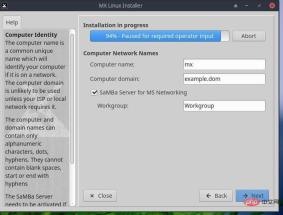
Name your computer so you can easily identify it on the web. Leave the rest as is.
Set the time based on your location.

#Set the default username, password, and root password for your MX Linux.
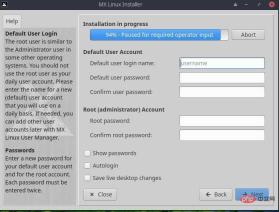
Finally, click the "Finish" button.
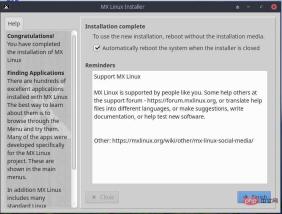
Now click on Devices->Optical Drive and deselect MX Linux ISO image, This is Required to prevent VirtualBox from booting from the ISO image again and again.

Step 7: Log in to MX Linux
Enter your default user password to log in and start using this lightweight and beautiful Linux distribution.

The above is the detailed content of How to install MX Linux on VirtualBox VM. For more information, please follow other related articles on the PHP Chinese website!

 如何修复 Windows 11 中的 Hypervisor 错误Apr 16, 2023 pm 12:37 PM
对于许多用户来说,Windows有一个隐藏的内置功能,可用于轻松创建和管理虚拟机。此功能称为Hypervisor或Hyper-V。但与其他Windows功能一样,此功能并非完全没有错误。在本文中,我们将向您展示如何轻松快速地解决Hyper-V问题。因此,事不宜迟,让我们立即进入解决方案,让虚拟机启动并运行。修复1–检查您的系统是否支持Hyper-V您应该尝试的第一件事是检查系统是否支持Hyper-V并且仍然处于激活状态。1.您必须重新启动系统。要安全地执行此操作,请按一次Wi
 使用 VirtualBox 在 Windows 11 上安装 Windows XP ISOMay 05, 2023 pm 02:25 PM
Windows11VirtualBox虚拟机上的WindowsXP此处给出的使用VirtualBox安装WindowsXPISO映像的步骤不仅限于Windows11。用户可以在Linux(例如Ubuntu、macOS、Windows10、7或他们正在使用并拥有Virtualbox的其他操作系统)上遵循这些步骤。下载WindowsXPISOWindowsXP已由Microsoft存档,其ISO与产品密钥一起由他们在Archive.org上正式
 如何修复 VMMEM 高内存和 CPU 使用率Apr 18, 2023 pm 04:40 PM
由于各种因素,Vmmem或虚拟内存可能会导致高CPU或内存使用率。此问题背后的关键原因之一是虚拟主机中运行的一些资源密集型进程。但是,如果不是这种情况,并且VM在空闲模式下仍然占用大量系统资源,则可能是驱动程序故障。这会降低虚拟机的速度,并且您的工作可能会停止。因此,请按照以下步骤快速解决问题。修复1–结束所有资源密集型进程如果您正在运行一些繁重的应用程序或软件版本,则预计vmmem会使用大量资源。这没有什么异常。即使您可以直接终止这些进程,也可以为您的设备释放更多资源。注意–您可以通
 适用于Windows 11的最佳虚拟机(免费和付费)Apr 13, 2023 am 11:40 AM
虚拟机或虚拟机是一种模拟计算机并替代真实事物的软件。VM 模仿计算机的硬件和体系结构以提供相同的功能。你可以在虚拟机上运行现有的应用和服务,而不必冒常规电脑稳定性的风险。例如,Windows 11现在有很多错误,可能会使体验令人沮丧。虚拟机将允许人们试用它而无需注册任何东西。请继续阅读,了解哪个是适合您需求和愿望的最佳 Windows 11 虚拟机。什么是适用于 Windows 11 的最佳虚拟机?VMware 工作站VMware Workstation是市场上最好的虚拟机之一,因为它具有高度的
 如何在 Windows 11 上安装和使用 VirtualBox:2022详细的分步教程Apr 14, 2023 pm 11:43 PM
自发布以来,Windows11经历了相当大的起伏。该操作系统现在更加稳定,并且具有许多似乎可以适应大多数用户的变化。Windows作为一个平台一直是通用的,能够创建虚拟机、驱动器、硬件设备等。这有助于内部测试、在不同环境中编码,或者只是一些好的旧修补。如果您一直希望在Windows11上模拟或虚拟化平台,那么VirtualBox是您的绝佳选择。让我们进一步了解它!什么是VirtualBox?VirtualBox是一款历史悠久的虚拟化软件,自发布以来一直受到大多数用户的青睐。目前由Ora
 VMWare Workstation Fix 中没有足够的物理内存可用Apr 20, 2023 pm 03:43 PM
VMWare上的虚拟机需要大量物理内存才能正常运行和运行。RAM是虚拟机的重要组成部分,如果没有足够数量的物理RAM可用,它甚至无法启动并抛出一个长错误消息“没有足够的物理内存来启动此虚拟机”。正如错误消息所暗示的,这是系统中物理内存不足的结果。解决方法——1.您应该做的第一件事是重新启动系统。这显然会为主机清除一些额外的内存。重启后直接启动VMWare,启动虚拟机。2.如果你有另一个虚拟机,尝试运行它并测试。修复1–编辑config.ini文件您可以编辑配置文件,以便虚拟机仅使用系统可
 Windows 11 ARM 在 UTM 虚拟机中在 Apple M1 上的惊人运行速度Apr 22, 2023 am 08:55 AM
Windows11架构:ARM64内存:8GB磁盘:20GiB显示:VGASPICE工具:已安装本教程仅适用于AppleSiliconMac。下载适用于Mac的UTM适用于ARM的WindowsSPICE访客工具指示打开UTM并单击“+”按钮以打开VM创建向导。选择“虚拟化”。选择“窗口”。单击“浏览”并选择上面下载的WindowsVHDX。按“下一步”继续。选择您希望授予VM访问权限的RAM和CPU内核数量。按“下一步”继续。如果你有一个目录要挂载到V
 虚拟机对电脑伤害大吗?Sep 08, 2023 pm 05:29 PM
虚拟机对电脑伤害不大。原因是虚拟机一般不会对电脑造成直接的伤害。虚拟机是一种软件工具,允许在一台物理计算机上创建和运行多个虚拟的操作系统环境,它通过在主机操作系统上模拟硬件和资源来实现,如果虚拟机配置不当或资源分配不合理,可能会导致主机计算机的性能下降或出现不稳定的情况,此外,虚拟机也可能会在主机计算机上占用较多的存储空间。因此,在使用虚拟机时,建议合理配置虚拟机的资源。

Hot AI Tools

Undresser.AI Undress
AI-powered app for creating realistic nude photos

AI Clothes Remover
Online AI tool for removing clothes from photos.

Undress AI Tool
Undress images for free

Clothoff.io
AI clothes remover

AI Hentai Generator
Generate AI Hentai for free.

Hot Article
Hot Tools

VSCode Windows 64-bit Download
A free and powerful IDE editor launched by Microsoft

SublimeText3 Mac version
God-level code editing software (SublimeText3)

Zend Studio 13.0.1
Powerful PHP integrated development environment

mPDF
mPDF is a PHP library that can generate PDF files from UTF-8 encoded HTML. The original author, Ian Back, wrote mPDF to output PDF files "on the fly" from his website and handle different languages. It is slower than original scripts like HTML2FPDF and produces larger files when using Unicode fonts, but supports CSS styles etc. and has a lot of enhancements. Supports almost all languages, including RTL (Arabic and Hebrew) and CJK (Chinese, Japanese and Korean). Supports nested block-level elements (such as P, DIV),

SAP NetWeaver Server Adapter for Eclipse
Integrate Eclipse with SAP NetWeaver application server.

