Ubuntu is an open source Linux distribution that can run on Windows 11, but some users have reported bugs.
WSL is not designed for the average Windows user. It is suitable for system administrators and developers who love coding.
However, in some cases, you will receive different error messages when you want to run Ubuntu on Windows 11. These errors can occur for a number of reasons, such as upgrades, installation issues, or certain components missing from WSL.
To fix Ubuntu errors on Windows 11, you first need to know what they are. So, before solving these problems, let’s explain the most common issues you can get while running on Windows 11.
What are the 0x8007003, 0x8007019e and 0x800701bc WslRegisterDistribution Failed errors?
- 0x80070032 Error : 0x80070032 is an error that occurs when you want to upgrade WSL to the next version. This error also indicates that your virtual machine platform is disabled.
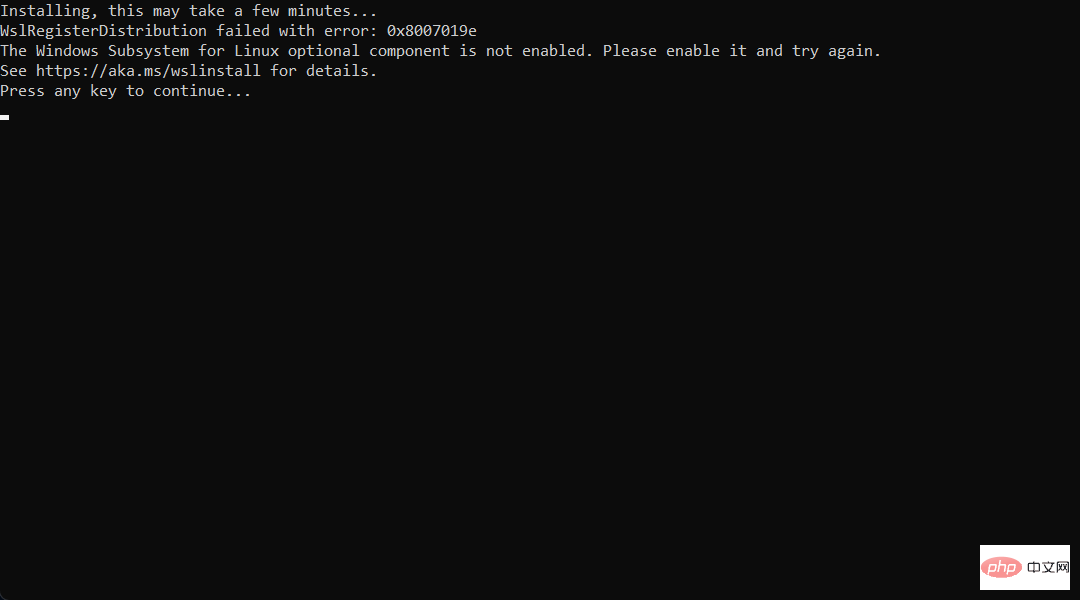
- 0x8007019e Error: The 0x8007019e error occurs when you do not have permission to run the command line in Linux. Just like the first error, it indicates that WSL is disabled. Additionally, many users reported receiving 0x8007019e when trying to install Ubuntu from the Microsoft Store. However, you can easily troubleshoot it by enabling the component in Windows 11. We'll give you some instructions to fix this error in the next section.
- 0x800701bc Error : 0x800701bc is a Linux kernel issue when you try to install Ubuntu. In this case, you should download the WSL2 Linux Kernel. Hopefully Microsoft will provide a latest update for WSL that you can download.
How to fix WSL Ubuntu error on Windows 11?
1. Fix 0x80070032 error
Reset Microsoft Store
- First, open the Start menu. Right-click Microsoft Store and select App settings.

- Now scroll down a little and click on the "Reset" button.

As we mentioned earlier, the 0x80070032 error is caused by reinstalling or upgrading WSL. Therefore, we need to reset/reinstall Microsoft Store or clear its cache.
Reinstall Microsoft Store
- Click on the Start menu and type PowerShell, then right-click on it and select "Run as administrator".

- Type the following command and hit Enter:
<strong>get-appxpackage -alluser Microsoft.WindowsStore</strong> - Now, copy the PackageFullName value. In our example, the PackageFullName is as follows:
<strong>Microsoft.WindowsStore_2202.1402.2.0_X64__8wekyb3d8bbwe</strong>
- Enter your # after the remove-appxpackage command ##PackageFullName and click. So, in our case, the command line would be: Enter
remove-appxpackage Microsoft.WindowsStore_2202.1402.2.0_X64__8wekyb3d8bbwe<strong></strong> To reinstall
 - Microsoft Store, type the following command and press Enter:
Get-AppXPackage *WindowsStore* -AllUsers | Foreach {Add -AppxPackage -DisableDevelopmentMode -Register "$($_.InstallLocation)\AppXManifest.xml"}<strong></strong>After executing the command, close - PowerShell and restart the system.
Enable Virtual Machine Platform
- Open the
- Start menu and type Open Windows Features, then select Turn Windows features on or off.
 Scroll down and select the
 - Virtual Machine Platform checkbox. Then, click OK.

Clear Microsoft Store cache
- Hold down the key to open the Run dialog box. WindowsR

- Type wsreset.exe and press Enter.

A black window will now pop up and close automatically. Finally, when finished, it will clean your Microsoft Store cache.
0x8007019e error is one of the common problems. However, you must enable the WSL feature or use Windows PowerShell to resolve this issue. So, here's how you do it.
2. Fix 0x8007019e error
Enable WSL feature
- First, open the Start menu and enter optional function and click Enter.

- Under the Installed features section, search for WSL and select More Windows features.

- Now, select Windows Subsystem for Linux, and click OK in the Windows Features box.

- Afterwards, Windows will install the required features.
- Finally, restart your computer.
Alternatively, you can use Windows PowerShell to enable this feature:
- Click the Start menu, type PowerShell, then right-click it and select Run as administrator.

- Type the following command and press Enter:
<strong>Enable-WindowsOptionalFeature -Online -FeatureName Microsoft-Windows-Subsystem-Linux</strong>
- After that, type the following letters and click Enter to restart your computer:
<strong>Y</strong>
3. Fix 0x800701bc error
- First, visit this link to download the Linux kernel update package.

- After downloading the kernel package, run it as administrator.
- Wait until Windows completes the WSL update package installation. Then follow the on-screen instructions.

- After that, open Ubuntu. Now the command prompt window opens and asks you to create a new UNIX username and password.
- Enter your desired password and username. Now let CMD complete the installation.
0x800701bc is a kernel error that you can resolve by downloading the latest WSL2 Linux Kernel version. This article will show you how to uninstall WSL on Windows 11 if you no longer need it.
Why run Ubuntu on Windows 11?
If you are a Linux developer who occasionally needs access to the Windows world, then the WSL feature is like a godsend.
Developers, system administrators, and enthusiasts working on Microsoft operating systems and Linux appreciate the convenience provided by Windows Subsystem for Linux. However, although WSL is useful, it suffers from many limitations.
If you've ever tried to get a graphics application to run on WSL, you'll know that it's not always as straightforward as it should be, and requires some third-party software.
However, both issues are fixed in Windows 11. Ubuntu is an open source operating system that runs on Windows 11, but when mounting on Windows 11, you encounter Linux kernel or WSL errors.
Also, if you have problems dual-booting Ubuntu on Windows 10, don’t hesitate to read this article. Windows 11 users may also find some tips that may apply.
The most common Ubuntu error is 0x80070032, which you can resolve by clearing the Microsoft Store cache.
The above is the detailed content of How to fix Ubuntu errors on Windows 11. For more information, please follow other related articles on the PHP Chinese website!
 这就是修复 Windows 11 的 WSL 错误的方法May 03, 2023 pm 07:19 PM
Windows11中的WSL错误可能由于多种原因而发生。确切的消息是WslRegisterDistributionFailed并带有不同的错误代码。适用于Linux的Windows子系统(WSL)是一项允许开发人员和典型用户在其Windows计算机上安装和使用Linux的功能。尽管此功能对开发人员非常有价值,但它有时会导致难以修复的令人难以置信的复杂情况。幸运的是,这些错误并非不可克服。在这篇文章中,我们将讨论所有可能的原因和解决方案。Windows11中最常见的W
 如何在 Windows 10 或 11 WSL 上安装 Oracle Linux – 子系统Apr 14, 2023 pm 10:07 PM
在Windows10上安装OracleLinux8或7.5的步骤|11WSL1.启用WSL–Windows子系统Linux我们需要拥有的第一件事是WSL,如果尚未启用它,请启用它。转到搜索框并输入–打开或关闭Windows功能。在选项出现时,单击以打开相同。在打开的窗口中,向下滚动并选择为Linux的Windows子系统提供的框。然后单击确定按钮。之后重新启动系统以应用更改。2.在Windows11或10上下载OracleLinx8或
 在 Windows 上运行 shell 脚本文件的不同方法Apr 13, 2023 am 11:58 AM
适用于 Linux 的 Windows 子系统第一种选择是使用适用于 Linux 或 WSL 的 Windows 子系统,这是一个兼容层,用于在 Windows 系统上本地运行 Linux 二进制可执行文件。它适用于大多数场景,允许您在 Windows 11/10 中运行 shell 脚本。WSL 不会自动可用,因此您必须通过 Windows 设备的开发人员设置启用它。您可以通过转到设置 > 更新和安全 > 对于开发人员来完成。切换到开发人员模式并通过选择是确认提示。接下来,查找 W
 如何处理Linux系统中频繁出现的进程资源耗尽问题Jun 29, 2023 am 09:58 AM
如何处理Linux系统中频繁出现的进程资源耗尽问题概述:Linux系统下,有时会出现进程资源耗尽的情况,如CPU负载高、内存占用过多等问题。这些问题可能导致系统性能下降,甚至系统崩溃。本文将介绍一些解决进程资源耗尽问题的常见方法。一、定位问题:监测系统资源:使用top、htop等工具监测系统资源的使用情况,包括CPU、内存、磁盘和网络等。查看进程:使用ps命
 如何优化和调整Linux系统的内核参数以提高性能Jun 29, 2023 am 10:24 AM
如何优化和调整Linux系统的内核参数以提高性能摘要:Linux操作系统是世界上最流行的操作系统之一,拥有强大的性能和灵活的配置选项。本文介绍了如何通过优化和调整Linux系统的内核参数来提高性能。从理解内核参数的含义开始,将探讨常见的性能调优技巧,包括内存管理、磁盘IO、网络和调度器等方面。通过这些优化和调整,用户可以更好地利用Linux系统,提升工作效率
 想在 Windows 11 上安装 AlmaLinux?这是怎么做的Apr 30, 2023 pm 08:13 PM
在MicrosoftStore中,现在有一个版本的AlmaLinux与适用于Linux的Windows子系统兼容。这为用户提供了一系列令人印象深刻的新选项,因此我们将向您展示如何在Windows11上安装AlmaLinux。它于2021年3月发布,提供了第一个稳定的生产版本,此后该非营利基金会增加了许多新成员。最近的AMD是上个月加入的,时间是2022年3月。借助适用于Linux的Windows子系统,在Windows和Linux世界中工作的开
 linux中acpi是什么意思Jun 01, 2023 pm 04:03 PM
linux中acpi是“Advanced Configuration and Power Interface”的缩写,意思是高级配置与电源管理接口,这是微软、英特尔和东芝共同开发的一种工业标准。ACPI是提供操作系统与应用程序管理所有电源管理接口,包括了各种软件和硬件方面的规范。
 Linux系统中的服务优化指南Jun 18, 2023 pm 02:32 PM
随着Linux操作系统在企业中的广泛应用,对其服务的优化需求越来越高。本文将介绍Linux系统中常见的服务优化指南,以帮助企业更好地运维和管理Linux系统。禁止不必要的服务Linux系统中预装了许多服务程序,其中一些可能不会被企业所使用。禁止不必要的服务可以降低系统资源的消耗,并减少系统的安全漏洞。例如,企业如果不需要用到FTP服务,可以通过禁用FTP服务

Hot AI Tools

Undresser.AI Undress
AI-powered app for creating realistic nude photos

AI Clothes Remover
Online AI tool for removing clothes from photos.

Undress AI Tool
Undress images for free

Clothoff.io
AI clothes remover

AI Hentai Generator
Generate AI Hentai for free.

Hot Article

Hot Tools

SAP NetWeaver Server Adapter for Eclipse
Integrate Eclipse with SAP NetWeaver application server.

EditPlus Chinese cracked version
Small size, syntax highlighting, does not support code prompt function

Dreamweaver Mac version
Visual web development tools

Notepad++7.3.1
Easy-to-use and free code editor

VSCode Windows 64-bit Download
A free and powerful IDE editor launched by Microsoft


