


How to boot into safe mode in Windows 11

What is the use of safe mode?
Simply put, safe mode is a system state that removes all unnecessary drivers and applications that may interfere with the system and loads only those components that the system cannot live without. In most cases, you'll boot into Safe Mode if you want to troubleshoot malware, network, performance, or startup-related issues. Since there aren't many features running in the background, it's easier to narrow down and determine what's causing problems with your system in a Safe Mode environment.
Types of safe modes (and when to use them)
There are three types of safe modes. Let’s take a look at them and see when you should choose them.
Safety Mode: This is the most basic type. It allows you to start Windows with the minimum required drivers and services.
Safe Mode with Networking: This type is similar to the basic Safe Mode type, but adds the ability to access the Internet and share files and folders on the network.
Safe Mode with Command Prompt: This is a fairly advanced type of safe mode that allows using the Command Prompt terminal and making important changes to the system.
How to Boot into Safe Mode
Now that you know what Safe Mode is, let’s jump into the methods that allow you to boot into it.
Method 1: From Settings
Press Win I to open the Windows Settings app. Select System from the left pane.

Then scroll down on the right side and select Recovery.

Now click Restart Now next to Advanced Startup.

Troubleshoot.

Advanced Options.

to start settings.

Restart.


Win L. Once you get to the login screen, click the power button.

Shift key and select Restart.

Start and click the power button in the lower right corner.

Shift key and click Restart.

Step 1 -Press and hold the power button to turn off the device.
Step 2 -Press the power button again and turn on your device.
Step 3 - Once you see the first signs of Windows turning back on (most likely when you see the manufacturer's logo), hold down the power button again to turn it off . Then reopen it.
Repeat this process three times.After three failed boot attempts, Windows will restart and enter automatic repair. Automatic repair mode is triggered whenever Windows fails to start properly.

On the first screen, select Advanced Options.

This will open the Windows Repair Environment. On the first screen, click Troubleshoot.
Then select Advanced Options.
Click Start Settings.
Click Restart.
#After your device restarts, you will see a list of options, including three options for Safe Mode. Select the one you want by pressing the corresponding key.
Method 5: Configure the application from the system
Users can also choose to boot into safe mode through the legacy MSConfig application. The operation method is as follows:
Press "Start", type msconfig, and then click "System Configuration".

Go to the Bootstrap tab.

Under Startup Options, select Safe Boot.

#Then select from the options provided.
"Minimum" is the basic security mode; "Alternate shell" is the security mode with command prompt; "Network" is the security mode with network.
You will see another special safe mode option - "Active Directory Repair". This option boots into Directory Services Restore Mode (DSRM) safe mode, allowing administrators to repair and recover the Active Directory database or add new data to the directory. However, for most users, this option won't be of much help. So, stick with the three main security modes.

#After selecting the safe boot option, click OK.

Then restart the computer.
But please note that if you do not undo these changes, your computer will always boot into the selected safe mode. So, once you have resolved the issue, go back to the System Configuration app and uncheck the Secure Boot option.
Method 6: From Command Prompt or PowerShell
Command terminals such as Command Prompt and PowerShell also allow you to boot into Safe Mode. For demonstration purposes, we use the former. Here's how to do it:
Press Start, type cmd, then right-click Command Prompt and select Run as administrator .

Now type the following command:
bcdedit /set {bootmgr} displaybootmenu yes

Then press Enter.

Now, to restart your computer, type the following command:
shutdown /r /t 0

Press Enter.
After the computer restarts, Windows Startup Manager will appear. Press F8 to enter the "Startup Settings" menu.

Now select option 4-6 to boot into safe mode.

After troubleshooting, in order to boot normally, open the command prompt again, but this time enter the following command:
bcdedit /set {bootmgr } displaybootmenu no

#Press Enter.

Method 7: From a bootable USB drive
Windows can also boot into Safe Mode with the help of a USB drive that contains the Windows 11 installer. We already have a full article on how to make a Windows 11 bootable USB in 4 easy steps, so be sure to check it out before continuing.
Once you have your bootable USB drive ready, you can boot your PC by:
Enter the Windows Recovery Environment (as shown in the previous method). Then click Troubleshoot.
Click Advanced Options.
Select UEFI Firmware Settings.

Then click Restart.

Now you will get a boot menu with the option to change boot device options. Note that this screen will vary depending on your PC manufacturer. Press the key that will lead you to the boot device options.

On the next screen, select your USB device.

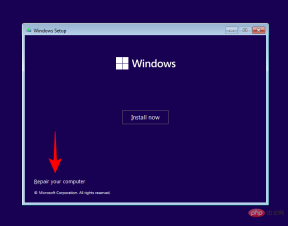
Now, once the Windows Installer screen appears, click Next.

Repair Computer in the lower left corner.
Troubleshooter.

Command Prompt.

bcdedit /set {default} safeboot minimal

Continue.
Your computer should now restart and boot into Safe Mode. Method 9: From BIOS (Legacy BIOS only) For those of you who have a fairly modern system with a UEFI BIOS and an SSD drive, this process will not work. The main reason for this is that in modern PCs you cannot press a key combination to interrupt the boot process. However, for those computers that still use traditional BIOS and HDDs, the old BIOS hack still works. So, if your computer qualifies, here's what you can do: Turn off your computer. Then press the power button to turn it on. There is a small window of opportunity between when your computer turns on and before you see the Windows logo (or the manufacturer's logo). During this time, press F8 repeatedly. If that doesn't work, try Shift F8. This will interrupt the boot process and bring you to the Advanced Startup window. From there, you can select the option to boot into Safe Mode. It’s worth reiterating that this option is only available on computers with slow-moving mechanical hard drives and older BIOSes. If you're not in that camp and have a modern PC, try the alternatives given above. Can’t boot into Safe Mode in Windows 11? How to fix itOkay, try these fixes.Fix: Unable to log in and access the desktop in Safe Mode
If you are in a Safe Mode environment but cannot access the desktop because you cannot log in, this is usually because you are logging in using a Microsoft Credentials account, which Internet connection required.
However, since the basic safe mode option does not provide networking options, you must select the safe mode option that also allows networking. Here's how:
On the lock screen, click the Power icon.

Then press the Shift key and click Restart.

This will take you to the Windows Recovery Environment. Here, click Troubleshooting.

Then click Advanced Options.

Click Start Settings.

Click Restart.

Select option 5 – Press the number “5”Enable Safe Mode with Networking.

#Once you enter this new security mode type, log in using your Microsoft credentials.
Fix: Windows won’t boot in Safe Mode
If you can’t boot into Safe Mode, it’s usually a problem with corrupted system files. Here are a few ways to fix this issue:
Method 1: Use a system restore point
If you create a system restore point on Windows 11, it’s easy to restore to a system where your system files are not corrupted time point. To do this, press Start, type System Restore, and click Createrestore point.

This will open the System Properties window. Here, click System Restore.

Here, Windows will provide a "recommended restore" point. Click Next.

Alternatively, you can click to select a different restore point.

Here, select the event before which you want the system to recover. Then click "Next".

Click to complete.

When prompted, click Yes.

Wait for the system restore to complete. Once completed, you should be able to boot into Safe Mode using the method given in the tutorial above.
Method 2: Use the DISM command to restore system health
If you have not created a restore point, you can use Command Prompt to scan and repair the health of your system. Here's how to do it:
Press Start, type cmd, right-click on the command prompt and select Run as administrator.
Then, enter the following command:
dism /online /cleanup-image /scanhealth

Press Enter. Wait for the scan to complete.

Then enter the following command:
dism/ online /cleanup-image /checkhealth

Press Enter.
Finally, enter the following command:
dism /online /cleanup-image /restorehealth


The above is the detailed content of How to boot into safe mode in Windows 11. For more information, please follow other related articles on the PHP Chinese website!

Hot AI Tools

Undresser.AI Undress
AI-powered app for creating realistic nude photos

AI Clothes Remover
Online AI tool for removing clothes from photos.

Undress AI Tool
Undress images for free

Clothoff.io
AI clothes remover

Video Face Swap
Swap faces in any video effortlessly with our completely free AI face swap tool!

Hot Article
Hot Tools

EditPlus Chinese cracked version
Small size, syntax highlighting, does not support code prompt function

SublimeText3 Linux new version
SublimeText3 Linux latest version

mPDF
mPDF is a PHP library that can generate PDF files from UTF-8 encoded HTML. The original author, Ian Back, wrote mPDF to output PDF files "on the fly" from his website and handle different languages. It is slower than original scripts like HTML2FPDF and produces larger files when using Unicode fonts, but supports CSS styles etc. and has a lot of enhancements. Supports almost all languages, including RTL (Arabic and Hebrew) and CJK (Chinese, Japanese and Korean). Supports nested block-level elements (such as P, DIV),

SublimeText3 Mac version
God-level code editing software (SublimeText3)

Dreamweaver Mac version
Visual web development tools

