The navigation pane is located on the left side of File Explorer/Windows Explorer. It shows Quick Access, This PC, Folders, etc. Some folders and locations can be accessed quickly and easily from this navigation pane. But few users are willing to hide this and do it. In this article, we will learn how to hide and unhide/enable the Navigation Pane from File Explorer.
How to Hide the Navigation Pane
Step 1: Open File Explorer and press the Windows E key at the same time .
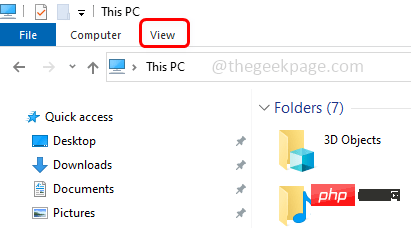
Step 2: Click the "How to hide and unhide the navigation pane in File Explorer in Windows 10"tab in the upper left corner. By default, the navigation pane will be enabled on the system.

Step 3: Click the Navigation Pane button and a drop-down menu will appear .

Step 4: Click the Navigation Pane option in the drop-down menu.

Step 5: Now in File Explorer, you can see that the navigation pane has disappeared.

How to Unhide/Enable Navigation Pane
Follow the same steps as above [Step1 – Step 4] to enable or show Navigation pane. Basically, click on the Navigation Pane option to hide or show the Navigation Pane in Explorer.

Now it's back in File Explorer.

The above is the detailed content of How to hide and unhide the navigation pane in File Explorer in Windows 10. For more information, please follow other related articles on the PHP Chinese website!
 如何在Windows 10和11上按收藏夹对照片进行排序Apr 30, 2023 pm 12:19 PM
WindowsPhotos在Windows11中进行了大修,因此您将享受新功能和改进功能。其中之一是按收藏夹对照片进行排序。Windows有一个特殊的文件夹,用于存放已标记为收藏夹的照片。如果相册或文件夹中有许多照片,则“收藏夹”列表非常有用,因为它可以轻松找到要在屏幕上显示的照片。如果您不知道此功能或如何将照片添加到收藏夹文件夹,我们将向您展示如何操作。如何在Windows中对收藏夹照片进行排序?Windows11通过单击键启动照片应用程序,在搜索栏中键入照片,然后单击打开。Windows电
 如何在Windows 10 / 11上启用或禁用数据执行保护(DEP)Apr 13, 2023 am 11:37 AM
数据执行保护 (DEP) 是 Windows 中的一项内存保护功能。它会进行检查并保护内存的几个区域,并帮助防止它们执行恶意代码。反过来,它可以帮助防止病毒和其他安全威胁对您的计算机造成损害。它可以防止从默认堆、堆栈和内存池运行代码。如果应用程序尝试从受保护的页面执行或运行代码,则该应用程序会收到带有状态代码的异常错误。DEP 很有帮助,有时当它没有按预期工作时也会出现问题。DEP 在 64 位程序中已建立。大多数导致 DEP 问题的程序都是 32 位程序。在本文中,让我们看看如何在Window
 如何在Windows11上从文件资源管理器中删除图库?Feb 05, 2024 pm 04:27 PM
Windows11的文件资源管理器中新增了图库功能,用户可以在资源管理器导航窗格中找到图库选项。图库会按照时间线的方式展示所有照片。本文将向您介绍在Windows11的文件资源管理器中如何添加或删除文件夹到图库。如何在Windows11中的文件资源管理器图库中添加文件夹要将文件夹添加到文件资源管理器中的库,请按照以下步骤操作:1.打开文件资源管理器(可以通过按下Win+E键来快速打开)。2.在左侧导航栏中,右键单击“库”选项,并选择“新建库”。3.输入一个名称来命名新的库文件夹。4.右键单击新创
 如何修复您尝试安装的应用不是 Windows 上经过 Microsoft 验证的应用Apr 13, 2023 pm 05:52 PM
Microsoft Windows 10 和 11 可能配置为仅允许在设备上安装某些类型的应用程序。该限制可能是有意的,例如,当限制可以安装在设备上的内容的策略到位时,但有时也是无意的。以下指南提供了易于遵循的分步说明,以解决意外出现的错误消息。尝试安装某些类型的应用程序的 Windows 用户可能会收到错误消息“您尝试安装的应用程序不是 Microsoft 验证的应用程序”。该对话框几乎没有提供有关安装被阻止原因的信息。它指出“从商店安装应用程序有助于保护您的 PC 并使其平稳运行”,并链接到
![在 Windows 10 上自动设置时区不起作用 [已修复]](https://img.php.cn/upload/article/000/887/227/168136135759894.png) 在 Windows 10 上自动设置时区不起作用 [已修复]Apr 13, 2023 pm 12:49 PM
在 Windows 10 上自动设置时区不起作用 [已修复]Apr 13, 2023 pm 12:49 PM根据时区手动更改日期和时间有点费时,如果有人忘记更改计算机的时间,也可能会造成混淆,尤其是如果您是出于商务目的旅行的人。自动设置时间是最好和明智的选择,这样它就可以根据您所在的位置自动更新计算机的时间。在本文中,让我们看看如何在 Windows 10 上自动设置时区。方法一:启用自动设置时间和时区选项第 1 步:同时使用Windows + I键打开 Windows 设置第 2 步:点击时间和语言第 3 步:通过单击下方的切换栏启用自动设置时间选项第 4 步:还可以通过单击下方的切换栏启用自动设置
 如何修复注册表编辑器在 Windows 11、10 中无法打开的问题May 23, 2023 pm 11:31 PM
注册表编辑器是我们用来修复Windows系统错误的工具。它是注册表项的中心,经过适当调整,可以解决大部分问题。但在极少数情况下,注册表编辑器也可能会挂起。许多用户报告在尝试搜索系统中不存在的密钥时看到了错误。如果您尝试取消搜索,应用程序将挂起,即使您不取消搜索,应用程序也会冻结并显示以下消息。注册表编辑器已停止工作。问题的根本原因是子键的长度。如果子键的长度超过255个字节,则会出现此错误。但是,有时,这也可能是因为病毒或恶意软件。如果您在系统上注意到此问题,请不要惊慌。在本文中,让我们讨论解决
 如何在 Windows 10 中为所有文件夹设置默认文件夹视图Apr 15, 2023 am 09:31 AM
在文件资源管理器中,有许多选项可以更改文件夹布局,例如超大图标、小图标、列表、磁贴等,并且每个选项都有不同的视图。默认情况下,Windows将根据文件夹内容设置文件夹视图。例如,包含视频的文件夹具有不同的视图,同样,图像,文档等文件夹具有不同的文件夹视图。如果一个文件夹中有不同类型的文件,这意味着图像、文档、视频、音乐等的混合,那么它有一个通用模板。这么说,您还可以为所有文件夹设置默认文件夹视图。在本文中,让我们看看如何为计算机上的所有文件夹设置默认文件夹视图。为所有文件夹设置默认文件夹视图步骤
 如何在 Windows 10 的文件资源管理器中隐藏和取消隐藏导航窗格Apr 13, 2023 pm 02:16 PM
导航窗格位于文件资源管理器/Windows 资源管理器的左侧。它显示“快速访问”、“此 PC”、“文件夹”等。从此导航窗格中可以快速轻松地访问一些文件夹和位置。但很少有用户愿意隐藏这一点并执行操作。在本文中,我们将学习如何从文件资源管理器中隐藏和取消隐藏/启用导航窗格。如何隐藏导航窗格第 1 步:打开文件资源管理器,同时按下Windows + E键。第 2 步:在左上角单击“查看”选项卡。默认情况下,导航窗格将在系统上启用。广告第 3 步:单击导航窗格按钮,将出现一个下拉菜单。第 4 步:单击下

Hot AI Tools

Undresser.AI Undress
AI-powered app for creating realistic nude photos

AI Clothes Remover
Online AI tool for removing clothes from photos.

Undress AI Tool
Undress images for free

Clothoff.io
AI clothes remover

AI Hentai Generator
Generate AI Hentai for free.

Hot Article

Hot Tools

Safe Exam Browser
Safe Exam Browser is a secure browser environment for taking online exams securely. This software turns any computer into a secure workstation. It controls access to any utility and prevents students from using unauthorized resources.

SublimeText3 Linux new version
SublimeText3 Linux latest version

SublimeText3 Chinese version
Chinese version, very easy to use

Notepad++7.3.1
Easy-to-use and free code editor

SublimeText3 Mac version
God-level code editing software (SublimeText3)


