


First of all, I want to tell you that in the field of programming development, what you need to learn is the way to learn. If you go in the right direction, you can get twice the result with half the effort. And I think the fastest and most effective way to learn technical skills is to practice. Don’t get into too many theories first. You can’t just dismantle the bike you bought. You have to find a way to ride it first.
So this is what Brother Fu is doing, learning things. Driven by the goal, build the smallest unit version that can run tests. Because Conway's Law says; the smaller the problem, the easier it is to understand and deal with. So after coming into contact with ChatGPT, I often thought about how to train and deploy such a chat dialogue model by myself, even with a small amount of training data for me to test. So here comes this silly dog robot that can troll people!
1. Silly Dog Machine Chat
Based on the learning based on the previous article "Build a ChatGPT Algorithm Model" by Brother Fu, OpenAI open source GPT-2 and related GPT2-chitchat The model training code deploys this silly dog robot that can troll people. However, due to problems with training data, this chatbot always feels abnormal when talking to it. ——But it does not affect our learning of algorithm model training.

This page is the WEB version of the chat dialogue window programmed by Brother Fu
- Access address: http:/ /120.48.169.252/ - The server configuration is limited and cannot handle excessive concurrent access.
- Video demonstration: https://www.bilibili.com/video/BV1LG4y1P7bo - You can also watch the GPT2 model deployment demonstration through the Bilibili video.
2. Basic configuration environment
OpenAI GPT2 model training and service use require the use of Python, TensorFlow machine learning and other related configurations, and there are some version dependencies between these environments. So for smooth debugging, try to keep the same version as me. If you have difficulty installing the environment, you can also ask Brother Fu to help you buy a cloud server. Then I will mirror my environment to your server and you can use it directly. Below is the basic environment, code, and data required.
- System configuration: Centos 7.9 - 2-core 4GB memory 200G disk 4Mbps bandwidth cloud server
- Deployment environment: Python3.7, Transformers==4.2.0, pytorch==1.7 .0
- Model code: https://github.com/fuzhengwei/GPT2-chitchat - This code is open source and contains websocket communication page
- Model data: https://pan.baidu .com/s/1iEu_-Avy-JTRsO4aJNiRiA - ju6m
1. Environment dependencies
yum -y install zlib-devel bzip2-devel openssl-devel ncurses-devel sqlite-devel readline-devel tk-devel gdbm-devel db4-devel libpcap-devel xz-devel

yum install gcc -y

yum -y install libffi-devel

make

make altinstall
2. Python 3.7
cd ~

# 1.下载Python安装包
wget https://www.python.org/ftp/python/3.7.4/Python-3.7.4.tgz

# 2.将安装包移动到/usr/local文件夹下
mv Python-3.7.4.tgz /usr/local/

# 3.在local目录下创建Python3目录
mkdir /usr/local/python3

# 4.进入的Python安装包压缩包所在的目录
cd /usr/local/

# 5.解压安装包
tar -xvf Python-3.7.4.tgz

# 6.进入解压后的目录
cd /usr/local/Python-3.7.4/

# 7.配置安装目录
./configure --prefix=/usr/local/python3

# 8.编译源码
make

# 9.执行源码安装
make install

# 10.创建软连接
ln -s /usr/local/python3/bin/python3/usr/bin/python3

# 11. 测试
python3 -V
3. Install pip3
cd ~

# 1.下载
wget https://bootstrap.pypa.io/get-pip.py

# 2.安装;注意咱们安装了 python3 所以是 pyhton3 get-pip.py
python3 get-pip.py

# 3.查找pip安装路径
find / -name pip

# 4.将pip添加到系统命令
ln -s/usr/local/python/bin/pip /usr/bin/pip

# 5.测试
pip -V

# 6.更换源,如果不更换那么使用 pip 下载软件会很慢
pip config set global.index-url https://pypi.tuna.tsinghua.edu.cn/simple
pip config set install.trusted-host mirrors.aliyun.com
pip config list

# pip国内镜像源:

# 阿里云 http://mirrors.aliyun.com/pypi/simple/
# 中国科技大学https://pypi.mirrors.ustc.edu.cn/simple/
# 豆瓣 http://pypi.douban.com/simple
# Python官方 https://pypi.python.org/simple/
# v2ex http://pypi.v2ex.com/simple/
# 中国科学院http://pypi.mirrors.opencas.cn/simple/
# 清华大学 https://pypi.tuna.tsinghua.edu.cn/simple/
4. Install git
cd ~

# 1.安装前首先得安装依赖环境
yum install -y perl-devel

# 2.下载源码包到 CentOS 服务器后进行解压
tar -zxf git-2.9.5.tar.gz

cd git-2.9.5

# 3.执行如下命令进行编译安装

./configure --prefix=/usr/local/git

make && make install

# 4.添加到系统环境变量
vim ~/.bashrc

export PATH="/usr/local/git/bin:$PATH"

# 5.使配置生效
source ~/.bashrc

# 6.测试
git version
5. Install Pagoda
yum install -y wget && wget -O install.sh https://download.bt.cn/install/install_6.0.sh && sh install.sh 12f2c1d72
- After installation, log in to the address prompted by Pagoda. By default, it will use port 8888, so you need to be on the server Enable access to port 8888.
- The installation of Pagoda is to deploy a web version of the chat interface on the server side, using the Nginx service. It's easier to operate with a pagoda here.
3. Model running environment
Model training requires the transformers machine learning service, as well as pytorch, sklearn and other components; the following content needs to be installed separately;
transformers==4.4.2
pytorch==1.7.0
sklearn
tqdm
numpy
scipy==1.2.1
1. transformers
pip install transformers==4.4.2
2. pytorch
pip install torch==1.7.0+cpu torchvision==0.8.1+cpu torchaudio===0.7.0 -f https://download.pytorch.org/whl/torch_stable.html
- This torch version cpu and torchvision need to match.
3. Other installations
For the rest, just follow the pip install instructions. In addition, when running GTP2-chitchat, if you are prompted that some components are missing, use pip directly and follow the instructions. Can.
4. Chat page configuration
Here, first put the websocket page code prepared by Brother Fu for you, and then deploy it after creating the site through Pagoda. Code: https://github.com/fuzhengwei/GPT2-chitchat/tree/master/web

After that, open your pagoda address, Create a site and upload web code.

Note: The current configuration for accessing websocket in this code is in index.js, and you need to change it to your server address.
if(!window.WebSocket){
 alert("您的浏览器不支持WebSocket协议!推荐使用谷歌浏览器进行测试。");
 return;
}
socket = new WebSocket("ws://120.48.169.252:7397");
5. Model training deployment
1. Download code
cd /home

git clone https://github.com/fuzhengwei/GPT2-chitchat.git
You need to modify the interact.py code and change the IP and port configuration of Websocket here;
async def start_server():
try:
async with websockets.serve(server, "192.168.0.4", 7397):
print("Starting server at ws://localhost:7397")
await asyncio.Future()# run forever
except OSError as e:
print(f"Error starting server: {e}")
except Exception as e:
print(f"Unexpected error: {e}")
2. Upload model
Download model: https://pan.baidu.com/s/1iEu_-Avy-JTRsO4aJNiRiA#list/path=/ - Password: ju6m
Upload model: Here you need to install an SFTP tool on your local machine, or use the tool provided by IntelliJ IDEA to link. After linking, you can upload the decompressed model to /home/GPT2-chitchat/model.
async def start_server():
try:
async with websockets.serve(server, "192.168.0.4", 7397):
print("Starting server at ws://localhost:7397")
await asyncio.Future()# run forever
except OSError as e:
print(f"Error starting server: {e}")
except Exception as e:
print(f"Unexpected error: {e}")
修改这部分代码的IP和端口,以及在云服务上开启 7397 的访问权限。另外为了安全起见,可以在云服务的防火墙IP来源中授权,只有你当前的台机器才可以链接到 websocket 上。
3. 启动服务
这里小傅哥通过 mac nuoshell 连接工具,进行模型启动;模型路径:/home/GPT2-chitchat/model/model_epoch40_50w
python3 interact.py --no_cuda --model_path /home/GPT2-chitchat/model/model_epoch40_50w

- 启动后就可以把你的 websocket 页面打开了,它会自动的链接到这个 websocket 服务上。
- 如果你还需要 Socket 或者命令行的服务,也可以修改 interact.py 代码进行处理。
以上就是整个 GPT2-chitchat 一个闲聊模型的部署,你也可以尝试使用 Docker 部署。如果在部署过程中实在很难部署成功,也可以找小傅哥买云服务,这样我可以直接把镜像部署到你的云服务上,就可以直接使用了。
The above is the detailed content of A stupid dog robot was trained based on GPT2. For more information, please follow other related articles on the PHP Chinese website!


 令人惊艳的4个ChatGPT项目,开源了!Mar 30, 2023 pm 02:11 PM
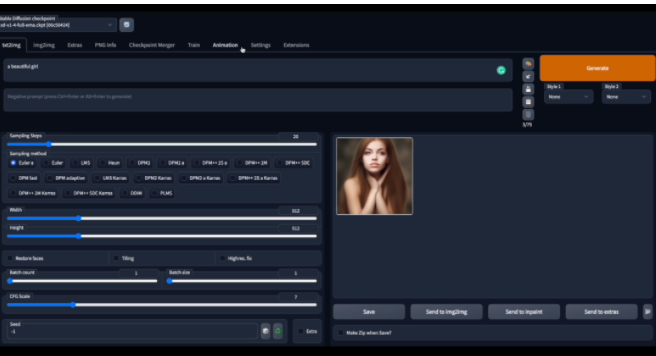
自从 ChatGPT、Stable Diffusion 发布以来,各种相关开源项目百花齐放,着实让人应接不暇。今天,着重挑选几个优质的开源项目分享给大家,对我们的日常工作、学习生活,都会有很大的帮助。
 Word文档拆分后的子文档字体格式变了怎么办Feb 07, 2023 am 11:40 AM
Word文档拆分后的子文档字体格式变了的解决办法:1、在大纲模式拆分文档前,先选中正文内容创建一个新的样式,给样式取一个与众不同的名字;2、选中第二段正文内容,通过选择相似文本的功能将剩余正文内容全部设置为新建样式格式;3、进入大纲模式进行文档拆分,操作完成后打开子文档,正文字体格式就是拆分前新建的样式内容。
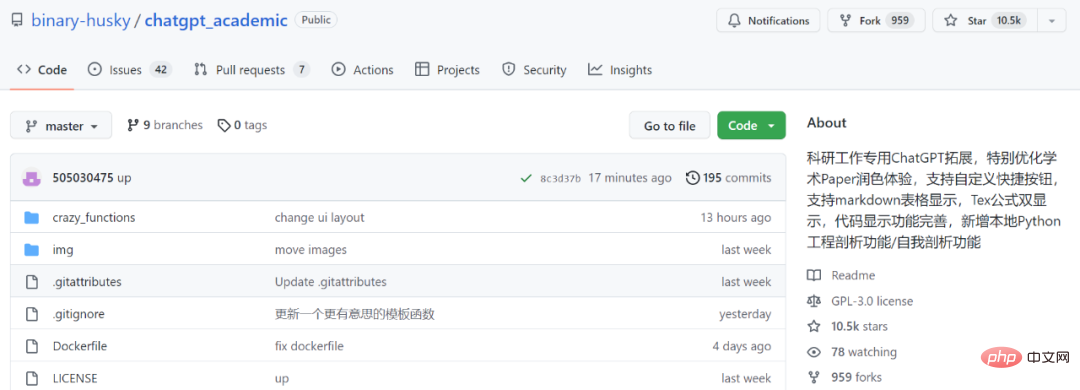 学术专用版ChatGPT火了,一键完成论文润色、代码解释、报告生成Apr 04, 2023 pm 01:05 PM
用 ChatGPT 辅助写论文这件事,越来越靠谱了。 ChatGPT 发布以来,各个领域的从业者都在探索 ChatGPT 的应用前景,挖掘它的潜力。其中,学术文本的理解与编辑是一种极具挑战性的应用场景,因为学术文本需要较高的专业性、严谨性等,有时还需要处理公式、代码、图谱等特殊的内容格式。现在,一个名为「ChatGPT 学术优化(chatgpt_academic)」的新项目在 GitHub 上爆火,上线几天就在 GitHub 上狂揽上万 Star。项目地址:https://github.com/
 30行Python代码就可以调用ChatGPT API总结论文的主要内容Apr 04, 2023 pm 12:05 PM
阅读论文可以说是我们的日常工作之一,论文的数量太多,我们如何快速阅读归纳呢?自从ChatGPT出现以后,有很多阅读论文的服务可以使用。其实使用ChatGPT API非常简单,我们只用30行python代码就可以在本地搭建一个自己的应用。 阅读论文可以说是我们的日常工作之一,论文的数量太多,我们如何快速阅读归纳呢?自从ChatGPT出现以后,有很多阅读论文的服务可以使用。其实使用ChatGPT API非常简单,我们只用30行python代码就可以在本地搭建一个自己的应用。使用 Python 和 C
 vscode配置中文插件,带你无需注册体验ChatGPT!Dec 16, 2022 pm 07:51 PM
面对一夜爆火的 ChatGPT ,我最终也没抵得住诱惑,决定体验一下,不过这玩意要注册需要外国手机号以及科学上网,将许多人拦在门外,本篇博客将体验当下爆火的 ChatGPT 以及无需注册和科学上网,拿来即用的 ChatGPT 使用攻略,快来试试吧!
 用ChatGPT秒建大模型!OpenAI全新插件杀疯了,接入代码解释器一键getApr 04, 2023 am 11:30 AM
ChatGPT可以联网后,OpenAI还火速介绍了一款代码生成器,在这个插件的加持下,ChatGPT甚至可以自己生成机器学习模型了。 上周五,OpenAI刚刚宣布了惊爆的消息,ChatGPT可以联网,接入第三方插件了!而除了第三方插件,OpenAI也介绍了一款自家的插件「代码解释器」,并给出了几个特别的用例:解决定量和定性的数学问题;进行数据分析和可视化;快速转换文件格式。此外,Greg Brockman演示了ChatGPT还可以对上传视频文件进行处理。而一位叫Andrew Mayne的畅销作
 ChatGPT教我学习PHP中AOP的实现(附代码)Mar 30, 2023 am 10:45 AM
本篇文章给大家带来了关于php的相关知识,其中主要介绍了我是怎么用ChatGPT学习PHP中AOP的实现,感兴趣的朋友下面一起来看一下吧,希望对大家有帮助。


Hot AI Tools

Undresser.AI Undress
AI-powered app for creating realistic nude photos

AI Clothes Remover
Online AI tool for removing clothes from photos.

Undress AI Tool
Undress images for free

Clothoff.io
AI clothes remover

AI Hentai Generator
Generate AI Hentai for free.

Hot Article
Hot Tools

SublimeText3 English version
Recommended: Win version, supports code prompts!

Zend Studio 13.0.1
Powerful PHP integrated development environment

Atom editor mac version download
The most popular open source editor

MinGW - Minimalist GNU for Windows
This project is in the process of being migrated to osdn.net/projects/mingw, you can continue to follow us there. MinGW: A native Windows port of the GNU Compiler Collection (GCC), freely distributable import libraries and header files for building native Windows applications; includes extensions to the MSVC runtime to support C99 functionality. All MinGW software can run on 64-bit Windows platforms.

Dreamweaver Mac version
Visual web development tools

