


Translator |Chen Jun
Reviewer |Sun Shujuan
Implementing self-service user assistance is often one of the goals that customer support teams continue to pursue. It can not only effectively reduce the number of user demand orders, but also allow users to quickly find the answers they need. A few years ago, a study by American Express found that more than 60% of consumers said they preferred to make inquiries through simple "preferred channels" such as online chat, voice response, website, and mobile application. , for digital self-service. In this regard, chatbots happen to be ideal tools capable of delivering self-service at scale.
In the past, beginners often felt intimidated when it came to building a chatbot. Today, the Answers platform provided by Infobip is making this problem simple. With Answers, you can create smart, keyword-based chatbots. By building with a no-code web GUI, you not only increase customer satisfaction, but you also directly reduce operational costs.
Below, I will take you step by step to build a code-free chatbot. It can communicate with end-users and solve real-world customer problems through the use of WhatsApp. Of course, if you don’t want to use the support provided by WhatsApp, you can also use a variety of communication channels supported by Answers, including SMS and live chat.
How to create a WhatsApp self-service customer support chatbot without coding
In this example, I will create a chatbot to help those who can’t find To customers who visit the restaurant, provide them with the location of the restaurant, send them menus, and provide them with push information for new customers. Of course, you can completely replace this restaurant use case with your own workflow, thereby improving the human-machine dialogue scenario designed based on Answers.
Prerequisites
First, you need to create an Infobip trial account. At the same time, you can also try its WhatsApp channel for free to test your chatbot from your mobile phone.
Step 1: Define User Pain Points
Before starting to create a self-service chatbot, it is very important to clearly define the user pain points to be solved. In this case, we can define the following pain points:
- Users think of our restaurant, but don’t know the address.
- The user wants a menu but doesn't know where to find it.
- Users want to get new recruitment reward information, but don’t know where to register.
For each pain point, we need to assist the user with a message from the self-service chatbot. Of course, as you deepen your learning and research, you may also define more complex pain points and cases.
Step 2: Create an Answer Outline for the Bot
Now that you have defined your pain points, you can outline how your chatbot will solve them. For example:
- Provide restaurant addresses and links to Google Maps to users who need to know directions.
- Provide links for users who need the menu.
- Provide a link to the registration page to users who want to register for rewards.
Step 3: Log in and create a chatbot
Now, we can start designing our own chatbot.

Start designing a chatbot
- Log in to Infobip’s portal page.
- Click Answers in the left menu.
- Click the "NEW CHATBOT" button.
- Fill in the fields in the pop-up window for configuring the chatbot (make sure WhatsApp is selected in the Channel drop-down list) and click "CREATE CHATBOT".
Step 4: Create Keywords
Now, we will create keywords that will help the chatbot branch the conversation correctly.
- Click on the Keywords (Keywords) tab.
- Click to add keywords (ADD keywords).
- Enter a keyword. In this example we will use location.
- Enter at least one synonym (Synonym) for the keyword. Synonyms will be able to trigger the same logic as keywords. After each synonym, press the Enter key and click its checkmark when finished. In this example, we set the synonyms of the location keyword to be "directions" and "address".
- Repeat steps 2 through 4 above for each keyword you plan to add. In this example, we plan to prompt the user to enter 1 for "yes" and 2 for "no". At the same time, we also need to use keywords to know when to send our menu or reward program links to users. Therefore, we can finally sort out the following table:

Final list of keywords
Step 5: Create a dialog box
Next, we start to create a dialog box for user interaction. Here, our example will include the following six dialog boxes:

# Since the default dialog box already exists, we need to create the other five dialog boxes through the following steps:
- Click the Dialogs tab.
- Click "ADD DIALOG".
- Click the pencil icon to edit and add a name to the dialog box (eg: Send Location), then click the checkmark.
- Repeat steps 2 and 3 above. After the overall completion, the corresponding list is as shown below:

Final list of dialogue
Step 6: Configure dialog box
Below, we will configure each conversation to match the actual desired conversation flow.
Configuring the default dialog box
According to the basic logic of this chatbot, the default dialog box will be sent as a message to any user who greets it. Here we will provide users with three options. Of course, if the chatbot cannot understand the user's words, it will fall back to the default message. Therefore, you can perform the following steps:
- Click on the default dialog box in the left menu.
- Drag a "Text" element onto the interface.
- Type the welcome message in the box for Message 1. In this example, we will use text like this:
Hello!
I'm just a simple robot, but I'm here to help!
What can I do for you?
Type the name of the option:
*"Location" - our address and directions
*"Menu" - Get our menu
*" Rewards” - Sign up for our Rewards Club
- Drag the “User Input” element onto the interface.
- Click "Add Keyword Mapping (ADD Keyword Mapping)" and select a location. Note: If you haven't created a keyword before, you can create one now by clicking "Create new keyword."
- Repeat the previous step and add menu and bonus keywords.
- In each "User Input" block, drag in a To Dialog element. 8. Click the "User Input" element in the interface, and in the build panel on the right, scroll down to the "Repeat" section. Set the repeat count to 1. Then, type a message similar to the following in the (optional) Repeat message text box so that the chatbot can choose to send it if it doesn't understand the user input.
Sorry, I misunderstood.
Type one of the options in quotes and I'll do my best to help!
*"Location" - Our address and directions
*"Menu"-Get our menu
*"Rewards"-Sign up for our Rewards Club
- Note: We can integrate Answers with Infobip Conversations to escalate user issues to the Infobip Cloud Contact Center for processing. Of course, if you don't want to do this, you can bypass this step or configure different follow-up actions.
Scroll the mouse pointer down to the Fallback action in the build panel and change the drop-down list to Connect with agent. If our chatbot still cannot understand the user's input after responding to a repeated message, this action will connect them to a human agent. For this, we can type the following message in the (optional) Fallback message text box for the bot to send to the user before forwarding.
Sorry, but I still don't understand.
Let me transfer you to someone.
- Click the Go To Dialog element under "Location" and set the Go to drop-down menu to the "Send location" dialog box.
- Click the Go To Dialog element under "Menu" and set the Go to drop-down menu to the "Send menu (Send menu) dialog box.
- Click under "Rewards" Go To Dialog element, and set the Go to drop-down menu to the "Send rewards info" dialog box. The completed interface is as shown below:

Configuring the "Sending Location" dialog box
Next, we will enter the workflow of sending location. In this case, the bot will assume that the user is asking for the address of the restaurant, so we just need to give them directions and see if they need any other help.
It is worth noting that if you want to send multiple messages at once, please pause at least 2 seconds between messages. This will give users enough time to digest the content you send. The sending of messages can also appear more natural, thereby improving the user experience.

Configure the "Send Location" dialog box
- Click the Send Location dialog box in the left menu.
- Drag the "Delay" element directly below the "Send Position" on the interface, and change the delay time to 2 seconds.
- Drag the "Position" element below the "Delay" element.
- Type and select an address in Location Address, or select it in the Map field in the Send Location build panel. This will send the user a Google Maps location.
- Below the send position element, add another delay 2 seconds element.
- Below the second deferred element, add a "text" element.
- Enter a message in the box of Message 1 to confirm the user's address. In this case we are using: We are on 35th Street! This is the "map" link.
- Drag the To Dialog element under the "Send Text" element.
- In the Go to drop-down menu of the build panel, select "Ask to end chat".
- The completed dialog box is as shown below:

Complete dialog box
Configure "Send Menu" "Dialog
In this example, the Send Menu dialog is configured very similarly to the Send Location dialog, in that we simply send a link to the menu. After completion, its complete dialog box is as shown below:

#"Send Menu" Dialog
Configure "Send Reward Information" Dialog Box
Conceptually, the Send Rewards Message dialog is also similar to the Send Menu dialog, except that the chatbot will send a link to help the user create a rewards account. After completion, its complete dialog box is as shown below:

#"Send reward information" dialog box
Configure "Ask to end chat" Dialog box
According to the previous dialogue design, the dialog box asking to end the chat should be when the chatbot provides some information to the user and asks them if they need anything else or no more information. End the chat directly.
- Click the "Ask to end chat" dialog box in the left menu.
- Drag a "Delay" element under the "Ask to end chat" element on the interface and set it to 2 seconds.
- Drag a "Text Element" under the "Delay" element.
- Enter a message for the user to select in the message 1 box. In this example, we will enter the following text:
Is there anything else I can help you with?
1-Yes, I need more information.
2-No, that's it.
- Drag the "User Input" element below the "Send Text" element on the interface.
- Click the dialog box for "User Input", then click "Add Keyword Mapping" and select 1. Then click Add Keyword Mapping again and select 2.
- Scroll down to Fallback action in the build panel and change the dropdown to Connect with agent. If the chatbot cannot understand the user's input, we connect them to a human agent. For this, we can type the following message in the (optional) Fallback message text box for the bot to send to the user before forwarding.
Sorry, I'm having a little trouble.
#Let me transfer you to someone.
- Drag the To Dialog element under "User Input 1" and set the Go to drop-down menu to User Wants More Information.
- Drag a text element under "User Input 2" and enter a farewell message in the box for Message 1. In this example we will use:
Thank you! Have a nice day!
- We drag in a "Close session" element below the last text element created in the previous step.
The completed dialog box is as shown below:

"Last Ask to Send" chat dialog box configuration
"User wants more information" dialog box
Finally, we need to configure the "User wants more information" dialog box in case the user continues to ask more questions. The dialog here is basically the same as the previous default dialog, with just a slight modification to the greeting, so we won't go into details here.
It is worth noting that once you have mastered the basic flow of dialog box creation, use the copy function to save time. You may have noticed that the User Wants More Information dialog box effectively serves the same purpose as the default dialog box. Therefore, we can completely copy the default dialog box and edit it directly. The complete dialog box looks like this:

"End User Wants More Information" Dialog
Step 7: Test the Chatbot
At this point, all dialog boxes have been configured and we can use Infobip Simulator to test them.

Test the chatbot
- Click on the Simulator (Emulator) tab.
- Click the "START SIMULATION" button.
- Type a message in the "Send a message" box to see how the bot responds.
- Adjust the chatbot settings as needed based on the test results. At the same time, you can use the buttons in the emulator to assist with debugging. For example, in the screenshot below, we can see that the To dialog logic triggers Dialog start. It opens with a delay and then performs the "send text" action.
Step 8: Activate the Self-Service Customer Support Chatbot
You can now activate the chatbot by clicking the ACTIVATE button in the upper right corner of the screen.

Activate the chatbot by clicking on the activation button
The chatbot will be displayed in your Infobip portal and you can follow Number/Page Send a message to WhatsApp using the number listed in the column.

Numbers are listed in pages/pages
Next step outlook
At this point, we have completed a system that can handle basic customers Chatbot for service workflow. Of course, we've only scratched the surface of chatbots. In real demand scenarios, you need to layer intelligent and more complex workflows to enhance their service efficiency.
In general, you can further explore from the following three aspects:
- Intent: By customizing service intent, you can let the chatbot better understand the customer's demand and provide a higher response hit rate.
- Natural language processing: Currently, the Answers platform can support NLP. Even if the user doesn't exactly match the keyword or synonym, the chatbot should be able to "reason" and provide a high-quality response.
- Properties: In this example, we are not personalizing the message. Through attribute settings, we can allow the chatbot to better learn and understand users, thereby improving the user experience.
Original link: https://dzone.com/articles/create-a-self-service-customer-support-chatbot-wit
Translator Introduction
Julian Chen, 51CTO community editor, has more than ten years of experience in IT project implementation. He is good at managing and controlling internal and external resources and risks, and focuses on disseminating network and information security knowledge. and experience; continue to share cutting-edge technologies and new knowledge in the form of blog posts, special topics, and translations; often conduct information security training and teaching online and offline.
The above is the detailed content of How to Create a No-Code Self-Service Customer Chatbot. For more information, please follow other related articles on the PHP Chinese website!

 Let's Dance: Structured Movement To Fine-Tune Our Human Neural NetsApr 27, 2025 am 11:09 AM
Scientists have extensively studied human and simpler neural networks (like those in C. elegans) to understand their functionality. However, a crucial question arises: how do we adapt our own neural networks to work effectively alongside novel AI s
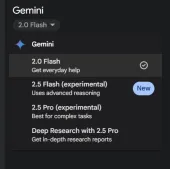
 New Google Leak Reveals Subscription Changes For Gemini AIApr 27, 2025 am 11:08 AM
Google's Gemini Advanced: New Subscription Tiers on the Horizon Currently, accessing Gemini Advanced requires a $19.99/month Google One AI Premium plan. However, an Android Authority report hints at upcoming changes. Code within the latest Google P
 How Data Analytics Acceleration Is Solving AI's Hidden BottleneckApr 27, 2025 am 11:07 AM
Despite the hype surrounding advanced AI capabilities, a significant challenge lurks within enterprise AI deployments: data processing bottlenecks. While CEOs celebrate AI advancements, engineers grapple with slow query times, overloaded pipelines, a
 MarkItDown MCP Can Convert Any Document into Markdowns!Apr 27, 2025 am 09:47 AM
Handling documents is no longer just about opening files in your AI projects, it’s about transforming chaos into clarity. Docs such as PDFs, PowerPoints, and Word flood our workflows in every shape and size. Retrieving structured
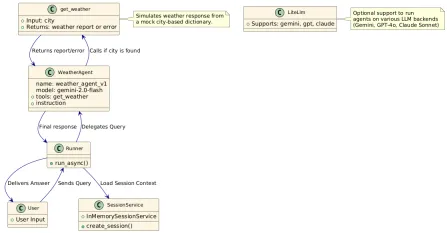 How to Use Google ADK for Building Agents? - Analytics VidhyaApr 27, 2025 am 09:42 AM
Harness the power of Google's Agent Development Kit (ADK) to create intelligent agents with real-world capabilities! This tutorial guides you through building conversational agents using ADK, supporting various language models like Gemini and GPT. W
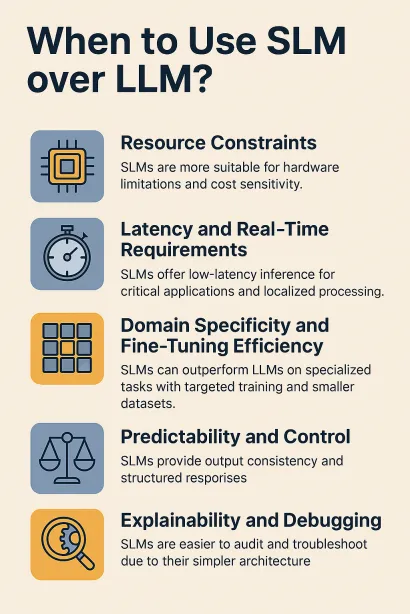 Use of SLM over LLM for Effective Problem Solving - Analytics VidhyaApr 27, 2025 am 09:27 AM
summary: Small Language Model (SLM) is designed for efficiency. They are better than the Large Language Model (LLM) in resource-deficient, real-time and privacy-sensitive environments. Best for focus-based tasks, especially where domain specificity, controllability, and interpretability are more important than general knowledge or creativity. SLMs are not a replacement for LLMs, but they are ideal when precision, speed and cost-effectiveness are critical. Technology helps us achieve more with fewer resources. It has always been a promoter, not a driver. From the steam engine era to the Internet bubble era, the power of technology lies in the extent to which it helps us solve problems. Artificial intelligence (AI) and more recently generative AI are no exception
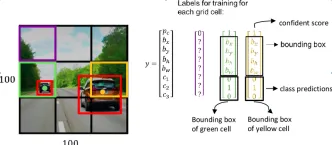 How to Use Google Gemini Models for Computer Vision Tasks? - Analytics VidhyaApr 27, 2025 am 09:26 AM
Harness the Power of Google Gemini for Computer Vision: A Comprehensive Guide Google Gemini, a leading AI chatbot, extends its capabilities beyond conversation to encompass powerful computer vision functionalities. This guide details how to utilize
 Gemini 2.0 Flash vs o4-mini: Can Google Do Better Than OpenAI?Apr 27, 2025 am 09:20 AM
The AI landscape of 2025 is electrifying with the arrival of Google's Gemini 2.0 Flash and OpenAI's o4-mini. These cutting-edge models, launched weeks apart, boast comparable advanced features and impressive benchmark scores. This in-depth compariso


Hot AI Tools

Undresser.AI Undress
AI-powered app for creating realistic nude photos

AI Clothes Remover
Online AI tool for removing clothes from photos.

Undress AI Tool
Undress images for free

Clothoff.io
AI clothes remover

Video Face Swap
Swap faces in any video effortlessly with our completely free AI face swap tool!

Hot Article
Hot Tools

SublimeText3 English version
Recommended: Win version, supports code prompts!

ZendStudio 13.5.1 Mac
Powerful PHP integrated development environment

Safe Exam Browser
Safe Exam Browser is a secure browser environment for taking online exams securely. This software turns any computer into a secure workstation. It controls access to any utility and prevents students from using unauthorized resources.

SublimeText3 Chinese version
Chinese version, very easy to use

EditPlus Chinese cracked version
Small size, syntax highlighting, does not support code prompt function

