Home >Web Front-end >Front-end Q&A >How to implement floating menu in react
How to implement floating menu in react
- 藏色散人Original
- 2022-12-27 10:23:302504browse
React method to implement floating menu: 1. Use onMouseOver and onMouseLeave to monitor mouse changes; 2. Set the position value of the parent class and subclass in the style; 3. Set the parent class value to relative, and the child class value to relative. The class value is absolute, and "z-index:999;" is added to the menu's css; 4. Control the display by controlling the display.

The operating environment of this tutorial: Windows 10 system, react18.0.0 version, Dell G3 computer.
How to implement floating menu in react?
How to hover the floating menu in React
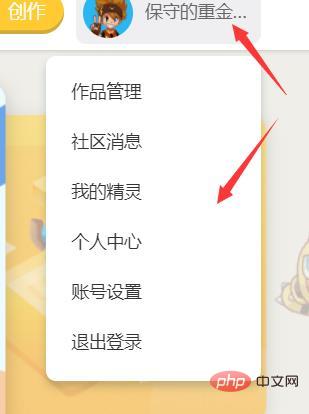
For the floating menu, it is mainly implemented with the help of the event mechanism of the html tag or hover. Let’s take a look at the effect first. Picture:

When the mouse is placed on the name, the menu pops up, and when you leave it, the menu disappears.
1. Let’s first talk about how to use the event mechanism:
In the event mechanism, we mainly use some events of the mouse to monitor, as follows:
You can use onMouseOver (mouse Enter), onMouseLeave (mouse leaves) to monitor mouse changes
class UserMenu extends React.Component{

    constructor(props){
        super(props),
            this.state={
                modalIsOpen:'none',
                atUserItems:false,
            }

        this.contentBtn=this.contentBtn.bind(this),
        this.programBtn=this.programBtn.bind(this),
        this.handleMouseOver = this.handleMouseOver.bind(this);
        this.handleMouseOut = this.handleMouseOut.bind(this);
        this.userCenter = this.userCenter.bind(this);
        this.handleMouseUserOver = this.handleMouseUserOver.bind(this);

    }

    contentBtn(){
        this.context.router.history.push("/details");
    }

    programBtn(){
        this.context.router.history.push("/gui");
    }

    handleMouseOver(e){
        this.setState({
            modalIsOpen: 'block',
        })
    }

    handleMouseOut(){

        this.setState({
           modalIsOpen: 'none',
        })

    }
    handleMouseUserOver(e){
        this.setState({
            modalIsOpen: 'block',
        })
    }

    userCenter(){
        this.setState({
            modalIsOpen: 'none',
        })
    }

    render(){
        const {username} = this.props;
        return(
            <div className={styles.body} >
                <div className={styles.uname}
                     onMouseOver={this.handleMouseOver}
                     onMouseLeave={this.handleMouseOut}
                >{username}</div>

                <div className={styles.menus}
                     style={{display:this.state.modalIsOpen}}
                     onMouseOver={this.handleMouseUserOver}
                     onMouseLeave={this.handleMouseOut}
                >
                    <ul className={styles.ul}>
                        <li className={styles.li} onClick={this.userCenter}>个人中心</li>
                        <li className={styles.li} >账号设置</li>
                        <li className={styles.li} >注销</li>
                    </ul>
                </div>
            </div>
        )
    }

}

UserMenu.contextTypes = {
    router: PropTypes.object.isRequired
};

export default UserMenu
At the same time, you need to set the position value of the parent class and subclass in the style. The parent class value is relative, the subclass value is absolute, and at the same time, for the use The floating menu is displayed at the front end, and z-index:999; needs to be added to the css of the menu (the larger the value, the closer to the front end, the maximum value of 999)
.body{
    position:relative
}
.menus{
    display:none;
    position:absolute;
    right: 0;
    z-index:999;
}

.uname{
    color: white;
    margin-left: 5px;
    margin-right: 10px;
    cursor: pointer;
    padding-top: 25px;
    padding-bottom: 20px;
    padding-left: 5px;
}
.uname:hover{
    color: darkorange;
}
.ul{
    width: 120px;
    background-color: #fff;
    padding: 10px;
    border-radius: 8px;
    -webkit-box-shadow: 0 5px 10px 0 rgba(12,40,46,0.20);
    box-shadow: 0 5px 10px 0 rgba(12,40,46,0.20);
}
.li{
    list-style: none;
    height: 40px;
    display: list-item;
    cursor: pointer;
}
.li:hover{
    color: darkorange;
}
2. If judged by hover, it needs to be in the css Add parent class: hover . subclass {}, this style, and then control the display or not by controlling the display.
If the parent component style is named A and the child component style is named B, it needs to be written like this : A:hover .B{display:'block'}, to control
Recommended learning: "react video tutorial"
The above is the detailed content of How to implement floating menu in react. For more information, please follow other related articles on the PHP Chinese website!

