

 headlinesThree years of interview experience sharing: four stages and three deciding factors of front-end interviews
Three years of interview experience sharing: four stages and three deciding factors of front-end interviews

The employment situation this year is simply dark. Based on the "lucky mentality" that next year will be worse than this year, I chose to resign without hesitation. After a month and a half of hard work, I received a pretty good offer. The salary and platform have been greatly improved, but there is still a big gap with my psychological expectations. So the biggest conclusion is: don’t talk naked! Don't say anything naked! Don't say anything naked! Because the pressure brought to people during the interview and the psychological damage caused by the gap between reality and ideals are immeasurable, it is a good choice to survive in such an environment.
Related recommendations: Summary of 2023 front-end interview questions (collection)
Next, we will summarize the following things that will be experienced in front-end interviews under normal circumstances. Four stages and three determining factors:
 As a front-end staff, the depth and breadth of technology is ranked first. Three years is a dividing line. You must find your own right at this time. Orientation and direction.
Secondly, good communication and expression skills, clothing and performance and other off-site factors can increase the interviewer's recognition of you.
Some people are very skilled, but the interviewer feels uncomfortable during the interview. They think you are arrogant/sloppy/self-righteous/cannot express themselves clearly, so they will just reject you. That is the worst loss.
The following is a summary of my entire interview preparation and the questions I was asked, because during the interview process, the communication with the interviewer is not a simple endorsement to a large extent. It is best to pass the knowledge Express your own summary and conciseness, and then supplement and improve it on the spot based on the interviewer's questions. [Recommended learning: web front-end, programming teaching]
1. Self-introduction
The interviewer will ask you to introduce yourself , and does not limit the scope of self-introduction. The interviewer must want to know you from your self-introduction, so the introduction must be brief and smooth. Facing different interviewers, the content of self-introduction can be exactly the same. Therefore, it is important to prepare your words in advance, and be sure to pay attention: don’t stumble, be confident! Smooth expression and communication skills is also one of the interviewer’s assessment points for candidates. I have also been an interviewer. Candidates who are confident and generous are often more likely to be favored.
1. Personal introduction (basic situation) and main resume are all available, which must be short
2. What you are good at, including technical and non-technical. Technical people can understand your transition, and non-technical people can understand you as a person
3. Pick the most core projects of the projects you have done, and don’t introduce all the projects like endorsements
4. Some of your own ideas, interests or opinions, even your own career plans. If this gives the interviewer a feeling: keen on "tossing" or "thinking"
Example:
Hello interviewer, my name is xxx, I graduated from xx University in xx. Since graduation, I have been engaged in front-end development related work.
The technology stack I am good at is vue family bucket, and I have a certain degree of research on the use and source code of vue2 and vue3; the packaging tools are familiar with webpack and vite; I have dominated medium and large-scale projects from zero to one Experience and ability in project implementation.
In my previous company, I was mainly the person in charge of the xx product line, and my main responsibilities were. . . . . .
In addition to development-related work, he also has certain technical management experience: such as serving as a requirement review, UI/UE interaction review judge, responsible for development scheduling, member collaboration, reviewing member code, organizing regular meetings, etc.
I usually record some learning articles or study notes on the blog I built, and also write some original technical articles and publish them on the Nuggets, and won the xx award.
Generally speaking, try to keep your self-introduction between 3-5 minutes. The first priority is to be concise and to the point, followed by highlighting your abilities and strengths.
For ordinary technical interviewers, self-introduction is just a habitual opening statement before the interview. Generally, the basic information listed on the resume has already satisfied their basic understanding of you. But for supervisor-level interviewers or HR, they will value your personality, behavioral habits, stress resistance and other comprehensive abilities. Therefore, you should be as positive as possible during the interview process, have broad hobbies, like continuous learning, like teamwork, and be able to work overtime unconditionally, etc. Of course, I don't mean to let you cheat, but in this environment, these "side abilities" are also magic weapons that can improve your competitiveness to a certain extent.
2. Project Mining
In the current market situation, when you receive an interview notice, there is a high probability that it is because of your project experience and the position you are recruiting for. More in line. Therefore, you should pay extra attention to the preparation of the project, such as:
Deep dig into the technologies used in the project
Control of projectoverall designideas
Management of projectoperation process
Team collaboration ability.
- What are the
optimization points of the project
3. Personal
Let me talk about the individual first. When you pass the technical interview and reach the stage of supervisor and HR, no matter how awesome your current technology is, they will In addition to examining your personal potential, learning ability, personality and team integration and other soft skills, here are some questions that are easy to be asked:Why did you change jobs?
Start directly from personal development to show your ambition:- I have always wanted to go to a larger platform, which not only has a better technical atmosphere, but also I learned more things I want to expand my knowledge. Before, I always made xx products on the x end. The technology stack was relatively simple, so I studied xx.
- I fell into a comfort zone in my previous job, and I could only do those things. I want to change my platform to expand my technical breadth, and be exposed to and learn some new technical systems, which will be more beneficial to my subsequent personal development.
Tell me about you and ordinary front-ends. What are your highlights?
1. I am good at planning and summarizing. I will conduct a comprehensive analysis of the projects I handle. One is business dismantling, using mind maps to dismantle the business of each module; the other It is to dismantle the code modules and distinguish each code module according to function. Go to development again. I think this is something that many front-ends who only do blind business development can't do2. I like to specialize in technology. I usually keep learning the source code of vue, and I also output my own technical articles, like the one I wrote before A line-by-line intensive reading ofteleport’s source code, which took about thirty hours to write. It explains the function and role of each line of source code (but why are the reading and likes so low) .
What are your shortcomings?
I have a relatively serious temper and am more introverted, so I will also try to make myself more extroverted. One is to hold various review meetings. As a front-end representative, I need to prepare various materials and make speeches. So I do more technical sharing within the team and host regular meetings every week, which also gives me the courage to express and discuss.Have you paid attention to any new technologies recently?
- Package dependency management tool pnpm (no repeated installation of dependencies, non-flat node_modules structure, adding dependent packages through symbolic links)
- Packaging tool vite (extremely fast development environment)
- flutter (Google’s open source mobile application (App) development framework, focusing on cross-platform, high fidelity, and high performance)
- rust (I heard it is the future base of js)
- turbopack, the successor of webpack, is said to be 10 times faster than vite, webpack 700 times faster, and You Yuxi personally verified that it is not 10 times faster than vite
- webcomponents
You are biased towards Should you explore in various directions or keep researching in a certain direction?
My personal plan is as follows: In 3-5 years, while improving my technical depth, I will also broaden my knowledge, that is, both in depth and breadth. To improve, it is mainly in terms of breadth. Only when you have a full understanding of the big front-end can you make better choices5-7 years is when you have enough knowledge to accumulate before you choose a certain direction of interest. Study further and strive to become an expert in that fieldTeam size, team specifications and development process
This varies from person to person, just prepare truthfully, because different scales The research and development models of teams vary greatly.The goal of code review
1. The most important thing is the maintainability of the code (variable naming, comments, function unity principle, etc.)2. Extensibility: encapsulation capabilities (whether components and code logic are reusable, scalability) 3. ES new features (es6, ES2020, ES2021 optional chain, at) 4. Function usage specifications (for example, when using map as forEach) 5. Performance improvement, how to use algorithms to write more elegant and better performing codeHow to lead a team
I was in a technical management role in my last company. 0,Implementing development specifications, I have posted on the company's internal wiki, from naming, best practices to the use of various tool libraries. In the early stage when new people come in, I will give priority to follow up on their code quality
1.Team division of labor: Each person is responsible for the development of a product alone, and then I will generally designate a few people to develop public modules
2, Code Quality Assurance: Their code will be reviewed every week, and cross-review codes will be organized, and the output articles of the modified results will be placed in the wiki
3, Regular organizational meetings : Regular organizational meetings are held every week to synchronize their respective progress and risks, and allocate work tasks according to their own progress
4, Technology sharing: We will also organize irregular technology sharing. In the beginning, it was just me sharing, such as the micro front-end system, ice stark’s source code
5, public demand pool: such as the upgrade of webpack5/vite; the introduction of the upgrade of vue2.7 setup syntax sugar; use of pnpm; topology map performance optimization
6, Optimization project: After the first version of the product came out, I also initiated a special performance optimization project to improve first-screen loading performance. Packaging volume optimization; let everyone be responsible for the corresponding optimization items
What do you think about overtime?
I think there are generally two situations when working overtime:
First, the project progress is tight, so of course the project progress comes first, after all, everyone depends on this for a living
The second problem is my own ability. If I am not familiar with the business or introduce a new technology stack, then I think I not only have to work overtime to keep up, but also use my free time to study hard and make up for my shortcomings
What are your interests and hobbies?
I usually like to read, that is, I read some books on psychology, time management, and some speech skills in WeChat reading
Then I write articles, because I found It’s easy to forget simply taking notes, because you only record other people’s content, and write your own original articles. In this process, a very high proportion of knowledge can be converted into your own things, so in addition to your own gold-mining articles, I also often output articles on project outputs to the wiki
My other hobbies are playing basketball and singing with friends
4. Technology
Be sure to pay attention to technical interviews:Be concise and to the point, be detailed appropriately, and if you don’t understand, just say you don’t understand. Because the interview process is a face-to-face communication process with the interviewer, no interviewer would like a candidate who chatters for a long time without talking about the key points. At the same time, during the speaking process, the listener will passively ignore the parts that he is not interested in, so It is necessary to highlight the core features of a certain technology and appropriately expand around the core.
Big companies will basically screen candidates through algorithm questions. There are no shortcuts to algorithms. You can only answer questions step by step and then answer questions again. Those who are weak in this aspect should plan in advance and study.
The technical interview process will mainly ask questions about technologies related to the front-end field. Generally, the interviewer will be based on your establishment, and more often, the interviewer will be based on the interview questions he has prepared before, or the project team where he is working. Asking questions about relatively familiar technical points, because they are all unknowns, so all aspects are quite demanding.
If you want to enter a medium-to-large company with good development prospects, you can’t fool yourself by just memorizing other people’s experiences. Although each summary here is very brief, they are all I refined some of the core knowledge points after comprehensive study of each knowledge point, so I am not afraid of the interviewer's "divergent thinking."
The interview process generally involves the consideration of the following eight major types of knowledge:
JS/CSS/TypeScript/Framework (Vue, React)/Browser and Network/Performance Optimization/Front-End Engineering/ Architecture/Others

#So the technical preparation before the interview is by no means accomplished overnight. It also requires daily accumulation. For example, you can use ten to twenty minutes a day to study one of the small knowledge points. Comprehensive study, in the long run, no matter how many years of interviews, it will be enough to talk eloquently.
JS Chapter
JS learning stud red envelope book and Mr. Yu Yu’s In-depth JS series blog is basically ok
Common JS interview questions generally include these

What is a prototype/prototype chain?
The essence of a prototype is an object.
When we create a constructor, this function will have a prototype attribute by default, and the value of this attribute points to the prototype object of this function.
This prototype object is used to provide shared properties for the instance object created through the constructor, that is, is used to implement prototype-based inheritance and property sharing
So The instance object we create through the constructor function will inherit the above attributes from the prototype object of this function
When reading the attributes of an instance, if it cannot be found, it will look for the attributes in the prototype associated with the object. If it cannot be found, it will look for the prototype of the prototype until it finds the top level (the top level is The prototype of Object.prototype, the value is null).
So The chain structure that is interconnected layer by layer through prototypes is called the prototype chain.
What is closure?
Definition: Closure refers to a function that references variables in the scope of other functions, usually implemented in nested functions.
Technically all js functions are closures. From a practical point of view, a function that meets the following two conditions is considered a closure- It still exists even if the context that created it is destroyed. (For example, returning from the parent function)
- Free variables are referenced in the code (variables used in the function that are neither function parameters nor function local variables are called free variables)
Usage scenarios:
- Create private variablesThe data in vue needs to be a closure package to ensure that the data in each data is unique and avoid data sharing caused by multiple references to the component
- Prolong the life cycle of variablesThe lexical environment of general functions is in the function It will be destroyed after returning, but the closure will save a reference to the lexical environment where it was created. Even if the execution context where it was created is destroyed, the lexical environment where it was created still exists, in order to extend the life cycle of the variable.
Application
- Curried functions
- For example, counters, delayed calls, callback functions, etc.
Pointing to this
In most cases, the way the function is called determines the value ofthis (runtime binding)
The event loop of the browser ?
During the execution of js code, the corresponding execution context will be created and pushed into the execution context stack. If an asynchronous task is encountered, the task will be suspended and handed over to other threads to process the asynchronous task. When the asynchronous task is processed, the callback result will be added to the event queue. When all tasks in the execution stack have been executed, that is, when the main thread is idle, the first event callback result will be taken from the event queue, and this callback will be added to the execution stack and then executed. code, and so on, this process is called an event loop. The event queue is divided intomacro task queue and micro task queue. When the current execution stack is empty, the main thread will first check whether there is an event in the micro task queue. If there is an event, the micro task queue will be executed in sequence. The event in the task queue is called back until the micro task queue is empty; if it does not exist, it will be processed in the macro task queue.
Common macro tasks include setTimeout(), setInterval(), setImmediate(), I/O , User interaction, UI rendering
Common microtasks includepromise.then(),promise.catch(),new MutationObserver、process.nextTick()
The essential difference between macro tasks and micro tasks
- Macro tasks have clear asynchronous tasks that need to be executed and callbacks, and require support from other asynchronous threads
- Micro tasks have no clear asynchronous tasks that need to be executed, only callbacks, and do not require support from other asynchronous threads.
How data is stored in the stack and heap in JavaScript
1. The basic data type has a fixed size and is simple to operate, so it is placed on the stack Storage2. The size of the reference data types is uncertain, so put them into the heap memory and let them determine the size by themselves when applying for memory3. Separate storage in this way can make the memory Minimal occupancy. The efficiency of the stack is higher than that of the heap4. The variables in the stack memory will be garbage collected immediately after the execution environment ends, while all references to the variables in the heap memory must be completed before they can be recycledTalk about v8 garbage collection
1. Carry out memory garbage collection into different generations according to the survival time of the object, and then use different recycling algorithms for different generations2. The new generation uses the space-for-time scavenge algorithm: the entire space is divided into two blocks, and variables only exist in one of them. During recycling, the surviving variables are copied to another block of space, and the non-surviving ones are recycled, and the operation is repeated over and over again3. The old generation uses mark clearing and mark sorting. Mark clearing: traverse all objects to mark the objects that can be accessed (alive), and then recycle the inactive ones as garbage. After recycling, to avoid memory discontinuities, live objects need to be moved to one end of the memory through marking and sorting, and then clean up the boundary memory after the movement is completed
Function calling method
1. Ordinary function is directly called using () and passes parameters, such as: function test(x, y) { return x y},test(3, 4)
2. Called as an attribute method of the object, such as: const obj = { test: function (val) { return val } }, obj.test(2)
3. Use call or applyCall, change the this point of the function, that is, change the execution context of the function
4, newYou can indirectly call the constructor to generate an object instance
defer and The difference between async
Under normal circumstances, when the script tag is executed, it will download and execute a two-step operation. These two steps will block the parsing of HTML;
async and defer can The script's download phase becomes asynchronous execution (synchronously with HTML parsing);
Async will execute js immediately after the download is completed, which will block HTML parsing;
defer will wait until all HTML parsing is completed and executed before the DOMContentLoaded event.
Browser event mechanism
DOM event flow three stages:
-
Capture stage: event The less specific nodes are the first to receive events, and the most specific nodes (trigger nodes) are the last to receive events. To intercept events before they reach their final destination.
For example, if you click on a div, the click event will be triggered in this order: document =>
=>=> ;<div>, that is, it is captured by the document and then propagated downward along the DOM tree, <strong>and triggers the capture event </strong> on each node until it reaches the actual target element. <li> <p><strong>Target phase</strong></p> <p>When the event reaches the target node, the event enters the target stage. <strong>The event is triggered on the target node </strong> (executes the function corresponding to the event), and then flows back in reverse until it is propagated to the outermost document node. </p> </li> <li> <p><strong>Bubbling phase</strong></p> <p>After the event is triggered on the target element, it will continue to bubble up layer by layer along the DOM tree until Reach the outermost root node. </p> </li> <p>All events must go through the capture phase and the target phase, but some events will skip the bubbling phase, such as the element gaining focus and losing focus blur which will not bubble</p> <p><strong>Extension 1</strong></p> <p>What is the difference between e.target and e.currentTarget? </p> <ul> <li> <code>e.targetPoints to the object that triggers event listening. -
e.currentTargetPoints to the object to which the listening event is added.
For example:
<ul>
<li><span>hello 1</span></li>
</ul>
let ul = document.querySelectorAll('ul')[0]
let aLi = document.querySelectorAll('li')
ul.addEventListener('click',function(e){
let oLi1 = e.target
let oLi2 = e.currentTarget
console.log(oLi1) // 被点击的li
console.log(oLi2) // ul
console.og(oLi1===oLi2) // false
})The event is bound to ul. When clicking on the li, the target is the clicked li, and the currentTarget is the ul of the bound event
In the bubbling stage of the event (the above example), e.currenttarget and e.target are not equal, but in the target stage of the event, e.currenttarget and e.target are equal
Function:
e.target can be used to implement event delegation , The principle is to add event listening to the parent element through event bubbling (or event capturing), and e.target points to the element that triggers the trigger event
Extension 2
addEventListener parameter
Syntax:
addEventListener(type, listener);
addEventListener(type, listener, options || useCapture);
type: Type of listening event, such as: 'click'/'scroll'/'focus'
-
listener: must be an object that implements the
EventListenerinterface, or a function. When the monitored event type is triggered, it will be executed -
options: Specify the optional parameter object related to the listener
- capture: Boolean value, indicating whether the listener is Triggered when the event capture phase is propagated to EventTarget
- once: Boolean value, indicating that the listener can be called at most once after being added. If true, the listener will be removed after being executed once.
- passive: Boolean value, Indicates that the listener will never call
preventDefault() - signal: optional,
AbortSignal, when itsabort()method is called , the listener will be removed
useCapture: Boolean value, the default is false, the listener is executed at the end of the event bubbling phase, true means it is executed at the beginning of the capture phase . The function is to change the timing of the event to facilitate interception/non-interception.
Vue Chapter
The author is mainly engaged in Vue-related development, and has also done react-related projects. Of course, react is only capable of doing projects. , so it is the kind of thing that is mentioned in the resume. The value of frameworks is not too many but their essence. Learning the Vue source code series makes me very confident in Vue. The same is true for the learning process. If you can master the principles of a framework, learning other frameworks is just a matter of time.

The difference between vue and react
1. Data variability
- React advocates functional style Programming, immutable data and one-way data flow, view updates can only be achieved through
setStateoronchange - Vue designs responsive data based on data variability , automatically update the view by monitoring data changes
2. Writing method
- React recommends using jsx inline style, which is all in js
- Vue It is in the form of single file component (SFC), divided into modules (tmplate/script/style) within a component. Of course, vue also supports jsx form, which can be used when developing vue's ui component library
3 , diff algorithm
- Vue2 uses double-ended comparison, Vue3 uses fast comparison
-
reactmainly uses the diff queue to save which DOMs need to be updated, get the patch tree, and then Unified operation to update DOM in batches. , you need to useshouldComponentUpdate()to manually optimize react rendering.
Extension: Do you know react hooks?
The writing of component classes is very heavy, and it is difficult to maintain if there are too many levels.
Function components are pure functions, cannot contain state, and do not support life cycle methods, so they cannot replace classes.
The design purpose of React Hooks is to enhance the functional component. You can write a fully functional component without using "classes" at all
##React Hooks means that components should be written as pure functions as much as possible. If external functions and side effects are needed, hooks should be used to "hook" the external code in.
vue component communication method
- props / $emit
- ref / $refs
- attrs/listenerseventBus/vuex/pinia/localStorage/sessionStorage/Cookie/window
- provide/inject
- Why does vue need to add a key to the rendering list?
Vue in the process of updating a group of child nodes of the same type of vnode (such as the list node rendered by v-for), in order to reduce the DOM Performance overhead of frequent creation and destruction: The update of the child node array without key is through the
in-place updatestrategy. It will compare the lengths of the old and new child node arrays, first use the shorter length as the basis, and directly patch the part of the new child node. Then judge, if the length of the new child node array is longer, directly mount the remaining part of the new child node array; if the new child node array is shorter, uninstall the extra part of the old child node) .
So if the child node is a component or a stateful DOM element, the original state will be retained, and incorrect rendering will occur. The update of the child node with key is called patchKeyedChildren. This function is the familiar place to implement the core diff algorithm. The approximate process is to synchronize the head node, synchronize the tail node, and process new Add and delete nodes, and finally use the method of solving the longest increasing subsequence to deal with the unknown subsequence. This is to
maximize the reuse of existing nodes, reduce the performance overhead of DOM operations, and avoid the problem of child node status errors caused by in-place updates. 想详细了解这个知识点的可以去看看我之前写的文章:v-for 到底为啥要加上 key? vue2使用的是 所以 vue3 采用了 其实从api的原生性能上 而 vue 做的响应式性能优化主要是在将嵌套层级比较深的对象变成响应式的这一过程。 vue2的做法是在组件初始化的时候就递归执行 而vue3是在访问到子对象属性的时候,才会去将它转换为响应式。这种延时定义子对象响应式会对性能有一定的提升 前提:当同类型的 vnode 的子节点都是一组节点(数组类型)的时候, 步骤:会走核心 diff 流程 Vue3是快速选择算法 Vue2是双端比较算法 在新旧字节点的头尾节点,也就是四个节点之间进行对比,找到可复用的节点,不断向中间靠拢的过程 diff目的:diff 算法的目的就是为了尽可能地复用节点,减少 DOM 频繁创建和删除带来的性能开销 基于 MVVM 模型,viewModel(业务逻辑层)提供了数据变化后更新视图和视图变化后更新数据这样一个功能,就是传统意义上的双向绑定。 Vue2.x 实现双向绑定核心是通过三个模块:Observer监听器、Watcher订阅者和Compile编译器。 首先监听器会监听所有的响应式对象属性,编译器会将模板进行编译,找到里面动态绑定的响应式数据并初始化视图;watchr 会去收集这些依赖;当响应式数据发生变更时Observer就会通知 Watcher;watcher接收到监听器的信号就会执行更新函数去更新视图; vue3的变更是数据劫持部分使用了porxy 替代 Object.defineProperty,收集的依赖使用组件的副作用渲染函数替代watcher vue2 v-model 原理剖析 V-model 是用来监听用户事件然后更新数据的语法糖。 其本质还是单向数据流,内部是通过绑定元素的 value 值向下传递数据,然后通过绑定 input 事件,向上接收并处理更新数据。 单向数据流:父组件传递给子组件的值子组件不能修改,只能通过emit事件让父组件自个改。 给组件添加 如果想给绑定的 value 属性和 input 事件换个名称呢?可以这样: 在 Vue 2.2 及以上版本,你可以在定义组件时通过 model 选项的方式来定制 prop/event: vue3 v-model 原理 实现和 vue2 基本一致 等同于 自定义 model 参数 不管vue2 还是 vue3,响应式的核心就是观察者模式 + 劫持数据的变化,在访问的时候做依赖收集和在修改数据的时候执行收集的依赖并更新数据。具体点就是: vue2 的话采用的是 Vue3 使用的是 ES6 的 proxy,proxy 不仅能够追踪属性的获取和修改,还可以追踪对象的增删,这在 vue2中需要 delete 才能实现。然后就是收集的依赖是用组件的副作用渲染函数替代 watcher 实例。 性能方面,从原生 api 角度,proxy 这个方法的性能是不如 Object.property,但是 vue3 强就强在一个是上面提到的可以追踪对象的增删,第二个是对嵌套对象的处理上是访问到具体属性才会把那个对象属性给转换成响应式,而 vue2 是在初始化的时候就递归调用将整个对象和他的属性都变成响应式,这部分就差了。 扩展一 vue2 通过数组下标更改数组视图为什么不会更新? 尤大:性能不好 注意:vue3 是没问题的 why 性能不好? 我们看一下响应式处理: 对于对象是通过 理由是数组的键相较对象多很多,当数组数据大的时候性能会很拉胯。所以不开放 Computed 的大体实现和普通的响应式数据是一致的,不过加了延时计算和缓存的功能: 在访问computed对象的时候,会触发 getter ,初始化的时候将 computed 属性创建的 watcher (vue3是副作用渲染函数)添加到与之相关的响应式数据的依赖收集器中(dep),然后根据里面一个叫 dirty 的属性判断是否要收集依赖,不需要的话直接返回上一次的计算结果,需要的话就执行更新重新渲染视图。 watchEffect? watchEffect会自动收集回调函数中响应式变量的依赖。并在首次自动执行 推荐在大部分时候用 vue有个机制,更新 DOM 是异步执行的,当数据变化会产生一个异步更行队列,要等异步队列结束后才会统一进行更新视图,所以改了数据之后立即去拿 dom 还没有更新就会拿不到最新数据。所以提供了一个 nextTick 函数,它的回调函数会在DOM 更新后立即执行。 nextTick 本质上是个异步任务,由于事件循环机制,异步任务的回调总是在同步任务执行完成后才得到执行。所以源码实现就是根据环境创建异步函数比如 Promise.then(浏览器不支持promise就会用MutationObserver,浏览器不支持MutationObserver就会用setTimeout),然后调用异步函数执行回调队列。 所以项目中不使用$nextTick的话也可以直接使用Promise.then或者SetTimeout实现相同的效果 1、全局错误处理: 如果在组件渲染时出现运行错误,错误将会被传递至全局 比如前端监控领域的 sentry,就是利用这个钩子函数进行的 vue 相关异常捕捉处理 2、全局警告处理: 注意:仅在开发环境生效 像在模板中引用一个没有定义的变量,它就会有warning 3、单个vue 实例错误处理: 和组件相关,只适用于开发环境,这个用处不是很大,不如直接看控制台 4、子孙组件错误处理: 注:只能在组件内部使用,用于捕获子孙组件的错误,一般可以用于组件开发过程中的错误处理 5、终极错误捕捉: 它是一个全局的异常处理函数,可以抓取所有的 JavaScript 异常 Vuex 利用 vue 的mixin 机制,在beforeCreate 钩子前混入了 vuexinit 方法,这个方法实现了将 store 注入 vue 实例当中,并注册了 store 的引用属性 store.xxx`去引入vuex中定义的内容。 然后 state 是利用 vue 的 data,通过 概念 可以通过全局方法 该方法第一个参数必须是 所以** 源码实现 使用方式 要暴露一个 Css直接面试问答的题目相对来说比较少,更多的是需要你能够当场手敲代码实现功能,一般来说备一些常见的布局,熟练掌握flex基本就没有什么问题了。 Block Formatting context,块级格式上下文 BFC 是一个独立的渲染区域,相当于一个容器,在这个容器中的样式布局不会受到外界的影响。 比如浮动元素、绝对定位、overflow 除 visble 以外的值、display 为 inline/tabel-cells/flex 都能构建 BFC。 常常用于解决 处于同一个 BFC 的元素外边距会产生重叠(此时需要将它们放在不同 BFC 中); 清除浮动(float),使用 BFC 包裹浮动的元素即可 阻止元素被浮动元素覆盖,应用于两列式布局,左边宽度固定,右边内容自适应宽度(左边float,右边 overflow) 伪类 伪类即:当元素处于特定状态时才会运用的特殊类 开头为冒号的选择器,用于选择处于特定状态的元素。比如 伪元素 伪元素用于创建一些不在文档树中的元素,并为其添加样式。比如说,我们可以通过 href是Hypertext Reference的简写,表示超文本引用,指向网络资源所在位置。href 用于在当前文档和引用资源之间确立联系 src是source的简写,目的是要把文件下载到html页面中去。src 用于替换当前内容 浏览器解析方式 当浏览器遇到href会并行下载资源并且不会停止对当前文档的处理。(同时也是为什么建议使用 link 方式加载 CSS,而不是使用 @import 方式) 当浏览器解析到src ,会暂停其他资源的下载和处理,直到将该资源加载或执行完毕。(这也是script标签为什么放在底部而不是头部的原因) flex flex + margin Transform + absolute 注:使用该方法只适用于行内元素(a、img、label、br、select等)(宽度随元素的内容变化而变化),用于块级元素(独占一行)会有问题,left/top 的50%是基于图片最左侧的边来移动的,tanslate会将多移动的图片自身的半个长宽移动回去,就实现了水平垂直居中的效果 display: table-cell 浏览器和网络是八股中最典型的案例了,无论你是几年经验,只要是前端,总会有问到你的浏览器和网络协议。 最好的学习文章是李兵老师的《浏览器工作原理与实践》 这里分了同源页面和不同源页面的通信。 不同源页面可以通过 iframe 作为一个桥梁,因为 iframe 可以指定 origin 来忽略同源限制,所以可以在每个页面都嵌入同一个 iframe 然后监听 iframe 中传递的 message 就可以了。 同源页面的通信大致分为了三类:广播模式、共享存储模式和口口相传模式 第一种广播模式,就是可以通过 BroadCast Channel、Service Worker 或者 localStorage 作为广播,然后去监听广播事件中消息的变化,达到页面通信的效果。 第二种是共享存储模式,我们可以通过Shared Worker 或者 IndexedDB,创建全局共享的数据存储。然后再通过轮询去定时获取这些被存储的数据是否有变更,达到一个的通信效果。像常见cookie 也可以作为实现共享存储达到页面通信的一种方式 最后一种是口口相传模式,这个主要是在使用 window.open 的时候,会返回被打开页面的 window 的引用,而在被打开的页面可以通过 window.opener 获取打开它的页面的 window 点引用,这样,多个页面之间的 window 是能够相互获取到的,传递消息的话通过 postMessage 去传递再做一个事件监听就可以了 在浏览器第一次发起请求服务的过程中,会根据响应报文中的缓存标识决定是否缓存结果,是否将缓存标识和请求结果存入到浏览器缓存中。 HTTP 缓存分为强制缓存和协商缓存两类。 强制缓存就是请求的时候浏览器向缓存查找这次请求的结果,这里分了三种情况,没查找到直接发起请求(和第一次请求一致);查找到了并且缓存结果还没有失效就直接使用缓存结果;查找到但是缓存结果失效了就会使用协商缓存。 强制缓存有 Expires 和 Cache-control 两个缓存标识,Expires 是http/1.0 的字段,是用来指定过期的具体的一个时间(如 Fri, 02 Sep 2022 08:03:35 GMT),当服务器时间和浏览器时间不一致的话,就会出现问题。所以在 http1.1 添加了 cache-control 这个字段,它的值规定了缓存的范围(public/private/no-cache/no-store),也可以规定缓存在xxx时间内失效(max-age=xxx)是个相对值,就能避免了 expires带来的问题。 Negotiation caching is a process in which the cache result of the forced cache becomes invalid. The browser carries the cache identifier to initiate a request to the server, and the server decides whether to use the cache through the cache identifier. The fields that control negotiation cache include last-modified / if-modified-since and Etag / if-none-match, the latter has a higher priority. The general process is to pass the value of last-modified or Etag to the server through the request message for comparison with the corresponding value in the server. If it matches the result of if-modified-since or if-none-match in the response message If consistent, the negotiation cache is valid, the cached result is used, and 304 is returned; otherwise it is invalid, the result is requested again, and 200 is returned. After entering a piece of content, the browser will first determine whether the piece of content is search content or a URL. If it is search content, it will be combined with the default search engine to generate a URL. For example, Google browser is goole.com/search?xxxx. If it is a URL Will splice protocols, such as http/https. When the page does not listen to the beforeupload time or agrees to continue the execution process, the browser icon bar will enter the loading state. Then the TCP three-way handshake establishes the connection between the browser and the server, and then performs data transmission. After the data transmission is completed, wave the hand four times to disconnect. If is set, it can always Stay connected. The network process will parse the data packets obtained through TCP. First, the data type will be determined based on the content-type of the response header. If it is a byte stream or file type, it will be handed over to the download manager for downloading. , then the navigation process ends. If it is of text/html type, the browser process will be notified to obtain the document for rendering. The browser process gets the rendering notification and will judge whether it is the same site based on the current page and the newly input page. If so, it will reuse the rendering process created by the previous web page. Otherwise, it will create a new separate one. rendering process. After the browser receives the "Confirm Submission" message from the rendering process, it will update the browser's page status: security status, address bar URL, forward and backward history messages, and update the web page. At this time The page is a blank page (white screen). (key memory) Finally, the rendering process performs page parsing and sub-resource loading of the document. The rendering process will convert HTML into a DOM tree structure, and css converted to styleSeets (CSSOM). Then copy the DOM tree and filter out non-displayed elements to create a basic rendering tree. Then calculate the style of each DOM node and calculate the position layout information of each node to build a layout tree. Layers will be created independently where there is a layering context or where cropping is required. This is called layering. A layered tree will eventually be formed. The rendering process will generate a drawing list for each layer and submit it to the composition thread. , the composition thread divides the layer into tiles (to avoid drawing all the contents of the layer at once, and the viewport part can be rendered according to tile priority), and converts the tiles into bitmaps in the rasterization thread pool. After the conversion is completed, the synthesis thread sends the drawing block command DrawQuard to the browser process. The browser generates a page based on the DrawQuard message and displays it on the browser. The browser's rendering process parses html into a dom tree and css into a cssom tree. Then it will first copy a DOM tree to filter out the The displayed elements (such as display: none) are then combined with cssom to calculate the layout information of each dom node to build a layout tree. After the layout tree is generated, it will be layered according to the layer's stacking context or cropped part to form a hierarchical tree. The rendering process then generates a drawing list for each layer and submits it to the composition thread. In order to avoid one-time rendering, the composition thread renders in blocks. It divides the layer into tiles and passes them through the rasterization thread pool. Convert tiles to bitmaps. After the conversion is completed, the synthesis thread sends the command to draw the tile to the browser for display UDP is User Dataprogram Protocol (User Dataprogram Protocol). IP transmits data packets to the designated computer through IP address information. Finally, UDP can distribute the data packet to the correct program through the port number. UDP can verify whether the data is correct, but it has no retransmission mechanism and will only discard incorrect data packets. At the same time, UDP cannot confirm whether it has reached the destination after sending it. UDP cannot guarantee the reliability of data, but the transmission speed is very fast. It is usually used in areas such as online videos and interactive games that do not strictly guarantee data integrity. TCP is a transmission control protocol (Transmission Control Protocol) introduced to solve the problem that UDP data is easy to lose and cannot correctly assemble data packets. It is a connection-oriented, reliable, byte-based Transport layer communication protocol for streams. TCP provides a retransmission mechanism to deal with packet loss; and TCP introduces a packet sorting mechanism that can combine out-of-order data packets into complete files. In addition to containing the destination port and local port number, the TCP header also provides a sequence number for sorting, so that the receiving end can rearrange the data packets through the sequence number. The life cycle of a TCP connection will go through three stages: link stage, data transmission and disconnection stage. Connection phase is used to establish the link between the client and the server. The three-way handshake is used to confirm the sending and receiving of data packets between the client and the server. ability. 1. The client first sends a SYN message to confirm that the server can send data, and enters the SYN_SENT state to wait for confirmation from the server 2. When the server receives the SYN message, it will The client sends an ACK confirmation message, and the server also sends a SYN message to the client to confirm whether the client can send data. At this time, the server enters the SYN_RCVD state 3. The client receives ACK SYN message will send a data packet to the server and enter the ESTABLISHED state (establish a connection); when the server receives the ACK packet sent by the client, it will also enter the ESTABLISHED state and complete the three-way handshake Transmission data phase In this phase, the receiving end needs to confirm each packet; So when the sending end sends a data packet, it is not received within the specified time The confirmation message fed back by the receiving end will be judged as packet loss, thus triggering the retransmission mechanism; A large file will be divided into many small data packets during the transmission process. After the data packet reaches the receiving end, Sort them according to the sequence number in the TCP header to ensure data integrity. Disconnection phase Wave four times to ensure that the connection established by both parties can be disconnected 1. The client initiates to the server FIN packet, and enters the FIN_WAIT_1 state 2. The server receives the FIN packet, sends an acknowledgment packet ACK, and brings its own serial number, and the server enters the CLOSE_WAIT state. At this time, the client has no data to send to the server, but if the server has data to send to the client, the client still needs to receive it. After receiving the ACK, the client enters the FIN_WAIT_2 state 3. After the server completes sending the data, it sends a FIN packet to the client. At this time, the server enters the LAST_ACK state 4. The client receives the FIN The packet sends a confirmation packet ACK. At this time, the client enters the TIME_WAIT state and waits for 2 MSL before entering the CLOSED state; the server enters the CLOSED state after receiving the client's ACK. For four waves, because TCP is full-duplex communication, after the active closing party sends the FIN packet, the receiving end may still send data, and the data channel from the server to the client cannot be closed immediately, so it is The Content-length is the http message length, the number of bytes expressed as a decimal number. If content-length > actual length, the server/client will continue to wait for the next byte when reading the end of the message queue, and a no-response timeout will occur If content -length When you are unsure about the value of content-length, you should use Transfer-Encoding: chunked, which can divide the data to be returned into multiple data chunks until a termination block with a length of 0 is returned What is cross-domain? If the protocol domain name and port number are the same, it is the same domain, if any one is different, it is cross-domain Solution 1. Traditional jsonp: Use the 2、 一般使用 cors(跨域资源共享)来解决跨域问题,浏览器在请求头中发送origin字段指明请求发起的地址,服务端返回Access-control-allow-orign,如果一致的话就可以进行跨域访问 3、 Iframe 解决主域名相同,子域名不同的跨域请求 4、 浏览器关闭跨域限制的功能 5、 http-proxy-middleware 代理 预检 补充:http会在跨域的时候发起一次预检请求,“需预检的请求”要求必须首先使用OPTIONS方法发起一个预检请求到服务器,以获知服务器是否允许该实际请求。“预检请求”的使用,可以避免跨域请求对服务器的用户数据产生未预期的影响。 withCredentials为 true不会产生预请求;content-type为application/json会产生预请求;设置了用户自定义请求头会产生预检请求;delete方法会产生预检请求; xss基本概念 Xss (Cross site scripting)跨站脚本攻击,为了和 css 区别开来所以叫 xss Xss 指黑客向 html 或 dom 中注入恶意脚本,从而在用户浏览页面的时候利用注入脚本对用户实施攻击的手段 恶意脚本可以做到:窃取 cookie 信息、监听用户行为(比如表单的输入)、修改DOM(比如伪造登录界面骗用户输入账号密码)、在页面生成浮窗广告等 恶意脚本注入方式: 存储型 xss 黑客利用站点漏洞将恶意 js 代码提交到站点服务器,用户访问页面就会导致恶意脚本获取用户的cookie等信息。 反射性 xss 用户将一段恶意代码请求提交给 web 服务器,web 服务器接收到请求后将恶意代码反射到浏览器端 基于 DOM 的 xss 攻击 通过网络劫持在页面传输过程中更改 HTML 内容 前两种属于服务端漏洞,最后一种属于前端漏洞 防止xss攻击的策略 1、服务器对输入脚本进行过滤或者转码,比如将 2、充分利用内容安全策略 CSP(content-security-policy),可以通过 http 头信息的 content-security-policy 字段控制可以加载和执行的外部资源;或者通过html的meta 标签 3、cookie设置为 http-only, cookie 就无法通过 csrf基本概念 Csrf(cross site request forgery)跨站请求伪造,指黑客引导用户访问黑客的网站。 CSRF 是指黑客引诱用户打开黑客的网站,在黑客的网站中,利用用户的登录状态发起的跨站请求。简单来讲,CSRF 攻击就是黑客利用了用户的登录状态,并通过第三方的站点来做一些坏事。 Csrf 攻击场景 自动发起 get 请求 比如黑客网站有个图片: 黑客将转账的请求接口隐藏在 img 标签内,欺骗浏览器这是一张图片资源。当该页面被加载时,浏览器会自动发起 img 的资源请求,如果服务器没有对该请求做判断的话,那么服务器就会认为该请求是一个转账请求,于是用户账户上的 100 极客币就被转移到黑客的账户上去了。 自动发起 post 请求 黑客在页面中构建一个隐藏的表单,当用户点开链接后,表单自动提交 引诱用户点击链接 比如页面上放了一张美女图片,下面放了图片下载地址,而这个下载地址实际上是黑客用来转账的接口,一旦用户点击了这个链接,那么他的极客币就被转到黑客账户上了 防止csrf方法 1、设置 cookie 时带上SameSite: strict/Lax选项 2、验证请求的来源站点,通过 origin 和 refere 判断来源站点信息 3、csrf token,浏览器发起请求服务器生成csrf token,发起请求前会验证 csrf token是否合法。第三方网站肯定是拿不到这个token。我们的 csrf token 是前后端约定好后写死的。 websocket是一种支持双向通信的协议,就是服务器可以主动向客户端发消息,客户端也可以主动向服务器发消息。 It establishes a connection based on the HTTP protocol and has good compatibility with the http protocol, so it can pass the HTTP proxy server; there is no origin restriction. WebSocket is an event-driven protocol, which means it can be used for true real-time communication. Unlike HTTP (where updates must be constantly requested), with websockets, updates are sent as soon as they are available WebSockets will not automatically recover when the connection is terminated. This is a mechanism that needs to be implemented by yourself in application development , which is also one of the reasons why there are many client-side open source libraries. devServers like webpack and vite use websocket to implement hot updates Performance optimization is a point that medium and large companies pay great attention to. Because it is closely related to the KPIs of front-end people, it will naturally be an interview question. Regular customer. From a cache perspective In terms of network, it is more commonly used to use CDN for static resources In terms of packaging Code level First screen speed improvement #vue Common performance optimization methods You can obtain various performance indicator data through The complete front-end monitoring platform includes: data collection and reporting, data sorting and storage, and data display Web page performance indicators: The above indicators can be obtained through PerformanceObserver 首屏渲染时间计算:通过 首先应该避免直接使用 DOM API 操作 DOM,像 vue react 虚拟 DOM 让对 DOM 的多次操作合并成了一次。 样式集中改变,好的方式是使用动态 class 读写操作分离,避免读后写,写后又读 原来的操作会导致四次重排,读写分离之后实际上只触发了一次重排,这都得益于浏览器的渲染队列机制: 当我们修改了元素的几何属性,导致浏览器触发重排或重绘时。它会把该操作放进渲染队列,等到队列中的操作到了一定的数量或者到了一定的时间间隔时,浏览器就会批量执行这些操作。 使用 通过 documentFragment 创建 dom 片段,在它上面批量操作 dom ,操作完后再添加到文档中,这样只有一次重排(示例:一次性插入2000个div) 复制节点在副本上操作然后替换它 使用 BFC 脱离文档流,重排开销小 Css 中的 优化请求数 减小图片大小 缓存 非响应式变量可以定义在 访问局部变量比全局变量块,因为不需要切换作用域 尽可能使用 使用 v8 引擎时,运行期间,V8 会将创建的对象与隐藏类关联起来,以追踪它们的属性特征。能够共享相同隐藏类的对象性能会更好,v8 会针对这种情况去优化。所以为了贴合”共享隐藏类“,我们要避免”先创建再补充“式的动态属性复制以及动态删除属性(使用delete关键字)。即尽量在构造函数/对象中一次性声明所有属性。属性删除时可以设置为 null,这样可以保持隐藏类不变和继续共享。 避免内存泄露的方式 避免强制同步,在修改 DOM 之前查询相关值 避免布局抖动(一次 JS 执行过程中多次执行强制布局和抖动操作),尽量不要在修改 DOM 结构时再去查询一些相关值 合理利用 css 合成动画,如果能用 css 处理就交给 css。因为合成动画会由合成线程执行,不会占用主线程 避免频繁的垃圾回收,优化存储结构,避免小颗粒对象的产生 感兴趣的可以看看我之前的一篇性能优化技巧整理的文章极意 · 代码性能优化之道 Внешнее проектирование — это наиболее важный навык на пути развития внешнего интерфейса. Все функции, которые могут повысить эффективность front-end development are Может использоваться как часть front-end разработки. Те, кто только начинает, могут начать с создания каркаса с нуля Длинная статья в 10 000 слов объясняет весь процесс создания фреймворка vue3 vite2 ts4 корпоративного уровня с нуля Для интервью, Самое важное, что нужно проверить, — это степень владения упаковочными инструментами. Webpack — это пакет, который предоставляет функции упаковки статических ресурсов для современных JS-приложений. Основной процесс состоит из трех этапов: этап инициализации, этап построения и этап генерации 1. На этапе инициализации параметры инициализации считываются из файла конфигурации, объекта конфигурации и параметров оболочки. и сравнивается со значением по умолчанию. Конфигурация объединяется в окончательные параметры, а также создает объект компилятора компилятора и инициализирует его рабочую среду 2. На этапе сборки компилятор выполнит свой метод run() для запустите процесс компиляции, который сначала подтвердит файл записи, начиная с файла записи, выполните поиск всех файлов, которые прямо или кратко связаны с файлом записи, для создания зависимых объектов, а затем создайте объекты модуля на основе зависимых объектов. на этот раз загрузчик будет использоваться для преобразования модуля в стандартный контент js, а затем вызывать js. Интерпретатор преобразует контент в объект AST, а затем находит модули, от которых зависит модуль, из AST. Этот шаг является рекурсивным до тех пор, пока все На этом этапе были обработаны файлы зависимостей записей. Наконец, компиляция модуля завершена и получены переведенное содержимое каждого модуля и граф зависимостей между ними.Этот граф зависимостей представляет собой взаимосвязь отображения всех модулей, используемых в проекте. loader
webpack может понимать только файлы JS и JSON, загрузчик по сути является преобразователем, который может конвертировать другие типы файлов в файлы, распознаваемые веб-пакетом Загрузчик преобразует модуль, созданный зависимым объектом, в стандартный js-контент во время создания этап веб-пакета. Например, vue-loader преобразует файлы vue в модули js, а графические шрифты преобразуются в URL-адреса данных с помощью url-loader. Это вещи, которые Webpack может распознать. В модуле.rules можно настроить разные загрузчики для разбора разных файлов , эта функция Apply имеет компилятор параметров, который является объектом компилятора, созданным на этапе инициализации веб-пакета. Вы можете вызывать перехватчики в объекте компилятора для регистрации обратные вызовы для различных перехватчиков.Эти перехватчики действуют на протяжении всего жизненного цикла компиляции. Таким образом, разработчики могут вставлять в него определенный код с помощью обратных вызовов для выполнения определенных функций. MiniCssExtractPlugin Браузер, с одной стороны, ожидает получения новейших ресурсов каждый раз, когда запрашивает ресурс страницы; с другой стороны , он ожидает, что объекты Cache могут быть повторно использованы, если ресурсы не изменились. В настоящее время, используя имя файла и значение хеш-функции файла, вы можете определить, был ли ресурс обновлен, просто используя имя файла. В Webpack есть встроенный метод расчета хеша.Для сгенерированных файлов вы можете добавить поле хеш-функции в выходной файл. #hash : каждый раз при сборке проекта будет генерироваться хеш, который связан для всего проекта, и в любом месте проекта есть изменения. Он изменится ##хеш содержимого хеш чанка Потому что после упаковки веб-пакета каждый входной файл и его зависимости в конечном итоге будут генерировать отдельный js-файл. Использование chunkhash в это время может гарантировать точность обновления всего упакованного содержимого. Расширение: хэш загрузчика файлов У некоторых учащихся могут возникнуть следующие вопросы. Часто можно увидеть, что при обработке некоторых изображений и упаковке загрузчика файлов шрифтов [name]_[hash:8].[ext] Но если оно изменено, генерируется хеш изображения другими файлами проекта, такими как index.js, не изменилось. Здесь следует отметить, что хэш-поле file-loader, заполнитель, определенный самим загрузчиком, не соответствует встроенному хеш-полю веб-пакета. Хеш здесь заключается в использовании алгоритмов хеширования, таких как md4, для хэширования содержимого файла. Поэтому, пока содержимое файла остается неизменным, хеш будет оставаться согласованным. Vite в основном состоит из двух частей Среда разработки Vite использует просмотр Сервер анализирует импорт, компилирует и возвращает их на серверную сторону по требованию, полностью пропуская концепцию упаковки, и сервер может использовать их по мере необходимости (что эквивалентно преобразованию файлов, которые мы разрабатываем, в формат ESM и их отправке). непосредственно в браузер) Когда браузер анализирует импорт HelloWorld из './comComponents/HelloWorld.vue', он отправляет запрос на текущее доменное имя для получения соответствующего ресурса (ESM поддерживает анализ относительных путей) , и браузер напрямую загружает соответствующий файл и затем анализирует его в модуль Record (откройте сетевую панель и вы увидите, что данные ответа — это все ESM типа js). Затем создайте экземпляр и выделите память для модуля, а также установите отношения отображения между модулем и памятью в соответствии с операторами импорта и экспорта. Наконец запустите код. vite запустит сервер koa для перехвата запроса браузера на ESM, найдет соответствующий файл в каталоге по пути запроса, обработает его в формат ESM и вернет клиенту. Горячая загрузка Vite устанавливает соединение через веб-сокет между клиентом и сервером. После изменения кода сервер отправляет сообщение, уведомляющее клиента о запросе на изменение кода модуля. После завершения горячего обновления это означает, какое представление было изменено.file повторно запросит этот файл, таким образом гарантируя, что на скорость горячего обновления не влияет размер проекта. Среда разработки будет использовать esbuild для предварительного создания кеша для зависимостей. Первый запуск будет медленнее, а последующие запуски будут напрямую считывать кеш. 0. Элемент конфигурации скрипта можно определить в файле package.json, который может определять ключ и значение запущенного скрипта 1. Во время установки npm npm прочитает конфигурацию и выполнит программную ссылку скрипта на каталог #2. Другая ситуация — просто выполнить команду сценария, например npm run build, и фактически запустить node build.js., то есть: используйте node для выполнения файла build.js ES6 CommonJS Режим агента: укажите замену или заполнитель для символа объекта в чтобы контролировать доступ к ней Например, чтобы реализовать функцию отложенной загрузки картинок, сначала используйте Определение шаблона декоратора: без изменения сам объект включен, динамическое добавление методов к объектам во время работы программы обычно используется для сохранения исходных методов неизмененными, а затем монтирования других методов к исходным методам для удовлетворения существующих потребностей. Декоратор типа typescript является типичным шаблоном декоратора, а примесь в vue гарантирует, что класс имеет только экземпляр и предоставить глобальную точку доступа к нему. Метод реализации заключается в том, чтобы сначала определить, существует ли экземпляр. Если он существует, он будет возвращен напрямую. Если он не существует, он будет создан, а затем возвращен. Это гарантирует, что класс имеет только один объект экземпляра Например, субприложение Ice Stark, один раз гарантированно отрисовывается только одно субприложение #1 Хотя в обоих режимах есть подписчики и издатели (конкретных наблюдателей можно считать подписчиком, а конкретную цель можно считать издателем), но режим наблюдателя запланирован конкретной целью, а режим публикации/подписки единообразно корректируется центром планирования, поэтому между подписчиком и издателем режима наблюдателя существуют зависимости, а в модели публикации/подписки - нет. 2. Оба шаблона можно использовать для слабой связи, улучшения управления кодом и возможности повторного использования. 3. В режиме наблюдателя наблюдатель знает Субъекта, а Субъект ведет записи о наблюдателе. Однако в модели публикации-подписки издатель и подписчик не знают о существовании друг друга. Они общаются только через агента сообщений 4. Режим наблюдателя большую часть времени является синхронным. Например, при возникновении события субъект вызывает метод наблюдателя. Модель публикации-подписки в основном асинхронна (с использованием очереди сообщений) Какой тип данных является регулярным выражением? — это объект, Обычный жадный режим и нежадный режим? Квантор Жадный режим #В обычных правилах квантификатор, указывающий количество раз, по умолчанию является жадным и будет соответствовать максимальной длине как как можно больше, например Нежадный режим Добавьте Жадные и нежадные функции Как жадный, так и нежадный режим требуют обратного отслеживания для выполнения соответствующей функции Эксклюзивный режим Эксклюзивный режим очень похож на жадный режим. Эксклюзивный режим будет соответствовать как можно большему количеству совпадений. Если сопоставление не удастся, оно завершится без возврата, что экономит время. Запись: используйте после квантификатора. Преимущества и недостатки: монопольный режим имеет хорошую производительность и может сократить время сопоставления и ресурсы ЦП; но в некоторых случаях сопоставление невозможно быть достигнуто, например:
概念:前端自动化测试领域的, 用来验证独立的代码片段能否正常工作 1、可以直接用 Node 中自带的 assert 模块做断言:如果当前程序的某种状态符合 assert 的期望此程序才能正常执行,否则直接退出应用。 2、常见单测工具:Jest,使用示例 babel 用途 bebel 如何转换的? 对源码字符串 parse 生成 AST,然后对 AST 进行增删改,然后输出目标代码字符串 转换过程 parse 阶段:首先使用 transform 阶段:接着使用 generate 阶段:使用 好的,以上就是我对三年前端经验通过面试题做的一个总结了,祝大家早日找到心仪的工作~To sum up, if you use v-for to traverse constants or the child nodes are nodes without "state" such as plain text, you can use the writing method without adding a key. However, in the actual development process, it is recommended to add the key uniformly, which can realize a wider range of scenarios and avoid possible status update errors. We can generally use ESlint to configure the key as a required element of v-for. vue3 相对 vue2的响应式优化
Object.defineProperty去监听对象属性值的变化,但是它不能监听对象属性的新增和删除,所以需要使用$set、$delete这种语法糖去实现,这其实是一种设计上的不足。proxy去实现响应式监听对象属性的增删查改。proxy是比Object.defineProperty要差的。Object.defineProperty把子对象变成响应式的;Vue 核心diff流程
vue双向绑定原理
v-model 原理
// 比如
<input v-model="sth" />
// 等价于
<input :value="sth" @input="sth = $event.target.value" />
v-model 属性时,默认会把value 作为组件的属性,把 input作为给组件绑定事件时的事件名:// 父组件
<my-button v-model="number"></my-button>
// 子组件
<script>
export default {
props: {
value: Number, // 属性名必须是 value
},
methods: {
add() {
this.$emit('input', this.value + 1) // 事件名必须是 input
},
}
}
</script><script>
export default {
model: {
prop: 'num', // 自定义属性名
event: 'addNum' // 自定义事件名
}
}<Son v-model="modalValue"/>
<Son v-model="modalValue"/>
<Son v-model:visible="visible"/>
setup(props, ctx){
    ctx.emit("update:visible", false)
}
vue 响应式原理
Object.definePorperty劫持对象的 get 和 set 方法,每个组件实例都会在渲染时初始化一个 watcher 实例,它会将组件渲染过程中所接触的响应式变量记为依赖,并且保存了组件的更新方法 update。当依赖的 setter 触发时,会通知 watcher 触发组件的 update 方法,从而更新视图。export class Observer {
this.value = value
this.dep = new Dep()
this.vmCount = 0
def(value, '__ob__', this)
if (Array.isArray(value)) {
// 这里对数组进行单独处理
if (hasProto) {
protoAugment(value, arrayMethods)
} else {
copyAugment(value, arrayMethods, arrayKeys)
}
this.observeArray(value)
} else {
// 对对象遍历所有键值
this.walk(value)
}
}
walk (obj: Object) {
const keys = Object.keys(obj)
for (let i = 0; i < keys.length; i++) {
defineReactive(obj, keys[i])
}
}
observeArray (items: Array<any>) {
for (let i = 0, l = items.length; i < l; i++) {
observe(items[i])
}
}
}Object.keys()遍历全部的键值,对数组只是observe监听已有的元素,所以通过下标更改不会触发响应式更新。computed 和 watch
watch 显式的指定依赖以避免不必要的重复触发,也避免在后续代码修改或重构时不小心引入新的依赖。watchEffect 适用于一些逻辑相对简单,依赖源和逻辑强相关的场景(或者懒惰的场景 )$nextTick 原理?
Vue 异常处理
Vue.config.errorHandlerVue.config.errorHandler = function(err, vm, info) {};Vue.config.errorHandler 配置函数 (如果已设置)。Vue.config.warnHandlerVue.config.warnHandler = function(msg, vm, trace) {};renderErrorconst app = new Vue({
el: "#app",
renderError(h, err) {
return h("pre", { style: { color: "red" } }, err.stack);
}
});errorCapturedVue.component("cat", {
template: `<div><slot></slot></div>`,
props: { name: { type: string } },
errorCaptured(err, vm, info) {
console.log(`cat EC: ${err.toString()}\ninfo: ${info}`);
return false;
}
});window.onerrorwindow.onerror = function(message, source, line, column, error) {};Vuex 流程 & 原理
new Vue({data: {$$state: state}} 将 state 转换成响应式对象,然后使用 computed 函数实时计算 getterVue.use函数里面具体做了哪些事
Vue.use()注册插件,并能阻止多次注册相同插件,它需要在new Vue之前使用。Object或Function类型的参数。如果是Object那么该Object需要定义一个install方法;如果是Function那么这个函数就被当做install方法。Vue.use()执行就是执行install方法,其他传参会作为install方法的参数执行。Vue.use()本质就是执行需要注入插件的install方法**。export function initUse (Vue: GlobalAPI) {
Vue.use = function (plugin: Function | Object) {
const installedPlugins = (this._installedPlugins || (this._installedPlugins = []))
// 避免重复注册
if (installedPlugins.indexOf(plugin) > -1) {
return this
}
// 获取传入的第一个参数
const args = toArray(arguments, 1)
args.unshift(this)
if (typeof plugin.install === 'function') {
// 如果传入对象中的install属性是个函数则直接执行
plugin.install.apply(plugin, args)
} else if (typeof plugin === 'function') {
// 如果传入的是函数,则直接(作为install方法)执行
plugin.apply(null, args)
}
// 将已经注册的插件推入全局installedPlugins中
installedPlugins.push(plugin)
return this
}
}installedPlugins import Vue from 'vue'
import Element from 'element-ui'
Vue.use(Element)
怎么编写一个vue插件
install方法,第一个参数是Vue构造器,第二个参数是一个可选的配置项对象Myplugin.install = function(Vue, options = {}) {
// 1、添加全局方法或属性
Vue.myGlobalMethod = function() {}
// 2、添加全局服务
Vue.directive('my-directive', {
bind(el, binding, vnode, pldVnode) {}
})
// 3、注入组件选项
Vue.mixin({
created: function() {}
})
// 4、添加实例方法
Vue.prototype.$myMethod = function(methodOptions) {}
}CSS篇
什么是 BFC
伪类和伪元素及使用场景
:first-child选择第一个子元素;:hover悬浮在元素上会显示;:focus用键盘选定元素时激活;:link + :visted点击过的链接的样式;:not用于匹配不符合参数选择器的元素;:fist-child匹配元素的第一个子元素;:disabled 匹配禁用的表单元素::before 来在一个元素前增加一些文本,并为这些文本添加样式。虽然用户可以看到这些文本,但是这些文本实际上不在文档树中。示例:::before 在被选元素前插入内容。需要使用 content 属性来指定要插入的内容。被插入的内容实际上不在文档树中h1:before {
content: "Hello ";
}::first-line 匹配元素中第一行的文本src 和 href 区别
不定宽高元素的水平垂直居中
<div class="wrapper flex-center">
  <p>horizontal and vertical</p>
</div>

.wrapper {
    width: 900px;
    height: 300px;
    border: 1px solid #ccc;
}
.flex-center {  // 注意是父元素
    display: flex;
    justify-content: center;  // 主轴(竖线)上的对齐方式
    align-items: center;      // 交叉轴(横轴)上的对齐方式
}<div class="wrapper">
<p>horizontal and vertical</p>
</div>
.wrapper {
width: 900px;
height: 300px;
border: 1px solid #ccc;
display: flex;
}
.wrapper > p {
margin: auto;
}<div class="wrapper">
<img src="/static/imghwm/default1.png" data-src="test.png" class="lazy" alt="Three years of interview experience sharing: four stages and three deciding factors of front-end interviews" >
</div>
.wrapper {
width: 300px;
height: 300px;
border: 1px solid #ccc;
position: relative;
}
.wrapper > img {
position: absolute;
left: 50%;
top: 50%;
tansform: translate(-50%, -50%)
}<div class="wrapper">
<p>absghjdgalsjdbhaksldjba</p>
</div>
.wrapper {
width: 900px;
height: 300px;
border: 1px solid #ccc;
display: table-cell;
vertical-align: middle;
text-align: center;
}浏览器和网络篇

跨页面通信的方法?
详细说说 HTTP 缓存
Next, the browser process will send the URL request to the network process through IPC inter-process communication. The network process will first search for the resource in the cache. If there is one, it will intercept the request and return 200 directly. If not, it will enter. Network request process. The network request process is that the network process requests the DNS server to return the IP and port number corresponding to the domain name (if these have been cached before, the cached result will be returned directly). If there is no port number, http defaults to 80 and https defaults to 443 , if it is https, you also need to establish a TLS secure connection to create an encrypted data channel.
The browser process sends the "Submit Document" message to the rendering process. When the rendering process receives the message, it will establish a data transmission channel with the network process. After the data transmission is completed, it returns the "Confirm Submission" message to the browser. server process. The difference between TCP and UDP
The difference between TCP and UDP
FIN packet from the server cannot be combined and sent with the ACK packet from the client. The ACK can only be confirmed first, and then the server will send it again when there is no need to send data. FIN packet, so four waves must be four packet interactionsContent-length Do you understand?
Cross-domain common solutions
<script></script> tag to have no cross-domain restrictions and only support the get interface. No one should use this anymoreXSS 和 CSRF
code:<script>alert('你被xss攻击了')</script>转换成code:<script>alert('你被xss攻击了')</script><meta http-equiv="Content-Security-Policy" content="script-src 'self'; object-src 'none'; style-src cdn.example.org third-party.org; child-src https:">document.cookie 来读取
<img src="/static/imghwm/default1.png" data-src="https://time.geekbang.org/sendcoin?user=hacker&number=100" class="lazy" alt="Three years of interview experience sharing: four stages and three deciding factors of front-end interviews" >
websocket
Differences between Post and Get
Performance Optimization Chapter

What are the means for performance optimization
Technical points of front-end monitoring SDK
window.performance
MutationObserver监听document对象的属性变化如何减少回流、重绘,充分利用 GPU 加速渲染?
// bad 强制刷新 触发四次重排+重绘
div.style.left = div.offsetLeft + 1 + 'px';
div.style.top = div.offsetTop + 1 + 'px';
div.style.right = div.offsetRight + 1 + 'px';
div.style.bottom = div.offsetBottom + 1 + 'px';


// good 缓存布局信息 相当于读写分离 触发一次重排+重绘
var curLeft = div.offsetLeft;
var curTop = div.offsetTop;
var curRight = div.offsetRight;
var curBottom = div.offsetBottom;

div.style.left = curLeft + 1 + 'px';
div.style.top = curTop + 1 + 'px';
div.style.right = curRight + 1 + 'px';
div.style.bottom = curBottom + 1 + 'px';
display: none后元素不会存在渲染树中,这时对它进行各种操作,然后更改 display 显示即可(示例:向2000个div中插入一个div)transform、opacity、filter、will-change能触发硬件加速大图片优化的方案
background-url和backgroun-position来显示图标background-url来懒加载
代码优化
created钩子中使用 this.xxx 赋值const声明变量,注意数组和对象
Внешнее проектирование

Процесс выполнения и жизненный цикл webpack
3.На этапе генерации объедините скомпилированные модули в фрагменты, а затем преобразуйте каждый фрагмент в отдельный файл и выведите его в список файлов.После определения выходного содержимого определите выходной путь и имя файла в соответствии с конфигурацией. , запишите содержимое файла в файловую систему
webpack's плагин и загрузчикСуть плагина – это класс с apply functionНапример, плагин stylelint может указать тип файла и диапазон файлов, которые Stylelint должен проверить; HtmlWebpackPlugin используется для создания упакованных файлов шаблонов; MiniCssExtactPlugin извлекает все CSS в независимые фрагменты, а stylelintplugin может предоставлять стили во время этап разработки, функция проверки.
хэш-стратегия webpack
Webpack имеет три встроенных хеша
принцип vite
Сравнение между webpack и vite
Принцип горячего обновления Webpack просто если это произойдет, то если зависимость (например, a.js) изменится, то модуль, в котором находится зависимость, будет обновлен и появится новый модуль будет снова отправлен в браузер. Каждое горячее обновление будет повторно создавать bundle
Какие оптимизации были сделаны
0. Обновите версию веб-пакета с 3 до 4. Фактические измерения показывают, что скорость упаковки увеличивается на десятки секунд 1. SplitChunksPlugin разделяет общий модуль и выводит отдельные фрагменты. Как и некоторые сторонние зависимые библиотеки, его можно разделить отдельно, чтобы отдельные фрагменты не были слишком большими. 2.Функция DllPlugin такая же, как и выше.Эта зависимая библиотека эквивалентна отделению от бизнес-кода.Только когда версия самой зависимой библиотеки изменится, она будет переупакована, улучшая скорость упаковки 3. Работа загрузчиков синхронна, каждый модуль будет выполнять все загрузчики
4. исключение/включение указывает диапазон соответствия; alias указывает псевдоним пути;5. постоянное хранилище кэш-загрузчика; 6. Проект ESM включает тег useExport и использует встряхивание дерева 7.исключить/включить для указания диапазона соответствия;псевдоним указывает псевдоним пути;постоянство загрузчика кэша Хранилище;8.terserPlugin может обеспечить сжатие кода, удаление комментариев и пробелов; MiniCssExtractPlugin сжимает CSS###процесс выполнения запуска npm
node_modules/.bin, одновременно . /bin Добавьте в переменную среды $PATH, поэтому, если вы запускаете команду напрямую глобально, она будет искать в глобальном каталоге. Если команда не может быть найдена, будет выдана ошибка сообщил. Например, npm run start выполняет webpack-dev-server с параметрами Разница между ESM и CJS
Шаблоны проектирования
Режим агента
loading картинку, чтобы занять место, а затем загружайте картинку асинхронно и ждите пока картинка не загрузится.Затем загрузите готовое изображение в тег imgШаблон декоратора
Шаблон с одним регистром
Режим наблюдателя и режим публикации-подписки
Другие
Регулярное выражение
let re = /ab c/ эквивалентно let re = new RegExp('ab c')*: 0 или более раз; ?: 0 или 1 раз; : от 1 до нескольких раз; {m}: появляется m раз; {m,}: появляется как минимум m раз; {m, n}: появляется от m до n раз a* будет соответствовать как можно большему количеству a в обратном направлении от первого соответствующего a, пока a не исчезнет. ? после квантора, чтобы стать нежадным режимом. Нежадный режим означает поиск минимальной длины и удовлетворение условий
Обычное регулярное сопоставление
Текст Результат жадный режим a{1,3}ab aaab match
не жадный режим ##Эксклюзивный режимa{1,3}?ab aaab Match
a{1,3} ab to соответствует строке aaab, a{1,3} будет использовать все первые три символа a и не будет выполнять возврат. a{1,3} ab
aaab
не соответствует
Оператор
#.
Описание
Экземпляр
представляет любой одиночный символ Набор символов, задающий диапазон для одного символа
[ ]
[abc] представляет a, b, c, [a-z] представляет один символ a-z
Набор символов, дающий диапазон исключения для один символ Предыдущий символ расширяется ноль или бесконечное количество раз
[^abc] представляет один символ, который не является a, b или c
##_
abc_ представляет ab, abc, abcc, abccc и т. д.
##`
#Любой из левых и правые выражения ` abc def` означает abc, def
$ соответствует концу строки
abc$ Представляет abc и в конце строки
Знак группировки является только внутренним. Вы можете использовать (abc)
для обозначения abc, `(abc
#def)` для обозначения abc, def
\D
Нечисловой
#\d Число, эквивалентное 0-9
##\S Видимые символы
##\s
Пробелы (пробелы, новые строки, табуляции и т. д.)
##\WНесловесные символы
##\w символов слова, эквивалентных [a-z0-9A -Z_]
## Соответствует началу строки означает abc И в начале строки
# {m,n} перед расширением Символ от m до n раз ab{1,2}c
означает abc, abbc
{m} Расширение предыдущего символа m раз ab{2}c
означает abbc
#{m,}
Предыдущий символ расширяется 0 раз или 1 разabc?
означает ab, abc
单元测试
function multiple(a, b) {
let result = 0;
for (let i = 0; i < b; ++i)
result += a;
return result;
}
const assert = require('assert');
assert.equal(multiple(1, 2), 3));const sum = require('./sum');
describe('sum function test', () => {
it('sum(1, 2) === 3', () => {
expect(sum(1, 2)).toBe(3);
});
// 这里 test 和 it 没有明显区别,it 是指: it should xxx, test 是指 test xxx
test('sum(1, 2) === 3', () => {
expect(sum(1, 2)).toBe(3);
});
})babel原理和用途
@babel/parser将源码转换成 AST@babel/traverse遍历 AST,并调用 visitor 函数修改 AST,修改过程中通过@babel/types来创建、判断 AST 节点;使用@babel/template来批量创建 AST@babel/generate将 AST 打印为目标代码字符串,期间遇到代码错误位置时会用到@babel/code-frame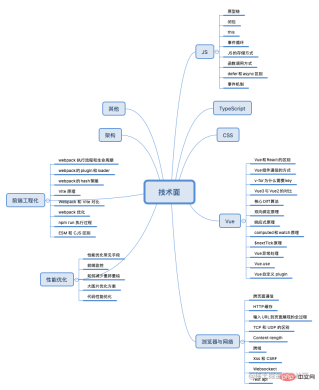

Hot AI Tools

Undresser.AI Undress
AI-powered app for creating realistic nude photos

AI Clothes Remover
Online AI tool for removing clothes from photos.

Undress AI Tool
Undress images for free

Clothoff.io
AI clothes remover

Video Face Swap
Swap faces in any video effortlessly with our completely free AI face swap tool!

Hot Article
Hot Tools

MinGW - Minimalist GNU for Windows
This project is in the process of being migrated to osdn.net/projects/mingw, you can continue to follow us there. MinGW: A native Windows port of the GNU Compiler Collection (GCC), freely distributable import libraries and header files for building native Windows applications; includes extensions to the MSVC runtime to support C99 functionality. All MinGW software can run on 64-bit Windows platforms.

PhpStorm Mac version
The latest (2018.2.1) professional PHP integrated development tool

SecLists
SecLists is the ultimate security tester's companion. It is a collection of various types of lists that are frequently used during security assessments, all in one place. SecLists helps make security testing more efficient and productive by conveniently providing all the lists a security tester might need. List types include usernames, passwords, URLs, fuzzing payloads, sensitive data patterns, web shells, and more. The tester can simply pull this repository onto a new test machine and he will have access to every type of list he needs.

Dreamweaver Mac version
Visual web development tools

Dreamweaver CS6
Visual web development tools

