Home >Web Front-end >Front-end Q&A >Can mobile web development use Vue?
Can mobile web development use Vue?
- 青灯夜游Original
- 2022-12-15 11:47:073401browse
Mobile web development can use vue. Vue is an open source JavaScript framework capable of developing single-page applications; it can be used as a web application framework and is designed to simplify web development. Vue supports mobile development and is suitable for making mobile Web apps; its entry cost is low and it is quick to get started. It can be developed in conjunction with mature front-end UI libraries such as i-view and Element UI.

The operating environment of this tutorial: windows7 system, vue3 version, DELL G3 computer.
Vue.js is an open source JavaScript framework capable of developing single-page applications. It can also be used as a web application framework and is designed to simplify web development. Vue.js application development has attracted a lot of attention from developers across the globe to build stunning web applications.
Vue.js is popular for many reasons, one of the key reasons is its ability to re-render without any action. It allows you to build reusable, small but powerful components, therefore, it provides a composable framework that allows you to add components when needed.
vue.js supports mobile development and is suitable for making mobile webapps. For the mobile terminal, vue is the first choice; it has low entry cost and is quick to get started. It can be developed in conjunction with some mature front-end UI libraries such as i-view and Element UI.
The app is very simple. It goes without saying that we use vuejs. We use vue-loader and webpack for component development module management. We use vue-router for page switching and cutscene animation. During the app development process, we only need to pay attention to the data direction of the app. In addition, it can be used with various UI libraries to make the application more beautiful. You can use SUI or Framework7. Light7, a branch version of Framework7, is often used (because jQuery may be used in subsequent functional additions. [Related recommendations: vuejs introductory tutorial 】
vue mobile terminal development summary
mobile terminal adaptation
relative For the PC side, mobile device resolutions are in full bloom, and there are all kinds of strange things. For every developer, mobile terminal adaptation is the first problem we need to face when developing mobile terminals.
On mobile We can often see this code in the head tag:
<meta name='viewport' content='width=device-width,initial-scale=1,user-scale=no' />
Setting the viewport through the meta tag defines the zoom ratio of the page; to understand the meaning of these parameters, we need to first know a few views The meaning of the mouth width.
-
layoutviewportThe layout width is the width of the web page -
visualviewportBut the width is the width of the browser window , this value determines the content that can be seen on one screen of our mobile phone; the size relationship betweenvisualviewportandlayoutviewportdetermines whether a scroll bar will appear. WhenvisualviewportWhen it is larger or just equal tolayoutviewport, the scroll bar will not appear. -
idealviewportis a viewport defined by the browser that can perfectly adapt to the mobile terminal and remains unchanged. , can be considered as the device viewport widthdevice-width. The setting of
meta is actually to set the layoutviewport and visualviewport .
-
width=device-widthIndicates the page widthlayoutviewportis consistent with the device viewport widthidealviewport -
initial-scale=1Indicates the initial scaling ratio of page width and web page width to device viewport width.visualviewportis determined by this ratio, but forlayoutviewport, it is affected by two attributes at the same time, and then takes the larger value. -
user-scale=noDisable scaling
So now we know the meaning of this code that is common on mobile terminals, it will soon visualviewport and layoutviewport are set to the value of idealviewport; in this way, we will not have scroll bars on the mobile terminal, and the web content can be displayed better. Under this premise, we will consider Page adaptation issues.
The UI generally has a fixed width when drawing pictures, but the width of our actual mobile devices is different. However, if the scaling ratio of the page element is consistent with the scaling ratio of the page width, The effect of our webpage will be consistent on devices of different sizes.
Use relative units
rem
rem is relative to The font-size of the root element html is used for calculation. This is usually achieved by setting document.documentElement.style.fontSize when the page is initialized and loaded. Generally, we set the font-size of the root element HTML to 1/10 of the width. The width of different devices is different, but the rem ratio of the same value is consistent with the width ratio of the device.
document.documentElement.style.fontSize = document.documentElement.clientWidth / 10 + 'px';
In actual projects, we do not need to convert it ourselves during development. We can use pxtorem to convert px to rem during output.
视口单位
将视口宽度window.innerWidth和视口高度window.innerHeight(即layoutviewport)等分为 100 份。
vw : 1vw 为视口宽度的 1% vh : 1vh 为视口高度的 1% vmin : vw 和 vh 中的较小值 vmax : 选取 vw 和 vh 中的较大值
和rem相比较,视口单位不需要使用js对根元素进行设置,兼容性稍差,但是大部分设备都已经支持了,同样的无须再开发时进行单位换算,直接使用相关的插件postcss-px-to-viewport在输出的时候进行转换。

修改viewport
之前我们提到了layoutviewport布局宽度实际上不是一个固定值,而是通过meta设置属性,通过idealviewport计算出来的值,我们可以通过控制meta的属性来将layoutviewport固定为某一个值。一般设计图的宽度为750px,现在我们的目标就是将layoutviewport设置为750px;layoutviewport受到两个属性的影响,width属性我们之间设置为750,initial-scale缩放比例应该为idealviewport的宽度/750;当我们未改变meta标签属性的时候,layoutviewport的值其实就是idealviewport的值,所以可以通过document.body.clientWidth或者window.innerWidth来获取。
;(function () {
    const width = document.body.clientWidth || window.innerWidth
    const scale = width / 750
    const content = 'width=750, initial-scale=' + scale + ', minimum-scale=' + scale + ', maximum-scale=' + scale + ', viewport-fit=cover'
    document.querySelector('meta[name="viewport"]').content = content
})()设置完成之后,layoutviewport在不同的设备中会始终保持为750px,我们开发时可以直接使用设计稿尺寸。
布局样式
布局的方式可以是各种各样的,但是出于兼容性的考虑,有些样式我们最好避免使用,难以解决的问题,那就不去面对。
需要谨慎对待的fixed
position:fixed在日常的页面布局中非常常用,在许多布局中起到了关键的作用。它的作用是:position:fixed的元素将相对于屏幕视口(viewport)的位置来指定其位置。并且元素的位置在屏幕滚动时不会改变。
但是,在许多特定的场合,position:fixed的表现与我们想象的大相径庭。
iOS弹出键盘;软键盘唤起后,页面的 fixed元素将失效(iOS认为用户更希望的是元素随着滚动而移动,也就是变成了 absolute 定位),既然变成了absolute,所以当页面超过一屏且滚动时,失效的 fixed 元素就会跟随滚动了。
当元素祖先的 transform 属性非 none 时,定位容器由视口改为该祖先。说的简单点,就是
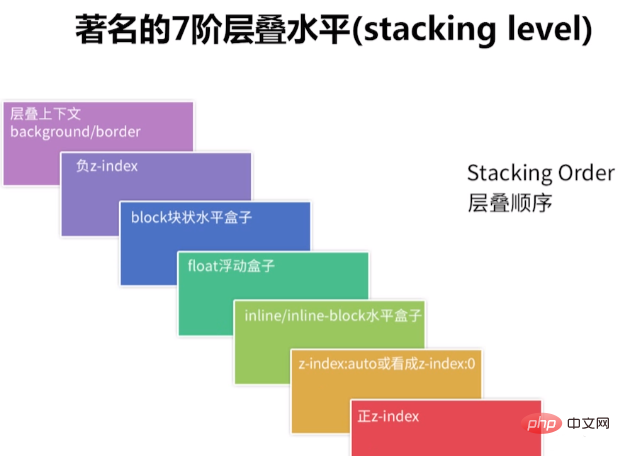
position:fixed的元素会相对于最近的并且应用了transform的祖先元素定位,而不是窗口。导致这个现象的原因是使用了transform的元素将创建一个新的堆叠上下文。堆叠上下文(Stacking Context):堆叠上下文是 HTML 元素的三维概念,这些 HTML 元素在一条假想的相对于面向(电脑屏幕的)视窗或者网页的用户的 z 轴上延伸,HTML 元素依据其自身属性按照优先级顺序占用层叠上下文的空间。顺序如下图所示,总之堆叠上下文会对定位关系产生影响。想要进一步可以查看不受控制的 position:fixed。

键盘弹出与使用transform属性的情况在移动端是很常见的,所以需要谨慎使用position:fixed。
推荐使用flex

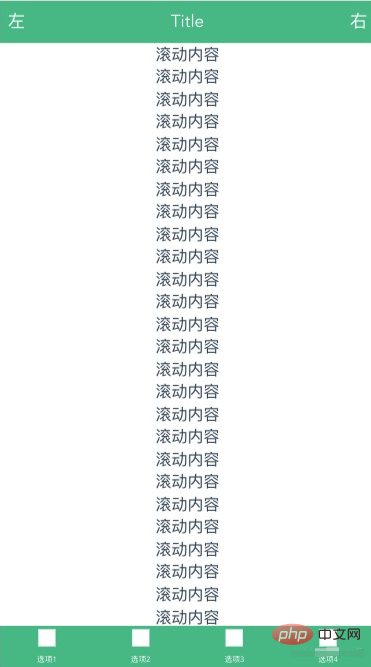
flex,即弹性布局,移动端兼容性较好,能够满足大部分布局需求。现在我们使用flex来实现h5中常见的顶部标题栏+中部滚动内容+底部导航栏的布局;实现效果如下:

首先我们来实现整体的布局,整体布局应该是一个方向为flex-direction: column;并且占据整个窗口的弹性盒子,然后里面的布局,应该是首尾为固定高度,中间内容区域为flex: 1;。
html, body {
  padding: 0;
  margin: 0;
}
.page {
  position: absolute;
  top: 0;
  bottom: 0;
  width: 100%;
  display: flex;
  flex-direction: column;
  .page-content {
    flex: 1;
    overflow-y: auto;
  }
}
然后再来实现底部标题栏,底部标题栏一般由居中标题和左右操作区域组成;为了实现中间区域标题居中,我们左右两部分应该保持相同的宽度。
<template>
<div>
<div>
左
</div>
<div>
<slot>Title</slot>
</div>
<div>
<div>右</div>
</div>
</div>
</template>
<script>
export default {
name: 'HeadBar'
}
</script>
<style scoped>
.header {
display: flex;
width: 100%;
line-height: 88px;
height: 88px;
font-size: 36px;
background-color: #42b983;
z-index: 999;
color: #fff;
transition: background-color .5s ease;
.header__main {
flex: 1;
display: flex;
justify-content: center;
align-items: center;
text-align: center;
}
.header__left, .header__right {
padding: 0 16px;
width: 120px;
}
.header__left {
text-align: left;
}
.header__right {
text-align: right;
}
}
</style>底部导航栏主体部分,其实是单个导航选项平分导航栏;而每个导航选项,是一个方向为flex-direction: column;布局方式横向为align-items: center;,竖向为justify-content: space-around;
<template>
<div>
<div>
<div></div>
<span>选项1</span>
</div>
<div>
<div></div>
<span>选项2</span>
</div>
<div>
<div></div>
<span>选项3</span>
</div>
<div>
<div></div>
<span>选项4</span>
</div>
</div>
</template>
<script>
export default {
name: 'BottomTaber',
data () {
return {
}
}
}
</script>
<style scoped>
.taber {
background-color: #42b983;
color: #fff;
height: 88px;
display: flex;
.taber-item {
flex: 1;
display: flex;
flex-direction: column;
justify-content: space-around;
align-items: center;
}
.icon {
width: 36px;
height: 36px;
background-color: #fff;
}
}
</style>页面跳转
转场动画
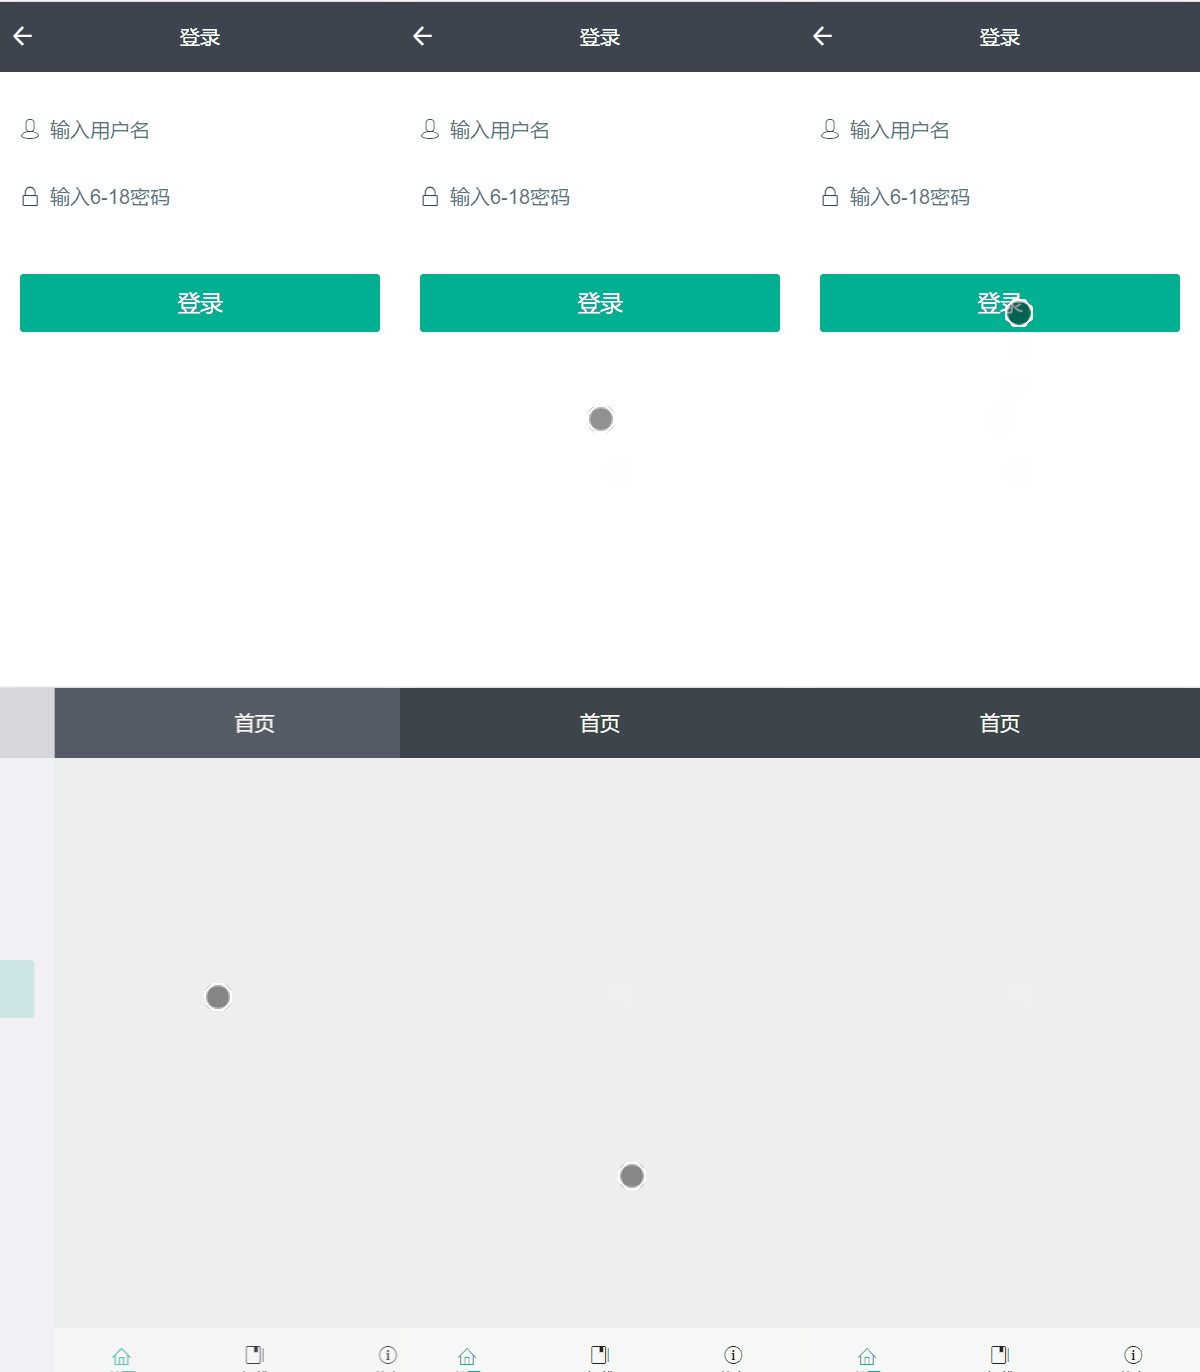
在vue中我们通过vue-router来管理路由,每个路由跳转类似与在不同的页面之间进行切换,从用户友好的角度来说,每次切换页面的时候最好添加一个转场效果。如果转场动画不区分路由是打开新页面、还是返回之前页面我们只需要在<router-view></router-view>外使用<transition></transition>添加一个动画效果即可;但是一般打开和返回是应用不同的动画效果的,所以我们需要在切换路由的时候区分路由是前进还是后退。为了区分路由的动作,我们在路由文件中设置meta为数字,meta表示其路由的深度,然后监听$route,根据to、from meta值的大小设置不同的跳转动画。如果应用到多种跳转动画,可以根据详情,具体情况具体应用。
<template>
<transition :name="transitionName">
<router-view></router-view>
</transition>
</template>
<script>
export default {
name: 'app',
data () {
return {
transitionName: 'fade'
}
},
watch: {
'$route' (to, from) {
let toDepth = to.meta
let fromDepth = from.meta
if (fromDepth > toDepth) {
this.transitionName = 'fade-left'
} else if (fromDepth < toDepth) {
this.transitionName = 'fade-right'
} else {
this.transitionName = 'fade'
}
}
}
}
</script>
虽然这样能够实现跳转效果,但是需要在编写router时添加设置,比较麻烦;我们可以使用开源项目vue-navigation来实现,更加方便,无须对router进行多余的设置。npm i -S vue-navigation安装,在main.js中导入:
import Navigation from 'vue-navigation'
Vue.use(Navigation, {router}) // router为路由文件
在App.vue中设置:
this.$navigation.on('forward', (to, from) => {
    this.transitionName = 'fade-right'
 })
 this.$navigation.on('back', (to, from) => {
    this.transitionName = 'fade-left'
 })
 this.$navigation.on('replace', (to, from) => {
    this.transitionName = 'fade'
})vue-navigation插件还有一个重要的功能就是保存页面状态,与keep-alive相似,但是keep-alive保存状态无法识别路由的前进后退,而实际应用中,我们的需求是返回页面时,希望页面状态保存,当进入页面时希望获取新的数据,使用vue-navigation可以很好的实现这个效果。具体使用可以查看vue-navigation有详细使用说明与案例。另外也可以尝试vue-page-stack,两个项目都能实现我们需要的效果,vue-page-stack借鉴了vue-navigation,也实现了更多的功能,并且最近也一直在更新。
PS: 这里的动画效果引用自animate.scss;
底部导航栏
之前我们已经实现了底部导航栏的基本样式,这里我们再做一些说明。当页面路由路径与router-link的路由匹配时,router-link将会被设置为激活状态,我们可以通过设置active-class来设置路径激活时应用的类名,默认为router-link-active,而激活的类名还有一个router-link-exact-active,这个类名是由exact-active-class来设置的,同样是设置路径激活时应用的类名;active-class与exact-active-class其实是由路由的匹配方式决定的。
一般路由的匹配方式是包含匹配。 举个例子,如果当前的路径是 /a 开头的,那么 也会被设置 CSS 类名。按照这个规则,每个路由都会激活 ,而使用exact属性可以使用“精确匹配模式”。精确匹配只有当路由完全相同的时候才会被激活。
路由守卫
移动端的路由守卫一般不会太复杂,主要是登录权限的判断,我们设置一个路由白名单,将所有不需要登录权限的路由放入其中;对于需要登录的路由做判断,没有登录就跳转登录页面,要求用户进行登录后在访问,如果登录后需要返回原有路由就把目标页面的路由作为参数传递给登录页面,再在登录后进行判断,如果存在目标页面参数就跳转目标页面,没有就跳转首页。
如果你的应用涉及到权限,那需要标注每个路由需要的权限,在meta中设置roles,roles是数组来保存需要的权限;从后台的接口中获取用户拥有的权限和roles进行对比就可以判断是否具有相关权限了。
const whiteList = ['/login']
router.beforeEach((to, from, next) => {
  const hasToken = store.getters.auth
  if (hasToken) {
    if (to.path === '/login') {
      next({ path: '/' })
    } else {
      const needRoles = to.meta && to.meta.roles && to.meta.roles.length > 0
      if (needRoles) {
        const hasRoles = store.state.user.roles.some(role => to.meta.roles.includes(role))
        if (hasRoles) {
          next()
        } else {
          next('/403')
        }
      } else {
        next()
      }
    }
  } else {
    if (whiteList.includes(to.path)) {
      next()
    } else {
      next('/login')
    }
  }
})
组件
自动加载
在我们的项目中,往往会使用的许多组件,一般使用频率比较高的组件为了避免重复导入的繁琐一般是作为全局组件在项目中使用的。而注册全局组件我们首先需要引入组件,然后使用Vue.component进行注册;这是一个重复的工作,我们每次创建组件都会进行,如果我们的项目是使用webpack构建(vue-cli也是使用webpack),我们就可以通过require.context自动将组件注册到全局。创建components/index.js文件:
export default function registerComponent (Vue) {
  /**
   * 参数说明:
   * 1. 其组件目录的相对路径
   * 2. 是否查询其子目录
   * 3. 匹配基础组件文件名的正则表达式
   **/
  const modules = require.context('./', false, /\w+.vue$/)
  modules.keys().forEach(fileName => {
    // 获取组件配置
    const component = modules(fileName)
    // 获取组件名称,去除文件名开头的 `./` 和结尾的扩展名
    const name = fileName.replace(/^\.\/(.*)\.\w+$/, '$1')
    // 注册全局组件
    // 如果这个组件选项是通过 `export default` 导出的,
    // 那么就会优先使用 `.default`,
    // 否则回退到使用模块的根。
    Vue.component(name, component.default || component)
  })
}之后在main.js中导入注册模块进行注册,使用require.context我们也可以实现vue插件和全局filter的导入。
import registerComponent from './components'
registerComponent(Vue)
通过v-model绑定数据
v-model是语法糖,它的本质是对组件事件进行监听和数据进行更新,是props和$on监听事件的缩写,v-model默认传递value,监听input事件。现在我们使用v-model来实现下数字输入框,这个输入框只能输入数字,在组件中我们只需要定义value来接受传值,然后在输入值满足我们输入条件(输入为数字)的时候使用$emit触发input事件。
<template>
<div>
<input type="text" :value="value" @input="onInput">
</div>
</template>
<script>
export default {
name: 'NumberInput',
props: {
value: String
},
methods: {
onInput (event) {
if (/^\d+$/.test(event.target.value)) {
this.$emit('input', event.target.value)
} else {
event.target.value = this.value
}
}
}
}
</script>使用的时候,我们只需要使用v-model绑定值就可以了。v-model默认会利用名为value的prop和名为input的事件,但是很多时候我们想使用不同的prop和监听不同的事件,我们可以使用model选项进行修改。
Vue.component('my-checkbox', {
  model: {
    prop: 'checked',
    event: 'change'
  },
  props: {
    // this allows using the `value` prop for a different purpose
    value: String,
    // use `checked` as the prop which take the place of `value`
    checked: {
      type: Number,
      default: 0
    }
  },
  // ...
})
<my-checkbox v-model="foo" value="some value"></my-checkbox>
上述代码相当于:
<my-checkbox
  :checked="foo"
  @change="val => { foo = val }"
  value="some value">
</my-checkbox>
通过插件的方式来使用组件
在很多第三方组件库中,我们经常看到直接使用插件的方式调用组件的方式,比如VantUI的Dialog弹出框组件,我们不但可以使用组件的方式进行使用,也可以通过插件的形式进行调用。
this.$dialog.alert({
  message: '弹窗内容'
});
将组件作为插件使用的原理其实并不复杂,就是使用手动挂载Vue组件实例。
import Vue from 'vue';
export default function create(Component, props) {
    // 先创建实例
    const vm = new Vue({
        render(h) {
            // h就是createElement,它返回VNode
            return h(Component, {props})
        }
    }).$mount();
    // 手动挂载
    document.body.appendChild(vm.$el);
    // 销毁方法
    const comp = vm.$children[0];
    comp.remove = function() {
        document.body.removeChild(vm.$el);
        vm.$destroy();
    }
    return comp;
}调用create传入组件和props参数就可以获取组件的实例,通过组件实例我们就可以调用组件的各种功能了。
<template>
<div v-show="visible">
加载中
</div>
</template>
<script>
export default {
name: 'Loading',
data () {
return {
visible: false
}
},
methods: {
show () {
this.visible = true
},
hide () {
this.visible = false
}
}
}
</script>
<style scoped>
.loading-wrapper {
position: absolute;
top: 0;
bottom: 0;
width: 100%;
background-color: rgba(0, 0, 0, .4);
z-index: 999;
}
</style>
<!--使用-->
const loading = create(Loading, {})
loading.show() // 显示
loading.hide() // 关闭第三方组件
移动端各种组件、插件已经相对完善,在项目开发中重复造轮子是一件很不明智的事情;开发项目时我们可以借助第三方组件、插件提高我们的开发效率。
常用组件库
VantUI是有赞开源的一套轻量、可靠的移动端Vue组件库;支持按需引入、主题定制、SSR,除了常用组件外,针对电商场景还有专门的业务组件,如果是开发电商项目的话,推荐使用。官方文档关于主题定制是在webpack.config.js中进行设置的:
// webpack.config.js
module.exports = {
  rules: [
    {
      test: /\.less$/,
      use: [
        // ...其他 loader 配置
        {
          loader: 'less-loader',
          options: {
            modifyVars: {
              // 直接覆盖变量
              'text-color': '#111',
              'border-color': '#eee'
              // 或者可以通过 less 文件覆盖(文件路径为绝对路径)
              'hack': `true; @import "your-less-file-path.less";`
            }
          }
        }
      ]
    }
  ]
};但我们的项目可能是使用vue-cli构建,这时我们需要在vue.config.js中进行设置:
module.exports = {
  css: {
    loaderOptions: {
      less: {
        modifyVars: {
          'hack': `true; @import "~@/assets/less/vars.less";`
        }
      }
    }
  }
}
常用插件
better-scroll是一个为移动端各种滚动场景提供丝滑的滚动效果的插件,如果在vue中使用可以参考作者的文章当 better-scroll 遇见 Vue。
swiper是一个轮播图插件,如果是在vue中使用可以直接使用vue-awesome-swiper,vue-awesome-swiper基于Swiper4,并且支持SSR。
[Related recommendations: vuejs video tutorial, web front-end development]
The above is the detailed content of Can mobile web development use Vue?. For more information, please follow other related articles on the PHP Chinese website!

