
 TopicsexcelPractical Excel skills sharing: How to divide a column into multiple rows and columns
Practical Excel skills sharing: How to divide a column into multiple rows and columns

To be honest, some people print out a form with many pages, but each page only occupies one side of the paper. Do you really have the courage to show such a document to your boss? It is ugly and a waste of paper. , you may get scolded bloody! The following article will show you the practical skills of dividing a column into multiple rows and columns in Excel. Come and take a look!

Sometimes there is only one column of data in our table. If we need to print it out, it will look like this:

1 , Operation method is to divide a long column of data into multiple columns
Step 1: First design the number of columns that need to be split, and then manually make the title;

 ##Click Replace All, OK, and complete the operation.
 Step 6: Paste selectively as value to delete the formula, center the data and add a border, set the print preview, the effect is exactly what we need;
Conclusion:
1. If there are not 8 per row, you only need to adjust the number of the first right pull;
2. Operation method The advantage is that it is easy to use and more suitable for novices;
3. However, the operation method also has disadvantages. If the data continues to increase, it will be troublesome to do this every time, so you still need to understand how to use formulas to implement Excel. A column is divided into multiple rows and columns.
2. Formula method to change one column of data into multiple columns Let’s use this example to illustrate, usually changing one column into multiple columns will Using the OFFSET function, let's first take a look at what the formula looks like:
=OFFSET($A$1,MOD(COLUMN(A1) 7,8) ROW(A1)*8-7 ,)#Just drag this formula to the right and pull it down.
OFFSET This function gets a new reference (cell or area) based on the offset. There are five parameters in total. The format is:
OFFSET (starting position, row offset, column offset, height, width). In this example, the starting position is cell A1, because the data sources are all in one column, and they are all cell references, so you only need to determine the row offset. You can see that in the formula, only There are two parameters, the second parameter is
. The effect of displaying this part alone is as follows:
 To put it simply, A1 is 1 line, 2 lines down...etc. cell reference.
This part requires some basic knowledge of sequence construction. If you don’t understand, you can memorize the routine. If you want to learn how to construct a sequence, you can leave a message. We will explain how to construct a sequence in a formula separately.
Conclusion:
1. If there are not 8 data in each row, you only need to adjust the numbers 7 and 8 in the second parameter accordingly. For example, if there are 6 data in each row, modify the formula For:
=OFFSET($A$1,MOD(COLUMN(A1) 5,6) ROW(A1)*6-5,)<p style="text-align: center;"><img src="/static/imghwm/default1.png" data-src="https://img.php.cn/upload/image/590/520/313/1667355049180653.png?x-oss-process=image/resize,p_40" class="lazy" title="1667355049180653.png" alt="1Practical Excel skills sharing: How to divide a column into multiple rows and columns"></p>
<p>2. The formula method requires users to have certain experience. It is very flexible to adjust when the data source changes; it has strong scalability. </p>
<p>Seeing this, some partners may be thinking: What if the data source is not one column, but two or three columns? </p>
<p>In fact, two-column or three-column data sources are more common in daily work, such as the following situation: </p>
<p style="text-align: center;"><img src="/static/imghwm/default1.png" data-src="https://img.php.cn/upload/image/294/630/305/1667355074546050.png?x-oss-process=image/resize,p_40" class="lazy" title="166735505473491Practical Excel skills sharing: How to divide a column into multiple rows and columns" alt="1Practical Excel skills sharing: How to divide a column into multiple rows and columns"></p>
<p>The data source has three columns , we hope to become nine columns (three groups), so that it is very reasonable to print. Have you learned how to divide a column of data into multiple columns in Excel introduced above? </p>
<p>For this kind of problem, it is more difficult to use the techniques introduced in Method 1. It is better to use the OFFSET function to deal with it. </p>
<p><strong><span style="font-size: 18px;">3. Processing method for multi-column data sources</span></strong></p>
<p>The formula is: <code>=OFFSET($A$1,INT(COLUMN (C1)/3) ROW(A1)*3-3,MOD(COLUMN(C1),3))

Because the data source is not in the same column , so the row offset and column offset must be considered, so three parameters are used. The starting position of the first parameter is still A1;
The second parameterINT(COLUMN(C1)/ 3) ROW(A1)*3-3 represents the row offset of the reference data relative to the starting position A1. Looking at it alone, the effect is:
Okay You can see the change pattern very clearly;
The third parameterMOD(COLUMN(C1),3) represents the column offset of the reference data relative to the starting position A1, viewed separately The effect is:

The ability to control this pattern determines the level of use of the OFFSET function. It is for this reason that many beginners are confused by the OFFSET function. , learning never makes sense.
Our main purpose today is not to learn the OFFSET function, but to learn an application of this function. In this case, write down the routine of the formula, and then you can modify the formula according to your actual problem and solve the problem. enough.
The key to learning OFFSET well lies in the construction of the second and third parameters.
For example, in the above question, the data source is three columns, and I hope it will be four groups (twelve columns), and the second parameter needs to be INT(COLUMN(C1)/ 3) ROW(A1)*4-4
Modify the two places pointed by the arrows.
The third parameter =MOD(COLUMN(C1),3) does not need to be adjusted; and so on, as long as the number of columns in the data source remains unchanged, only the above mentioned Two positions will do.
When the data source becomes 2 columns, the second parameter needs to be modified to INT(COLUMN(B1)/2) ROW(A1)*3-3

Still modify two positions, C is changed to B, 3 is changed to 2,
At the same time, the third parameter column offset also needs to be modified:
=MOD(COLUMN(B1),2)

also modified two places, C was changed to B, 3 was changed is 2.
And so on, If the data source becomes 4 columns, then modify B to D and 2 to 4 respectively.
Through the above explanation, you can basically understand how to adjust the corresponding content of the formula according to actual needs. If you want to fully understand the mystery here, the construction method of the sequence is an obstacle that cannot be bypassed. I hope this article’s tips for changing one column into multiple columns in Excel can be helpful to your work.
Related learning recommendations: excel tutorial
The above is the detailed content of Practical Excel skills sharing: How to divide a column into multiple rows and columns. For more information, please follow other related articles on the PHP Chinese website!

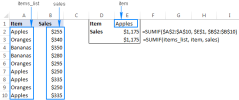
 MEDIAN formula in Excel - practical examplesApr 11, 2025 pm 12:08 PM
This tutorial explains how to calculate the median of numerical data in Excel using the MEDIAN function. The median, a key measure of central tendency, identifies the middle value in a dataset, offering a more robust representation of central tenden
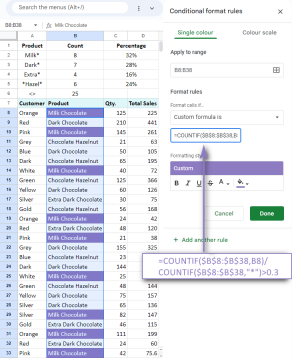 Google Spreadsheet COUNTIF function with formula examplesApr 11, 2025 pm 12:03 PM
Master Google Sheets COUNTIF: A Comprehensive Guide This guide explores the versatile COUNTIF function in Google Sheets, demonstrating its applications beyond simple cell counting. We'll cover various scenarios, from exact and partial matches to han
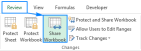 Excel shared workbook: How to share Excel file for multiple usersApr 11, 2025 am 11:58 AM
This tutorial provides a comprehensive guide to sharing Excel workbooks, covering various methods, access control, and conflict resolution. Modern Excel versions (2010, 2013, 2016, and later) simplify collaborative editing, eliminating the need to m
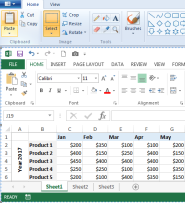 How to convert Excel to JPG - save .xls or .xlsx as image fileApr 11, 2025 am 11:31 AM
This tutorial explores various methods for converting .xls files to .jpg images, encompassing both built-in Windows tools and free online converters. Need to create a presentation, share spreadsheet data securely, or design a document? Converting yo
 Excel names and named ranges: how to define and use in formulasApr 11, 2025 am 11:13 AM
This tutorial clarifies the function of Excel names and demonstrates how to define names for cells, ranges, constants, or formulas. It also covers editing, filtering, and deleting defined names. Excel names, while incredibly useful, are often overlo
 Standard deviation Excel: functions and formula examplesApr 11, 2025 am 11:01 AM
This tutorial clarifies the distinction between standard deviation and standard error of the mean, guiding you on the optimal Excel functions for standard deviation calculations. In descriptive statistics, the mean and standard deviation are intrinsi
 Square root in Excel: SQRT function and other waysApr 11, 2025 am 10:34 AM
This Excel tutorial demonstrates how to calculate square roots and nth roots. Finding the square root is a common mathematical operation, and Excel offers several methods. Methods for Calculating Square Roots in Excel: Using the SQRT Function: The
 Google Sheets basics: Learn how to work with Google SpreadsheetsApr 11, 2025 am 10:23 AM
Unlock the Power of Google Sheets: A Beginner's Guide This tutorial introduces the fundamentals of Google Sheets, a powerful and versatile alternative to MS Excel. Learn how to effortlessly manage spreadsheets, leverage key features, and collaborate


Hot AI Tools

Undresser.AI Undress
AI-powered app for creating realistic nude photos

AI Clothes Remover
Online AI tool for removing clothes from photos.

Undress AI Tool
Undress images for free

Clothoff.io
AI clothes remover

AI Hentai Generator
Generate AI Hentai for free.

Hot Article
Hot Tools

MinGW - Minimalist GNU for Windows
This project is in the process of being migrated to osdn.net/projects/mingw, you can continue to follow us there. MinGW: A native Windows port of the GNU Compiler Collection (GCC), freely distributable import libraries and header files for building native Windows applications; includes extensions to the MSVC runtime to support C99 functionality. All MinGW software can run on 64-bit Windows platforms.

Dreamweaver CS6
Visual web development tools

WebStorm Mac version
Useful JavaScript development tools

ZendStudio 13.5.1 Mac
Powerful PHP integrated development environment

Notepad++7.3.1
Easy-to-use and free code editor

