Home >Backend Development >PHP Tutorial >IP access control: Nanny style teaches you how to implement an IP firewall with PHP

IP access control: Nanny style teaches you how to implement an IP firewall with PHP

藏色散人
藏色散人forward
2022-08-06 14:52:013880browse

Recently I encountered a requirement. One of my servers is always subject to port scanning and malicious login attacks. What can I do about this? It seems that apart from intranet isolation, enhanced password authentication, certificate login, and setting up firewalliptables, there are no other solutions available online. By the way, I also use the bastion host solution.

None of these solutions actually solve my problem. This is a public network server and does not have a complicated network structure, so intranet isolation cannot be established. Adjusting the password policy of the account is naturally a solution, but manual operation is too troublesome, and I usually change computers. If I change the password, both the company and home computers have to be updated, which is very troublesome. Setting up a firewall is naturally a basic operation and maintenance operation, but the configuration of iptables is too troublesome, the ufw tool is better, firewall-cmd is more troublesome, and there is a Huge pain point. As we all know, everyone’s outgoing network IP changes frequently. I finally configured it letter by letter in the command line, but it was all in vain after a long sleep. The bastion machine is not a mainstream solution. It is a bit overkill. If you use a bastion machine, you cannot use the system at will, not to mention that I have never heard of the free bastion machine. [Recommended: PHP Video Tutorial]

So what should I do? As a senior

PHP developer, the server application is not yet readily available. Network penetration can be easily achieved with an IP filtering system, which is a trivial matter. So I plan to develop such a project myself. First, I can implement IP filtering. In addition, I can easily add IP to the whitelist. For example, when I visit a web page, it will be automatically added to the whitelist. List.

The entire project was developed in less than a few hours. It at least met my own needs and achieved the following features:

    Multi-process
  • Supports concurrency
  • Daemon process
  • Can be managed through the web panel
  • IP
  • Traffic statistics
  • Interception records
Now let’s implement this system step by step.

The first step is to simply filter

IP

There are many frameworks for using

PHP to listen on ports and forward data. For this, I Choose workerman for the following reasons 3:

    Simple and stable operation
  • Simple method interface
  • Built-in process guard
As for the specific installation method, you can refer to his official documentation.

Copyright Statement: This article is original and published by

phpreturn.com (PHP Weapon Library Official Website), all rights belong to phpreturn ( PHPArmory) All, this site allows any form of reprint/quoted articles, but the source must be indicated at the same time.

IP access control: Nanny style teaches you how to implement an IP firewall with PHP

workerman is very simple to use. As long as 10 lines of code, IP forwarding is achieved Whitelist filtering:

$worker = new Worker('tcp:0.0.0.0:' . Config::get('door.port_in'));
// 监听一个端口
$worker->count = 2;
// 设置多进程
$worker->onConnect = function (TcpConnection $connection) {
    // 获取IP白名单
    $list_ip = AppIp::where('status', 0)->cache(3)->column('ip');
    $remote_ip = $connection->getRemoteIp();
    // 拦截IP
    if (!in_array($remote_ip, $list_ip)) {
        $connection->close();
    }
    // 放行连接,连接内部目标端口
    $to_connection = new AsyncTcpConnection('tcp:127.0.0.1:' . Config::get('door.port_to'));
    // 互相转发流量
    $connection->pipe($to_connection);
    $to_connection->pipe($connection);
    $to_connection->connect();
}

As shown in the above code, with only a few simple lines,

IP monitoring and forwarding are realized, among which IP The whitelist is queried through the database and cached.

The second step is to integrate it with the

ThinkPHP command line.

For the convenience of project development, I will use the

ThinkPHP framework for development. It is enough Simple and relatively complete in functions.

IP access control: Nanny style teaches you how to implement an IP firewall with PHP

最终实现的命令行效果如下:

版权声明:本文由phpreturn.comPHP武器库官网)原创和首发,所有权利归phpreturnPHP武器库)所有,本站允许任何形式的转载/引用文章,但必须同时注明出处。

运行命令
php think door start
php think door start --mode d  // 守护进程重启
重启
php think door restart
停止
php think door stop

workerman的命令参数与thinkphp并不兼容,但是实现这样的效果并不难,实际上很简单,代码如下:

<?php

declare(strict_types=1);

namespace app\common\command;

use think\console\Command;
use think\console\Input;
use think\console\input\Argument;
use think\console\input\Option;
use think\console\Output;

class Door extends Command
{
    protected function configure()
    {
        // 指令配置
        $this->setName(&#39;door&#39;)
            // 设置think的命令参数
            ->addArgument(&#39;action&#39;, Argument::OPTIONAL, "start|stop|restart|reload|status|connections", &#39;start&#39;)
            ->addOption(&#39;mode&#39;, &#39;m&#39;, Option::VALUE_OPTIONAL, &#39;Run the workerman server in daemon mode.&#39;)
            ->setDescription(&#39;the door command&#39;);
    }
    protected function execute(Input $input, Output $output)
    {
        // 指令输出
        $output->writeln(&#39;door&#39;);
        $action = $input->getArgument(&#39;action&#39;);
        $mode = $input->getOption(&#39;mode&#39;);
        // 重新构造命令行参数,以便兼容workerman的命令
        global $argv;
        $argv = [];
        array_unshift($argv, &#39;think&#39;, $action);
        if ($mode == &#39;d&#39;) {
            $argv[] = &#39;-d&#39;;
        } else if ($mode == &#39;g&#39;) {
            $argv[] = &#39;-g&#39;;
        }
        // ...workerman的代码
    }
}

在上面的代码中,主要做了两件事:

  • 实现ThinkPHP的命令设置
  • 将命令参数重新构造为workerman兼容的方式

第三步,实现管理面板

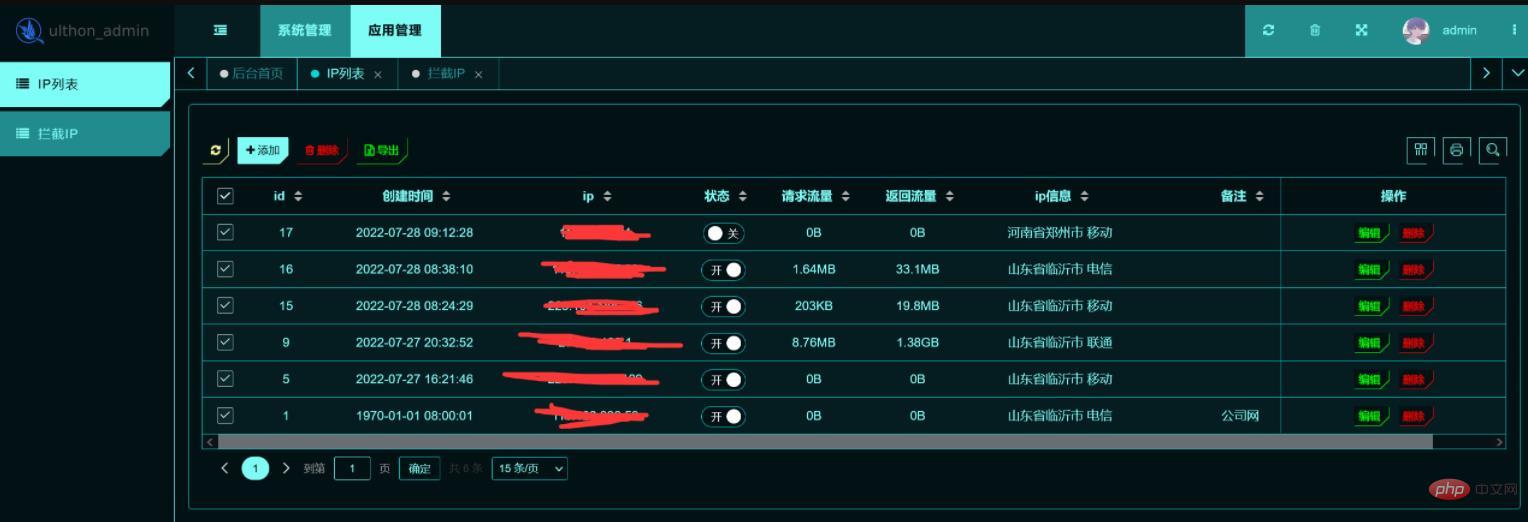
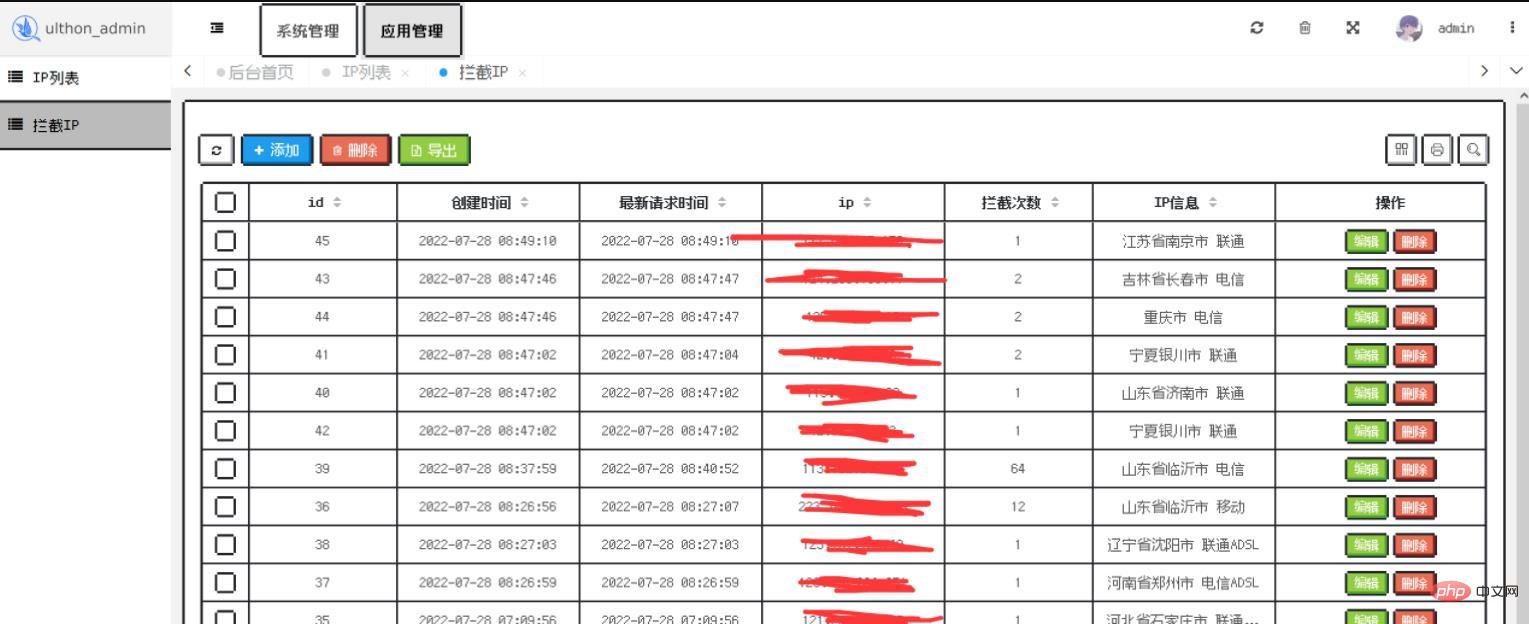
使用PHP实现一个管理面板太简单了,PHP到处都是这样的后台框架,这里我选择ulthon_admin,这是我自己开发维护的,它基于ThinkPHP6,很简单,为定制而生,不搞所谓的“插件”和“市场”生态,能够自动生成CURD代码,并且内置几了几个有趣的皮肤。

最终效果如下:

IP access control: Nanny style teaches you how to implement an IP firewall with PHPIP access control: Nanny style teaches you how to implement an IP firewall with PHP

以上是ulthon_admin内置的两款皮肤效果,分别是:科幻、像素。

对于面板的管理,这里多做介绍,这算是PHP开发者的基本功,谁还不会个CURD啊。

版权声明:本文由phpreturn.comPHP武器库官网)原创和首发,所有权利归phpreturnPHP武器库)所有,本站允许任何形式的转载/引用文章,但必须同时注明出处。

第四步,进阶,更好的性能和流量统计

我们的IP拦截客户端需要运行在服务器上,并且直接连接数据库,如果每次收到请求都要查询数据库,那么很有可能导致连接不通畅,尤其是客户端和数据库本身位置较远的时候。在第一步的代码中,我们只是简单的使用了查询缓存,但是还不够,还可以优化。并且我们可以在管理面板的截图中看到,我们是可以统计流量和拦截次数的,现在我们要实现这些功能:

流量统计

首先我们将第一个步中,流量转发部分的代码改造成如下的样子:

<?php
// 向TO发起连接
$to_connection = new AsyncTcpConnection(&#39;tcp://127.0.0.1:&#39; . Config::get(&#39;door.port_to&#39;));
$to_connection->onMessage = function ($source, $data) use ($connection, $remote_ip) {
    // 接收到来自TO的数据,返回的数据
    $connection->send($data);
    // 将流量统计存储到内存里
    Cache::inc(md5($remote_ip) . &#39;-to&#39;, strlen($data));
};
// 流程和流量控制
$to_connection->onClose = function ($source) use ($connection) {
    $connection->close();
};
$connection->onBufferFull = function ($dest) use ($to_connection) {
    $to_connection->pauseRecv();
};
$connection->onBufferDrain = function ($dest) use ($to_connection) {
    $to_connection->resumeRecv();
};
$connection->onMessage = function ($source, $data) use ($to_connection, $remote_ip) {
    // 接收来自IN的数据,请求的数据
    $to_connection->send($data);
    // 将流量统计存储到内存里
    Cache::inc(md5($remote_ip) . &#39;-in&#39;, strlen($data));
};
// 流程和流量控制
$connection->onClose = function ($source) use ($to_connection) {
    $to_connection->close();
};
$to_connection->onBufferFull = function ($dest) use ($connection) {
    $connection->pauseRecv();
};
$to_connection->onBufferDrain = function ($dest) use ($connection) {
    $connection->resumeRecv();
};

在第一部的代码中,只用两行便实现了这些代码:

// 放行连接,连接内部目标端口
$to_connection = new AsyncTcpConnection(&#39;tcp:127.0.0.1:&#39; . Config::get(&#39;door.port_to&#39;));
// 互相转发流量
$connection->pipe($to_connection);
$to_connection->pipe($connection);

这里使用的是workerman内置的流量转发,它很好用,但是这里我们要统计流量,所以我们手动转发流量。

这里我们将统计的数据存储到缓存里,而不是直接连接数据库更新,这是为了更好的连接性能。我们会另外开启一个进程将这些改动更新到数据库。后面会介绍到。

拦截统计

我们将第一步中的加载IP白名单的逻辑改成下面这样:

版权声明:本文由phpreturn.comPHP武器库官网)原创和首发,所有权利归phpreturnPHP武器库)所有,本站允许任何形式的转载/引用文章,但必须同时注明出处。

<?php
$worker->onConnect = function (TcpConnection $connection) {
    $disable_cache_key = &#39;disable_ip_list&#39;;
    $list_ip = Cache::get($disable_cache_key);
    if (empty($list_ip)) {
        $connection->close();
    }
    $remote_ip = $connection->getRemoteIp();
    if (!in_array($remote_ip, $list_ip)) {
        AppIpReject::initRecord($remote_ip);
        $connection->close();
    }
};

在这里我们不连接数据库查询,而是直接从本地缓存读取白名单,这样会有更好的性能。我们会在另一个进程中更新这份白名单。

另外我们可以看到,拦截的IP调用了一个静态方法,这里的功能很简单,判断数据库中该IP是否存在,如果不存在则新增,如果存在,则更新拦截次数+·1。这里就不多介绍了。这里也没有必要做什么性能优化,反正本来就是拦截的IP,优化个毛。

高性能处理缓存数据

上面我们介绍,我们会另外开启一个进程,维护IP白名单,并且将流量统计提交到数据库。这就是这个进程:

<?php
$worker_ip = new Worker();
$worker_ip->name = &#39;report&#39;;
$worker_ip->onWorkerStart = function () {
    Timer::add(5, function () {
        $disable_cache_key = &#39;disable_ip_list&#39;;
        $list_ip = AppIp::where(&#39;status&#39;, 1)->column(&#39;ip&#39;);
        Cache::set($disable_cache_key, $list_ip);
        foreach ($list_ip as  $ip) {
            $ip_md5 = md5($ip);
            $in_length = Cache::pull("$ip_md5-in");
            // 请求的数据
            $to_length = Cache::pull("$ip_md5-to");
            // 返回的数据
            if (!empty($in_length) || !empty($to_length)) {
                $model_ip = AppIp::where(&#39;ip&#39;, $ip)->find();
                $model_ip->in_buffer += $in_length;
                $model_ip->to_buffer += $to_length;
                $model_ip->save();
            }
        }
    });
};

他做的事情很简单,读取缓存,更新数据到数据库,并且更新IP白名单。这里不需要考虑它和数据库之间的性能问题,这是额外的进程,不影响端口的连接和转发。

下一步,更好的性能设计

以上,只有几行代码,几个小时(如果不含设计系统的时间,代码量可能只有一两个小时。还能再怎么优化呢?实际上还是可以优化的。

更好的内存驱动

这里使用的是ThinkPHP内置的文件缓存,存储到磁盘上,以上方法,在大量连接并发时,肯定受制于磁盘的性能。所以自然而然,我们可以使用内存缓存。

版权声明:本文由phpreturn.comPHP武器库官网)原创和首发,所有权利归phpreturnPHP武器库)所有,本站允许任何形式的转载/引用文章,但必须同时注明出处。

但是使用内存缓存,redis可以吗?并不好。这里是客户端,它只是想简简单单实现一个拦截转发,还要再部署redis,不可取。

但实际上,workerman本身内置了数据共享组件,这是一个很好的方案。相当于一个极简的redis。完美符合我们的需求。但是我并没有实现这个功能,目前的系统已经符合我的场景。

更好的客户端

目前拦截IP客户端和管理面板集成在一起,使用相同的配置,面板基于ThinkPHP,客户端只是ThinkPHP的一个命令。我之所以这样做,是希望直接在Workerman中使用ThinkPHP的众多特性(数据库、缓存

实际上,我们可以将客户端的代码,另外开一个项目,使客户端和面板独立开。在面板上实现通用得API。客户端通过API操作数据。这样客户端就不需要连接数据库。好处多多。

But this also brings more workload. In this case, we naturally think that the client environment is unsafe, so we need to perform permission authentication and login authentication. Interface development also requires writing more code.

Summary

This article mainly introduces my ideas for implementing IP firewall. These technologies require developers to have rich website development experience. This requirement is not high, but they also need to have basic network development experience, which has a certain threshold. Workerman is very simple, but Workerman is not HTTP. This is not an ordinary website development and requires certain learning and changes in thinking. But for me, it’s easy to drive with ease. If I look for other solutions to learn, deploy, and test, it may not be faster than developing it myself.

Copyright Statement: This article is original and published by phpreturn.com (PHP Weapon Library Official Website), all rights belong to phpreturn ( PHPArmory) All, this site allows any form of reprint/quoted articles, but the source must be indicated at the same time.

IPHow is the whitelist managed? You can add it through the panel or visit a page of the panel to automatically obtain the outbound IP and add it to the whitelist. , the user experience is very good.

In fact, there is a better way, that is to make a rss server and automatically obtain the outgoing network IP## of customers who subscribe to rss #Add to whitelist. But I don’t have the habit of using rss, and I don’t have a good rss reader on my phone, and I don’t want to open it every time I update the IP whitelist. It does not use this solution.

I made it open source, if you need it, you can refer to: https://gitee.com/augushong/ip-door.

More

This system, compared with

iptables, just has a more convenient IP whitelist management experience, which is equivalent to a Simple bastion machine. He can hide some ports so that only "I" can connect.

For example, hide the port of

ssh and forward it through the ip access control. Another example is to hide the 80 port and forward it through the ip access control.

Currently, my system has not implemented simultaneous binding and forwarding of multiple ports, but the core idea is the same and can be used as a reference.

Copyright Statement: This article is original and published by

phpreturn.com (PHP Weapon Library Official Website), all rights belong to phpreturn ( PHPArmory) All, this site allows any form of reprint/quoted articles, but the source must be indicated at the same time.

The above is the detailed content of IP access control: Nanny style teaches you how to implement an IP firewall with PHP. For more information, please follow other related articles on the PHP Chinese website!

Statement:
This article is reproduced at:phpreturn.com. If there is any infringement, please contact admin@php.cn delete