
Home >Java >javaTutorial >Detailed explanation of Java basics volatile
Detailed explanation of Java basics volatile

- WBOYWBOYWBOYWBOYWBOYWBOYWBOYWBOYWBOYWBOYWBOYWBOYWBforward
- 2022-07-06 13:49:542590browse
This article brings you relevant knowledge about java, which mainly organizes issues related to volatile, including volatile guarantees visibility, volatile does not guarantee atomicity, and volatile prohibits instruction rearrangement. Let’s take a look at the content below. I hope it will be helpful to everyone.

Recommended study: "java video tutorial"
Q: Please talk about your understanding of volatile?
Answer: volatile is a lightweight synchronization mechanism provided by the Java virtual machine. It has 3 features:
1) Guaranteed visibility
2) Does not guarantee atomicity
3) Prohibits instruction rearrangement
I have just learned the basics of java, if someone asks you what is volatile? If it has any function, I believe you must be very confused...
Maybe you don’t understand at all after reading the answer, what is a synchronization mechanism? What is visibility? What is atomicity? What is instruction reordering?
1. Volatile ensures visibility
1.1. What is the JMM model?
To understand what visibility is, you must first understand JMM.
JMM (Java Memory Model, Java Memory Model) itself is an abstract concept and does not really exist. It describes a set of rules or specifications. Through this set of specifications, the access methods of various variables in the program are determined. JMM's regulations on synchronization:
1) Before a thread is unlocked, the value of the shared variable must be refreshed back to the main memory;
2) Before the thread is locked, the latest value of the main memory must be read into its own working memory;
3) Locking and unlocking are the same lock;
Since the entity of the JVM running program is a thread, when each thread is created, the JMM will create a working memory (called stack space in some places) for it. , working memory is the private data area of each thread.
The Java memory model stipulates that all variables are stored in main memory. Main memory is a shared memory area that can be accessed by all threads.
But the thread's operations on variables (reading, assigning, etc.) must be performed in the working memory. Therefore, you must first copy the variables from the main memory to your own working memory, then operate the variables, and then write the variables to the main memory after the operation is completed.
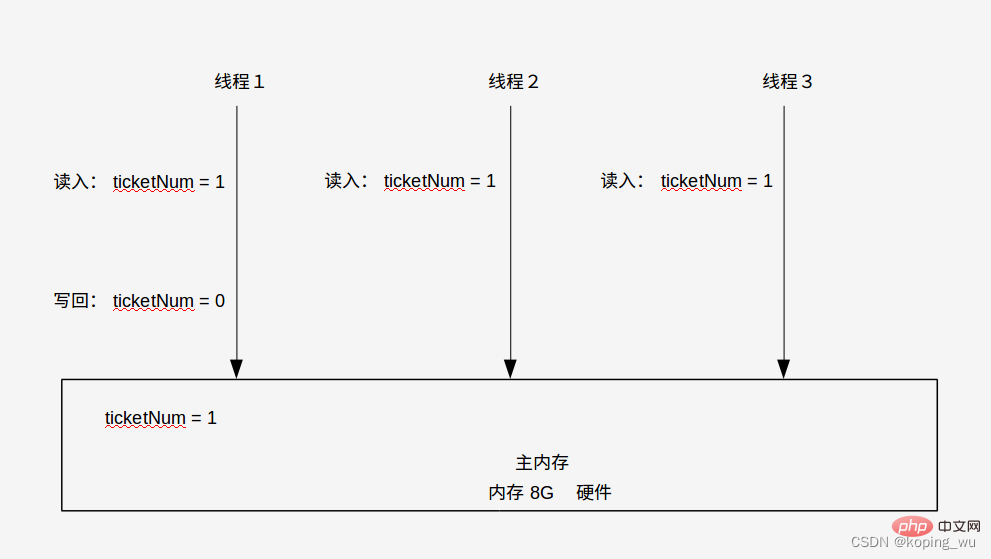
After reading the above introduction to JMM, you may still be confused about its advantages. Let’s use a ticket selling system as an example:
1) As shown below, at this time the backend of the ticket selling system only There is 1 ticket left and has been read into the main memory: ticketNum=1.
2) At this time, there are multiple users on the network who are grabbing tickets, so there are multiple threads that are performing ticket buying services at the same time. Assume that there are 3 threads that have read the current number of tickets: ticketNum. =1, then you will buy a ticket.
3) Assume that thread 1 first seizes the CPU resources, buys the ticket first, and changes the value of ticketNum to 0 in its own working memory: ticketNum=0, and then writes it back to the main memory.
At this time, the user in thread 1 has already purchased the ticket, so thread 2 and thread 3 should not be able to continue buying tickets at this time, so the system needs to notify thread 2 and thread 3 that ticketNum is now equal to 0: ticketNum=0. If there is such a notification operation, you can understand it as having visibility.
Through the above introduction and examples of JMM, we can briefly summarize it.
The visibility of the JMM memory model means that when multiple threads access a resource in the main memory, if a thread modifies the resource in its own working memory and writes it back to the main memory, Then the JMM memory model should notify other threads to re-obtain the latest resources to ensure the visibility of the latest resources.
1.2. Code verification of volatile guaranteeing visibility
In 1.1, we have basically understood the meaning of visibility. Next, use the code to verify that volatile can indeed guarantee visibility.
1.2.1. Non-visibility code verification
First verify whether there is no visibility if volatile is not used.
package com.koping.test;import java.util.concurrent.TimeUnit;class MyData{
    int number = 0;

    public void add10() {
        this.number += 10;
    }}public class VolatileVisibilityDemo {
    public static void main(String[] args) {
        MyData myData = new MyData();

        // 启动一个线程修改myData的number,将number的值加10
        new Thread(
                () -> {
                    System.out.println("线程" + Thread.currentThread().getName()+"\t 正在执行");
                    try{
                        TimeUnit.SECONDS.sleep(3);
                    } catch (Exception e) {
                        e.printStackTrace();
                    }
                    myData.add10();
                    System.out.println("线程" + Thread.currentThread().getName()+"\t 更新后,number的值为" + myData.number);
                }
        ).start();

        // 看一下主线程能否保持可见性
        while (myData.number == 0) {
            // 当上面的线程将number加10后,如果有可见性的话,那么就会跳出循环;
            // 如果没有可见性的话,就会一直在循环里执行
        }

        System.out.println("具有可见性!");
    }}
The running result is as shown below. You can see that although thread 0 has changed the value of number to 10, the main thread is still in the loop because number is not visible at this time and the system will not actively notify. 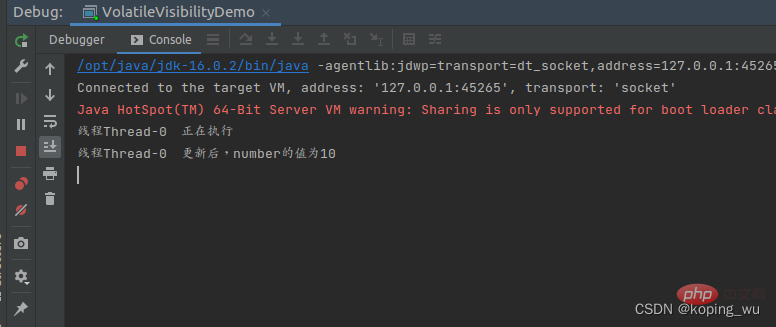
1.2.1. Volatile guarantee visibility verification
Add volatile to the variable number in line 7 of the above code and test again, as shown below, at this time the main thread The loop was successfully exited because JMM actively notified the main thread to update the value of number, and number is no longer 0. 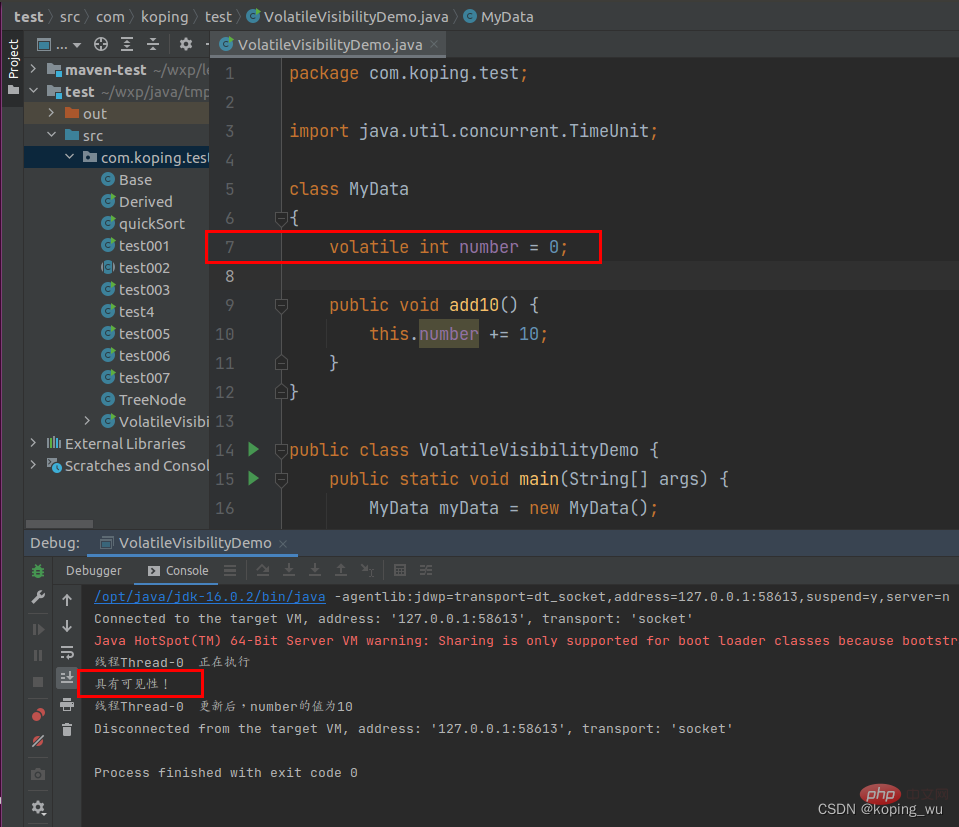
2、volatile不保证原子性
2.1 什么是原子性?
理解了上面说的可见性之后,再来理解下什么叫原子性?
原子性是指不可分隔,完整性,即某个线程正在做某个业务时,中间不能被分割。要么同时成功,要么同时失败。
还是有点抽象,接下来举个例子。
如下图,创建了一个测试原子性的类:TestPragma。在add方法中将n加1,通过查看编译后的代码可以看到,n++被拆分为3个指令进行执行。
因此可能存在线程1正在执行第1个指令,紧接着线程2也正在执行第1个指令,这样当线程1和线程2都执行完3个指令之后,很容易理解,此时n的值只加了1,而实际是有2个线程加了2次,因此这种情况就是不保证原子性。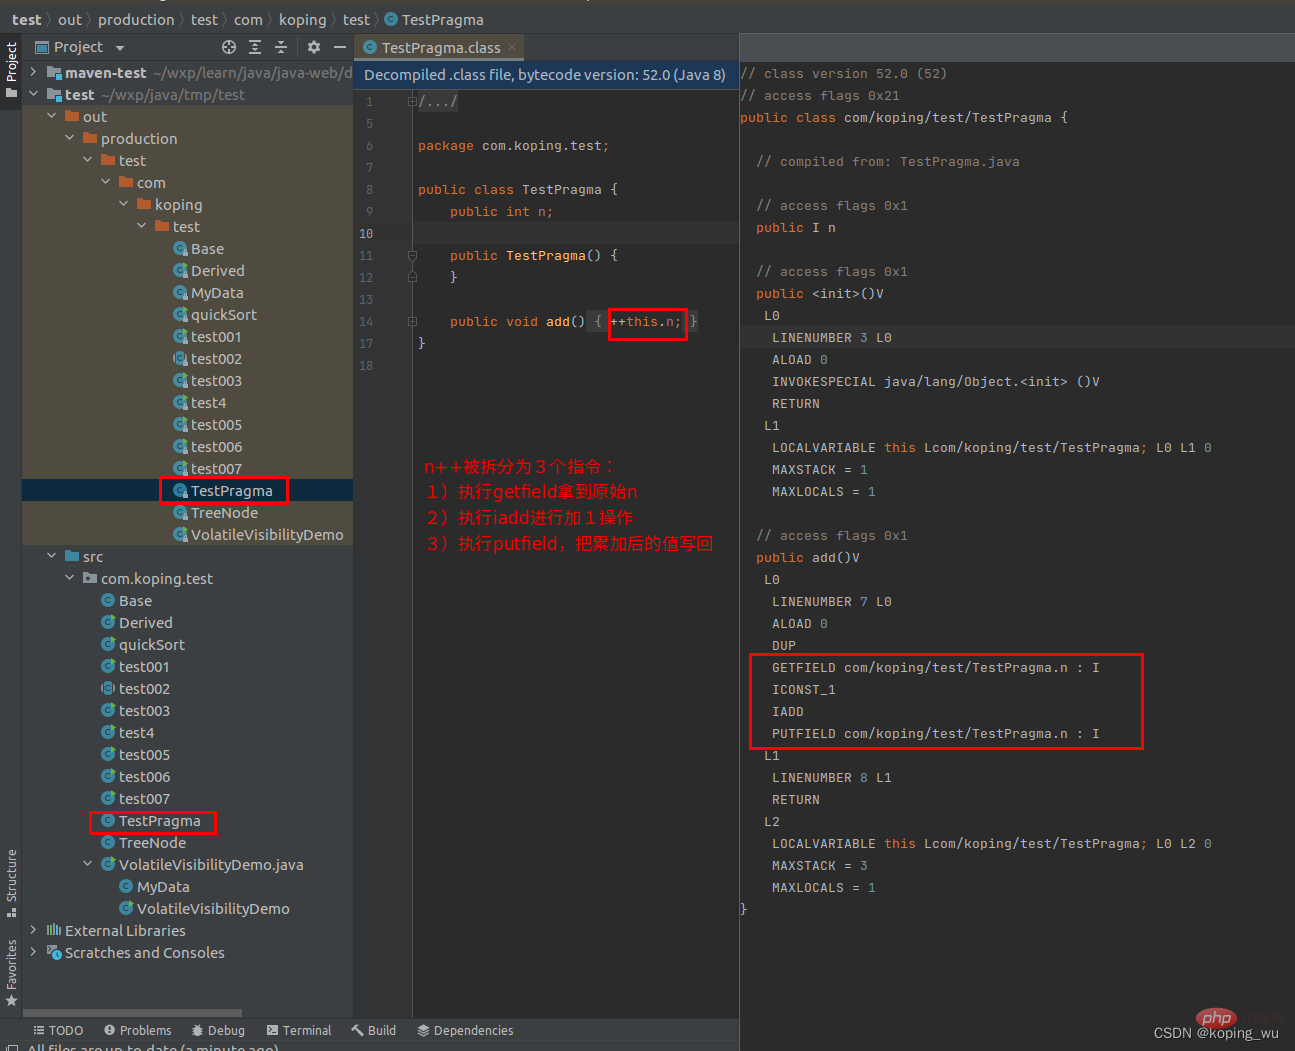
2.2 不保证原子性的代码验证
在2.1中已经进行了举例,可能存在2个线程执行n++的操作,但是最终n的值却只加了1的情况,接下来对这种情况再用代码进行演示下。
首先给MyData类添加一个add方法
package com.koping.test;class MyData {
    volatile int number = 0;

    public void add() {
        number++;
    }}
然后创建测试原子性的类:TestPragmaDemo。测试下20个线程给number各加1000次之后,number的值是否是20000。
package com.koping.test;public class TestPragmaDemo {
    public static void main(String[] args) {
        MyData myData = new MyData();

        // 启动20个线程,每个线程将myData的number值加1000次,那么理论上number值最终是20000
        for (int i=0; i {
                for (int j=0; j2){
            Thread.yield();
        }

        System.out.println("number值加了20000次,此时number的实际值是:" + myData.number);

    }}
运行结果如下图,最终number的值仅为18410。
可以看到即使加了volatile,依然不保证有原子性。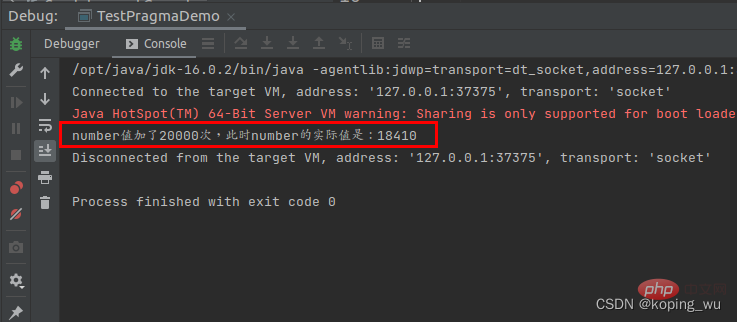
2.3 volatile不保证原子性的解决方法
上面介绍并证明了volatile不保证原子性,那如果希望保证原子性,怎么办呢?以下提供了2种方法
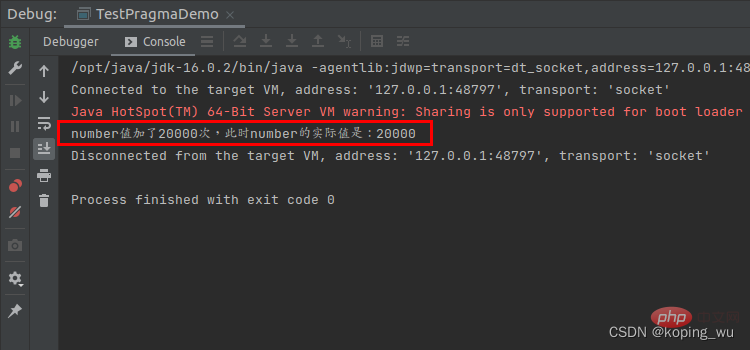
2.3.1 方法1:使用synchronized
方法1是在add方法上添加synchronized,这样每次只有1个线程能执行add方法。
结果如下图,最终确实可以使number的值为20000,保证了原子性。
但是,实际业务逻辑方法中不可能只有只有number++这1行代码,上面可能还有n行代码逻辑。现在为了保证number的值是20000,就把整个方法都加锁了(其实另外那n行代码,完全可以由多线程同时执行的)。所以就优点杀鸡用牛刀,高射炮打蚊子,小题大做了。
package com.koping.test;class MyData {
    volatile int number = 0;

    public synchronized void add() {
      // 在n++上面可能还有n行代码进行逻辑处理
        number++;
    }}
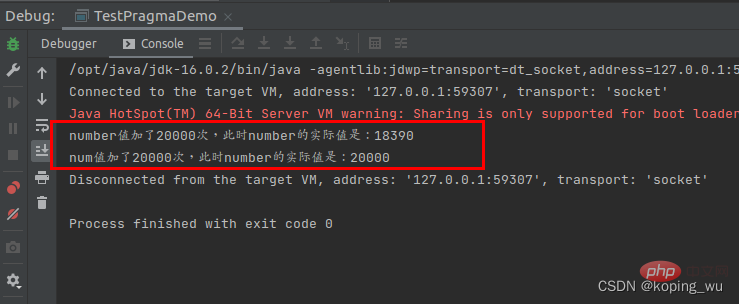
2.3.2 方法1:使用JUC包下的AtomicInteger
给MyData新曾一个原子整型类型的变量num,初始值为0。
package com.koping.test;import java.util.concurrent.atomic.AtomicInteger;class MyData {
    volatile int number = 0;

    volatile AtomicInteger num = new AtomicInteger();

    public void add() {
        // 在n++上面可能还有n行代码进行逻辑处理
        number++;
        num.getAndIncrement();
    }}
让num也同步加20000次。结果如下图,可以看到,使用原子整型的num可以保证原子性,也就是number++的时候不会被抢断。
package com.koping.test;public class TestPragmaDemo {
    public static void main(String[] args) {
        MyData myData = new MyData();

        // 启动20个线程,每个线程将myData的number值加1000次,那么理论上number值最终是20000
        for (int i=0; i {
                for (int j=0; j2){
            Thread.yield();
        }

        System.out.println("number值加了20000次,此时number的实际值是:" + myData.number);
        System.out.println("num值加了20000次,此时number的实际值是:" + myData.num);

    }}
3、volatile禁止指令重排
3.1 什么是指令重排?
在第2节中理解了什么是原子性,现在要理解下什么是指令重排?
计算机在执行程序时,为了提高性能,编译器和处理器常常会对指令进行重排:
源代码–>编译器优化重排–>指令并行重排–>内存系统重排–>最终执行指令
处理器在进行重排时,必须要考虑指令之间的数据依赖性。
单线程环境中,可以确保最终执行结果和代码顺序执行的结果一致。
但是多线程环境中,线程交替执行,由于编译器优化重排的存在,两个线程使用的变量能否保持一致性是无法确定的,结果无法预测。
看了上面的文字性表达,然后看一个很简单的例子。
比如下面的mySort方法,在系统指令重排后,可能存在以下3种语句的执行情况:
1)1234
2)2134
3)1324
以上这3种重排结果,对最后程序的结果都不会有影响,也考虑了指令之间的数据依赖性。
public void mySort() {
    int x = 1;  // 语句1
    int y = 2;  // 语句2
    x = x + 3;  // 语句3
    y = x * x;  // 语句4}
3.2 单线程单例模式
看完指令重排的简单介绍后,然后来看下单例模式的代码。
package com.koping.test;public class SingletonDemo {
    private static SingletonDemo instance = null;

    private SingletonDemo() {
        System.out.println(Thread.currentThread().getName() + "\t 执行构造方法SingletonDemo()");
    }

    public static SingletonDemo getInstance() {
        if (instance == null) {
            instance = new SingletonDemo();
        }
        return instance;
    }

    public static void main(String[] args) {
        // 单线程测试
        System.out.println("单线程的情况测试开始");
        System.out.println(SingletonDemo.getInstance() == SingletonDemo.getInstance());
        System.out.println(SingletonDemo.getInstance() == SingletonDemo.getInstance());
        System.out.println("单线程的情况测试结束\n");
    }}
首先是在单线程情况下进行测试,结果如下图。可以看到,构造方法只执行了一次,是没有问题的。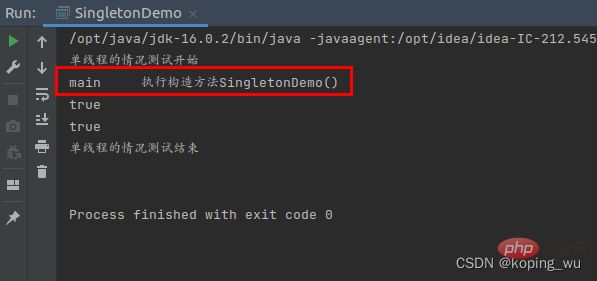
3.3 多线程单例模式
接下来在多线程情况下进行测试,代码如下。
package com.koping.test;public class SingletonDemo {
    private static SingletonDemo instance = null;

    private SingletonDemo() {
        System.out.println(Thread.currentThread().getName() + "\t 执行构造方法SingletonDemo()");
    }

    public static SingletonDemo getInstance() {
        if (instance == null) {
            instance = new SingletonDemo();
        }

        // DCL(Double Check Lock双端检索机制)//        if (instance == null) {//            synchronized (SingletonDemo.class) {//                if (instance == null) {//                    instance = new SingletonDemo();//                }//            }//        }
        return instance;
    }

    public static void main(String[] args) {
        // 单线程测试//        System.out.println("单线程的情况测试开始");//        System.out.println(SingletonDemo.getInstance() == SingletonDemo.getInstance());//        System.out.println(SingletonDemo.getInstance() == SingletonDemo.getInstance());//        System.out.println("单线程的情况测试结束\n");

        // 多线程测试
        System.out.println("多线程的情况测试开始");
        for (int i=1; i {
                SingletonDemo.getInstance();
            }, String.valueOf(i)).start();
        }
    }}
在多线程情况下的运行结果如下图。可以看到,多线程情况下,出现了构造方法执行了2次的情况。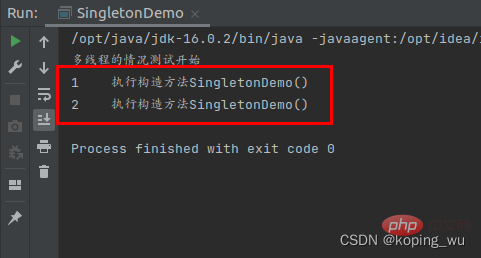
3.4 多线程单例模式改进:DCL
在3.3中的多线程单里模式下,构造方法执行了两次,因此需要进行改进,这里使用双端检锁机制:Double Check Lock, DCL。即加锁之前和之后都进行检查。
package com.koping.test;public class SingletonDemo {
    private static SingletonDemo instance = null;

    private SingletonDemo() {
        System.out.println(Thread.currentThread().getName() + "\t 执行构造方法SingletonDemo()");
    }

    public static SingletonDemo getInstance() {//        if (instance == null) {//            instance = new SingletonDemo();//        }

        // DCL(Double Check Lock双端检锁机制)
        if (instance == null) {  // a行
            synchronized (SingletonDemo.class) {
                if (instance == null) {  // b行
                    instance = new SingletonDemo();  // c行
                }
            }
        }
        return instance;
    }

    public static void main(String[] args) {
        // 单线程测试//        System.out.println("单线程的情况测试开始");//        System.out.println(SingletonDemo.getInstance() == SingletonDemo.getInstance());//        System.out.println(SingletonDemo.getInstance() == SingletonDemo.getInstance());//        System.out.println("单线程的情况测试结束\n");

        // 多线程测试
        System.out.println("多线程的情况测试开始");
        for (int i=1; i {
                SingletonDemo.getInstance();
            }, String.valueOf(i)).start();
        }
    }}
在多次运行后,可以看到,在多线程情况下,此时构造方法也只执行1次了。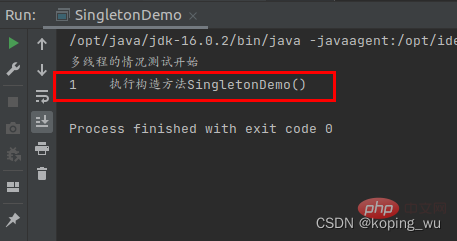
3.5 多线程单例模式改进,DCL版存在的问题
需要注意的是3.4中的DCL版的单例模式依然不是100%准确的!!!
是不是不太明白为什么3.4DCL版单例模式不是100%准确的原因?
是不是不太明白在3.1讲完指令重排的简单理解后,为什么突然要讲多线程的单例模式?
因为3.4DCL版单例模式可能会由于指令重排而导致问题,虽然该问题出现的可能性可能是千万分之一,但是该代码依然不是100%准确的。如果要保证100%准确,那么需要添加volatile关键字,添加volatile可以禁止指令重排。
接下来分析下,为什么3.4DCL版单例模式不是100%准确?
查看instance = new SingletonDemo();编译后的指令,可以分为以下3步:
1)分配对象内存空间:memory = allocate();
2)初始化对象:instance(memory);
3)设置instance指向分配的内存地址:instance = memory;
由于步骤2和步骤3不存在数据依赖关系,因此可能出现执行132步骤的情况。
比如线程1执行了步骤13,还没有执行步骤2,此时instance!=null,但是对象还没有初始化完成;
如果此时线程2抢占到cpu,然后发现instance!=null,然后直接返回使用,就会发现instance为空,就会出现异常。
这就是指令重排可能导致的问题,因此要想保证程序100%正确就需要加volatile禁止指令重排。
3.6 volatile保证禁止指令重排的原理
在3.1中简单介绍了下执行重排的含义,然后通过3.2-3.5,借助单例模式来举例说明多线程情况下,为什么要使用volatile的原因,因为可能存在指令重排导致程序异常。
接下来就介绍下volatile能保证禁止指令重排的原理。
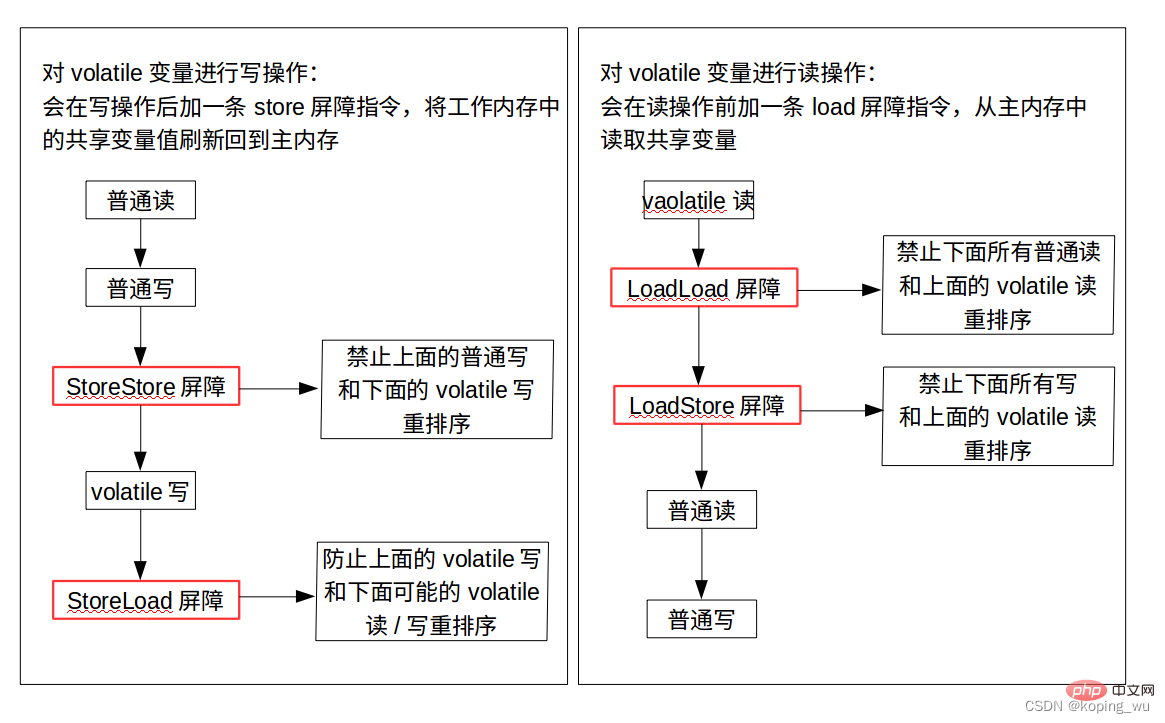
首先要了解一个概念:内存屏障(Memory Barrier),又称为内存栅栏。它是一个CPU指令,有2个作用:
1)保证特定操作的执行顺序;
2)保证某些变量的内存可见性;
由于编译器和处理器都能执行指令重排。如果在指令之间插入一条Memory Barrier则会告诉编译器和CPU,不管什么指令都不能和这条Memory Barrier指令重排序,也就是说,通过插入内存屏障,禁止在内存屏障前后的指令执行重排需优化。
内存屏障的另一个作用是强制刷出各种CPU的缓存数据,因此任何CPU上的线程都能读取到这些数据的最新版本。
推荐学习:《java视频教程》
The above is the detailed content of Detailed explanation of Java basics volatile. For more information, please follow other related articles on the PHP Chinese website!