

Practical Excel skills sharing: 'Data Validity' can be used in this way!

In the previous article " Practical Excel skills sharing: How to extract numbers? ", we explain several common types of data extraction situations. Today we are going to talk about Excel’s “data validity” function and share 3 tips to make data validity more efficient. Come and learn!

Everyone should use the "data validity" function quite a lot in their work, right? Most people commonly use it for selection drop-downs, data entry restrictions, etc. Today Bottle will introduce to you some functions that may seem inconspicuous but are actually very efficient and warm.
1. Make a drop-down list with "Super Table"
For the table as shown below, you need to make a drop-down list in column E. This way you don't have to manually enter the position, you can select it directly from the drop-down list.
At this time, most people may click on the data validity dialog box and directly enter the required content in the drop-down list manually.

#There is a drawback to this. When a new position is added, the data validity needs to be reset. We can create a dedicated table as a source here. Create a basic information table in the workbook. As shown in the figure below, name Table 2 as the basic information table.
Click "Insert" - "Table" in cell A1 of the basic information table.
#The "Create Table" dialog box pops up, click "OK" directly to see the super table in the table.
Directly enter the company’s existing positions in the form, and the super table will automatically expand, as shown below.
Select the entire data area, set a name for this column of data in the name box above the table, such as "Position", and press Enter to confirm.
After setting the name, click "Formula" - "Use for formula". You can see the name we just customized in the drop-down menu, which can be called at any time. This will also be used in future function learning.
Go back to the original salary table, select the data in column E, and click "Data" - "Data Validity".

In the pop-up dialog box, select "Sequence" in the "Allow" drop-down menu.

Click in the input box below "Source", and then click the "Formula" tab "Used for Formulas" - "Position". At this point you can see that the "Position" table area is called in "Source".

After clicking "OK", a drop-down button will appear after the data in column E. Click the button to select a position in the drop-down list.
#If there are new positions at this time, add content directly to the "Position" super table in the basic information table. As shown in the picture below, I entered the newly added position of R&D Director in cell A12.
#After pressing Enter, you can see that the table is automatically expanded and the new positions are included in the "Positions" table area.
At this point we return to the salary table and look at the drop-down list of any cell in column E. We can see that "R&D Director" has been added to the end of the list.
For those who use the excel2010 version, please note that after using the super table, the data validity may be "invalid". In this case, you only need to uncheck "Ignore null values". .

2. Humanized warning message
In the table as shown below, select column C Data, formatted as text. Because our ID numbers are all 18-digit long numbers and will not participate in mathematical operations, we can set the entire column in text format in advance.
Call up the data validity dialog box and enter the text length - equal to -18.
When you enter a string of numbers without 18 digits in cell C2, a warning message will pop up as shown in the figure below.
The warning message at this time looks very stiff, and it is possible that people using the form cannot understand it. We can customize a humanized warning message to let people know how to do it. operate.
After selecting the data in the ID card column, bring up the data validity dialog box and click the "Error Warning" tab. We can see the dialog box shown below.
Click the "Style" drop-down list, there are three methods: "Stop", "Warning" and "Information". "Stop" means that when the user enters incorrect information, the information cannot be entered into the cell. "Warning" means that when the user enters incorrect information, the user is reminded. After the user clicks OK again, the information can be entered into the cell. "Information" means that when the user enters incorrect information, it only reminds the user that the information has been entered into the cell.
#On the right side of the dialog box, we can set the title and prompt content of the warning message, as shown below.
After clicking OK, when the number entered in cell C2 is not 18 digits, a prompt box for our custom settings will pop up.
3. Circle the error data and empty cells
As shown below, when I After setting column C as "warning" information, the user entered incorrect data and clicked OK again, but it was still saved. At this time I need to mark out the incorrect data.
Select the data in column C and click "Data" - "Data Validity" - "Circle Invalid Data".
At this time, the incorrect data entered in the ID card column will be marked. However, the empty cells with no information entered are not marked.
If you want to circle the empty cells with no entered information, we click "Clear Invalid Data Identification Circles" in the "Data Validity" drop-down list to clear it first. Logo circle.

Then select the data area, bring up the data validity dialog box, and uncheck "Ignore null values" in the "Settings" dialog box.

At this time, perform the previous circle release operation, and you can see that the cells with entered error information and empty cells have been circled and released.

#When our company has hundreds of people, we can easily find the missed cells using this method.
That’s it for today’s tutorial, have you learned it? Making good use of data validity can save a lot of time when statistics are collected.
Related learning recommendations: excel tutorial
The above is the detailed content of Practical Excel skills sharing: 'Data Validity' can be used in this way!. For more information, please follow other related articles on the PHP Chinese website!

 MEDIAN formula in Excel - practical examplesApr 11, 2025 pm 12:08 PM
This tutorial explains how to calculate the median of numerical data in Excel using the MEDIAN function. The median, a key measure of central tendency, identifies the middle value in a dataset, offering a more robust representation of central tenden
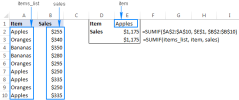
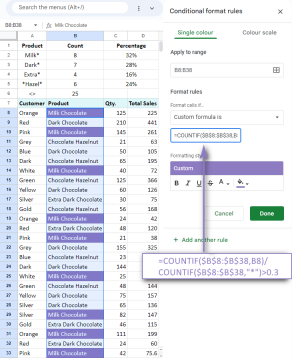 Google Spreadsheet COUNTIF function with formula examplesApr 11, 2025 pm 12:03 PM
Master Google Sheets COUNTIF: A Comprehensive Guide This guide explores the versatile COUNTIF function in Google Sheets, demonstrating its applications beyond simple cell counting. We'll cover various scenarios, from exact and partial matches to han
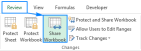 Excel shared workbook: How to share Excel file for multiple usersApr 11, 2025 am 11:58 AM
This tutorial provides a comprehensive guide to sharing Excel workbooks, covering various methods, access control, and conflict resolution. Modern Excel versions (2010, 2013, 2016, and later) simplify collaborative editing, eliminating the need to m
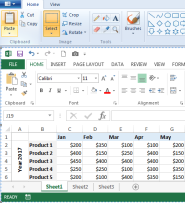 How to convert Excel to JPG - save .xls or .xlsx as image fileApr 11, 2025 am 11:31 AM
This tutorial explores various methods for converting .xls files to .jpg images, encompassing both built-in Windows tools and free online converters. Need to create a presentation, share spreadsheet data securely, or design a document? Converting yo
 Excel names and named ranges: how to define and use in formulasApr 11, 2025 am 11:13 AM
This tutorial clarifies the function of Excel names and demonstrates how to define names for cells, ranges, constants, or formulas. It also covers editing, filtering, and deleting defined names. Excel names, while incredibly useful, are often overlo
 Standard deviation Excel: functions and formula examplesApr 11, 2025 am 11:01 AM
This tutorial clarifies the distinction between standard deviation and standard error of the mean, guiding you on the optimal Excel functions for standard deviation calculations. In descriptive statistics, the mean and standard deviation are intrinsi
 Square root in Excel: SQRT function and other waysApr 11, 2025 am 10:34 AM
This Excel tutorial demonstrates how to calculate square roots and nth roots. Finding the square root is a common mathematical operation, and Excel offers several methods. Methods for Calculating Square Roots in Excel: Using the SQRT Function: The
 Google Sheets basics: Learn how to work with Google SpreadsheetsApr 11, 2025 am 10:23 AM
Unlock the Power of Google Sheets: A Beginner's Guide This tutorial introduces the fundamentals of Google Sheets, a powerful and versatile alternative to MS Excel. Learn how to effortlessly manage spreadsheets, leverage key features, and collaborate


Hot AI Tools

Undresser.AI Undress
AI-powered app for creating realistic nude photos

AI Clothes Remover
Online AI tool for removing clothes from photos.

Undress AI Tool
Undress images for free

Clothoff.io
AI clothes remover

Video Face Swap
Swap faces in any video effortlessly with our completely free AI face swap tool!

Hot Article
Hot Tools

Dreamweaver CS6
Visual web development tools

SublimeText3 Chinese version
Chinese version, very easy to use

Notepad++7.3.1
Easy-to-use and free code editor

MinGW - Minimalist GNU for Windows
This project is in the process of being migrated to osdn.net/projects/mingw, you can continue to follow us there. MinGW: A native Windows port of the GNU Compiler Collection (GCC), freely distributable import libraries and header files for building native Windows applications; includes extensions to the MSVC runtime to support C99 functionality. All MinGW software can run on 64-bit Windows platforms.

SAP NetWeaver Server Adapter for Eclipse
Integrate Eclipse with SAP NetWeaver application server.

