

 Web Front-endCSS TutorialThe most easy-to-understand detailed explanation of CSS float attribute (detailed pictures and text)
The most easy-to-understand detailed explanation of CSS float attribute (detailed pictures and text)

This article brings you a detailed analysis of the relevant knowledge of the float attribute in CSS. The float attribute defines in which direction the element floats. Let's take a look at what will happen with different attribute values. Different results, hope it helps everyone.
CSS floating float property detailed explanation
I have been exposed to CSS a long time ago, but I am always very confused about floating. It may be because of my poor understanding, or it may be I haven't been able to find a simple tutorial.
I finally understood the basic principles of floating a few days ago, and I can’t wait to share it with everyone.
Words written in front:
   由于CSS内容比较多,没有精力从头到尾讲一遍,只能有针对性的讲解。
   如果读者理解CSS盒子模型,但对于浮动不理解,那么这篇文章可以帮助你。
   小菜水平有限,本文仅仅是入门教程,不当之处请谅解!
   本文以p元素布局为例。
Start of tutorial:
First of all, you need to know, p It is a block-level element that occupies an exclusive line on the page and is arranged from top to bottom, which is the legendary flow. As shown below: 
It can be seen that even if the width of p1 is very small, one line on the page can accommodate p1 and p2, and p2 will not be ranked behind p1, because the p element occupies its own line.
Note that the above theories refer to p in the standard stream.
Xiaocai believes that no matter how complex the layout is, the basic starting point is: "How to display multiple p elements in one line".
Obviously the standard stream can no longer meet the demand, so floats must be used.
Floating can be understood as letting a certain p element break away from the standard flow and float on the standard flow. It is not at the same level as the standard flow.
For example, assuming that p2 in the above figure floats, it will break away from the standard stream, but p1, p3, and p4 are still in the standard stream, so p3 will automatically move up and occupy the position of p2. Reassemble a stream. As shown in the figure: 
As can be seen from the figure, since p2 is set to float, it no longer belongs to the standard flow. p3 automatically moves up to replace p2, and p1, p3, and p4 are arranged in sequence. Become a new stream. And because the float floats above the standard flow, p2 blocks part of p3, and p3 looks "short".
Here p2 uses left floating (float:left;), which can be understood as floating and arranging to the left, and right floating (float:right;) of course means arranging to the right. The left and right here refer to the left and right edges of the page.
If we float p2 to the right, the effect will be as follows: 
At this time, p2 is arranged on the right edge of the page and no longer blocks p3. The reader can clearly see the above. Let’s talk about the stream composed of p1, p3, and p4.
So far we have only floated one p element, how about more?
Next we add left floating to both p2 and p3, the effect is as shown: 
Similarly, since p2 and p3 float, they no longer belong to the standard stream, so p4 will It automatically moves up and forms a "new" standard flow with p1, and floats above the standard flow, so p2 blocks p4 again.
Ahem, here comes the point. When p2 and p3 are set to float at the same time, p3 will follow p2. I don’t know if readers have noticed that until now, p2 is floating in every example. , but it does not follow p1. Therefore, we can draw an important conclusion:
If a certain p element A is floating, and if the previous element of the A element is also floating, then the A element will follow the # of the previous element. ## followed by (if these two elements cannot be placed on one line, then the A element will be squeezed to the next line); if the previous element of the A element is an element in the standard stream, then the relative vertical position of A will not change. That is to say, the top of A is always aligned with the bottom of the previous element.
The order of p is determined by the order of p in the HTML code. The end close to the edge of the page is the front, and the end far away from the edge of the page is the back.  To help readers understand, here are a few more examples.
leftfloating, the effect is as follows: 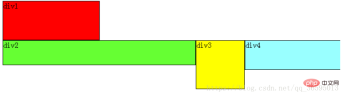 Based on the above conclusion, follow the explanation of Xiaocai: First, start with p4 starts to analyze, and it finds that the upper element p3 is floating, so p4 will follow p3; p3 finds that the upper element p2 is also floating, so p3 will follow p2; and p2 finds that the upper element p1 is a standard stream element in, so the relative vertical position of p2 remains unchanged, and the top is still aligned with the bottom of the p1 element.
假如把p2、p3、p4都设置成右浮动,效果如下: 
道理和左浮动基本一样,只不过需要注意一下前后对应关系。由于是右浮动,因此右边靠近页面边缘,所以右边是前,因此p2在最右边。
假如我们把p2、p4左浮动,效果图如下: 
依然是根据结论,p2、p4浮动,脱离了标准流,因此p3将会自动上移,与p1组成标准流。p2发现上一个元素p1是标准流中的元素,因此p2相对垂直位置不变,与p1底部对齐。p4发现上一个元素p3是标准流中的元素,因此p4的顶部和p3的底部对齐,并且总是成立的,因为从图中可以看出,p3上移后,p4也跟着上移,p4总是保证自己的顶部和上一个元素p3(标准流中的元素)的底部对齐。
至此,恭喜读者已经掌握了添加浮动,但还有清除浮动,有上边的基础清除浮动非常容易理解。
经过上边的学习,可以看出:元素浮动之前,也就是在标准流中,是竖向排列的,而浮动之后可以理解为横向排列。
清除浮动可以理解为打破横向排列。
   清除浮动的关键字是clear,官方定义如下:


   语法:

   clear : none | left | right | both

   取值:

   none  :  默认值。允许两边都可以有浮动对象

   left   :  不允许左边有浮动对象

   right  :  不允许右边有浮动对象

   both  :  不允许有浮动对象
定义非常容易理解,但是读者实际使用时可能会发现不是这么回事。
定义没有错,只不过它描述的太模糊,让我们不知所措。
根据上边的基础,假如页面中只有两个元素p1、p2,它们都是左浮动,场景如下: 
此时p1、p2都浮动,根据规则,p2会跟随在p1后边,但我们仍然希望p2能排列在p1下边,就像p1没有浮动,p2左浮动那样。
这时候就要用到清除浮动(clear),如果单纯根据官方定义,读者可能会尝试这样写:在p1的CSS样式中添加clear:right;,理解为不允许p1的右边有浮动元素,由于p2是浮动元素,因此会自动下移一行来满足规则。
其实这种理解是不正确的,这样做没有任何效果。看小菜定论:
对于CSS的清除浮动(clear),一定要牢记:这个规则只能影响使用清除的元素本身,不能影响其他元素。
怎么理解呢?就拿上边的例子来说,我们是想让p2移动,但我们却是在p1元素的CSS样式中使用了清除浮动,试图通过清除p1右边的浮动元素(clear:right;)来强迫p2下移,这是不可行的,因为这个清除浮动是在p1中调用的,它只能影响p1,不能影响p2。
根据小菜定论,要想让p2下移,就必须在p2的CSS样式中使用浮动。本例中p2的左边有浮动元素p1,因此只要在p2的CSS样式中使用clear:left;来指定p2元素左边不允许出现浮动元素,这样p2就被迫下移一行。 
那么假如页面中只有两个元素p1、p2,它们都是右浮动呢?读者此时应该已经能自己推测场景,如下: 
此时如果要让p2下移到p1下边,要如何做呢?
同样根据小菜定论,我们希望移动的是p2,就必须在p2的CSS样式中调用浮动,因为浮动只能影响调用它的元素。
可以看出p2的右边有一个浮动元素p1,那么我们可以在p2的CSS样式中使用clear:right;来指定p2的右边不允许出现浮动元素,这样p2就被迫下移一行,排到p1下边。 
至此,读者已经掌握了CSS+p浮动定位基本原理,足以应付常见的布局。
其实,万变不离其宗,只要读者用心体会,再复杂的布局都可以通过总结的规律搞定。
(学习视频分享:css视频教程)
The above is the detailed content of The most easy-to-understand detailed explanation of CSS float attribute (detailed pictures and text). For more information, please follow other related articles on the PHP Chinese website!

 @keyframes vs CSS Transitions: What is the difference?May 14, 2025 am 12:01 AM
@keyframesandCSSTransitionsdifferincomplexity:@keyframesallowsfordetailedanimationsequences,whileCSSTransitionshandlesimplestatechanges.UseCSSTransitionsforhovereffectslikebuttoncolorchanges,and@keyframesforintricateanimationslikerotatingspinners.
 Using Pages CMS for Static Site Content ManagementMay 13, 2025 am 09:24 AM
I know, I know: there are a ton of content management system options available, and while I've tested several, none have really been the one, y'know? Weird pricing models, difficult customization, some even end up becoming a whole &
 The Ultimate Guide to Linking CSS Files in HTMLMay 13, 2025 am 12:02 AM
Linking CSS files to HTML can be achieved by using elements in part of HTML. 1) Use tags to link local CSS files. 2) Multiple CSS files can be implemented by adding multiple tags. 3) External CSS files use absolute URL links, such as. 4) Ensure the correct use of file paths and CSS file loading order, and optimize performance can use CSS preprocessor to merge files.
 CSS Flexbox vs Grid: a comprehensive reviewMay 12, 2025 am 12:01 AM
Choosing Flexbox or Grid depends on the layout requirements: 1) Flexbox is suitable for one-dimensional layouts, such as navigation bar; 2) Grid is suitable for two-dimensional layouts, such as magazine layouts. The two can be used in the project to improve the layout effect.
 How to Include CSS Files: Methods and Best PracticesMay 11, 2025 am 12:02 AM
The best way to include CSS files is to use tags to introduce external CSS files in the HTML part. 1. Use tags to introduce external CSS files, such as. 2. For small adjustments, inline CSS can be used, but should be used with caution. 3. Large projects can use CSS preprocessors such as Sass or Less to import other CSS files through @import. 4. For performance, CSS files should be merged and CDN should be used, and compressed using tools such as CSSNano.
 Flexbox vs Grid: should I learn them both?May 10, 2025 am 12:01 AM
Yes,youshouldlearnbothFlexboxandGrid.1)Flexboxisidealforone-dimensional,flexiblelayoutslikenavigationmenus.2)Gridexcelsintwo-dimensional,complexdesignssuchasmagazinelayouts.3)Combiningbothenhanceslayoutflexibilityandresponsiveness,allowingforstructur
 Orbital Mechanics (or How I Optimized a CSS Keyframes Animation)May 09, 2025 am 09:57 AM
What does it look like to refactor your own code? John Rhea picks apart an old CSS animation he wrote and walks through the thought process of optimizing it.
 CSS Animations: Is it hard to create them?May 09, 2025 am 12:03 AM
CSSanimationsarenotinherentlyhardbutrequirepracticeandunderstandingofCSSpropertiesandtimingfunctions.1)Startwithsimpleanimationslikescalingabuttononhoverusingkeyframes.2)Useeasingfunctionslikecubic-bezierfornaturaleffects,suchasabounceanimation.3)For


Hot AI Tools

Undresser.AI Undress
AI-powered app for creating realistic nude photos

AI Clothes Remover
Online AI tool for removing clothes from photos.

Undress AI Tool
Undress images for free

Clothoff.io
AI clothes remover

Video Face Swap
Swap faces in any video effortlessly with our completely free AI face swap tool!

Hot Article
Hot Tools

SublimeText3 Mac version
God-level code editing software (SublimeText3)

Zend Studio 13.0.1
Powerful PHP integrated development environment

Safe Exam Browser
Safe Exam Browser is a secure browser environment for taking online exams securely. This software turns any computer into a secure workstation. It controls access to any utility and prevents students from using unauthorized resources.

SublimeText3 English version
Recommended: Win version, supports code prompts!

PhpStorm Mac version
The latest (2018.2.1) professional PHP integrated development tool

