Home >Web Front-end >JS Tutorial >A brief analysis of how the Node.js+Winston library builds a simple logging function
A brief analysis of how the Node.js+Winston library builds a simple logging function
- 青灯夜游forward
- 2021-10-20 10:01:211860browse
This article will introduce to you how to use the Winston library to build a simple logging function in Node.js. I hope it will be helpful to everyone!

Winston is one of the powerful and flexible Node.js open source log libraries. In theory, Winston is a logger that can record all information. This is a highly intuitive tool that is easy to customize. The logic behind it can be adjusted by changing a few lines of code. It makes logging to persistent storage locations such as databases or files simple and easy. [Recommended learning: "nodejs Tutorial"]
Winston Provides the following functions:
- Centralized control of logging And time: Change the code in one place to
- Control where logs are sent: Save logs to multiple destinations synchronously (such as Elasticsearch, MongoDB, Postgres, etc.).
- Customized log format: With prefixes such as timestamp, color log level, JSON format, etc.
winston practice
The practice code will add the logging function to the projectpretender-service, and install the dependencies:
npm install winston --save
The next step is to initialize logger, since there is already a logger.js file in the project, create another winstonLogger.js here, the code is as follows:
const { createLogger, format, transports } = require("winston");

module.exports = createLogger({
    transports: [
        new transports.File({
            filename: "logs/server.log",
            level: "info",
            format: format.combine(
                format.timestamp({ format: "MMM-DD-YYYY HH:mm:ss" }),
                format.align(),
                format.printf(
                    (info) =>
                        `${info.level}: ${[info.timestamp]}: ${info.message}`
                )
            ),
        }),
    ],
});
Passed Call the createLogger function in the winston library to initialize the logger. In the transports object, you can provide a filename to store the logs in a file. By default, logging is unformatted and printed as a JSON string with two parameters, the log message and the level.
Next, modify the previous logger and add the winston logger. Please refer to the code for the specific modification method. Here is how to use it:
const winlogger = require("./winstonLogger");
winlogger.info("日志内容");
After executing the program, the corresponding log file can be generated in the root directory logs/server.log

You can also change the log level, Modify logger and only use winston in console.error mode:
records the database connection Error messages, the above information is for demonstration only.
Multiple transports
winston Allows setting multiple transport, change createLogger# in winstonLogger.js ## The function is as follows:
const { createLogger, format, transports } = require("winston");

module.exports = createLogger({
    format: format.combine(
        format.timestamp({ format: "MMM-DD-YYYY HH:mm:ss" }),
        format.align(),
        format.printf((i) => `${i.level}: ${[i.timestamp]}: ${i.message}`)
    ),
    transports: [
        new transports.File({
            filename: "logs/info.log",
            level: "info",
            format: format.combine(
                format.printf((i) =>
                    i.level === "info"
                        ? `${i.level}: ${i.timestamp} ${i.message}`
                        : ""
                )
            ),
        }),
        new transports.File({
            filename: "logs/error.log",
            level: "error",
        }),
    ],
});
Execute the program again, you will see the error.log and info.log files, because in logger info is not set in , so the content of info.log is empty, and the content of error.log is the same as above.
winston Allows the setting of multiple loggers. In actual projects, a logger can be created for each modulelogger , the following code creates a user logger and login verification recorder:
const { createLogger, format, transports } = require("winston");

const customFormat = format.combine(
    format.timestamp({ format: "MMM-DD-YYYY HH:mm:ss" }),
    format.align(),
    format.printf((i) => `${i.level}: ${[i.timestamp]}: ${i.message}`)
);

const globalLogger = createLogger({
    format: customFormat,
    transports: [
        new transports.File({
            filename: "logs/info.log",
            level: "info",
            format: format.combine(
                format.printf((i) =>
                    i.level === "info"
                        ? `${i.level}: ${i.timestamp} ${i.message}`
                        : ""
                )
            ),
        }),
        new transports.File({
            filename: "logs/error.log",
            level: "error",
        }),
    ],
});

const authLogger = createLogger({
    transports: [
        new transports.File({
            filename: "logs/authLog.log",
            format: customFormat,
        }),
    ],
});

module.exports = {
    globalLogger: globalLogger,
    authLogger: authLogger,
};
The modified code creates a global loggerglobalLogger and an authentication loggerauthLogger, corresponding modification logger.js:
const { globalLogger } = require("./winstonLogger");
globalLogger.error(message);
Daily rolling log fileAs mentioned in the best practices introduced earlier, according to the specific Split the log file according to the conditions, usually according to date and size, and set the number of days to save the log. In order to realize these requirements, it is necessary to install a Winston related dependency library.
npm install winston-daily-rotate-file --saveAfter the installation is complete, use the following code to update to the
winstonLogger.js file:
const { createLogger, format, transports } = require("winston");
require("winston-daily-rotate-file");

const customFormat = format.combine(
    format.timestamp({ format: "MMM-DD-YYYY HH:mm:ss" }),
    format.align(),
    format.printf((i) => `${i.level}: ${[i.timestamp]}: ${i.message}`)
);
const defaultOptions = {
    format: customFormat,
    datePattern: "YYYY-MM-DD",
    zippedArchive: true,
    maxSize: "20m",
    maxFiles: "14d",
};
const globalLogger = createLogger({
    format: customFormat,
    transports: [
        new transports.DailyRotateFile({
            filename: "logs/info-%DATE%.log",
            level: "info",
            ...defaultOptions,
        }),
        new transports.DailyRotateFile({
            filename: "logs/error-%DATE%.log",
            level: "error",
            ...defaultOptions,
        }),
    ],
});

const authLogger = createLogger({
    transports: [
        new transports.DailyRotateFile({
            filename: "logs/authLog-%DATE%.log",
            ...defaultOptions,
        }),
    ],
});

module.exports = {
    globalLogger: globalLogger,
    authLogger: authLogger,
};
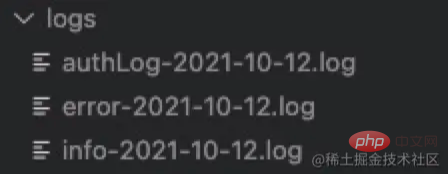
Run the project and you can see the log file:

Winston has been introduced. The above can basically meet the needs of daily projects.
For more programming-related knowledge, please visit: Programming Video! !
The above is the detailed content of A brief analysis of how the Node.js+Winston library builds a simple logging function. For more information, please follow other related articles on the PHP Chinese website!
Related articles
See more- How to run esm code directly in Nodejs or browser
- Explain how to communicate between two Node.js processes in different scenarios!
- An in-depth analysis of how to create child processes in Node.js
- Teach you step by step how to deploy a TS Node.js project correctly and quickly!
- Interesting explanation of callback functions in Node.js (with examples)


