Home >PHP Framework >ThinkPHP >Teach you step by step how to use ThinkPHP+phpExcel to import and export Excel data (Practice)
Teach you step by step how to use ThinkPHP+phpExcel to import and export Excel data (Practice)
- 青灯夜游forward
- 2021-09-15 19:59:187537browse
How to import Excel table with pictures in PHP? How to export pictures to Excel? How to define styles for exported Excel to make it more beautiful? The following article will help you solve it one by one. I hope it will be helpful to you!

Excel is a commonly used tool for data compilation and statistics. Usually in some information platforms, in order to better achieve paperless or go to the cloud, it is necessary to Migrating data from the office computer to the platform, or downloading the data on the platform for non-developers to use, will inevitably involve the import and export of data, and the data format must be Excel.
This article will combine the actual development needs and summarize the import and export of Excel during the development process. The development framework involved:
- ThinkPHP 3.2 [Related tutorial recommendations: thinkphp framework 】
- phpExcel
In terms of deployment, for data with many pictures in Excel, it is necessary to lengthen the timeout or running time and increase the upload size limit
Code repository: https://github.com/QuintionTang/crayon-thinkphp
Import
Import of data, you need to define the import before starting The format of the data must be strictly followed in order to correctly parse the data. The usual data import is just plain text data. This article will import data with pictures in Excel to cover the import needs as much as possible.
Template
The template is the basis for data import. A simple data template is defined below, with the following format:

There is text, there is For pictures, the first choice for importing data is to read Excel files, so it also needs to involve file upload. After the file is uploaded successfully, first detect the picture column and look at the code directly:
    public function excel_import(){
            $usedfor = empty($_GET['usedfor']) ? 'picture' : trim($_GET['usedfor']);
            $used_for = $usedfor;
            import('ORG.Net.UploadFile');
            $upload = $this->_upload_init(new \Org\Net\UploadFile(),$usedfor);// 实例化上传类
            $attach = array();
            $attachment = array();
            $attach["success"] = 0;
            $info = "";
            if(!$upload->upload()) { // 上传错误提示错误信息
                $upload_error = $upload->getErrorMsg();
                $attach["msg"] = $upload_error;
            }else{ // 上传成功 获取上传文件信息
                $info =  $upload->getUploadFileInfo();
            }
            // 上传成功后开始处理
            if(is_array($info)){
                $info = $info[0];
                // PHPExcel 类引入
                import("Org.Util.PHPExcel");
                import("Org.Util.PHPExcel.Reader.Excel5");
                import("Org.Util.PHPExcel.Reader.Excel2007");

                import("Org.Util.PHPExcel.IOFactory.php");

                $filePath = $info["savepath"] . $info["savename"];
                $input_file_type = \PHPExcel_IOFactory::identify($filePath);

                // 开始读取Excel数据
                $objExcel = new \PHPExcel();

                $objReader = \PHPExcel_IOFactory::createReader($input_file_type);
                // 加载Excel文件
                $objPHPExcel = $objReader->load($filePath);
                $objWorksheet = $objPHPExcel->getActiveSheet();
                $data = $objWorksheet->toArray();
                $attach_path = C('attach_path');
                $subpath = date('YmdHm', time());
                // Excel图片存储路径
                $imageFileRealPath = $attach_path . "excel_img/".$subpath ."/" ;
                mkdirs($imageFileRealPath);
                $i = 0;
                $rebarRows = array();
                // 下面开始处理图片
                foreach ($objWorksheet->getDrawingCollection() as $img) {
                    list($startColumn, $startRow) = \PHPExcel_Cell::coordinateFromString($img->getCoordinates()); //获取图片所在行和列
                    $imageFileName = uniqid();
                    try {
                        switch($img->getExtension()) {
                            case 'jpg':
                            case 'jpeg':
                                $imageFileName .= '.jpeg';
                                $source = imagecreatefromjpeg($img->getPath());
                                imagejpeg($source, $imageFileRealPath.$imageFileName,100);
                                break;
                            case 'gif':
                                $imageFileName .= '.gif';
                                $source = imagecreatefromgif($img->getPath());
                                $width = imagesx($source);
                                $height = imagesy($source);
                                if (function_exists("imagecreatetruecolor")) {
                                    $newImg = imagecreatetruecolor($width, $height);
                                    /* --- 用以处理缩放png图透明背景变黑色问题开始 --- */
                                    $color = imagecolorallocate($newImg,255,255,255);
                                    imagecolortransparent($newImg,$color);
                                    imagefill($newImg,0,0,$color);
                                    ImageCopyResampled($newImg, $source, 0, 0, 0, 0, $width, $height, $width, $height);
                                } else {
                                    $newImg = imagecreate($width, $height);
                                    ImageCopyResized($newImg, $source, 0, 0, 0, 0, $width, $height, $width, $height);
                                }
                                imagejpeg($source, $imageFileRealPath.$imageFileName,100);
                                break;
                            case 'png':
                                $imageFileName .= '.png';
                                $source = imagecreatefrompng($img->getPath());
                                $width = imagesx($source);
                                $height = imagesy($source);
                                if (function_exists("imagecreatetruecolor")) {
                                    $newImg = imagecreatetruecolor($width, $height);

                                    /* --- 用以处理缩放png图透明背景变黑色问题开始 --- */
                                    $color = imagecolorallocate($newImg,255,255,255);
                                    imagecolortransparent($newImg,$color);
                                    imagefill($newImg,0,0,$color);
                                    ImageCopyResampled($newImg, $source, 0, 0, 0, 0, $width, $height, $width, $height);
                                } else {
                                    $newImg = imagecreate($width, $height);
                                    ImageCopyResized($newImg, $source, 0, 0, 0, 0, $width, $height, $width, $height);
                                }
                                imagejpeg($newImg, $imageFileRealPath.$imageFileName,100);
                                break;
                        }
                        $startColumn = $this->ABC2decimal($startColumn);
                        $data[$startRow-1][$startColumn] = $imageFileRealPath . $imageFileName;
                    } catch (\Throwable $th) {
                        throw $th;
                    }

                }
                $rowsData = array();
                foreach ($data as $key => $rowData) {
                    $serial = safty_value($rowData[0],0,'intval'); // 第一列 序号
                    $title = safty_value($rowData[1],'','trim'); // 第二列 名称
                    $logo_save_path = safty_value($rowData[2],'','trim');  // logo图形保存路径
                    $remark = safty_value($rowData[3],'','trim');  //备注

                    if ($serial >0 && $logo_save_path!=="" && $title!==""){

                        array_push($rowsData,array(
                            "serial"=>$serial,
                            "title"=>$title,
                            "logo_path"=>$logo_save_path,
                            "remark"=>$remark
                        ));

                    }
                }
                // 将导入的数据生成文件缓存
                $this->update_excel_data($rowsData);
                $upload_result = array(
                    "count" => count($rowsData),
                    "success" => 1,
                    "state"=>"SUCCESS"
                );

            } else {
                $upload_result = array(
                    "message" => "上传失败!",
                    "success" => 0
                );
            }
            echo json_encode($upload_result);
    }
The following is the operation process, as follows:

Select the file to upload and import. After the export is successful, you will be prompted and the current list page will be refreshed.

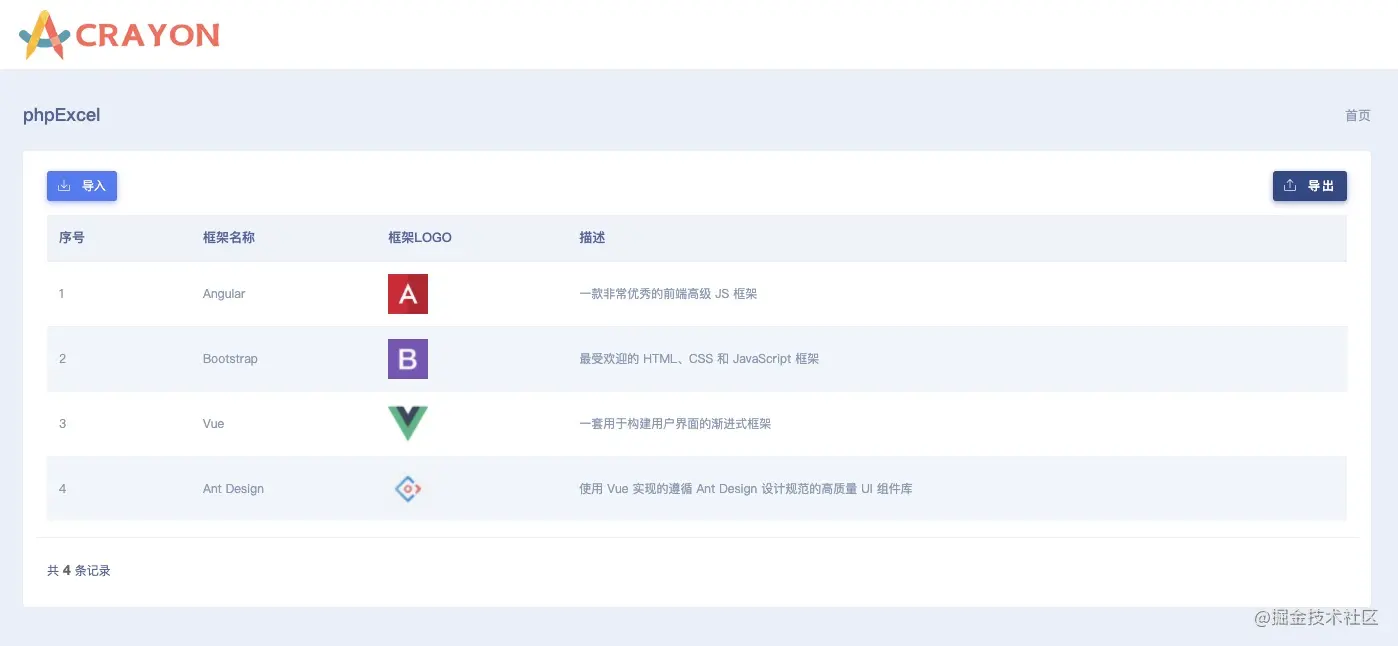
List after successful export:

At this point, the data import has been completed.
Insufficient, the imported Excel file is not processed after the data is imported, so it is recommended to delete it
Export
Now let’s export the above data and export the format definition of Excel. First, you need to define the header:
$first_cells = array(
    array("serial","序号"),
    array("title","名称"),
    array("logo","logo"),
    array("remark","描述")
);
The next step is to encapsulate the data according to the format of the header, as follows:
foreach ($excel_data as $key => $row_info) {
    array_push($first_rows_data,array(
        "serial"=>$row_info['serial'],
        "title"=>$row_info['title'],
        "logo"=>$row_info['logo_path'],
        "remark"=>$row_info['remark']
    ));
}
That’s it , the data encapsulation has been completed, the complete code is as follows:
    public function export(){
        $excel_detail = array(
            "author"=>"devpoint",
            "date"=>join(" ",$artifacts_full)
        );
        // 定义导出Excel表格信息
        $sheets = array(); // Excel表信息,一维代表一个数据表
        // 定义表头
        $first_cells = array(
            array("serial","序号"),
            array("title","名称"),
            array("logo","logo"),
            array("remark","描述")
        );
        // 为表增加数据
        $excel_data = get_file_cache("excel_data");
        $first_rows_data = array();
        // 数据与上面表头对应
        foreach ($excel_data as $key => $row_info) {
            array_push($first_rows_data,array(
                "serial"=>$row_info['serial'],
                "title"=>$row_info['title'],
                "logo"=>$row_info['logo_path'],
                "remark"=>$row_info['remark']
            ));
        }
        array_push($sheets,array(
            "title"=>"前端项目流行框架",
            "cells"=>$first_cells,
            "rows"=>$first_rows_data
        ));
        $xlsName  = "Excel数据导出";
        $xlsName = $xlsName  . date('YmdHis');
        $this->exportExcel($xlsName,$sheets,$excel_detail);
}FunctionexportExcelWrite the data to Excel, and define the style of the table, the complete code is as follows:
protected function exportExcel($expTitle,$xlsSheets,$detail){
import("Org.Util.PHPExcel");
import("Org.Util.PHPExcel.Writer.Excel5");
import("Org.Util.PHPExcel.IOFactory.php");
$fileName = $expTitle;
$objPHPExcel = new \PHPExcel();
$objPHPExcel->getDefaultStyle()->getFont()->setName('宋体');
// Excel列名称
$cellName = array(
'A','B','C','D','E','F','G','H','I','J','K','L','M','N','O','P','Q','R','S','T','U',
'V','W','X','Y','Z','AA','AB','AC','AD','AE','AF','AG','AH','AI','AJ','AK','AL','AM',
'AN','AO','AP','AQ','AR','AS','AT','AU','AV','AW','AX','AY','AZ'
);
foreach ($xlsSheets as $index => $sheet_info) {
$sheet_title = $sheet_info['title'];
if ($index>0){
// Excel默认已经建好的数据表,超过一张需要执行这里创建一个工作表
$newSheet = new \PHPExcel_Worksheet($objPHPExcel, $sheet_title); //创建一个工作表
$objPHPExcel->addSheet($newSheet);
} else {
$objPHPExcel->getActiveSheet($index)->setTitle($sheet_title);
}
$expCellName = $sheet_info['cells'];
$expTableData = $sheet_info['rows'];
$cellNum = count($expCellName);
$dataNum = count($expTableData);
$cellmerget = "";
$cellWidths = array();
$sheet_head_title = $sheet_title;
// 下面需要为每个工作表定义宽度
switch ($index) {
case 1: // 每张表的索引从 0 开始计算
$cellmerget = 'A1:E1';
$cellWidths=array(16,16,16,28,16);
break;
default:
$cellmerget = 'A1:D1';
$sheet_head_title = $sheet_title ;
$cellWidths=array(16,16,16,36);
break;
}
$activeSheet = $objPHPExcel->setActiveSheetIndex($index);
for($i=0;$i<$cellNum;$i++){
$currentCellName = $cellName[$i];
$activeSheet->getRowDimension(1)->setRowHeight(36);
$activeSheet->getColumnDimension($currentCellName)->setWidth($cellWidths[$i]);
$activeSheet->getStyle($currentCellName.'1')->getFont()->setSize(12)->setBold(true);
$activeSheet->getStyle($currentCellName.'1')->getAlignment()->setVertical(\PHPExcel_Style_Alignment::VERTICAL_CENTER);
}
$activeSheet->mergeCells($cellmerget);//合并单元格
$activeSheet->setCellValue('A1', $sheet_head_title);
$activeSheet->getStyle('A1')->getAlignment()->setHorizontal(\PHPExcel_Style_Alignment::HORIZONTAL_CENTER);
$activeSheet->getStyle('A1')->getFont()->setSize(20);
$activeSheet->getRowDimension(1)->setRowHeight(50);
$styleThinBlackBorderOutline = array(
'borders' => array (
'outline' => array (
'style' => \PHPExcel_Style_Border::BORDER_MEDIUM, //设置border样式
'color' => array ('argb' => 'FF9b9b9b'), //设置border颜色
),
),
);
for($i=0;$i<$cellNum;$i++){
$currentCellName = $cellName[$i];
$activeSheet->getRowDimension(2)->setRowHeight(36);
$activeSheet->getColumnDimension($currentCellName)->setWidth($cellWidths[$i]);
$activeSheet->setCellValue($currentCellName.'2', $expCellName[$i][1]);
$activeSheet->getStyle($currentCellName.'2')->getFill()->setFillType(\PHPExcel_Style_Fill::FILL_SOLID);
$activeSheet->getStyle($currentCellName.'2')->getFill()->getStartColor()->setARGB('FFc6efcd');
$activeSheet->getStyle($currentCellName.'2')->getFont()->setSize(12)->setBold(true);
$activeSheet->getStyle($currentCellName.'2')->applyFromArray($styleThinBlackBorderOutline);
$activeSheet->getStyle($currentCellName.'2')->getAlignment()->setVertical(\PHPExcel_Style_Alignment::VERTICAL_CENTER);
$activeSheet->freezePane($currentCellName.'3'); // 锁定表头,3 意味着锁定第3行上面的
}
switch ($index) {
case 1:
break;
default:
$start_row_index = 3; // 数据开始索引行
for($i1=0;$i1<$dataNum;$i1++){
$objPHPExcel->getActiveSheet()->getRowDimension($i1+3)->setRowHeight(60);
for($j1=0;$j1<$cellNum;$j1++){
if ($j1===2){
$logo_path = $expTableData[$i1][$expCellName[$j1][0]];
if ($logo_path!=="" && file_exists($logo_path)){
$objDrawing = new \PHPExcel_Worksheet_Drawing();
$objDrawing->setPath($logo_path);
$objDrawing->setHeight(60);
$objDrawing->setWidth(60);
$objDrawing->setOffsetX(5);
$objDrawing->setOffsetY(5);
$objDrawing->setCoordinates($cellName[$j1].($i1+$start_row_index));
$objDrawing->setWorksheet($objPHPExcel->getActiveSheet());
} else {
$objPHPExcel->getActiveSheet()->setCellValue($cellName[$j1].($i1+$start_row_index), "");
$objPHPExcel->getActiveSheet()->getStyle($cellName[$j1].($i1+$start_row_index))->getAlignment()->setVertical(\PHPExcel_Style_Alignment::VERTICAL_CENTER);
$objPHPExcel->getActiveSheet()->getStyle($cellName[$j1].($i1+$start_row_index))->getAlignment()->setHorizontal(\PHPExcel_Style_Alignment::HORIZONTAL_LEFT);
$objPHPExcel->getActiveSheet()->getStyle($cellName[$j1].($i1+$start_row_index))->getAlignment()->setWrapText(true);
}
} else {
$objPHPExcel->getActiveSheet()->setCellValue($cellName[$j1].($i1+$start_row_index), $expTableData[$i1][$expCellName[$j1][0]]);
$objPHPExcel->getActiveSheet()->getStyle($cellName[$j1].($i1+$start_row_index))->getAlignment()->setVertical(\PHPExcel_Style_Alignment::VERTICAL_CENTER);
$objPHPExcel->getActiveSheet()->getStyle($cellName[$j1].($i1+$start_row_index))->getAlignment()->setHorizontal(\PHPExcel_Style_Alignment::HORIZONTAL_LEFT);
$objPHPExcel->getActiveSheet()->getStyle($cellName[$j1].($i1+$start_row_index))->getAlignment()->setWrapText(true);
}
}
}
break;
}
}
$objPHPExcel->setActiveSheetIndex(0);
header('pragma:public');
header('Content-type:application/vnd.openxmlformats-officedocument.spreadsheetml.sheet;charset=utf-8;name="'.$fileName.'.xlsx"');
header("Content-Disposition:attachment;filename=$fileName.xlsx"); // attachment新窗口打印inline本窗口打印
$objWriter = \PHPExcel_IOFactory::createWriter($objPHPExcel, 'Excel2007');
$objWriter->save('php://output');
exit;
}Export The final format is as follows:

Lock header
Lock header is a common function in Excel , which can facilitate readers to check the data. Use phpExcel to set the header code as follows:
$activeSheet->freezePane($currentCellName.'3'); // 3 意味着锁定第3行上面的行数
Table border style
The code above to set the table border style is \PHPExcel_Style_Border::BORDER_MEDIUM. There are 14 configuration optional items in phpExcel.
PHPExcel_Style_Border::BORDER_NONE;
PHPExcel_Style_Border::BORDER_THIN;
PHPExcel_Style_Border::BORDER_MEDIUM;
PHPExcel_Style_Border::BORDER_DASHED;
PHPExcel_Style_Border::BORDER_DOTTED;
PHPExcel_Style_Border::BORDER_THICK;
PHPExcel_Style_Border::BORDER_DOUBLE;
PHPExcel_Style_Border::BORDER_HAIR;
PHPExcel_Style_Border::BORDER_MEDIUMDASHED;
PHPExcel_Style_Border::BORDER_DASHDOT;
PHPExcel_Style_Border::BORDER_MEDIUMDASHDOT;
PHPExcel_Style_Border::BORDER_DASHDOTDOT;
PHPExcel_Style_Border::BORDER_MEDIUMDASHDOTDOT;
PHPExcel_Style_Border::BORDER_SLANTDASHDOT;
1. The complete configuration item corresponding to BORDER_NONE
is PHPExcel_Style_Border::BORDER_NONE, the effect is as follows:

2. BORDER_THIN
\PHPExcel_Style_Border::BORDER_THIN

3. BORDER_MEDIUM
\PHPExcel_Style_Border::BORDER_MEDIUM

4. BORDER_DASHED
\PHPExcel_Style_Border::BORDER_DASHED

5. BORDER_DOTTED
\PHPExcel_Style_Border::BORDER_DOTTED

6. BORDER_THICK
\PHPExcel_Style_Border::BORDER_THICK

7. BORDER_DOUBLE
\PHPExcel_Style_Border::BORDER_DOUBLE

8. BORDER_HAIR
\PHPExcel_Style_Border::BORDER_HAIR

9. BORDER_MEDIUMDASHED
\PHPExcel_Style_Border::BORDER_MEDIUMDASHED

10. BORDER_DASHDOT
\PHPExcel_Style_Border::BORDER_DASHDOT

11. BORDER_MEDIUMDASHDOT
\PHPExcel_Style_Border::BORDER_MEDIUMDASHDOT
12. BORDER_DASHDOTDOT
\PHPExcel_Style_Border::BORDER_DASHDOTDOT
13. BORDER_MEDIUMDASHDOTDOT
\PHPExcel_Style_Border::BORDER_MEDIUMDASHDOTDOT
14. BORDER_SLANTDASHDOT
\PHPExcel_Style_Border::BORDER_SLANTDASHDOT
部署
在部署上,通常的架构是 nginx + php-fpm,对于Excel中图片比较多的数据导入需要设置加大上传文件的限制和超时时间。
在文件上传上,通常会出现 413 request Entity too Large 错误,解决的办法是在 nginx 配置中增加以下配置:
client_max_body_size 2048m;
相应的 PHP 配置也需要修改,需要修改 php.ini :
upload_max_filesize = 2048M
post_max_size = 2048M
Excel数据导入,通常会触发504错误,这种情况一般是执行时间太短,涉及的 nginx 配置:
fastcgi_connect_timeout 600;
php-fpm 中的 www.conf
request_terminate_timeout = 1800
环境问题个人觉得是后台开发经常发生的,最佳的方式是实际运行出一个最佳的配置,将其制作成 docker 镜像,这样可以确保环境迁移或者其他场合需要,可以快速完成环境配置,而且不容易出问题。
原文地址:https://juejin.cn/post/6982953271933550628
作者:天行无忌
推荐学习:《PHP视频教程》
The above is the detailed content of Teach you step by step how to use ThinkPHP+phpExcel to import and export Excel data (Practice). For more information, please follow other related articles on the PHP Chinese website!
Related articles
See more- ThinkPHP has three ways to collect form data
- An article explaining the definition and use of thinkphp controller in detail
- Clever use of .htaccess files in thinkphp
- The process of integrating phpsocketio with thinkphp5 was a pitfall that I personally stepped on!
- What is the difference between thinkphp5 and laravel


)
)
)
)