Home >Database >Mysql Tutorial >A brief discussion on how to set up master-slave replication in Mysql5.7?
A brief discussion on how to set up master-slave replication in Mysql5.7?
- 青灯夜游forward
- 2021-09-06 18:58:382459browse
How to set up master-slave replication in Mysql5.7? The following article will take you through the steps to build master-slave replication in Mysql5.7. I hope it will be helpful to you!

1. Overview
Master-slave replication can realize database backup and read-write separation:
In order to avoid service unavailability and ensure the security and reliability of data, we need to deploy at least two or more servers to store database data, that is, we need to copy the data and deploy it on multiple servers. On different servers, even if one server fails, the other servers can still continue to provide services.
MySQL provides a master-slave replication function to improve service availability and data security and reliability.Master-slave replication means that the server is divided into a master server and a slave server. The master server is responsible for reading and writing, and the slave server is only responsible for reading. Master-slave replication is also called master/slave. The master is the master and the slave is the slave, but it is not mandatory. That is to say, the slave can also write, and the master can also read, but generally we don't do this. [Related recommendations: mysql video tutorial]
2. Master-slave replication architecture
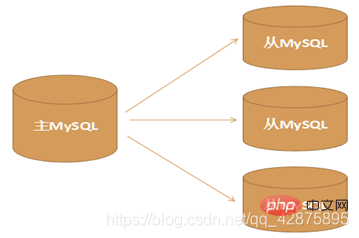
One master and multiple slaves architecture: 
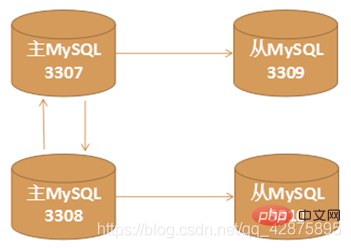
Multi-master and multi-slave architecture: 
Master-slave replication principle:
- When the data on the master server changes, the changes will be written to the binary event log file
- The salve slave server will detect the binary log on the master server within a certain time interval. , detect whether it has changed. If it is detected that the binary event log of the master server has changed, start an I/O Thread to request the master binary event log
- At the same time, the master server provides Thread starts a dump Thread to send binary event logs to it
- slave The slave server saves the received binary event logs to its own local relay log file
- salve The slave server saves Start SQL Thread to read the binary log from the relay log and replay it locally to make the data consistent with the main server;
- Finally, the I/O Thread and SQL Thread will enter the sleep state and wait for the next time they are awakened.
3. One master and multiple slaves build
Build environment: 1. Linux version CentOS release 6.9 (Final) 2. mysql-5.7.26-linux-glibc2.12-x86_64.tar.gzDownload address
1. Unzip mysql-5.7.26-linux- glibc2.12-x86_64.tar.gz
#/usr/local下解压
tar xzvf mysql-5.7.26-linux-glibc2.12-x86_64.tar.gz
#重命名文件
mv mysql-5.7.26-linux-glibc2.12-x86_64.tar.gz mysql
2. Create a multi-instance data directory
cd /usr/local/mysql
mkdir data
cd data
#主
mkdir 3306
#从
mkdir 3307

3. Database initialization
#mysql 安装bin目录下执行
#initialize-insecure 表示不生成MySQL数据库root用户的随机密码,即root密码为空

#初始化3306
./mysqld --initialize-insecure --basedir=/usr/local/mysql --datadir=/usr/local/mysql/data/3306 --user=mysql
#初始化3307
./mysqld --initialize-insecure --basedir=/usr/local/mysql --datadir=/usr/local/mysql/data/3307 --user=mysql
If an error occurs, executeyum install libaio-devel.x86_64yum -y install numactl
4. Create the configuration file my.cnf for each database
Note: 1. It is recommended to create the file under Linux to prevent windows from interacting with Linux encoding is inconsistent2. The port number needs to be modified for different configurations3.Put the modified my.cnf into the 3306 and 3307 folders respectively
[client]
port        = 3306
socket      = /usr/local/mysql/data/3306/mysql.sock
default-character-set=utf8

[mysqld]
port    = 3306
socket  = /usr/local/mysql/data/3306/mysql.sock
datadir = /usr/local/mysql/data/3306
log-error = /usr/local/mysql/data/3306/error.log
pid-file = /usr/local/mysql/data/3306/mysql.pid

character-set-server=utf8
lower_case_table_names=1
autocommit = 1

log-bin=mysql-bin
server-id=3306
5. Multi-instance startupSwitch to the /usr/local/mysql-5.7.24/bin directory and use the msyqld_safe command to specify the configuration file And start the MySQL service:
#其中 --defaults-file 是指定配置文件,& 符合表示后台启动
./mysqld_safe --defaults-file=/usr/local/mysql/data/3306/my.cnf &
./mysqld_safe --defaults-file=/usr/local/mysql/data/3307/my.cnf &
6. Database initialization configurationConfigure in each instance respectively, such as 3306:
#客户端连接
./mysql -uroot -p -P3306 -h127.0.0.1
#修改Mysql密码
alter user 'root'@'localhost' identified by 'root';
#授权远程访问(这样远程客户端才能访问)
grant all privileges on *.* to root@'%' identified by 'root';
#刷新配置
flush privileges;
Client connection test
7. Database unique id configuration
1. Make sure each instance starts normally and correctly Then perform master-slave configuration2. Close the instance and add the following configuration to the my.cnf file of each instance
#/usr/local/mysql/bin 关闭实例
./mysqladmin -uroot -p -P3307 -h127.0.0.1 shutdown
./mysqladmin -uroot -p -P3306 -h127.0.0.1 shutdown

#新加的配置
log-bin=mysql-bin   	#表示启用二进制日志
server-id=3307 		#表示server编号,编号要唯一 建议和端口保持一致
Start each instance after completion
./mysqld_safe --defaults-file=/usr/local/mysql/data/3306/my.cnf &

./mysqld_safe --defaults-file=/usr/local/mysql/data/3307/my.cnf &
7. Host settings1. Create an account for replicating data on the main server and authorize it
#在/usr/local/mysql/bin目录下执行
 ./mysql -uroot -p -P3306 -h127.0.0.1
 grant replication slave on *.* to 'copy'@'%' identified by 'root';
2. Check the main server status
# mysql主服务器默认初始值:
#			File:mysql-bin.000001
#			Position:154

show master status;
3. If the main service status is not the initial status, you need to reset the status
reset master;
7. From Machine settings
1.You need to log in to the slave client of 3306|3307|3308
#在/usr/local/mysql/bin目录下执行  多台从机‘|’分隔
./mysql -uroot -p -P3308|3309|3310 -h127.0.0.1
2. Check the slave machine status
#初始状态:Empty set
show slave status;
3. If it is not the initial state, reset it
stop slave; 	#停止复制,相当于终止从服务器上的IO和SQL线程
reset slave;
4. Set the slave machine and set the host configuration
change master to
master_host='主机ip',master_user='copy',
master_port=主机端口,master_password='连接主机密码',
master_log_file='mysql-bin.000001',master_log_pos=154;
5.执行 开始复制命令
start slave;
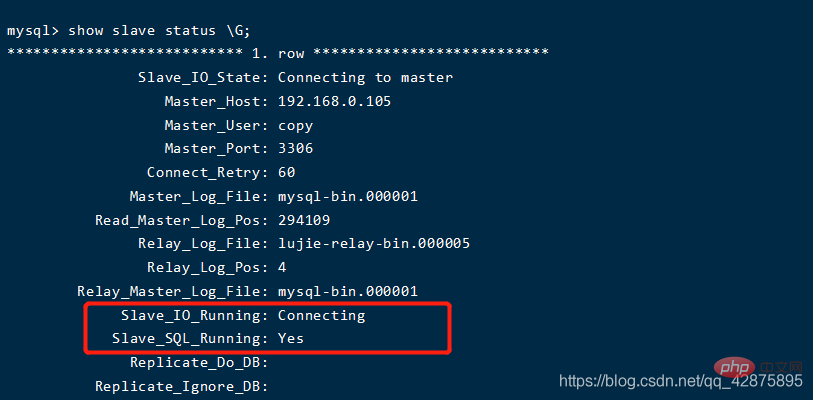
6.查看从机状态
show slave status \G;

7.测试主从复制
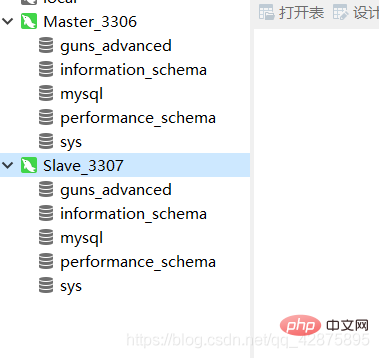
在主数据库中进行创建表,从库同步就算搭建成功了!
若你在从库进行写操作,则从服务器不再同步主库数据,在从库中执行此命令即可解决!
stop slave;
set global sql_slave_skip_counter =1;
start slave;
show slave status\G;
若主从复制速度较慢的话,执行此命令
 slave-parallel-type=LOGICAL_CLOCK
 slave-parallel-workers=16
 master_info_repository=TABLE
 relay_log_info_repository=TABLE
 relay_log_recovery=ON
更多编程相关知识,请访问:编程入门!!
The above is the detailed content of A brief discussion on how to set up master-slave replication in Mysql5.7?. For more information, please follow other related articles on the PHP Chinese website!

