Home >Web Front-end >JS Tutorial >How to install and use ESLint in Node.js projects
How to install and use ESLint in Node.js projects
- 青灯夜游forward
- 2021-08-10 09:51:583313browse
Node.jsHow to install and use ESLint in the project? This article will introduce you to how to use ESLint in Node.js applications.

[Recommended study: "nodejs Tutorial"]
ESLint is an open source JavaScript linting utility. , it can help us standardize the code and overcome some unexpected errors made by developers, because JavaScript is a weakly typed language.
There are many canonicalization options in the Javascript community, such as JSHint and JSCS, for code linting, including ESLint, which we are going to talk about today.
ESLint is designed to make all rules fully pluggable. This is one of the main reasons for it. It allows developers to create their own linting rules. ESLint Official Guide Each rule provided in the ESLint Official Guide is an independent rule, and developers can decide at any time whether to use a specific rule.
Installation
For local installation in the project directory:
$ npm i eslint -D
For global installation in the working system:
$ npm i eslint -g
Installed After that, we can use ESLint through the eslint command in the terminal.
Configuration
The simplest configuration method is to set up a .eslintrc JSON file, which can describe all linting rules. An example of
.eslintrc:
{
  "env": {
    "node": true,
    "browser": true
  },
  "globals": {
    "exampleGlobalVariable": true
  },
  "rules": {
    "no-console": 0,
    "space-infix-ops": "error",
    "quotes": ["error", "single", {
      "avoidEscape": true,
      "allowTemplateLiterals": true
    }],
    "space-before-blocks": ["error", "always"],
    "semi": ["error", "never"]
  },
  "plugins": []
}
Main fields:
-
parse— Specify the parser -
parserOptions— Specify the parser options -
env— Specify the running environment of the script -
root— Whentrue, stop looking upwards for configuration files in the parent directory -
globals— Additional global variables that the script accesses during execution -
rules— Add your custom rules here
If eslint is installed globally, we can also generate the configuration file using the following command:
$ eslint --init
In other cases, if you have installed it locally into your project, you will need to enter in the terminal:
$ ./node_modules/.bin/eslint --init
In both cases, you will be prompted to generate . A basic set of rules for eslintrc files.

Example of the file generated after the above prompt:
{
  "env": {
    "browser": true,
    "commonjs": true,
    "es2021": true
  },
  "extends": "eslint:recommended",
  "parserOptions": {
    "ecmaVersion": 12
  },
  "rules": {
    "indent": [
      "error",
      "tab"
    ],
    "linebreak-style": [
      "error",
      "windows"
    ],
    "quotes": [
      "error",
      "single"
    ],
    "semi": [
      "error",
      "never"
    ]
  }
}
For configuration details, please read:
http: //eslint.org/docs/user-guide/configuring
In order to facilitate operation, we can enter the project's package.json in the scripts field Add the following script inside:
{
  "scripts" : {
    "lint": "eslint **/*.js",
    "lint-html": "eslint **/*.js -f html -o ./reports/lint-results.html",
    "lint-fix": "eslint --fix **/*.js"
  }
}
We apply this rule to the following file:
var a = 1;
console.log(1);
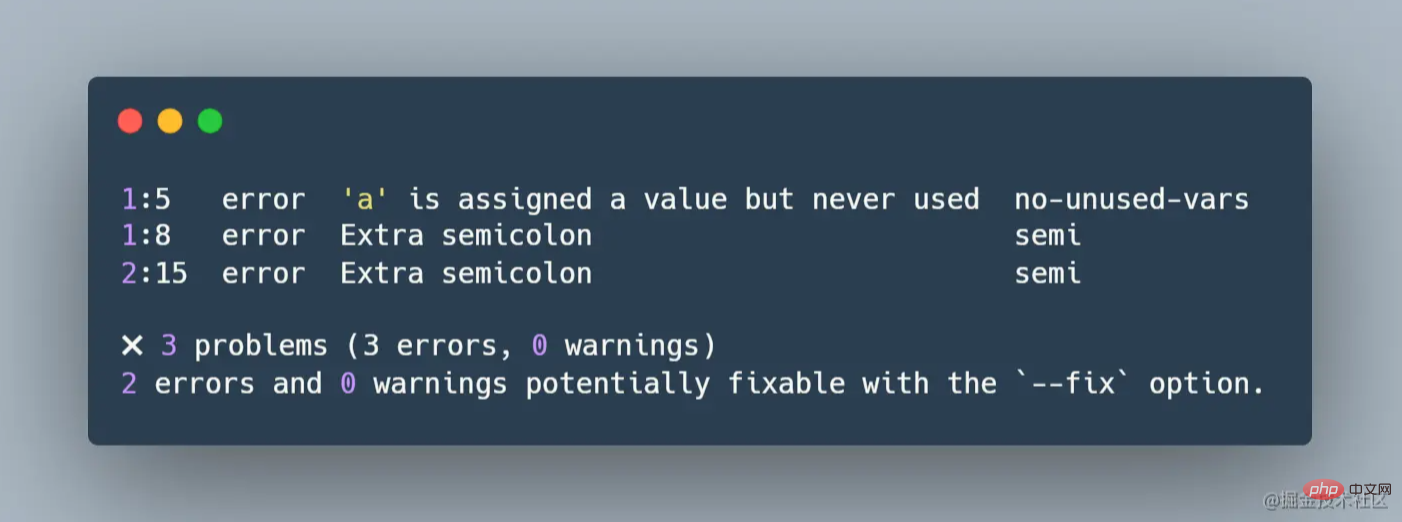
After executing npm run lint, the following information will appear:

ESLint The prompt is already obvious: 3 errors. The extra semicolon at the end of the first and second lines is wrong, a is assigned but never used.
And prompts to use the --fix option to fix errors and warnings. There are 2 errors that can be repaired. Now, use npm run lint-fix to fix it. a is up to you to change it manually.
You can also run the npm run lint-html command to write the check results to a web page file.
Configuration file priority
If you follow the above steps step by step, you will probably already know, ESLint supports several formats of configuration files.
There is a problem now, If there are multiple ESLint files in the same directory, how will they be executed and what is their priority?
ESLint Source code gives our answer, and its priority configuration is as follows:
const configFilenames = [
  ".eslintrc.js",
  ".eslintrc.yaml",
  ".eslintrc.yml",
  ".eslintrc.json",
  ".eslintrc",
  "package.json"
]
.eslintrc.js > . eslintrc.yaml > .eslintrc.yml > .eslintrc.json > .eslintrc > package.json
##Rules
ESLint The rules in are added separately. No rules are enforced by default. You must specify the rule explicitly before it is enabled for the linting process.Open the official documentation to find the complete list of rules: http://eslint.org/docs/rules/
在决定要包含哪些规则之后,您必须设置这些错误级别。每个错误级别可定义如下:
-
0— 关闭规则,相当于off -
1— 打开规则作为警告,相当于warn -
2— 打开规则作为错误,相当于error
错误和警告之间的区别在于 eslint 完成时将具有的退出代码。如果发现任何错误,eslint 将以 1 退出代码退出,否则将以 0 退出。
如果您在生成步骤中进行 lint,这允许您控制哪些规则应破坏您的生成,哪些规则应视为警告。
环境
您正在编写的代码可能适用于特定环境,例如,您可能正在使用 Express 框架在 Node.js 应用程序中编写 REST API,并且该应用程序的前端将在 Vue/React 中构建。
两个不同的项目、两个不同的环境,它们都可以在一个文件中具有单独的 eslint 配置,即使客户端和服务器位于一个被视为项目根目录的项目目录下。
它是如何完成的?
通过在 .eslintrc 的 "env" 部分将环境 id 设置为 true。
ESLint CLI
ESLint 附带一个命令行界面(CLI),用于 lint 文件或目录。
$ eslint index.js
前面示例中我们已经看到,运行命令后生成的输出将按文件分组,并将指定 line:column 警告/错误、错误原因以及每个故障的规则名称。
将 ESLint 与您喜欢的编码风格结合使用
ESLint 个人并不提倡任何编码风格。您可以设置 .eslintrc 文件以使用您喜欢的样式规则强制编码样式。
您还可以将 ESLint 与样式指南(如 Airbnb、JavaScript 标准风格)一起使用。
你还必须使用额外的插件,例如:
- Airbnb 的插件
eslint-config-airbnb-base。 - JavaScript 标准风格 eslint-config-standard
- 一些流行库的插件:Vue | React
团队规范
AlloyTeam 给出的 React/Vue/TypeScript 项目的渐进式 ESLint 配置(eslint-config-alloy),以下贴出 React 的一小部分配置:
module.exports = {
parserOptions: {
babelOptions: {
presets: ['@babel/preset-react'],
},
},
plugins: ['react'],
rules: {
/**
* 布尔值类型的 propTypes 的 name 必须为 is 或 has 开头
* @reason 类型相关的约束交给 TypeScript
*/
'react/boolean-prop-naming': 'off',
/**
* <button> 必须有 type 属性
*/
'react/button-has-type': 'off',
/**
* 一个 defaultProps 必须有对应的 propTypes
* @reason 类型相关的约束交给 TypeScript
*/
'react/default-props-match-prop-types': 'off',
/**
* props, state, context 必须用解构赋值
*/
'react/destructuring-assignment': 'off',
/**
* 组件必须有 displayName 属性
* @reason 不强制要求写 displayName
*/
'react/display-name': 'off',
// ...
}
}您可以参考该团队的一些配置,应用到自己的项目中。
更多编程相关知识,请访问:编程入门!!
The above is the detailed content of How to install and use ESLint in Node.js projects. For more information, please follow other related articles on the PHP Chinese website!
Related articles
See more- Learn more about how Node.js and Electron communicate between processes
- Understand the event loop in node.js in one article
- What is a Buffer object in node.js? What is the usage scenario?
- Is Node.js really single-threaded? How to communicate between processes?
- Teach you step by step how to optimize docker images in Node.js projects


