Solution: First open the software, click the "Picture" option on the left, select "Picture" - "PNG"; then click "Add File" to add the damaged JPG picture; then select " "Output Configuration" to set it; finally click "OK" and click "Start Conversion" in the new pop-up page.

The operating environment of this tutorial: Windows 7 system, Format Factory version 4.9.5, Dell G3 computer.
Open Format Factory, click the image option on the left

Click the icon->PNG to change the format of the damaged image

Click Add File to add the damaged JPG image

After the file is displayed in the file list, you can click Output Configuration Set it

#You can also install the default option, click OK directly, jump to the interface and click to start the conversion, and view the output image after completion

For more computer-related knowledge, please visit the FAQ column!
The above is the detailed content of What should I do if the jpg image is damaged and cannot be displayed?. For more information, please follow other related articles on the PHP Chinese website!
 如何在 Windows 11 上将 PNG 转换为 JPGMay 12, 2023 pm 03:55 PM
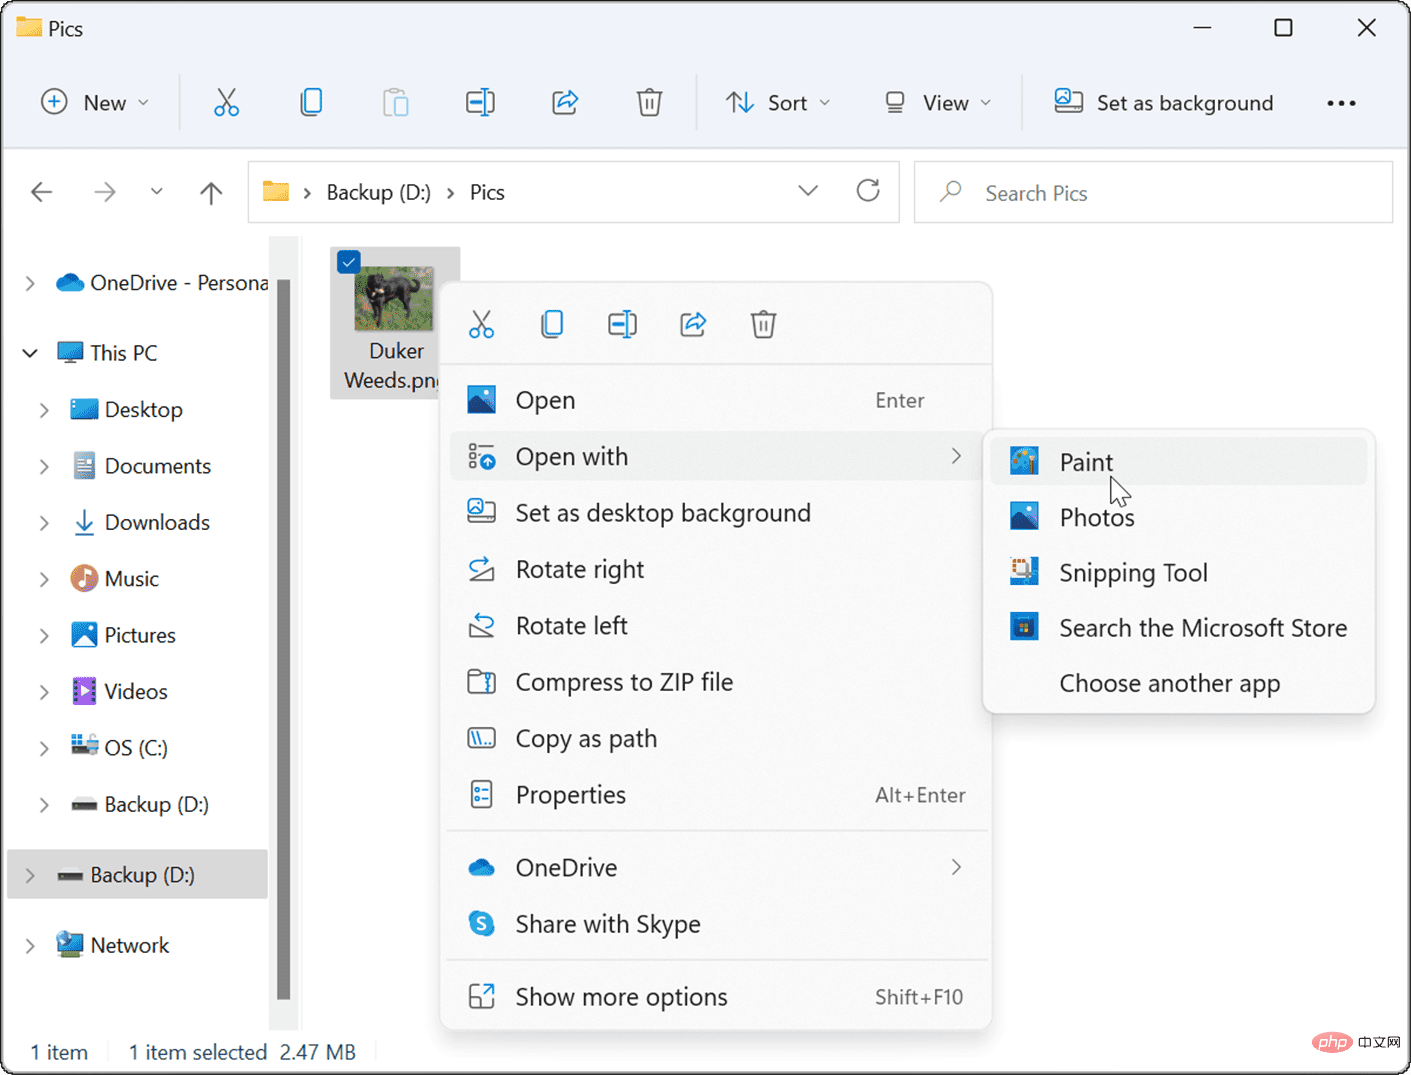
如何在Windows11上将PNG转换为JPG在Windows10和11上,您可以使用Microsoft内置的Paint应用程序快速转换图像文件。要在Windows11上将PNG图像转换为JPG,请使用以下步骤:打开文件资源管理器并导航到要转换的PNG图像。右键单击图像并从菜单中选择打开方式>绘制。您的照片或图像会在“画图”应用中打开。注意屏幕底部的文件大小。要将文件从PNG转换为JPG,请单击文件并从菜单中选择另存为>JPEG图片。当文件资源
 修复:无法在 Windows 11 中打开 JPG 文件Apr 17, 2023 pm 12:37 PM
JPG是与PNG一起最流行的图像文件格式之一。这是一种有损压缩图像格式,非常适合网站。因此,许多用户将图像保存或转换为JPG格式。但是,一些用户表示他们在使用该平台的默认照片应用程序在Windows11中打开JPG文件时遇到了问题。因此,这些用户无法在Windows11中打开、查看和编辑JPG格式的图像。这是一位用户在Microsoft论坛帖子中所说的:双击JPG文件以在MicrosoftPhoto中打开时,我收到错误找不到指定的程序。这是在大约一个月前购买的一台新
 聊聊怎么用php轻松实现WebP转JPG的功能Mar 24, 2023 pm 02:57 PM
近年来,随着Web技术的不断发展,WebP这种新型图片格式逐渐走进了程序员和Web开发者的视野。WebP优点不容忽视:文件体积小、质量高、浏览器支持度高等。但是在某些情况下,我们可能需要把WebP图片转换成一些其他格式的图片,比如JPG。那么,如何用PHP实现WebP转换为JPG的功能呢?
 jpg是什么格式文件Jun 21, 2023 am 11:36 AM
JPG是JPEG格式文件,JPEG格式是最常用的图像文件格式,后缀名为“.jpg”或“.jpeg”。JPG的格式标准分为JPEG、渐进式JPEG、JPEG2000等三种,一般用于连续色调静态图像压缩的一种标准,是有损压缩,将数据图像压缩在小存储空间的同时,造成图像数据的损伤,如果用户对图像质量要求较高的话,建议舍弃这种图像文件格式,特别是对于一些高清图片。
 jpg是什么意思Nov 28, 2022 am 09:46 AM
JPG一般是指JPEG格式,是一种使用有损压缩方法保存的图像格式,是用于连续色调静态图像压缩的一种标准,其文件后缀名为“.jpg”或“.jpeg”。JPG文件主要是采用预测编码(DPCM)、离散余弦变换(DCT)以及熵编码的联合编码方式,以去除冗余的图像和彩色数据;它能够将图像压缩在很小的储存空间,但一定程度上会造成图像数据的损伤。
 svg怎么转jpg格式Nov 24, 2023 am 09:50 AM
svg可以通过使用图像处理软件、使用在线转换工具和使用Python图像处理库的方法来转jpg格式。详细介绍:1、图像处理软件包括Adobe Illustrator、Inkscape和GIMP;2、在线转换工具包括CloudConvert、Zamzar、Online Convert等;3、Python图像处理库等等。
 如何重命名文件夹内所有文件的扩展名,包括子文件夹Apr 14, 2023 pm 12:22 PM
假设您需要将文件的扩展名从一个扩展名重命名为另一个扩展名,例如jpg到png。这很简单,当然!但是,如果您有多个需要更改扩展名的文件怎么办?或者更糟糕的是,如果这些多个文件也位于多个文件夹和子文件夹中,在一个文件夹中怎么办?好吧,对于一个普通人来说,这可能是一场噩梦。但对于一个极客来说,绝对不是。现在的问题是,你是不是极客。好吧,有了 极客专页的帮助,您绝对是!在本文中,我们通过批处理脚本的方法解释了如何轻松地重命名文件夹内所有文件的扩展名,包括您选择的子文件夹从一个扩展名到另一个扩展名。注意:
 png和jpg有什么区别Feb 23, 2024 pm 04:21 PM
png和jpg是两种常见的图片文件格式,它们在图片的压缩、质量和透明度方面有所不同。首先,我们来看看它们的压缩方式。JPG(也叫JPEG)采用有损压缩算法,通过减少图片中的细节和颜色信息来减小文件大小。这种压缩方式可以显著地减小文件的大小,但会损失一部分细节,尤其是在高压缩比时。而PNG(也叫可移植网络图形)采用无损压缩算法,它不会丢失任何图像细节,以更高的

Hot AI Tools

Undresser.AI Undress
AI-powered app for creating realistic nude photos

AI Clothes Remover
Online AI tool for removing clothes from photos.

Undress AI Tool
Undress images for free

Clothoff.io
AI clothes remover

AI Hentai Generator
Generate AI Hentai for free.

Hot Article

Hot Tools

Atom editor mac version download
The most popular open source editor

DVWA
Damn Vulnerable Web App (DVWA) is a PHP/MySQL web application that is very vulnerable. Its main goals are to be an aid for security professionals to test their skills and tools in a legal environment, to help web developers better understand the process of securing web applications, and to help teachers/students teach/learn in a classroom environment Web application security. The goal of DVWA is to practice some of the most common web vulnerabilities through a simple and straightforward interface, with varying degrees of difficulty. Please note that this software

VSCode Windows 64-bit Download
A free and powerful IDE editor launched by Microsoft

SecLists
SecLists is the ultimate security tester's companion. It is a collection of various types of lists that are frequently used during security assessments, all in one place. SecLists helps make security testing more efficient and productive by conveniently providing all the lists a security tester might need. List types include usernames, passwords, URLs, fuzzing payloads, sensitive data patterns, web shells, and more. The tester can simply pull this repository onto a new test machine and he will have access to every type of list he needs.

SAP NetWeaver Server Adapter for Eclipse
Integrate Eclipse with SAP NetWeaver application server.


