


How to completely delete the wps network disk: 1. Find and right-click the wps icon on the right side of the computer taskbar; 2. Find "Settings" in the displayed menu bar and open it; 3. In "Cloud Service" "Settings", click the "wps network disk" tab; 4. Find and turn off the button for the "Show network disk entry on my computer" option.

The operating environment of this tutorial: windows7 system, WPS Office11.1.0.10314 version, Dell G3 computer.
After downloading wps, many friends will be troubled. There is always wps network disk in my computer.

How to put wps network disk in Delete it from my computer? Let me introduce the method below.
First we find our wps icon in the lower right corner of the desktop.
# After clicking, we right-click, find the settings in the displayed menu bar, and open it.

In "Cloud Service Settings", click the "wps network disk" tab
"In my "Computer displays network disk entrance" and remove the selected area.
When entering my computer, the wps network disk disappeared.

For more related knowledge, please visit the FAQ column!
The above is the detailed content of How to completely delete wps network disk. For more information, please follow other related articles on the PHP Chinese website!

 deepseek web version official entranceMar 12, 2025 pm 01:42 PM
The domestic AI dark horse DeepSeek has risen strongly, shocking the global AI industry! This Chinese artificial intelligence company, which has only been established for a year and a half, has won wide praise from global users for its free and open source mockups, DeepSeek-V3 and DeepSeek-R1. DeepSeek-R1 is now fully launched, with performance comparable to the official version of OpenAIo1! You can experience its powerful functions on the web page, APP and API interface. Download method: Supports iOS and Android systems, users can download it through the app store; the web version has also been officially opened! DeepSeek web version official entrance: ht
 In-depth search deepseek official website entranceMar 12, 2025 pm 01:33 PM
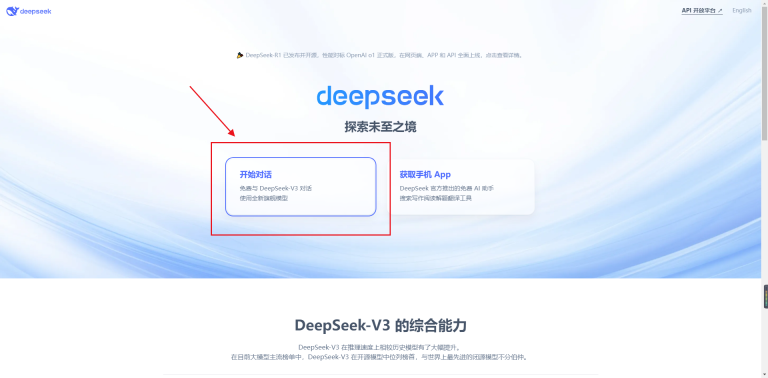
At the beginning of 2025, domestic AI "deepseek" made a stunning debut! This free and open source AI model has a performance comparable to the official version of OpenAI's o1, and has been fully launched on the web side, APP and API, supporting multi-terminal use of iOS, Android and web versions. In-depth search of deepseek official website and usage guide: official website address: https://www.deepseek.com/Using steps for web version: Click the link above to enter deepseek official website. Click the "Start Conversation" button on the homepage. For the first use, you need to log in with your mobile phone verification code. After logging in, you can enter the dialogue interface. deepseek is powerful, can write code, read file, and create code
 How to solve the problem of busy servers for deepseekMar 12, 2025 pm 01:39 PM
DeepSeek: How to deal with the popular AI that is congested with servers? As a hot AI in 2025, DeepSeek is free and open source and has a performance comparable to the official version of OpenAIo1, which shows its popularity. However, high concurrency also brings the problem of server busyness. This article will analyze the reasons and provide coping strategies. DeepSeek web version entrance: https://www.deepseek.com/DeepSeek server busy reason: High concurrent access: DeepSeek's free and powerful features attract a large number of users to use at the same time, resulting in excessive server load. Cyber Attack: It is reported that DeepSeek has an impact on the US financial industry.

Hot AI Tools

Undresser.AI Undress
AI-powered app for creating realistic nude photos

AI Clothes Remover
Online AI tool for removing clothes from photos.

Undress AI Tool
Undress images for free

Clothoff.io
AI clothes remover

AI Hentai Generator
Generate AI Hentai for free.

Hot Article
Hot Tools

SublimeText3 English version
Recommended: Win version, supports code prompts!

SAP NetWeaver Server Adapter for Eclipse
Integrate Eclipse with SAP NetWeaver application server.

WebStorm Mac version
Useful JavaScript development tools

SublimeText3 Linux new version
SublimeText3 Linux latest version

MinGW - Minimalist GNU for Windows
This project is in the process of being migrated to osdn.net/projects/mingw, you can continue to follow us there. MinGW: A native Windows port of the GNU Compiler Collection (GCC), freely distributable import libraries and header files for building native Windows applications; includes extensions to the MSVC runtime to support C99 functionality. All MinGW software can run on 64-bit Windows platforms.

