Home >Web Front-end >JS Tutorial >A deep dive into lifecycle hooks in Angular components
A deep dive into lifecycle hooks in Angular components
- 青灯夜游Original
- 2021-04-26 10:48:531987browse
This article will take you through Angular component life cycle hooks. It has certain reference value. Friends in need can refer to it. I hope it will be helpful to everyone.

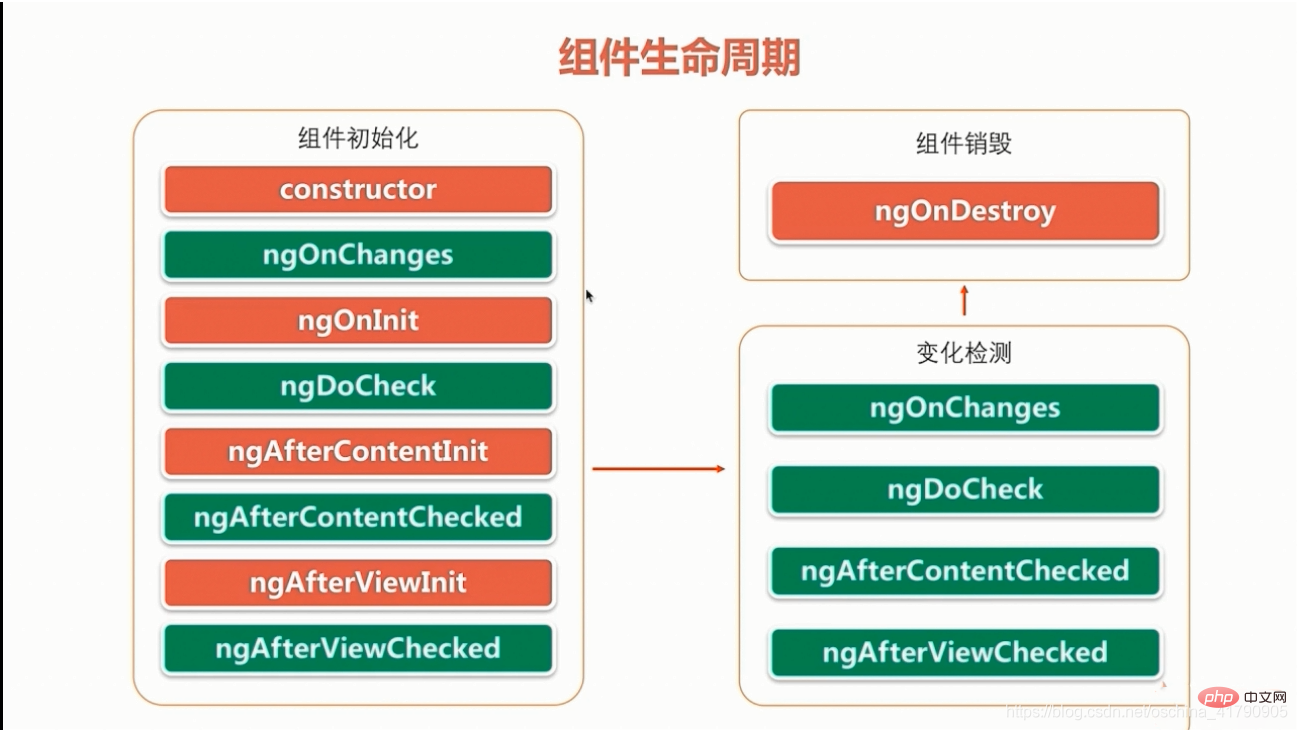
Angular component life cycle hook

Among them, the life marked in red The cycle hook is only called once, the green part will be called repeatedly, and the execution order is from top to bottom.
ngOnChanges
Response when Angular sets the data binding input property to change, only works on the input immutable object . To put it simply, ngOnChanges is called when the attributes of the @Input tag change, and ngOnChanges is not called when the attributes of non-@Input tags change.
ngOnInit
Called after the first ngOnChanges execution, and is only called once. It is mainly used to perform other initialization operations of the component or obtain the attribute values input by the component.
ngDoCheck
When the input attribute of the component changes, the ngDoCheck method will be triggered. We can use this method to customize our detection logic. [Related recommendations: "angular tutorial"]
Note: Do not do very complicated things in ngDoCheck, and define the check position more accurately when using it, otherwise Can cause performance issues. Because any change, such as a mouse click event or a keyboard input event, will trigger ngDoCheck.
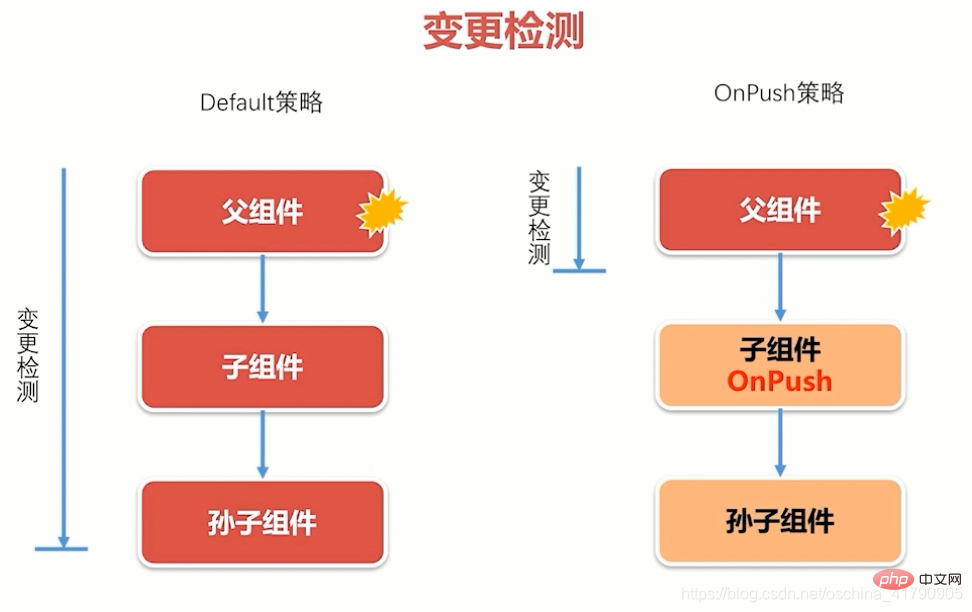
Change Detection

##Change Detection Strategy
- Default Strategy
When any component in the component tree changes, the entire component tree will be detected.
- onPush strategy
When a component changes, if its child components use the onPush strategy, it will not be detected. Detection will only occur if the @Input input property of the child component changes.
ngAfterViewInit and ngAfterViewChecked
ngAfterViewInit and ngAfterViewChecked hooks will be installed after all the contents of the component's template have been assembled and the component's template has been presented to the user is triggered later, the assembly process is performed sequentially from the child component to the parent component, and ngAfterViewInit is triggered before ngAfterViewChecked. ngAfterViewInit hook will only be triggered once after the component is initialized, while ngAfterViewChecked hook will be triggered when the component changes, so the implementation of this hook must be streamlined, otherwise it will cause performance problems. You cannot modify the bound properties on the component in these two hooks, otherwise an exception will be thrown.@ViewChild decorator and ElementRef element refer to
In actual applications, the DOM elements of the view layer can be obtained through these two elements, and the obtained DOM elements can be operate.// .ts 文件中声明 @ViewChild('inputElem') inputElem: ElementRef; // 获取Dom元素的值 const value = this.inputElem.nativeElement.value; // .html 文件中使用 <input nz-input type="text" #inputElem>
ngAfterContentInit and ngAfterContentChecked
These two hooks are executed after the projection content is assembled, and the entire template has not yet been assembled at that time Completed, so the bound properties can be modified in these two hooks.Projection
In some cases, it is necessary to dynamically change the content of the component template, and these contents do not have complex business logic and do not need to be reused, just a small For some HTML fragments, you can use a feature provided by Angular called projection. In Angular, you can use the ng-content directive to project any fragment from the parent component template to its child components. It should be noted that other tags cannot be nested inside the tags of custom components. It is not like ordinary HTML tags that can be nested, but projection can be used to achieve nesting.app.component.html
<div class="wrapper">
  <h1>我是父组件</h1>
  <div>这个 div 定义在父组件</div>
  <!-- 将要投影的内容写在子组件的标签之间 -->
  <app-child>
    <div class="header">这个是页头。这个 div 是父组件投影到子组件的。</div>
    <div class="footer">这个是页脚。</div>
  </app-child>
</div>
child.component.html
<div class="wrapper">
  <h1>这是子组件</h1>
  <!-- ng-content是投影点 -->
  <ng-content select=".header"></ng-content>
  <div>这个div定义在子组件中</div>
  <ng-content select=".footer"></ng-content>
</div>
Among them, use
select Attributes enable targeted content projection. However, it should be noted that the label node specified by the value corresponding to the select attribute must be a direct child node under the component. Otherwise, the select attribute is invalid.
ngAfterContentInit and ngAfterContentChecked Summary
- ##ngAfterContentInit and ngAfterContentChecked hooks will not be called until the content to be projected by the component is assembled. Triggered, ngAfterContentInit is triggered before ngAfterContentChecked.
If the component has sub-components, the two hooks of the parent component are triggered first, and the two hooks of the sub-component are triggered after the projection content of the parent component is assembled.
For more programming-related knowledge, please visit: Introduction to Programming! !
The above is the detailed content of A deep dive into lifecycle hooks in Angular components. For more information, please follow other related articles on the PHP Chinese website!

