Home >Web Front-end >CSS Tutorial >Share some very nice mouseover styles
Share some very nice mouseover styles
- 王林forward
- 2021-03-17 14:06:446453browse

Foreword:
When we need to add a style for mouse hover, we will use the hover pseudo-class, through which we can add this when the mouse moves to the element. Add special styles to elements. For example, for an ordinary URL, when we move the mouse over the URL link, it will change color.
1. Overview
There are many practical application scenarios. The most common one is the floating navigation of the website. When the mouse is placed on the navigation bar, the color will change or the element will automatically stick out of the menu bar.

Example 1: When the mouse hovers, the content is framed
<!DOCTYPE html>
<html lang="en">
<head>
    <meta charset="UTF-8">
    <title>Title</title>
    <style>
    .ele:hover {
    border:1px solid red;
    }
    .ele {
    #去掉边框闪烁问题。(因为边框1像素会导致闪烁,所以先用1px透明色占住位置,hover时再让其变红,就不会觉得有闪烁了)
    border:1px solid transparent;
    }
    </style>
    </head><body>
    <div class="ele">
    <div>222</div>
    <div class="ele-item">111</div>
    </div>
    </body>
    </html>
Original effect:

After hovering the mouse:

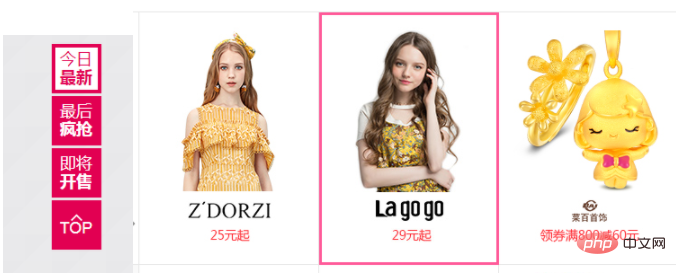
Example 2: There is such a picture at the bottom of the vdangdang.com homepage
Original web page:

The effect after mouse hover:

In fact, this is mainly made using hover. Let’s talk about the specific implementation:
Implementation ideas:
1. Create a new div1
2. Create a new div2, put the bottom image into div2
3, and create a new div3. , put the suspended content into div3
HTML code:
<div class="touch">
        <div><img  src="/static/imghwm/default1.png"  data-src="3.png"  class="lazy"   alt="Share some very nice mouseover styles" ></div>
        <div class="content">
            <p><h5>品牌故事</h5></p>
            <p><h6>我们的源泉不是时尚,不是潮流,而是由心而发的喜爱,将精致华丽的艺术融入东方式的低调,都只为了一个人而存在。</h6></p>
            <input class="inpt" type="text" name="tel" id="tel"/>
            <button class="btn">开售提醒</button>
        </div>
   </div>
(Learning video sharing: css video tutorial)
CSS code:
1. Define the height and width of div1, set the class to touch, and set overflow to hidden. If the image exceeds the defined height and width, it will be hidden.
.touch {
height:200px;
width:400px;
overflow:hidden;
position:relative;
}
2. div2 is content, and the content must fill div1, so set the top, bottom, left, and right to 0. Also set the font size, color, and alignment.
First set div2 to be invisible, that is, the content is hidden by default before the mouse hovers. When the mouse hovers, it will be released.
.touch .content {
top:0;
left:0;
right:0;
bottom:0;
position:absolute;
font-size:20px;
background-color:black;
color:white;
text-align:center;
visibility:hidden;
}
3. Set the style when the mouse is hovering. The content is released and the background image transparency is set to 0.5 so it can be seen.
.touch:hover .content{
visibility:visible;
border:4px solid red;
background-color:rgba(0,0,0,0.5)
}
4. Finally set the input box and button
.touch .content .btn{
background-color:#e83375;
color:white;
cursor: pointer;
border: none;
width: 70px;
height: 22px;
}
.touch .content .inpt{
height: 18px;
border: none
line-height: 18px;
font-size: 12px;
}
Overall html code:
<!DOCTYPE html>
<html lang="en">
<head>
<meta charset="UTF-8">
<title>Title</title>
<style>
.touch {
height:200px;
width:400px;
overflow:hidden;
position:relative;
}
.touch .content {
top:0;
left:0;
right:0;
bottom:0;
position:absolute;
font-size:20px;
background-color:black;
color:white;
text-align:center;
visibility:hidden;
}
.touch:hover .content{
visibility:visible;
border:4px solid red;
background-color:rgba(0,0,0,0.5)
}
.touch .content .btn{
background-color:#e83375;
color:white;
cursor: pointer;
border: none;
width: 70px;
height: 22px;
}
.touch .content .inpt{
height: 18px;
border: none
line-height: 18px;
font-size: 12px;
}
</style>
</head>
<body>
<div class="touch">
<div><img  src="/static/imghwm/default1.png"  data-src="3.png"  class="lazy"   alt="Share some very nice mouseover styles" >
</div>
<div class="content">
<p><h5>品牌故事</h5></p>
<p><h6>我们的源泉不是时尚,不是潮流,而是由心而发的喜爱,将精致华丽的艺术融入东方式的低调,都只为了一个人而存在。 </h6></p>
<input class="inpt" type="text" name="tel" value="请输入手机号码或邮箱地址" id="tel"/>
<button class="btn">开售提醒</button>
</div>
</div>
</body>
</html>
Key knowledge points:
1 , set the outermost div to relative, set the content to absolute, and then set top, bottom, left, and right to 0, that is, fill the div with content;
2, visibility:hidden; the topmost part is hidden by default The content;
3, visibility:visible and background-color:rgba(0,0,0,0.5), release the content when hovering, and set the background transparency, you can see the background image;
Related recommendations: CSS tutorial
Author: @skyflask
Please indicate the source when reprinting this article: https://www.cnblogs.com/skyflask/p/ 8886508.html
The above is the detailed content of Share some very nice mouseover styles. For more information, please follow other related articles on the PHP Chinese website!

