Home >Backend Development >PHP7 >Preparation for PHP7 message board development
Preparation for PHP7 message board development
- coldplay.xixiforward
- 2020-12-24 09:19:381997browse
PHP7The tutorial column introduces the prepared message board development

Recommended (free): PHP7
Course Points:
This tutorial was made at the request of an old friend, hoping to help him! I also hope to provide some "motivation" to friends who need to get into the trap (it's actually not that difficult).
This tutorial is suitable for students who are starting to learn PHP;
Here we use process-oriented development, which is easy to understand; process-oriented is a basic imperative programming, which is easier for beginners to master. Other conceptual things will not be elaborated here. ;
The following are the technical points involved in this lesson that need to be mastered:
p CSS, PHP MYSQL
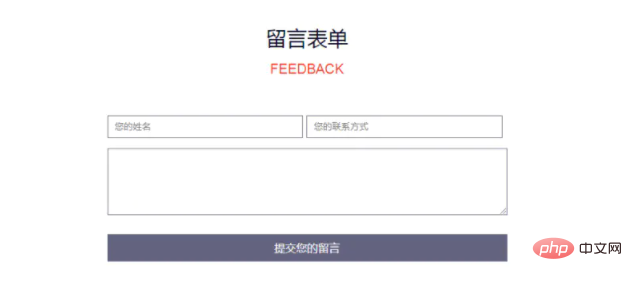
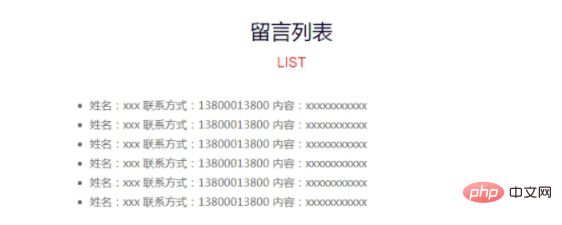
Page effect:

Message board home page

Message board list page
Development tools:
- XAMPP3.2.2 (php7. 1.8/MariaDB10.1.26)
Official website https://www.apachefriends.org/zh_cn/download.html - visual studio code (referred to as vs code)
Official website https://visualstudio.microsoft .com/zh-hans/downloads/
Tutorial arrangement:
The explanation is divided into three steps, from easy to deep.
- Step 1: Page design p CSS
- Step 2: Function implementation PHP MYSQL
- Step 3: Code optimization
Today I will mainly explain step one.
I believe that when I first get the design draft, if it is something I have made, I will quickly get into the state and type the code directly. However, if I encounter an unfamiliar layout or a more complex design draft When I do something, I will be in a hurry and don’t know where to start. Well, that’s right, because that’s how I came here in the beginning.
Let me talk about my method next:
-
1. Start building scaffolding
a. As the name suggests, it is similar to the scaffolding we saw. The house starts with a basic frame, poured with concrete, and then slowly laid with bricks. The same goes for writing p CSS. First, design the basic framework according to the design draft, clearly distinguish its top, bottom, left, and right structures, and then subdivide the sections in the framework. Of course, when building, define a class for each p tag, so that you can code the CSS style code. Quickly locate the designated location and improve efficiency.
b. For example, in the message board we are writing now, we first create a.container_boxcontainer (enclosure), and then divide it into.up and .downupper and lower structures (Okay, let’s just say Two floors), and finally design the detailed content on each layer. Of course, you can also repeat this operation (subdivided structure) on each layer; -
2. Create a new css style file And write the css code according to the renderings
a. Just look at the css code.
Note that the css file needs to be referenced in the HTML page<link rel="stylesheet" href="feedback.css"> - ##3. Final details adjustmenta. Add mouse events to the button
:hover
b. Add line spacing between processing content modules to make the entire page look clear and distinct
line-heightc. Of course, you can also add some CSS3 animation effects, which is not the focus here. No more writing. Students who want to go deeper can learn on their own. As a PHP developer, it is enough if you can complete the above two points.
If your thinking becomes much clearer, you can use your intelligence and wisdom to your heart's content. The page design is better and more beautiful than the design draft. This sense of accomplishment cannot be felt without experiencing it personally.I feel like I have said too much, so let’s start masturbating directly!This set of design ideas is actually applicable to the design of other front-end projects, such as designing pages, developing jquery plug-ins, etc.
Code area: p CSS page design
Key points: Form form (the tags to be used include input textarea)
The following is the completed HTML code:
CSS (feedback.css):
*{margin:0;padding:0;}

body{font-family: "微软雅黑", "Microsoft Yahei"; font-size: 12px;}
.container_box{width: 100%;max-width: 1170px;margin: 0 auto;text-align: center;}

a{color: #333;}
a:hover{color: #999;}

.fr{float: right}
.fl{float: left}

.container_box .up{padding: 20px 0;}
.container_box .up .title{font-size: 20px;}
.container_box .up .subtitle{color:#f00;margin-bottom: 10px;}
.container_box .down{margin: 0 auto;text-align: center;width: 50%;}
.container_box .down .input{margin-bottom: 10px;overflow: hidden;}
.container_box .down .input input{width: 46%;line-height: 30px;padding:4px;}
.container_box .down .content{width: 98%;display: block;margin-bottom: 10px;padding:4px;}
.container_box .down .sub{width: 100%;display: block;height: 35px;background-color: #63637f;color:#fff;border: 0;cursor: pointer;}
/* 鼠标移到按钮上去更换背景色 */
.container_box .down .sub:hover{background-color: #75849c;}

/* 列表 */
.list ul{padding: 20px 0;width: 100%;margin: 0 auto;text-align: left;}
.list ul li{line-height: 30px;color: #666;}
HTML (Homepage):
nbsp;html>


        <meta>
        <title>留言板_科科分享</title>
        <!-- 2.新建css样式文件并根据效果图编写css代码 -->
        <link>


        <!-- 工作区,呈现给用户看的 -->
        <!-- 1.开始搭建脚手架 -->
        <p>
            </p><p>
                </p><h3>留言板</h3>
                <h5>FEEDBACK</h5>

            <p>
                </p>
HTML (List):
nbsp;html>


        <meta>
        <title>列表_留言板_科科分享</title>
        <!-- 2.新建css样式文件并根据效果图编写css代码 -->
        <link>


        <!-- 工作区,呈现给用户看的 -->
        <!-- 1.开始搭建脚手架 -->
        <p>
            </p><p>
                </p><h3>留言板</h3>
                <h5>LIST</h5>

            <p>
                </p>
- 姓名:xxx 联系方式:13800013800 内容:xxxxxxxxxxx
- 姓名:xxx 联系方式:13800013800 内容:xxxxxxxxxxx
- 姓名:xxx 联系方式:13800013800 内容:xxxxxxxxxxx
- 姓名:xxx 联系方式:13800013800 内容:xxxxxxxxxxx
- 姓名:xxx 联系方式:13800013800 内容:xxxxxxxxxxx
- 姓名:xxx 联系方式:13800013800 内容:xxxxxxxxxxx
The above is the detailed content of Preparation for PHP7 message board development. For more information, please follow other related articles on the PHP Chinese website!
Related articles
See more- About scalar type and return value type declaration in PHP7
- A cryptographic extension for PHP7 code
- Introducing the whole process of PHP7 source code installation swoole
- Record PHP7 message board development background management-login/logout
- Ajax asynchronous submission for PHP7 message board development
- PHP7 message board development list search

