

组件通信
尽管子组件可以用this.$parent访问它的父组件及其父链上任意的实例,不过子组件应当避免直接依赖父组件的数据,尽量显式地使用 props 传递数据。
另外,在子组件中修改父组件的状态是非常糟糕的做法,因为:
这让父组件与子组件紧密地耦合;
只看父组件,很难理解父组件的状态。因为它可能被任意子组件修改!理想情况下,只有组件自己能修改它的状态。
每个Vue实例都是一个事件触发器:
$on()——监听事件。
$emit()——把事件沿着作用域链向上派送。(触发事件)
$dispatch()——派发事件,事件沿着父链冒泡。
$broadcast()——广播事件,事件向下传导给所有的后代。
监听与触发
v-on监听自定义事件:
html>


        <meta>
        <title></title>


        <!--子组件模板-->
        <template>
            <input>
            <button>Dispatch Event</button>
        </template>
        <!--父组件模板-->
        <div>
            <p>Messages: {{ messages | json }}</p>
            <child></child>
        </div>

    <script></script>
    <script>
//        注册子组件
//        将当前消息派发出去
        Vue.component('child', {
            template: '#child-template',
            data: function (){
                return { msg: 'hello' }
            },
            methods: {
                notify: function() {
                    if(this.msg.trim()){
                        this.$dispatch('child-msg',this.msg);
                        this.msg = '';
                    }
                }
            }
        })
//        初始化父组件
//        在收到消息时将事件推入一个数组中
        var parent = new Vue({
            el: '#events-example',
            data: {
                messages: []
            },
            methods:{
                'handleIt': function(){
                    alert("a");
                }
            }
        })
    </script>
父组件可以在使用子组件的地方直接用 v-on 来监听子组件触发的事件:
html>


        <meta>
        <title></title>


        <div>
          <p>{{ total }}</p>
          <button-counter></button-counter>
          <button-counter></button-counter>
        </div>

    <script></script>
    <script>
        Vue.component('button-counter', {
          template: '<button v-on:click="increment">{{ counter }}',
          data: function () {
            return {
              counter: 0
            }
          },
          methods: {
            increment: function () {
              this.counter += 1
              this.$emit('increment')
            }
          },
        })
        new Vue({
          el: '#counter-event-example',
          data: {
            total: 0
          },
          methods: {
            incrementTotal: function () {
              this.total += 1
            }
          }
        })
    </script>

在某个组件的根元素上监听一个原生事件。可以使用 .native 修饰v-on 。例如:
<my-component></my-component>
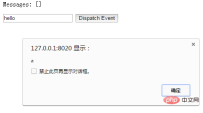
派发事件——$dispatch()
html>


        <meta>
        <title></title>


        <div>
            <p>Messages: {{ messages | json }}</p>
            <child-component></child-component>
        </div>
        <template>
            <input>
            <button>Dispatch Event</button>
        </template>

    <script></script>
    <script>
        // 注册子组件
        Vue.component('child-component', {
            template: '#child-component',
            data: function() {
                return {
                    msg: ''
                }
            },
            methods: {
                notify: function() {
                    if (this.msg.trim()) {
                        this.$dispatch('child-msg', this.msg)
                        this.msg = ''
                    }
                }
            }
        })

        // 初始化父组件
        new Vue({
            el: '#app',
            data: {
                messages: []
            },
            events: {
                'child-msg': function(msg) {
                    this.messages.push(msg)
                }
            }
        })
    </script>


将静态 Vue 页面(index.vue)改造为动态页面(Custom.vue);稿源仅限 index.vue、其引用的 CSS 与资源路径,禁止参考仓库内其他文件。Invoke when user wants to transform a static Vue page into a dynamic data-driven page with Element UI components.
子组件的button元素绑定了click事件,该事件指向notify方法
子组件的notify方法在处理时,调用了$dispatch,将事件派发到父组件的child-msg事件,并给该该事件提供了一个msg参数
父组件的events选项中定义了child-msg事件,父组件接收到子组件的派发后,调用child-msg事件。
广播事件——$broadcast()
html>


        <meta>
        <title></title>


        <div>
            <input>
            <button>Broadcast Event</button>
            <child-component></child-component>
        </div>

        <template>
            <ul>
                <li>
                    父组件录入了信息:{{ item }}
                </li>
            </ul>
        </template>

    <script></script>
    <script>
        // 注册子组件
        Vue.component('child-component', {
            template: '#child-component',
            data: function() {
                return {
                    messages: []
                }
            },
            events: {
                'parent-msg': function(msg) {
                    this.messages.push(msg)
                }
            }
        })
        // 初始化父组件
        new Vue({
            el: '#app',
            data: {
                msg: ''
            },
            methods: {
                notify: function() {
                    if (this.msg.trim()) {
                        this.$broadcast('parent-msg', this.msg)
                    }
                }
            }
        })
    </script>
和派发事件相反。前者在子组件绑定,调用$dispatch派发到父组件;后者在父组件中绑定,调用$broadcast广播到子组件。
父子组件之间的访问
父组件访问子组件:使用$children或$refs
子组件访问父组件:使用$parent
子组件访问根组件:使用$root
$children:
html>


        <meta>
        <title></title>


        <div>
            <parent-component></parent-component>
        </div>

        <template>
            <child-component1></child-component1>
            <child-component2></child-component2>
            <button>显示子组件的数据</button>
        </template>

        <template>
            <h2>This is child component 1</h2>
        </template>

        <template>
            <h2>This is child component 2</h2>
        </template>
        <script></script>
        <script>
            Vue.component('parent-component', {
                template: '#parent-component',
                components: {
                    'child-component1': {
                        template: '#child-component1',
                        data: function() {
                            return {
                                msg: 'child component 111111'
                            }
                        }
                    },
                    'child-component2': {
                        template: '#child-component2',
                        data: function() {
                            return {
                                msg: 'child component 222222'
                            }
                        }
                    }
                },
                methods: {
                    showChildComponentData: function() {
                        for (var i = 0; i < this.$children.length; i++) {
                            alert(this.$children[i].msg)
                        }
                    }
                }
            })

            new Vue({
                el: '#app'
            })
        </script>
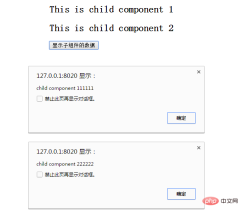
$ref可以给子组件指定索引ID:
html>


        <meta>
        <title></title>


        <div>
            <parent-component></parent-component>
        </div>

        <template>
            <!--<child-component1></child-component1>
            <child-component2></child-component2>-->
            <child-component1></child-component1>
            <child-component2></child-component2>
            <button>显示子组件的数据</button>
        </template>

        <template>
            <h2>This is child component 1</h2>
        </template>

        <template>
            <h2>This is child component 2</h2>
        </template>
        <script></script>
        <script>
            Vue.component('parent-component', {
                template: '#parent-component',
                components: {
                    'child-component1': {
                        template: '#child-component1',
                        data: function() {
                            return {
                                msg: 'child component 111111'
                            }
                        }
                    },
                    'child-component2': {
                        template: '#child-component2',
                        data: function() {
                            return {
                                msg: 'child component 222222'
                            }
                        }
                    }
                },
                methods: {
                    showChildComponentData: function() {
//                        for (var i = 0; i < this.$children.length; i++) {
//                            alert(this.$children[i].msg)
//                        }
                        alert(this.$refs.cc1.msg);
                        alert(this.$refs.cc2.msg);
                    }
                }
            })
            new Vue({
                el: '#app'
            })
        </script>
效果与$children相同。
$parent:
html>


        <meta>
        <title></title>


        <div>
            <parent-component></parent-component>
        </div>

        <template>
            <child-component></child-component>
        </template>

        <template>
            <h2>This is a child component</h2>
            <button>显示父组件的数据</button>
        </template>

        <script></script>
        <script>
            Vue.component('parent-component', {
                template: '#parent-component',
                components: {
                    'child-component': {
                        template: '#child-component',
                        methods: {
                            showParentComponentData: function() {
                                alert(this.$parent.msg)
                            }
                        }
                    }
                },
                data: function() {
                    return {
                        msg: 'parent component message'
                    }
                }
            })
            new Vue({
                el: '#app'
            })
        </script>

如开篇所提,不建议在子组件中修改父组件的状态。
非父子组件通信
有时候非父子关系的组件也需要通信。在简单的场景下,使用一个空的 Vue 实例作为中央事件总线:
var bus = new Vue()
// 触发组件 A 中的事件
bus.$emit('id-selected', 1)
// 在组件 B 创建的钩子中监听事件
bus.$on('id-selected', function (id) {
    // ...
})
相关推荐:2020年前端vue面试题大汇总(附答案)vue教程推荐:2020最新的5个vue.js视频教程精选
更多编程相关知识,请访问:编程入门!!
前端入门到VUE实战笔记:立即使用
在学习笔记中,你将探索 前端 的入门与实战技巧!