Home >PHP Framework >ThinkPHP >Think-Swoole Tutorial - WebSocket Introduction, Events and Data Sending
Think-Swoole Tutorial - WebSocket Introduction, Events and Data Sending
- 藏色散人forward
- 2020-10-16 14:33:493551browse

What is WebSocket
The WebSocket protocol is a new network protocol based on TCP that enables data exchange between the client and the server Becomes simpler and allows the server to actively push data to the client. In the WebSocket API, the browser and the server only need to complete a handshake, and a persistent connection can be created directly between the two for bidirectional data transmission.
Why WebSocket is needed
Because HTTP communication can only be initiated by the client.
What are the characteristics of WebSocket
Built on the TCP protocol
has small performance overhead , communication is efficient
The client can communicate with any server
Protocol identification: ws, wss
Persistent network communication protocol
WebSocket usage scenarios
Social chat, barrage, multi-player games, collaborative editing, stocks Real-time fund quotations, live sports updates, video conferencing chats, location-based applications, online education and other application scenarios that require high real-time performance.
Before WebSocket, the traditional way we wanted to make a chat program was to use a JavaScript timer to send an HTTP request to the server every second to check whether there are new messages.
With WebSocket, the client sends a WebSocket connection request to the server in HTTP mode through the browser, and then the server sends a response. This process is usually called a "handshake". The browser and the server only need to perform a handshake action, and then a fast channel is formed between the browser and the server to upgrade the protocol to WebSocket. If there is new message, the server will actively push the message to the client.
What is SocketIO?
WebSocket is the latest specification proposed by HTML5. Although mainstream browsers already support it, there may still be incompatibilities. In order to be compatible with all The browser provides programmers with a consistent programming experience. SocketIO encapsulates WebSocket, AJAX and other communication methods into a unified communication interface. That is to say, when we use SocketIO, we don’t have to worry about compatibility issues, the bottom layer will be automatically selected. The best way to communicate. Therefore, WebSocket is a subset of SocketIO, and Think-Swoole parses the data sent to the server according to SocketIO.
Enable WebSocket service in ThinkPHP 6
1. Set "websocket. enable" in the configuration file config/swoole.php to true.
2. Create listening events, create WsConnect, WsClose, and WsTest (this can be named arbitrarily and must correspond to the client). Enter the following commands in the project root directory:
php think make:listener WsConnect
php think make:listener WsClose
php think make:listener WsTest
app/ The listening class file just created will be generated in the listener directory, and business logic can be written in the corresponding event class. Let’s print the $event variable here first. The $event in the Connect event is the app\Request request object, and the $event in the Test custom message receiving event is the message sent by the client.
3. Define the event listening class in the array listen key in app/event.php:
app/event.php
'listen'    => [
        'AppInit'  => [],
        'HttpRun'  => [],
        'HttpEnd'  => [],
        'LogLevel' => [],
        'LogWrite' => [],
        //监听连接,swoole 事件必须以 swoole 开头
        'swoole.websocket.Connect' => [
            app\listener\WsConnect::class
        ],
        //监听关闭
        'swoole.websocket.Close' => [
            \app\listener\WsClose::class
        ],
        //监听 Test 场景
        'swoole.websocket.Test' => [
            \app\listener\WsTest::class
        ],
    ],
swoole.websocket.Connect: The client establishes a connection with the server and completes the handshake event, that is onOpen event in Swoole. Record here the connection ID (fd) between your own program user and the client, etc. Not required, recommended definition.
swoole.websocket.Close: Client connection closing event, optional.
swoole.websocket.Test: Customized Test event; used to receive test event messages sent by the client. Multiple Test events can be defined in a project, such as chat, positioning, and customer service function events, which can correspond to Test1, Test2, Test3, etc.
WebSocket events can also be configured in the "websocket. listen" of the config/swoole.php configuration file:
'listen' => [
    // 首字母大小写都可以;值应该是字符串非数组
    'connect' => 'app\listener\WsConnect',
    'close'   => 'app\listener\WsClose',
    'test'    => 'app\listener\WsTest'
],
4. Start the service in the project root directory: php think swoole start. The bottom layer will automatically determine whether the current request is HTTP or WebSocket.
Establishing a connection between the client and the server
Now we make an HTML page and establish a connection to our server through HTML5 WebSocket. Create a new test.html anywhere with the following content:
<!DOCTYPE HTML>
<html>
<head>
<meta charset="UTF-8">
<title>Document</title>
</head>
<body>
消息:<input type="text" id="message">
接收者:<input type="text" id="to">
<button onclick="send()">发送</button>
<script>
var ws = new WebSocket("ws://127.0.0.1:9501/");
ws.onopen = function(){
console.log('连接成功');
}
ws.onmessage = function(data){
console.log(data);
}
ws.onclose = function(){
console.log('连接断开');
}
function send()
{
var message = document.getElementById('message').value;
var to = document.getElementById('to').value;
console.log("准备给" + to + "发送数据:" + message);
ws.send(JSON.stringify(['test',{
//这里可以自己定义属性
to:to,
message:message
}])); //发送的数据必须是 "['test',数据]" 这种格式
}
</script>
</body>
</html>HTML5 WebSocket For an introduction, you can visit here to learn.
In the front-end code, var ws = new WebSocket("ws://127.0.0.1:9501/"); My server is local, and the port number configured in the swoole.php configuration file is 9501, so Visit 127.0.0.1:9501, ws is the WebSocket protocol, and like HTTP and HTTPS, it has WS and WSS protocols. ws.onmessage can accept messages.
Next, access this HTML page through the browser and open the browser debugging console. You can see the words successful connection and the parameters printed by the server:

Then we send a message in the input box of the HTML page we just created, and our information is printed in the console:

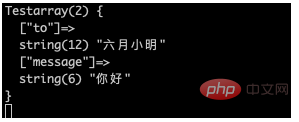
The Swoole listening service terminal also received the message we sent:

This is because we are in app/listener /WsTest prints the $event variable.
Finally, let me explain the code ws.send(JSON.stringify(['test',{to:to,message:message}])); in the front-end page. The function of JSON.stringify() is Convert the JavaScript object into a JSON string. The to and message attributes are customized by us. Test is the Test event defined by the backend. This name must correspond to the backend. Since think-swoole parses the sent data according to SocketIO, the data you send should be in the string form of "['event name', the actual data to be sent]": the first parameter test is the corresponding server The Test event on the end is used to distinguish real-time communication logic business in more scenarios; the second parameter is the data you actually send, which can be a string, data, or object. It is obtained by the $event parameter on the server side.
The above is the detailed content of Think-Swoole Tutorial - WebSocket Introduction, Events and Data Sending. For more information, please follow other related articles on the PHP Chinese website!

