Home >WeChat Applet >Mini Program Development >Several simple and practical WeChat mini program development tips that are highly recommended
Several simple and practical WeChat mini program development tips that are highly recommended
- coldplay.xixiforward
- 2020-10-10 17:34:413667browse
WeChat Mini Program Development column strongly recommends several simple and practical WeChat Mini Program development tips today.

I developed a WeChat applet some time ago. During the development process, I summarized some tips that I think are useful to me. I extracted them and it is equivalent to a summary review. I also hope it can help everyone. If it is really helpful to everyone, don’t forget to like it
- WeChat Developer Tools Version:
1.03.2006090(2020-06-19) - Basic library version:
v2.12.1(2020-08-04)
1. Potential pitfalls and Tips that may be encountered during development
I originally wanted to write one As a little trick, I ended up summing up a lot of pitfalls. Before I got started, I had no idea that the development experience of WeChat mini programs was so bad. From WeChat developer tools to the so-called "new language", there is a The strong visual sense of half-finished five really makes me emmm... In addition, I found that most of the small program articles on the Internet are practical articles on how to use and how to avoid pitfalls, rather than technical articles, which also reflects from the side. There are many pitfalls in mini programs.
During the native development process of WeChat mini-programs, I kept asking questions like "Why would Tencent, which has so many talented technical people, launch such a stupid thing?" Many mentally retarded and anti-human things were discovered in the community two or three years ago. It has been raised, and the official reply has reported that it is being repaired, but several years have passed and there is still no news. The official reply is still a cold "Feedback"
- WeChat developer tools are often not hotly updated. Even if it works, the screen will be white. Even recompiling won't work. I can only force quit and open it again;
- is similar to the previous one. Sometimes there is a mistake in the style, and the entire preview will be white, and the debugger will not tell where it is. The problem will be abandoned and not displayed. Recompiling cannot solve the problem. You can only force quit and open it again;
- is similar to the previous one. The errors reported in the debugger are often useless and the donkey's head is wrong. The horse's mouth makes it difficult to locate the problem;
- The custom Tabbar on Android will also move down with the screen when it is pulled down to refresh, and it is a bug that cannot be bypassed. The custom Tabbar style is written Okay, I changed it to the built-in Tabbar again! The path of
-
importdoes not support absolute paths. For example, if you want to referenceutils/fetch.js, you must slowly ## no matter how deep the component is. #../Click to the root directory, and similarly.wxssfile@importcan only use relative paths when importing files, so../ will appear ../../../../../utils/fetch.jsThis kind of thing; The static resource path cannot have Chinese characters, and if there are Chinese characters, it cannot be loaded; - # The ##.wxs
- file does not support ES6 and can only use the crappy ES5 writing method; only the
.wxsfile can be imported into -
.wxmlCan't import.jsfile? ? ?Template{{}} - Even the methods cannot be executed and can only handle simple operations such as
- * /. If you encounter data, you needfilterscenarios need to be pre-formatted in the.jsfile andsetDataone by one, such as[2,3,4].includes( type), can’t even run! TheDateobject cannot be used in the -
.wxsfile, so you cannotnew Date()and can only use the crappygetDatemethod, the same is true for regular expressions. To generate regular expression objects, you need to use thegetRegExpfunctiongetRegExp(pattern[, flags]); .wxs - You can call other
.wxsfiles, and you can only require calling.wxsfiles. The imported files must use relative paths; setData - I don’t even bother to merge an object. If
data: {a: {b: 1, c: 1}}, thensetData({a: {b: 2}})The value ofa.cwill be lost, which is really annoying. You have tosetData({['a.b': 2]})like this;##Date objects on #IOS get any time parameters such as - getDay
,getTimeare all NaN, because the Date constructor of IOS does not support2018-04 -26The date in this format must be converted to2018/04/26This format will be displayed normally;Sometimes the request of the development version applet cannot be sent inexplicably , there are three dots in the upper right corner of enable debug. After opening "Development and Debugging", outgoing requests can be sent inexplicably. This is the case on many mobile phones. The truth is unknown. - 2. WeChat requests Promise transformation
-s
or--production, otherwise the build will not be successful.
npm i -S wx-promise-pro复制代码
Then in app.js: import { promisifyAll } from 'wx-promise-pro'promisifyAll() // promisify all wx apiApp({ ... })复制代码 Then you can use it normally: wx.pro.showLoading({ title: '加载中', mask: true})
.then(() => console.log('in promise ~'))复制代码
2.2 自己实现
其实我们可以自己来实现一个这样的库,原理很简单,以原生 API 的 wx.request 为例:
// 原生 API 使用方式wx.request({    url: '',     // 请求的 url
    data: {},    // 参数
    method: '',  // post、get
    success: res => {        // 请求成功回调函数,res为回调参数
    },    fail: res => {        // 请求失败回调函数,res为回调参数
    }
})复制代码
如果我们将其 Promise 化,应该的调用方式希望是:
// Promise 化后的期望使用方式wx.pro.request({    url: '',     // 请求的 url
    data: {},    // 参数
    method: ''   // post、get})
  .then(res => {      // 请求成功回调函数,res为回调参数
  })
  .catch(res => {      // 请求失败回调函数,res为回调参数
  })复制代码
并且 then 函数返回的是一个 Promise 对象,让这个函数可以不断链式调用下去,所以首先需要 new 出来一个 Promise 对象:
function request(opt) {    return new Promise((resolve, reject) => {
        wx.request({
            ...opt,            success: res => { resolve(res)},            fail: res => {reject(res)}
        })
    })
}复制代码
这里代码我们可以进一步改进,由于 success、fail 这里传入的参数只是由 resolve、reject 方法执行了下,所以可以直接传入 resolve、reject 方法即可。
另外,由于其他小程序原生 API 格式一致,所以我们可以使用柯里化方法,来将其他需要进行 Promise 化的 API 进行处理:
function promisify(api) {    return (opt = {}) => {        return new Promise((resolve, reject) => {
            api({
                ...opt,                fail: reject,                success: resolve
            })
        })
    }
}复制代码
然后,将柯里化方法执行的结果作为新的 Promise 化的 API 挂载到 wx.pro 对象上:
// 将指定 API 进行 Promise 化wx.pro.request = promisify(wx.request)// 使用wx.pro.request({...})
    .then(...)复制代码
然后为了方便我们使用其他方法,可以循环将 wx 对象上可以被 Promise 化的方法比如 request、scanCode、showToast、getUserInfo 等一一挂载到 wx.pro 对象上,使用时可以直接 wx.pro.xx,由于这个方法执行返回的是一个 Promise 对象,因此可以像其它 Promise 化的对象那样使用。
事实上,不知不觉,我们就自己实现了 wx-promise-pro 的源码,这个库的核心代码也就是上面那这几行
2.3 在项目中使用
有了上面的工具后,我们可以将其使用在项目中,为了不在项目中遍布 wx.request 或 wx.pro.request 这里可以简单进行封装,新建两个文件如下:
// utils/api/fetch.js 封装请求方法、请求拦截器const app = getApp()const BaseUrl = 'http://172.0.0.1:7300/mock'const TokenWhiteList = [    '/app/user/get-by-code'     // 不需要鉴权的api手动添加到这里]/**
 * 设置请求拦截器
 * @param params 请求参数
 */const fetch = (params = {}) => {    // 拦截器逻辑
    if (!TokenWhiteList.includes(params.url)) {
        params.header = {            'content-type': 'application/json',             // 默认值
            'token': app.globalData.token || ''
        }
    }    if (params.url.startsWith('/')) {    // 拼接完整URL
        params.url = BaseUrl + params.url
    }    // 返回promise
    return wx.pro.request({ ...params })
      .then(({ data: { code, message, data } }) => {          // ... 各种异常情况的逻辑处理
          // 与后端约定 code 20000 时正常返回
          if (code === 20000) return Promise.resolve(data)          return Promise.reject(message)
      })
}export { fetch }复制代码
然后再将所有 API 封装到单独的文件中集中管理:
// utils/api/apis.js 封装所有请求 APIimport { fetch } from './fetch'/* 根据微信code获取用户信息 */const appUserGetByCode = ({ code } = {}) => fetch({    url: '/app/user/get-by-code',    data: { code }
})/* 扫码登录 */const appUserQrLogin = ({ qrCode } = {}) => fetch({    method: 'POST',    url: '/app/user/qr-login',    data: { qrCode }
})/* 个人信息 */const appUserInfo = () => fetch({    url: '/app/user/info'})/* 系统参数获取,数据字典 */const appSysParamListByParam = () => fetch({    url: '/app/sys-param/list-by-param'})/* 数据字典所有 */const appSysParamListAll = () => fetch({    url: '/app/sys-param/list-all'})export {
    appSysParamListAll,   // 数据字典所有
    appSysParamListByParam,   // 系统参数获取,数据字典
    appUserGetByCode,   // 根据微信code获取用户信息
    appUserQrLogin,   // 扫码登录
    appUserInfo   // 个人信息}复制代码
在要使用 API 的地方就可以这样引入:
import * as Api from '../../utils/api/apis.js'   // 相对路径// 使用方式Api.appSysParamListAll()
  .then(({ dataList }) => this.upData({ sysParamList: dataList }))
  .then(() => {      const keyList = this.data.sysParamList.map(T => T.key)      this.upData({
          keyList,          formData: { keys: keyList }
      })
  })复制代码
使用方式就很舒服,这里使用到了 upData,就是下面我要介绍的内容,是在下非常推介的小程序工具~
3. setState 修改 data 中想修改对象的属性
在小程序中,data 是不能直接操作的,需要使用 setData 函数。鉴于微信小程序开发时 setData 的使用体验十分蹩脚,我使用了个库函数 wx-updata,这个库函数在开发的时候对我很有帮助,这里特意推介给大家。
3.1 为什么要使用 wx-updata
你在使用 setData 的时候,是不是有时候觉得很难受,举个简单的例子:
// 你的 datadata: {    name: '蜡笔小新',    info: { height: 140, color: '黄色' }
}复制代码
如果要修改 info.height 为 155,使用 setData 要怎么做呢:
// 这样会把 info 里其他属性整不见了this.setData({ info: { height: 155 } })// 你需要取出 info 对象,修改后整个 setDataconst { info } = this.data
info.height = 155this.setData({ info })复制代码
似乎并不太复杂,但如果 data 是个很大的对象,要把比较深且不同的对象、数组项挨个改变:
data: {    name: '蜡笔小新',    info: {        height: 140, color: '黄色',        desc: [{ age: 8 }, '最喜欢大象之歌', '靓仔', { dog: '小白', color: '白色' }]
    }
}复制代码
比如某个需求,需要把 info.height 改为 155,同时改变 info.desc 数组的第 0 项的 age 为 12,第 3 项的 color 为灰色呢?
// 先取出要改变的对象,改变数字后 setData 回去const { info } = this.data
info.height = 155info.desc[0].age = 12info.desc[3].color = '灰色'this.setData({ info })// 或者像某些文章里介绍的,这样可读性差,也不太实用this.setData({    'info.height': 155,    'info.desc[0].age': 12,    'info.desc[3].color': '灰色'})复制代码
上面这两种方法,是我们平常小程序里经常用的,和其他 Web 端的框架相比,就很蹩脚,一种浓浓的半成品感扑面而来,有没有这样一个方法:
this.upData({    info: {        height: 155,        desc: [{ age: 12 }, , , { color: '灰色' }]
    }
})复制代码
这个方法会帮我们深度改变嵌套对象里对应的属性值,跳过数组项里不想改变的,只设置我们提供了的属性值、数组项,岂不是省略了一大堆蹩脚的代码,而且可读性也极佳呢。
这就是为什么我在上线的项目中使用 wx-updata,而不是 setData
wx-updata 的原理其实很简单,举个例子:
this.upData({    info: {        height: 155,        desc: [{ age: 12 }]
    }
})// 会被自动转化为下面这种格式,// this.setData({//    'info.height': 155,//    'info.desc[0].age': 12,// })复制代码
原来这个转化工作是要我们自己手动来做,现在 wx-updata 帮我们做了,岂不美哉!
3.2 wx-updata 使用方式
在一般情况下,我们可以将方法直接挂载到 Page 构造函数上,这样就可以在 Page 实例中像使用 setData 一样使用 upData 了:
// app.js 中挂载import { updataInit } from './miniprogram_npm/wx-updata/index'  // 你的库文件路径App({
    onLaunch() {
        Page = updataInit(Page, { debug: true })
    }
})// 页面代码中使用方式this.upData({    info: { height: 155 },    desc: [{ age: 13 }, '帅哥'],    family: [, , [, , , { color: '灰色' }]]
})复制代码
有的框架可能在 Page 对象上进行了进一步修改,直接替换 Page 的方式可能就不太好了,wx-updata 同样暴露了工具方法,用户可以在页面代码中直接使用工具方法进行处理:
// 页面代码中import { objToPath } from './miniprogram_npm/wx-updata/index'  // 你的库文件路径Page({    data: { a: { b: 2}, c: [3,4,5]},    // 自己封装一下
    upData(data) {        return this.setData(objToPath(data))
    },    // 你的方法中或生命周期函数
    yourMethod() {        this.upData({ a: { b: 7}, c: [8,,9]})
    }
})复制代码
针对修改数组指定项的时候,可能存在的跳过数组空位的情况,wx-updata 提供了 Empty 的 Symbol 类型替位符,还有数组的对象路径方式,感兴趣可以看看 wx-updata 的文档,也可以参考 这篇介绍文章。
另外,使用了 wx-updata 也还可以使用原来的 setData,特别是有时候要清空数组时,灵活使用,可以获得更好的小程序开发体验,祝大家小程序开发愉快
4. 使用 scss 写样式
4.1 Webstorm 配置方法
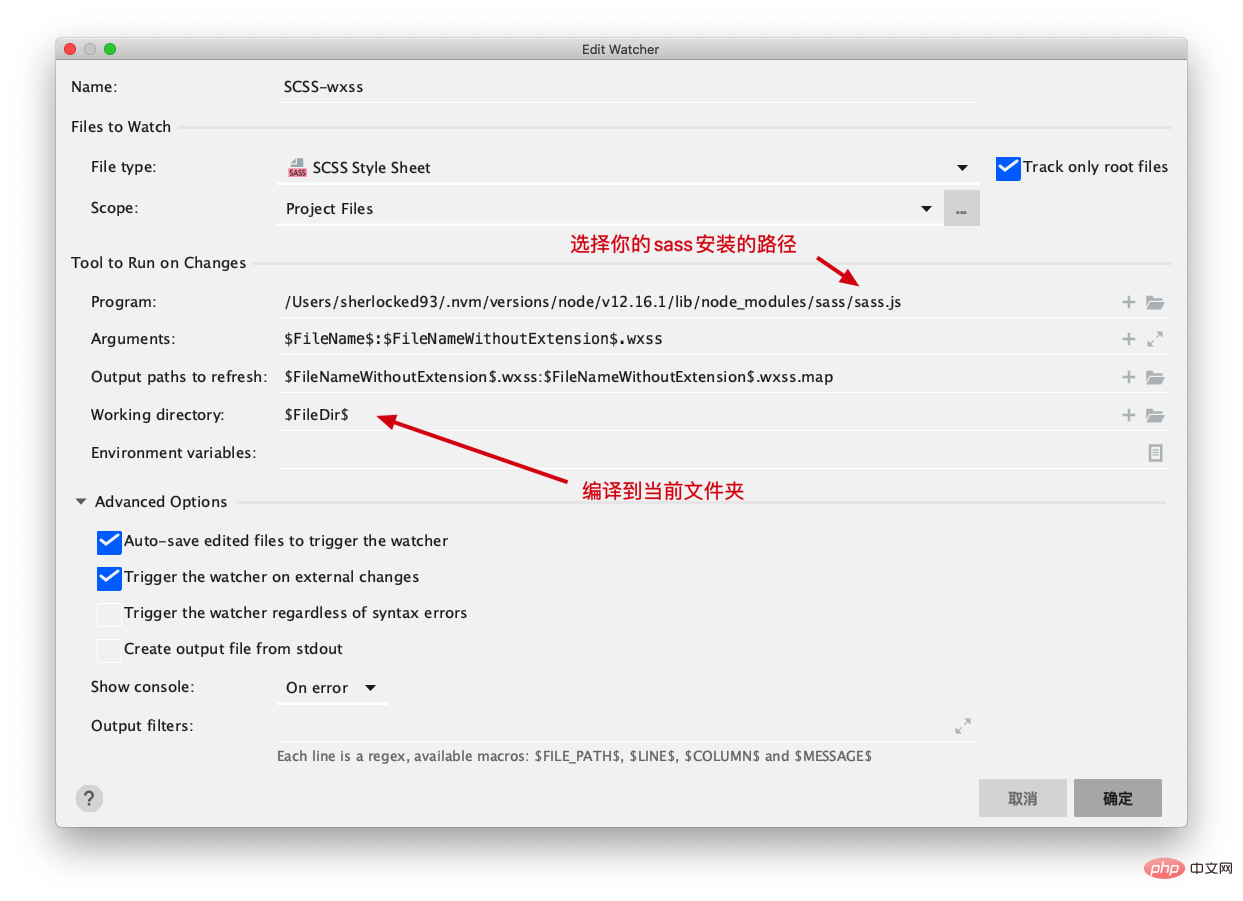
关于蹩脚的 .wxss 样式,我使用 webstorm 的 file watcher 工具把 scss 文件监听改动并实时编译成 .wxss 文件,感觉比较好用,这里给大家分享一下我的配置:

然后记得在 .gitignore 文件中加入要忽略的样式:
*.scss
*.wxss.map复制代码
这样在上传到 git 的时候,就不会上传 scss 文件了~ 当然如果你的团队成员需要 scss 的话,还是建议 git 上传的时候也加上 scss 文件。
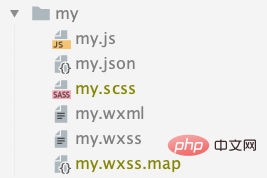
这样设置之后,一个组件在本地的会是下面这样

其中我们需要关注的就是 .js、.json、.scss、.wxml 文件,另外的文件 .wxss 会在你改动 .scss 文件之后自动生成并更新,而 .wxss.map 是插件自动生成的映射关系,不用管。
如果不是使用 webstorm,可以直接执行命令 sass --watch index.scss:index.wxss -s expanded,命令行如果关闭,sass 命令就不会监听文件的变动然后编译,所以最好用编辑器的插件。
同理,也可以使用 less、stylus 等预编译语言。
4.2 Visual Studio Code 配置方法
万能的 VSC 当然也可以做到这个功能,搜索并下载插件 easy sass,然后在 setting.json 中修改/增加配置:
"easysass.formats": [
  {    "format": "expanded",    "extension": ".wxss"
  },
  {    "format": "compressed",    "extension": ".min.wxss"
  }
]复制代码
上面 expanded 是编译生成的 .wxss 文件,下面 compressed 是压缩之后的 .wxss 样式文件,下面这个用不到可以把下面这个配置去掉,然后在 .gitignore 文件中加入要忽略的中间样式:
*.scss复制代码
当然也可以不添加,如果你的同事也是实用 scss 来开发小程序的话,其他跟上面一样,至此你就可以在小程序开发中快乐使用 scss 了~
5. 使用 iconfont 图标字体
在 Web 开发中 iconfont 可谓是最常用的灵活图标字体工具了,这里介绍一下如何在微信小程序中引入 iconfont 图标。
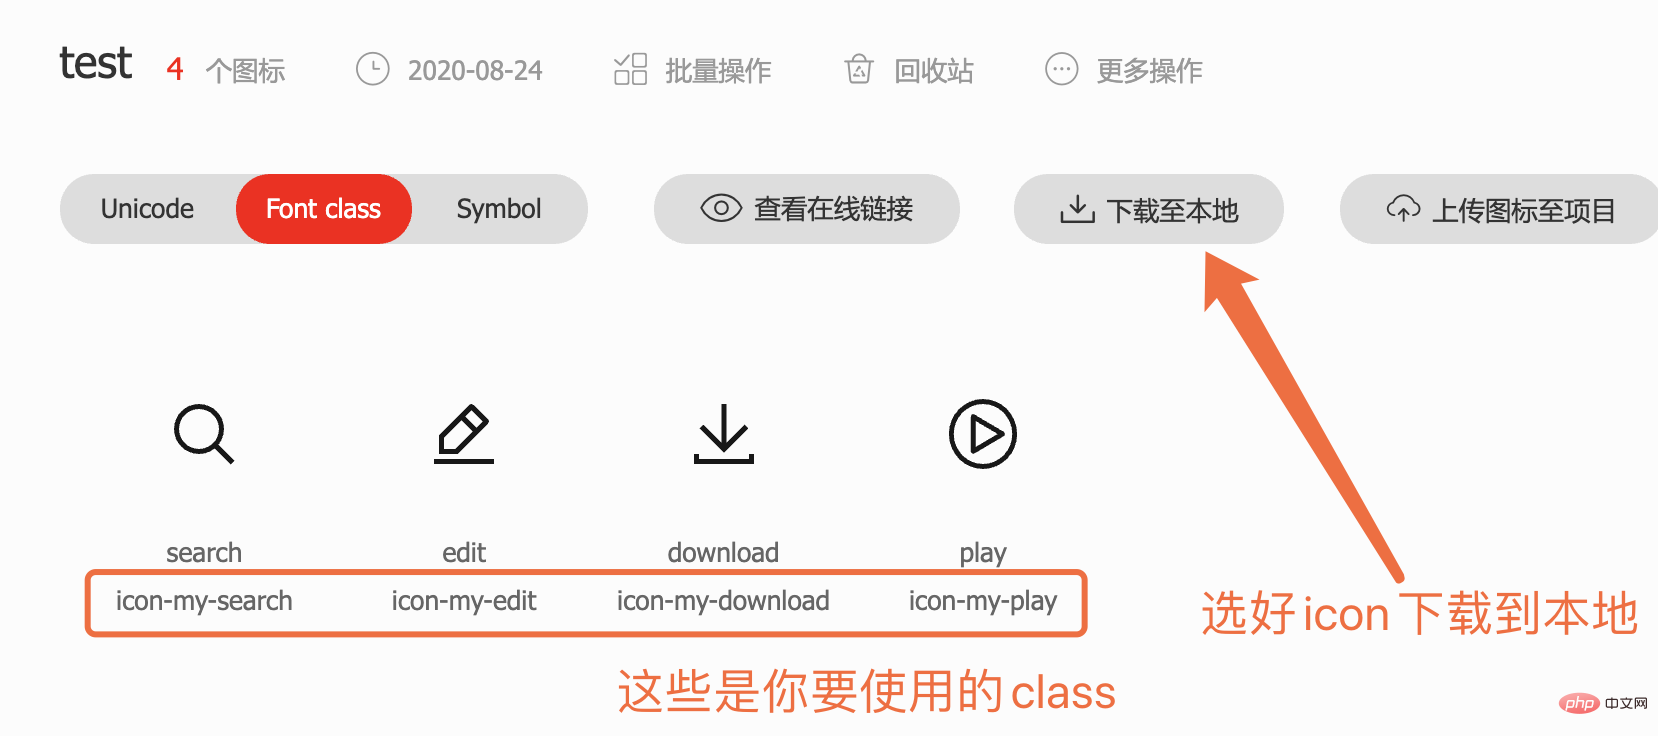
首先找到你想使用的图标们,点击购物车之后下载到本地。

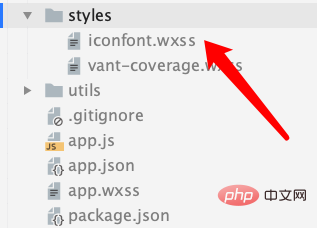
下载到本地是一个压缩包,解压缩之后将 iconfont.css 文件复制到微信小程序的 styles 文件夹中 (在下的习惯,也可以放到你想放的地方比如 fonts),将后缀改为 .wxss

在 app.wxss 中引入样式:
@import "styles/iconfont.wxss";复制代码
然后在 .wxml 中就可以使用刚刚你添加的图标了,Web 使用 i 标签,小程序中使用 text 标签:
<text class="iconfont icon-my-edit" style="color: blue"></text>复制代码
如果后面要加新的图标,要下载新的 iconfont.css 的文件到本地重命名并覆盖,重新走一遍这个流程。
相关免费学习推荐:微信小程序开发
The above is the detailed content of Several simple and practical WeChat mini program development tips that are highly recommended. For more information, please follow other related articles on the PHP Chinese website!

