Note: This is an example of MixPHP V1
Sending emails is a very common requirement. Since the operation of sending emails is generally time-consuming, we generally use asynchronous processing to improve user experience. , asynchronously usually we use message queue to achieve.
Due to the lack of multi-process development capabilities, the traditional MVC framework usually uses the same script to be executed multiple times to generate multiple processes. Mixphp encapsulates TaskExecutor specifically for multi-process development, and users can develop it very simply. A fully functional and highly available multi-process application.
Recommended: "PHP Video Tutorial"
The following demonstrates the development process of an asynchronous email sending system, involving knowledge points:
- Asynchronous
- Message Queue
- Multiple processes
- Daemon process
How to use message queue to implement asynchronous
PHP usually uses message queue It is implemented using middleware. Commonly used message middleware are:
- redis
- rabbitmq
- kafka
This time we Choose redis to implement asynchronous email sending. There is a list type in the data type of redis, which can implement message queue. Use the following command:
// 入列
$redis->lpush($key, $data);
// 出列
$data = $redis->rpop($key);
// 阻塞出列
$data = $redis->brpop($key, 10);
Architecture design
This example The traditional MVC framework delivers email sending requirements, and MixPHP multi-process performs sending tasks.
Selection of email sending library
In the past, we usually used the email sending library provided by the framework, or downloaded the library shared by other users online. After composer appeared, https: There are a lot of high-quality libraries on //packagist.org/, we just need to choose the best one, in this case swiftmailer.
Since the sending task is executed by MixPHP, swiftmailer is installed in the MixPHP project. Execute the following command in the project root directory to install:
composer require swiftmailer/swiftmailer
Production Developer development
In the requirement of email sending, the producer refers to the party that delivers the sending task. This party is usually an interface or web page. This part does not necessarily require mixphp development, TP, CI, YII All of these are possible, just post the task information to the message queue in the interface or web page.
Add the following code to the controller of the traditional MVC framework:
Usually using redis in the framework will install a class library for use. This example uses native code for easy understanding.
// 连接
$redis = new \Redis();
if (!$redis->connect('127.0.0.1', 6379)) {
    throw new \Exception('Redis Connect Failure');
}
$redis->auth('');
$redis->select(0);
// 投递任务
$data = [
    'to'      => ['***@qq.com' => 'A name'],
    'body'    => 'Here is the message itself',
    'subject' => 'The title content',
];
$redis->lpush('queue:email', serialize($data));
Usually in asynchronous development, a message will be responded to the user immediately after the delivery is completed. Of course, the task is not executed at this time.
Consumer Development
In this example we use MixPHP’s multi-process development tool TaskExecutor to complete this requirement. Resident processes are usually used to handle queue consumption, so we Use the TYPE_DAEMON type and MODE_PUSH mode of TaskExecutor.
TaskExecutor's MODE_PUSH mode has two processes:
Left process: Responsible for taking out task data from the message queue and putting it into the middle process.
Medium process: Responsible for performing email sending tasks.
PushCommand.php code is as follows:
<?php
namespace apps\daemon\commands;
use mix\console\ExitCode;
use mix\facades\Input;
use mix\facades\Redis;
use mix\task\CenterProcess;
use mix\task\LeftProcess;
use mix\task\TaskExecutor;
/**
* 推送模式范例
* @author 刘健 <coder.liu@qq.com>
*/
class PushCommand extends BaseCommand
{
// 配置信息
const HOST = 'smtpdm.aliyun.com';
const PORT = 465;
const SECURITY = 'ssl';
const USERNAME = '****@email.***.com';
const PASSWORD = '****';
// 初始化事件
public function onInitialize()
{
parent::onInitialize(); // TODO: Change the autogenerated stub
// 获取程序名称
$this->programName = Input::getCommandName();
// 设置pidfile
$this->pidFile = "/var/run/{$this->programName}.pid";
}
/**
* 获取服务
* @return TaskExecutor
*/
public function getTaskService()
{
return create_object(
[
// 类路径
'class' => 'mix\task\TaskExecutor',
// 服务名称
'name' => "mix-daemon: {$this->programName}",
// 执行类型
'type' => \mix\task\TaskExecutor::TYPE_DAEMON,
// 执行模式
'mode' => \mix\task\TaskExecutor::MODE_PUSH,
// 左进程数
'leftProcess' => 1,
// 中进程数
'centerProcess' => 5,
// 任务超时时间 (秒)
'timeout' => 5,
]
);
}
// 启动
public function actionStart()
{
// 预处理
if (!parent::actionStart()) {
return ExitCode::UNSPECIFIED_ERROR;
}
// 启动服务
$service = $this->getTaskService();
$service->on('LeftStart', [$this, 'onLeftStart']);
$service->on('CenterStart', [$this, 'onCenterStart']);
$service->start();
// 返回退出码
return ExitCode::OK;
}
// 左进程启动事件回调函数
public function onLeftStart(LeftProcess $worker)
{
try {
// 模型内使用长连接版本的数据库组件,这样组件会自动帮你维护连接不断线
$queueModel = Redis::getInstance();
// 保持任务执行状态,循环结束后当前进程会退出,主进程会重启一个新进程继续执行任务,这样做是为了避免长时间执行内存溢出
for ($j = 0; $j < 16000; $j++) {
// 从消息队列中间件阻塞获取一条消息
$data = $queueModel->brpop('queue:email', 10);
if (empty($data)) {
continue;
}
list(, $data) = $data;
// 将消息推送给中进程去处理,push有长度限制 (https://wiki.swoole.com/wiki/page/290.html)
$worker->push($data, false);
}
} catch (\Exception $e) {
// 休息一会,避免 CPU 出现 100%
sleep(1);
// 抛出错误
throw $e;
}
}
// 中进程启动事件回调函数
public function onCenterStart(CenterProcess $worker)
{
// 保持任务执行状态,循环结束后当前进程会退出,主进程会重启一个新进程继续执行任务,这样做是为了避免长时间执行内存溢出
for ($j = 0; $j < 16000; $j++) {
// 从进程消息队列中抢占一条消息
$data = $worker->pop();
if (empty($data)) {
continue;
}
// 处理消息
try {
// 处理消息,比如:发送短信、发送邮件、微信推送
var_dump($data);
$ret = self::sendEmail($data);
var_dump($ret);
} catch (\Exception $e) {
// 回退数据到消息队列
$worker->rollback($data);
// 休息一会,避免 CPU 出现 100%
sleep(1);
// 抛出错误
throw $e;
}
}
}
// 发送邮件
public static function sendEmail($data)
{
// Create the Transport
$transport = (new \Swift_SmtpTransport(self::HOST, self::PORT, self::SECURITY))
->setUsername(self::USERNAME)
->setPassword(self::PASSWORD);
// Create the Mailer using your created Transport
$mailer = new \Swift_Mailer($transport);
// Create a message
$message = (new \Swift_Message($data['subject']))
->setFrom([self::USERNAME => '**网'])
->setTo($data['to'])
->setBody($data['body']);
// Send the message
$result = $mailer->send($message);
return $result;
}
}Test
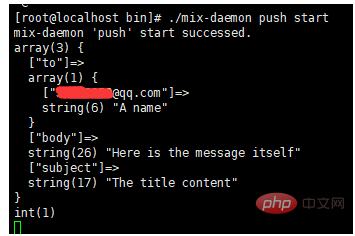
1. Start the push resident program in the shell.[root@localhost bin]# ./mix-daemon push start mix-daemon 'push' start successed.1. Call the interface to put tasks into the message queue.
At this time, the shell terminal will print:

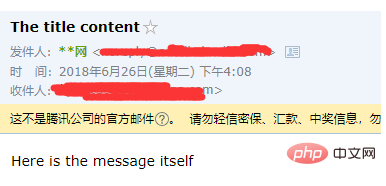
Successfully received the test email:

MixPHP
GitHub: https://github.com/mix-php/mix
Official website: http://www. mixphp.cn/

