



本文实例为大家分享了vue实现户籍管理系统的具体代码,供大家参考,具体内容如下
户籍管理系统,v-model,v-for的引用
界面预览
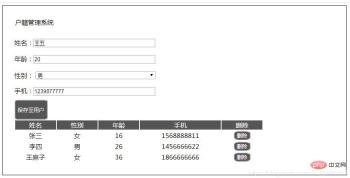
步骤思路:
1.html+css创建
2.引入vue,实例
3.准备默认数据message数组
4.渲染默认数据,v-for循环表单
5.创建一条新数据newmessage

vue-admin-change-reviewer
下载
审查 Vue 管理后台的变更请求(Vue 2 + Element UI,Vue 3 + Element Plus)。重点关注最小化变更实现、上线风险检查以及回归检查清单生成。
6.绑定到输入框v-model
7.创建一个添加函数add(),把新数据添加到默认数据中,newmessage->message
8.添加完后,清空表单,即恢复newmessage
9.点谁删谁del()函数
body部分:
<script></script><p>
 <legend>户籍管理系统</legend>
 姓名:<input>
 年龄:<input>
 性别:
 <select>
 <option>男</option>
 <option>女</option>
 </select>
 手机:<input>
 <button>保存至用户</button>
 </p>
| 姓名 | 性别 | 年龄 | 手机 | 删除 |
| {{item.name}} | {{item.sex}} | {{item.age}} | {{item.phone}} |
vue部分:
<script>
 var app = new Vue({
 el:'#app',
 data:{
 message:[
  {
  name:'张三',
  sex:'女',
  age:16,
  phone:'1568888811'
  },
  {
  name:'李四',
  sex:'男',
  age:26,
  phone:'1456666622'
  },
  {
  name:'王麻子',
  sex:'女',
  age:36,
  phone:'1866666666'
  },
 ],
 newmessage:{name:'',age:'',sex:'男',phone:''},

 },
 methods:{
 add(){
  if(!this.newmessage.name == ''){
  this.message.push(this.newmessage);
  this.newmessage = {
  name:'',
  age:'',
  sex:'男',
  phone:''
  };
  }
  else{
  alert('请输入姓名!');
  }
 },
 del(index){
  this.message.splice(index,1);
 }
 }
 })
 </script>
css样式:
<style>
 *{
 margin:0;
 padding:0;
 }
 #app{
 border: 1px solid black;
 width:800px;
 padding:30px 30px;
 }
 #app .save{
 background-color: #555555;
 border-radius: 10%;
 height:50px;
 color:white;
 }
 #app input,select{
 margin:10px 0;
 width:300px;
 }
 #app td{
 text-align: center;
 }
 #app .title td{
 background-color: #555555;
 color:white;
 }
 #app table button{
 background-color: #555555;
 color:white;
 border-radius: 30%;
 }
 </style>
相关学习推荐:javascript视频教程
前端入门到VUE实战笔记:立即使用
在学习笔记中,你将探索 前端 的入门与实战技巧!