
Home >Backend Development >PHP Tutorial >Detailed explanation of drawing technology in php
Detailed explanation of drawing technology in php

- 藏色散人forward
- 2020-07-11 13:55:445851browse
In php, using php drawing, the image we draw can appear when accessing the php file. PHP drawing technology can be applied to the development of reports and the design of verification codes.
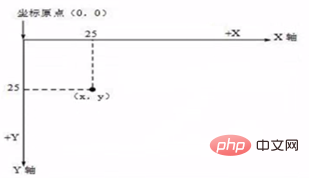
Before introducing PHP drawing technology, we first need to understand the drawing coordinate system in PHP: In the PHP coordinate system, the coordinate origin is located in the upper left corner, in pixels. Coordinates (x, y) - The first one is the x coordinate, indicating that the current position is in the horizontal direction, x pixels away from the coordinate origin; the second one is the y coordinate, indicating that the current position is in the vertical direction, y pixels away from the coordinate point.
## Special note: Pixel is not a unit of length, but a unit of density. Theoretically, the smaller the resolution, the larger the length occupied by one pixel.
##Basic principles and steps of php drawing
(1)Create canvas
(2)Draw Various graphics required (circle, straight line, rectangle, arc, sector...)
(3) Output the image to the web page, or you can save it (you can save it as several common image formats for website development. Based on storage format issues, the following introduces the characteristics of common image formats)
(4)Destroy the picture (release memory)
Common image formats currently used in website development are:
gif jpg/jpeg png bmp...##Summary:
gif
The picture compression rate is high, but it can only display256 color, which may cause color loss. Animated pictures can be displayed; jpg/jpeg
The picture has a high compression rate (lossy compression), can be displayed in smaller files, and is often used on web pages;png
(High fidelity) This format combines the advantages ofgif and jpg, but the disadvantage is that it cannot Show animation.
Now, let’s introduce the drawing function that comes with
php. Before starting the lecture, first confirm whether the gd library (php drawing library) has been enabled in the php configuration file - extension=php_gd2.dll. If it is not enabled, you need to restart apache after enabling it! ! ! In php drawing, we first need to create a canvas. The default background color of the canvas is black.
//1.创建画布,默认的背景是黑色
$im=imagecreatetruecolor(400,300);
//默认是黑色背景,修改为白色
$white=imagecolorallocate($im,255,255,255);
imagefill($im,0,0,$white);
Start drawing graphics on canvas $im:
Select to draw graphics using Color (red is used here)
//创建一个颜色
$red=imagecolorallocate($im,255,0,0);
(1) Draw an ellipse (of course you can also draw a circle using the same function)
imageellipse($im,20,20,20,20,$red);The first parameter indicates which canvas is drawing; the second and third parameters indicate the center coordinates of the ellipse (x, y );
The fourth and fifth parameters represent the width and height of the ellipse (of course, when the width and height are the same, the drawn ellipse is a circle);
The sixth parameter indicates the color used.
(2) Draw a straight line
imageline($im,0,0,400,300,$red);
第1个参数表示在哪个画布在绘图;
第2、3个参数表示直线的起点坐标(x1,y1);
第4、5个参数表示直线的终点坐标(x2,y2);
第6个参数表示使用的颜色。
(3)画矩形
imagerectangle($im,2,2,40,50,$red);
第1个参数表示在哪个画布在绘图;
第2、3个参数表示矩形的左上角坐标(x1,y1);
第4、5个参数表示矩形的宽、高;
第6个参数表示使用的颜色。
(4)画填充矩形
imagefilledrectangle($im,2,2,40,50,$red);
(参数含义同”画矩形“)
(5)画弧线
imagearc($im,100,100,50,50,0,30,$red);
画弧线是基于类似画椭圆的参数传递参数的。
第1个参数表示在哪个画布在绘图;
第2、3个参数表示弧线所在椭圆的中心坐标(x,y);
第4、5个参数表示弧线所在椭圆的宽、高;
第6、7个参数表示从(第6个参数的值)度到(第7个参数的值)度(如,第6、7个参数值分别为0、30,此时表示从0°顺时针旋转30°画出弧线,而0°所在方向是水平向右的方向);
第8个参数表示使用的颜色。
(6)画扇形
imagefilledarc($im,100,100,80,50,180,270,$red,IMG_ARC_PIE);
(前8个参数的含义同”画弧线“)第9个参数是php中自带的常量。该值可以为:
IMG_ARC_PIE
IMG_ARC_CHORD
IMG_ARC_NOFILL
IMG_ARC_EDGED
IMG_ARC_PIE和IMG_ARC_CHORD是互斥的;IMG_ARC_CHORD只是用直线连接了起始和结束点,IMG_ARC_PIE则产生圆形边界。IMG_ARC_NOFILL指明弧或弦只有轮廓,不填充。IMG_ARC_EDGED指明用直线将起始和结束点与中心点相连,和IMG_ARC_NOFILL一起使用是画饼状图轮廓的好方法(而不用填充)。
(7)拷贝源图片到目标画布
首先要加载源图片(如,arrow.jpg)
//加载源图片
$srcImage=imagecreatefrompng("arrow.jpg");这里特别注意的是:虽然我这张图片的后缀名为jpg,但实际上我调用的却是加载格式为jpg图片的函数。可能读者会纳闷,为什么不是调用imagecreatefromjpeg这个函数呢?实际上,文件的后缀名不能让我们断定该文件究竟属于哪种格式,也就是说即便现在这张图片的后缀名是.jpg,但是也有可能这个图片的真正格式是png格式。那么如何知道该图片的真正格式呢?可以使用getimagesize("arrow.jpg"); 查看该图片的格式。
$test=getimagesize("arrow.jpg");
print_r($test);
打印出返回结果$test后,你就会知道它返回结果的含义了。包括我们可以清楚地知道该图片的”真面目“,其实格式是png格式。同样还可使用该函数,得到源图片的宽、高。
//这里我们可以使用一个getimagesize()
$srcImageInfo=getimagesize("arrow.jpg");
$imageWidth=$srcImageInfo[0];
$imageHeight=$srcImageInfo[1];
得到宽、高后,将图片拷贝到目标画布上。
//拷贝源图片到目标画布
imagecopy($im,$srcImage,0,0,100,0,$imageWidth,$imageHeight);
第1个参数表示在哪个画布在绘图;
第2参数表示加载的源图片;
第3、4个参数表示目标画布的坐标(x1,y1)(拷贝至画布的坐标(x1,y1)位置);
第5、6个参数表示截取原图片的左上角的坐标(x2,y2)位置;
第7、8个参数表示截取原图片的宽、高值。
(8)写字
$str="hello,world!你好,世界!";
//使用imagestring写中文会出现乱码
imagestring($im,5,0,0,$str,$red);
第1个参数表示在哪个画布在绘图;
第2个参数表示内置字体(取值是1、2、3、4或5);
第3、4个参数表示所要绘制的内容的左上角的位置坐标;
第5个参数表示所要绘制的内容;第6个参数表示使用的颜色。
使用imagestring函数绘制中文时会出现乱码,这里需要使用到另一个函数 imagettftext。
//在字体库中找中文字体(将字体拷贝到当前目录)
//字体旋转时是逆时针旋转
imagettftext($im,15,10,50,50,$red,"SIMYOU.TTF",$str);
第1个参数表示在哪个画布在绘图;
第2个参数表示字体大小;
第3个参数表示设置字体旋转的角度;
第4、5个参数表示所要绘制的内容的左上角的位置坐标;
第6个参数表示使用的颜色;
第7个参数表示字体名称,从字体库复制到当前目录下的字体名;
第8个参数表示所要绘制的内容。
最后,绘制完毕后,需要将图像输出到网页——http响应,另存!
同时还要销毁该图片(释放内存——服务器的内存)。
//3.输出图像到网页,也可以另存
header("content-type:image/png");
imagepng($im);

//4.销毁该图片(释放内存--服务器内存)
imagedestory($im);
特别注意:绘制完毕后要释放内存这一操作。
完整php程序代码:
<?php
	//php绘图技术,参考文档

	//1.创建画布,默认的背景是黑色
	$im=imagecreatetruecolor(400,300);
	//默认是黑色背景,修改为白色
	$white=imagecolorallocate($im,255,255,255);
	imagefill($im,0,0,$white);

	//2.绘制需要的各种图形(圆,直线,矩形,弧线,扇形...)
	//创建一个颜色
	$red=imagecolorallocate($im,255,0,0);
	//圆
	imageellipse($im,20,20,20,20,$red);
	//直线
	imageline($im,0,0,400,300,$red);
	//矩形
	imagerectangle($im,2,2,40,50,$red);
	//填充矩形
	imagefilledrectangle($im,2,2,40,50,$red);
	//弧线
	imagearc($im,100,100,50,50,0,30,$red);
	//扇形
	imagefilledarc($im,100,100,80,50,180,270,$red,IMG_ARC_PIE);

	//拷贝图片到画布
	//加载源图片
	$srcImage=imagecreatefrompng("arrow.jpg");
	//$test=getimagesize("arrow.jpg");
	//print_r($test);

	//这里我们可以使用一个getimagesize()
	$srcImageInfo=getimagesize("arrow.jpg");
	$imageWidth=$srcImageInfo[0];
	$imageHeight=$srcImageInfo[1];

	//拷贝源图片到目标画布
	imagecopy($im,$srcImage,0,0,100,0,$imageWidth,$imageHeight);

	//写字
	$str="hello,world!你好,世界!";
	//使用imagestring写中文会出现乱码
	imagestring($im,5,0,0,$str,$red);
	//在字体库中找中文字体(将字体拷贝到当前目录)
	//字体旋转时是逆时针旋转
	imagettftext($im,15,10,50,50,$red,"SIMYOU.TTF",$str);

	//3.输出图像到网页,也可以另存
	header("content-type:image/png");
	imagepng($im);

	//4.销毁该图片(释放内存--服务器内存)
	imagedestory($im);
?>
这里还有一个案例(在php手册中也有)——绘制3D饼状图:
<?php
	//分析思路(先画出扇形)
	//1.画布
	$im=imagecreatetruecolor(400,300);

	//默认是黑色背景,修改为白色
	$white=imagecolorallocate($im,255,255,255);
	imagefill($im,0,0,$white);

	//2.画出扇形
	//创建三个颜色
	$red=imagecolorallocate($im,254,0,0);
	$darkred=imagecolorallocate($im,144,0,0);

	$blue=imagecolorallocate($im,0,0,128);
	$darkblue=imagecolorallocate($im,0,0,80);

	$gray=imagecolorallocate($im,192,192,192);
	$darkgray=imagecolorallocate($im,144,144,144);

	for($i=60;$i>=50;$i--) {
		imagefilledarc($im,100,$i,100,50,75,360,$darkred,IMG_ARC_PIE);
		imagefilledarc($im,100,$i,100,50,0,35,$darkblue,IMG_ARC_PIE);
		imagefilledarc($im,100,$i,100,50,35,75,$darkgray,IMG_ARC_PIE);
	}

	imagefilledarc($im,100,50,100,50,75,360,$red,IMG_ARC_PIE);
	imagefilledarc($im,100,50,100,50,0,35,$blue,IMG_ARC_PIE);
	imagefilledarc($im,100,50,100,50,35,75,$gray,IMG_ARC_PIE);


	//输出图像到网页,也可以另存
	header("content-type:image/png");
	imagepng($im);

	//销毁该图片(释放内存--服务器内存)
	imagedestory($im);


	//可以将其封装成一个函数
?>
结果如下:

另外,我们可以使用php绘图技术制作验证码,这里不多加解释,程序代码如下:
checkCode.php
<?php
//echo rand(2,9);
//echo "<br/>".dechex(rand(1,15))."<br/>";
session_start();
$checkCode="";
for($i=0;$i<4;$i++) {
$checkCode.=dechex(rand(1,15));
}
//讲随机验证码保存到session中
$_SESSION['myCheckCode']=$checkCode;
//创建图片,并把随机数画上去
$img=imagecreatetruecolor(110, 30);
//背景默认就是黑色
//你可以指定背景颜色
$bgcolor=imagecolorallocate($img, 0, 0, 0);
imagefill($img, 0, 0, $bgcolor);
//创建新的颜色
$white=imagecolorallocate($img, 255, 255, 255);
$blue=imagecolorallocate($img, 0, 0, 255);
$red=imagecolorallocate($img, 255, 0, 0);
$green=imagecolorallocate($img, 0, 255, 0);
//画出干扰线段
for($i=0;$i<20;$i++) {
//更好的方法是颜色随机
imageline($img, rand(0,110), rand(0,30), rand(0,110), rand(0,30),
imagecolorallocate($img, rand(0,255), rand(0,255), rand(0,255)));
}
//画出噪点,自己画
//for($i=0;$i<10;$i++)
//把四个随机值画上去
imagestring($img, rand(1,5), rand(2,80), rand(2,10), $checkCode, $white);
//如果要使用中文
//array imagefttext(string $font_file, string $text [,array $extrainfo)
//imagettftext($img,15,10,20,25,$white,"STXINWET.TTF","北京你好");
//输出
header("content-type: image/png");
imagepng($img);
?>checkCode.php的使用——用于登录界面(这里只提供部分代码,但是不影响理解,可删除无关内容,直接使用)
<form action="loginProcess.php" method="post">
<table>
<tr><td>用户id</td><td><input type="text" name="id" value="<?php echo getCookieVal("id"); ?>"/></td></tr>
<tr><td>密 码</td><td><input type="password" name="password"/></td></tr>
<tr><td>验证码</td><td><input type="text" name="checkCode"/>
<img src="checkCode.php" onClick="this.src='checkCode.php?aa='+Math.random()"/></td></tr>
<tr><td colspan="2">是否保存用户id<input type="checkbox" value="yes" name="keep"></td></tr>
<tr><td><input type="submit" value="用户登录"/></td>
<td><input type="reset" value="重新填写"/></td></tr>
</table>
</form>当点击验证码时,验证码会进行刷新。checkCode.php中还使用到session技术,在服务器端保存随机出来的验证码的值,当用户登录时,用户提交验证码时,可以用session取出正确的验证码进行比对。
The above is the detailed content of Detailed explanation of drawing technology in php. For more information, please follow other related articles on the PHP Chinese website!